1. Introduction
This manual provides essential information for the safe and correct installation, operation, and maintenance of your new Generic baking element. This replacement part is designed for compatibility with various General Electric oven models. Please read these instructions thoroughly before proceeding with installation or use.
2. Safety Information
WARNING: Risk of electric shock or injury. Always disconnect power to the oven before attempting any installation, maintenance, or repair. Wear appropriate personal protective equipment, such as gloves, during installation.
- Ensure the oven is completely cool before handling any internal components.
- Verify that the replacement element matches the specifications and design of the original part.
- If you are unsure about any step, consult a qualified appliance technician.
3. Product Overview
The Generic baking element is a replacement heating component for the lower section of your oven. It is rated at 2382/2585W and 240/250V. This element is designed to provide consistent heat for baking functions.
Compatible Models: This baking element is compatible with numerous General Electric oven models, including but not limited to: J402W2, J403W1, J404R1, J404R1WH, J404R2, J404R2WH, J404T3, J405*06, J405*07, J405*08, J405*09, J405*R1, J405*R2, J406T2WH, J408R1, J408R2, J408R3, J408S3.
Replacement Part Numbers: This element replaces various part numbers, including: AP2031097, AP2031084, 3366, AH249483, AP7, EA249483, PS249483, RP44X5099, TS44X5099, WB44X0103, WB44X0105, WB44X0111, WB44X0112, WB44X0117, WB44X0118, WB44X0119, WB44X0120, WB44X0125, WB44X0126, WB44X0133, WB44X103, WB44X105, WB44X111, WB44X112, WB44X117, WB44X118, WB44X119, WB44X120, WB44X125, WB44X126.

Figure 1: Front view of the Generic baking element, showing its U-shaped design and terminal connections.

Figure 2: Side view of the baking element, illustrating the mounting bracket and terminal connections.
4. Setup and Installation
Follow these steps carefully to replace your oven's baking element. Ensure all safety precautions are observed.
- Disconnect Power: Locate your oven's circuit breaker in your home's electrical panel and turn off the power supply to the oven. Verify power is off by attempting to turn on the oven.
- Access Oven Interior: Open the oven door and remove any oven racks to provide clear access to the baking element.
- Remove Old Element:
- Locate the existing baking element at the bottom of the oven cavity.
- Identify the screws or clips holding the element in place. Use a screwdriver to remove these fasteners.
- Carefully pull the element forward a few inches. This will expose the electrical terminals at the back.
- Note the position of the wires connected to the terminals. It is recommended to take a photograph for reference.
- Disconnect the wires from the old element's terminals. Ensure the wires do not retract into the oven wall. You may need to secure them with tape or clips.
- Completely remove the old element from the oven.
- Install New Element:
- Align the new baking element with the opening in the oven wall.
- Connect the electrical wires to the terminals of the new element. Ensure connections are secure. Refer to your photograph if needed.
- Gently push the new element into place, ensuring the terminals are properly seated in the oven wall.
- Secure the element with the screws or clips removed earlier. Do not overtighten.
- Restore Power and Test:
- Replace oven racks and close the oven door.
- Return to your electrical panel and restore power to the oven.
- Turn on the oven to a baking temperature (e.g., 350°F / 175°C) and observe the new element. It should begin to glow red, indicating proper function.
- Allow the oven to heat for a few minutes to confirm normal operation.
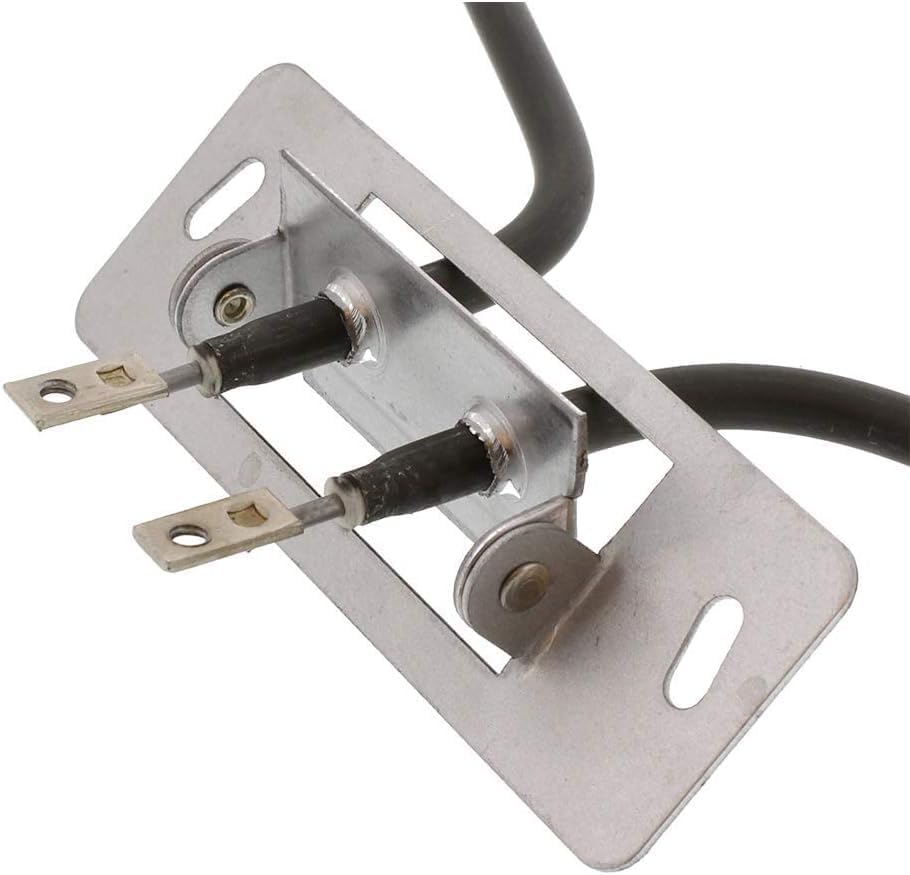
Figure 3: Detailed view of the element's terminals and mounting bracket, crucial for correct wiring and secure installation.
5. Operating Instructions
Once the baking element is correctly installed and tested, the oven can be operated as usual according to your oven's manufacturer instructions. The new element will function identically to the original part, providing heat for baking.
6. Maintenance
The baking element generally requires minimal maintenance. However, periodic inspection can help ensure its longevity and proper function.
- Visual Inspection: Periodically inspect the element for any signs of damage, such as cracks, breaks, or severe discoloration. Ensure the mounting screws are secure.
- Cleaning: Avoid direct contact with the element during oven cleaning. Spills on the element should be cleaned carefully once the oven is cool and power is disconnected. Do not use abrasive cleaners on the element itself.
- Power Disconnection: Always disconnect power to the oven before performing any cleaning or inspection of the element.
7. Troubleshooting
If your oven is not heating correctly after replacing the baking element, consider the following:
- Element Not Heating:
- No Power: Check the circuit breaker to ensure power to the oven is on.
- Loose Connections: Disconnect power and re-check the electrical connections to the element terminals. Ensure they are tight and properly seated.
- Faulty Element: Although new, a manufacturing defect is possible. If connections are secure and power is present, the element itself may be faulty.
- Uneven Heating:
- Ensure the element is fully seated and secured in its mounting brackets.
- Verify that no debris or obstructions are interfering with heat distribution.
- Oven Not Reaching Temperature:
- This could indicate an issue beyond the baking element, such as a faulty oven thermostat or control board. If the element glows red but the oven doesn't reach temperature, further diagnosis by a technician may be required.
8. Specifications
| Part Number | WB44X5099 |
| Power Rating | 2382/2585W |
| Voltage | 240/250V |
| Product Dimensions | 1 x 1 x 1 inches (approximate) |
| Item Model Number | J405*R2 J406T2WH J408R1 J408R2 |
| Manufacturer | Generic |
9. Warranty and Support
This product includes a 60-day warranty from the date of purchase, as specified by the manufacturer. For warranty claims, returns, or technical assistance, please contact the seller directly through your purchase platform. Please have your order details and product information available when contacting support.