1. Introduction
Thank you for choosing the VANBAR CP03pro/CP04pro Dedicated Rear Camera. This manual provides essential information for the proper installation, operation, and maintenance of your new rear camera. Please read this manual thoroughly before installation and use to ensure optimal performance and safety. This camera is designed to integrate seamlessly with VANBAR CP03pro and CP04pro portable display audio systems, offering enhanced visibility for reversing and parking maneuvers.
2. Safety Information
- Always disconnect the vehicle's battery before performing any electrical work to prevent short circuits and electrical shock.
- Ensure all wiring is properly insulated and secured to prevent damage from vibration, heat, or moisture.
- Do not obstruct the driver's view or interfere with the safe operation of the vehicle when installing the camera or routing cables.
- This product is designed to assist with reversing and parking; it is not a substitute for careful driving and direct observation.
- Consult a professional if you are unsure about any part of the installation process.
3. Package Contents
Please check the package for the following items:
- VANBAR CP03pro/CP04pro Dedicated Rear Camera
- Video Cable (with reverse trigger wire)
- Power Cable
- Mounting Screws/Adhesive Pad
- User Manual (This document)
4. Product Overview
The VANBAR dedicated rear camera features a compact design, high-resolution sensor, and wide viewing angle to provide a clear view of the area behind your vehicle. It is IP67 waterproof rated, ensuring durability in various weather conditions.
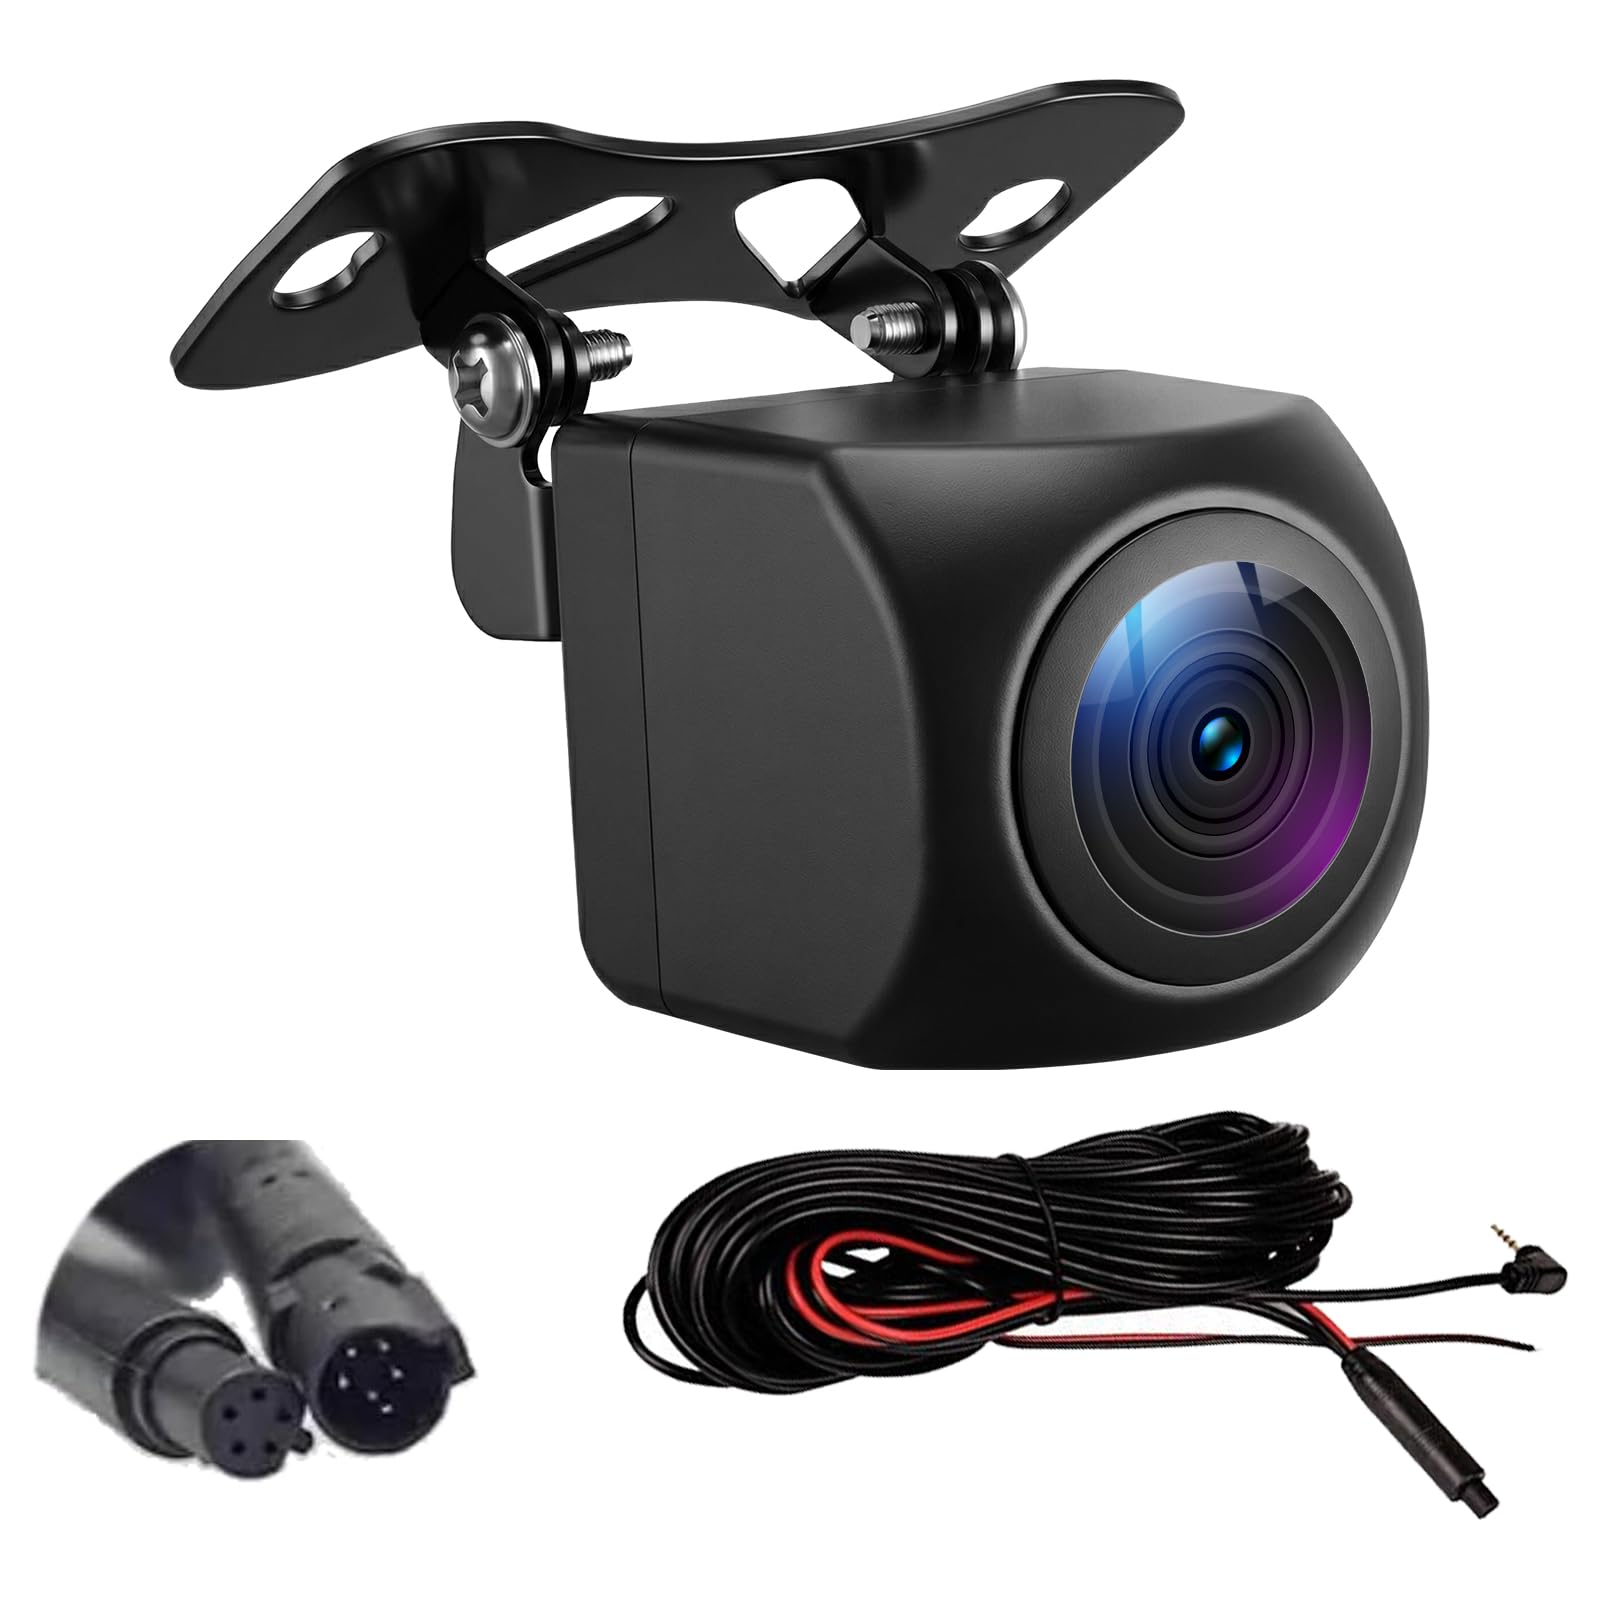
Image 1: VANBAR CP03pro/CP04pro Dedicated Rear Camera. This image shows the compact design of the camera unit.
Key Features:
- High Resolution: 1280x720P (720P AHD) for clear images.
- Ultra-Wide Angle: 170-degree viewing angle to minimize blind spots.
- Waterproof Design: IP67 rated for reliable performance in all weather.
- Super Night Vision: Enhanced low-light performance.
- Compatibility: Specifically designed for VANBAR CP03pro/CP04pro portable display audio systems.
5. Setup and Installation
Proper installation is crucial for the camera's performance. Follow these steps carefully.
5.1 Mounting the Camera
- Choose a Location: Select a central location on the rear of your vehicle, typically above the license plate, that provides a clear, unobstructed view.
- Clean the Surface: Ensure the mounting surface is clean and dry.
- Secure the Camera: Use the provided screws or adhesive pad to firmly attach the camera. If drilling is required, ensure no existing wiring or components are damaged.
Image 2: Recommended mounting location for the rear camera. The camera should be positioned centrally for optimal view.
5.2 Wiring Diagram
Follow the wiring instructions below to connect the rear camera to your VANBAR CP03pro/CP04pro display audio system.
Image 3: Simplified wiring diagram for the rear camera. Consult your vehicle's manual for specific wiring access points.
- Connect Video Cable: Connect the yellow RCA connector of the camera's video cable to the "REAR CAM IN" or similar video input on your VANBAR CP03pro/CP04pro unit.
- Connect Reverse Trigger: The video cable typically has a small red wire (reverse trigger wire) at both ends. Connect the red wire near the camera to the positive (+) lead of your vehicle's reverse light. Connect the red wire near the display unit to the "REVERSE" trigger input on your CP03pro/CP04pro unit. This signals the display to switch to the rear camera view when reversing.
- Connect Power: Connect the camera's power cable (red wire) to the positive (+) lead of your vehicle's reverse light. Connect the black wire to a reliable ground point on the vehicle chassis. This ensures the camera receives power only when the vehicle is in reverse.
- Route Cables: Carefully route all cables, ensuring they are hidden and secured to prevent damage or interference. Avoid sharp edges and moving parts.
- Test Connection: Before finalizing the installation, reconnect the vehicle's battery and test the camera functionality.
6. Operating Instructions
Once properly installed and connected to your VANBAR CP03pro/CP04pro display audio system, the rear camera operates automatically.
- Automatic Activation: When you shift your vehicle into reverse gear, the CP03pro/CP04pro display will automatically switch to the rear camera view, showing the live feed from the camera.
- Parking Guidelines: The camera may display static or dynamic parking guidelines on the screen to assist with parking. Refer to your CP03pro/CP04pro manual for settings related to parking lines.
- Exiting Reverse: When you shift out of reverse gear, the display will automatically return to its previous screen (e.g., CarPlay, Android Auto, radio).
7. Maintenance
To ensure the longevity and clear performance of your rear camera, follow these simple maintenance tips:
- Clean the Lens: Regularly clean the camera lens with a soft, damp cloth to remove dirt, dust, or water spots that may obscure the view. Avoid abrasive cleaners.
- Check Connections: Periodically inspect all wiring connections to ensure they are secure and free from corrosion or damage.
- Inspect Mounting: Verify that the camera remains securely mounted and has not become loose due to vibrations.
8. Troubleshooting
If you encounter issues with your rear camera, refer to the following troubleshooting guide:
| Problem | Possible Cause | Solution |
|---|---|---|
| No image on display when in reverse. |
|
|
| Image is blurry or distorted. |
|
|
| Image flickers or has interference. |
|
|
If the problem persists after trying these solutions, please contact customer support.
9. Specifications
| Feature | Detail |
|---|---|
| Model Compatibility | VANBAR CP03pro, CP04pro |
| Resolution | 1280 x 720P (AHD) |
| Viewing Angle | 170 degrees (Ultra-Wide) |
| Waterproof Rating | IP67 |
| Optical Sensor Technology | CMOS |
| Optical Sensor Size | 1/4 inch |
| Operating Voltage | DC 12V-24V |
| Dimensions (L x W x H) | 20 x 20 x 20 mm (approximate) |
10. Warranty and Support
This VANBAR product comes with a 1-year manufacturer's warranty from the date of purchase. The warranty covers defects in materials and workmanship under normal use.
The warranty does not cover:
- Damage caused by improper installation or operation.
- Damage caused by accidents, abuse, misuse, or natural disasters.
- Unauthorized repairs or modifications.
For warranty claims or technical support, please contact VANBAR customer service through the retailer where the product was purchased or visit the official VANBAR website for contact information.

