1. Introduction
This manual provides detailed instructions for the installation, operation, and maintenance of the EFUZCOCI KWS-DC200 series DC Voltmeter Ammeter Power Energy Meter. This device is designed to accurately measure DC voltage, current, power, energy (Wh), ampere-hours (Ah), and temperature. It is available in 10A, 50A, and 100A variants, each suitable for different current measurement ranges.
Please read this manual thoroughly before using the device to ensure correct operation and to prevent damage.
2. Product Overview
The KWS-DC200 is a compact digital meter featuring a clear LED display. It provides real-time readings of various electrical parameters. The device includes a 'MENU' button for navigating display modes and resetting accumulated data, along with internal calibration points for precise adjustments.

Figure 2.1: EFUZCOCI KWS-DC200 DC Multifunction Tester. This image shows the front view of the meter with its digital display active, indicating various electrical parameters such as voltage, current, power, time, temperature, and accumulated ampere-hours (Ah) or watt-hours (Wh).
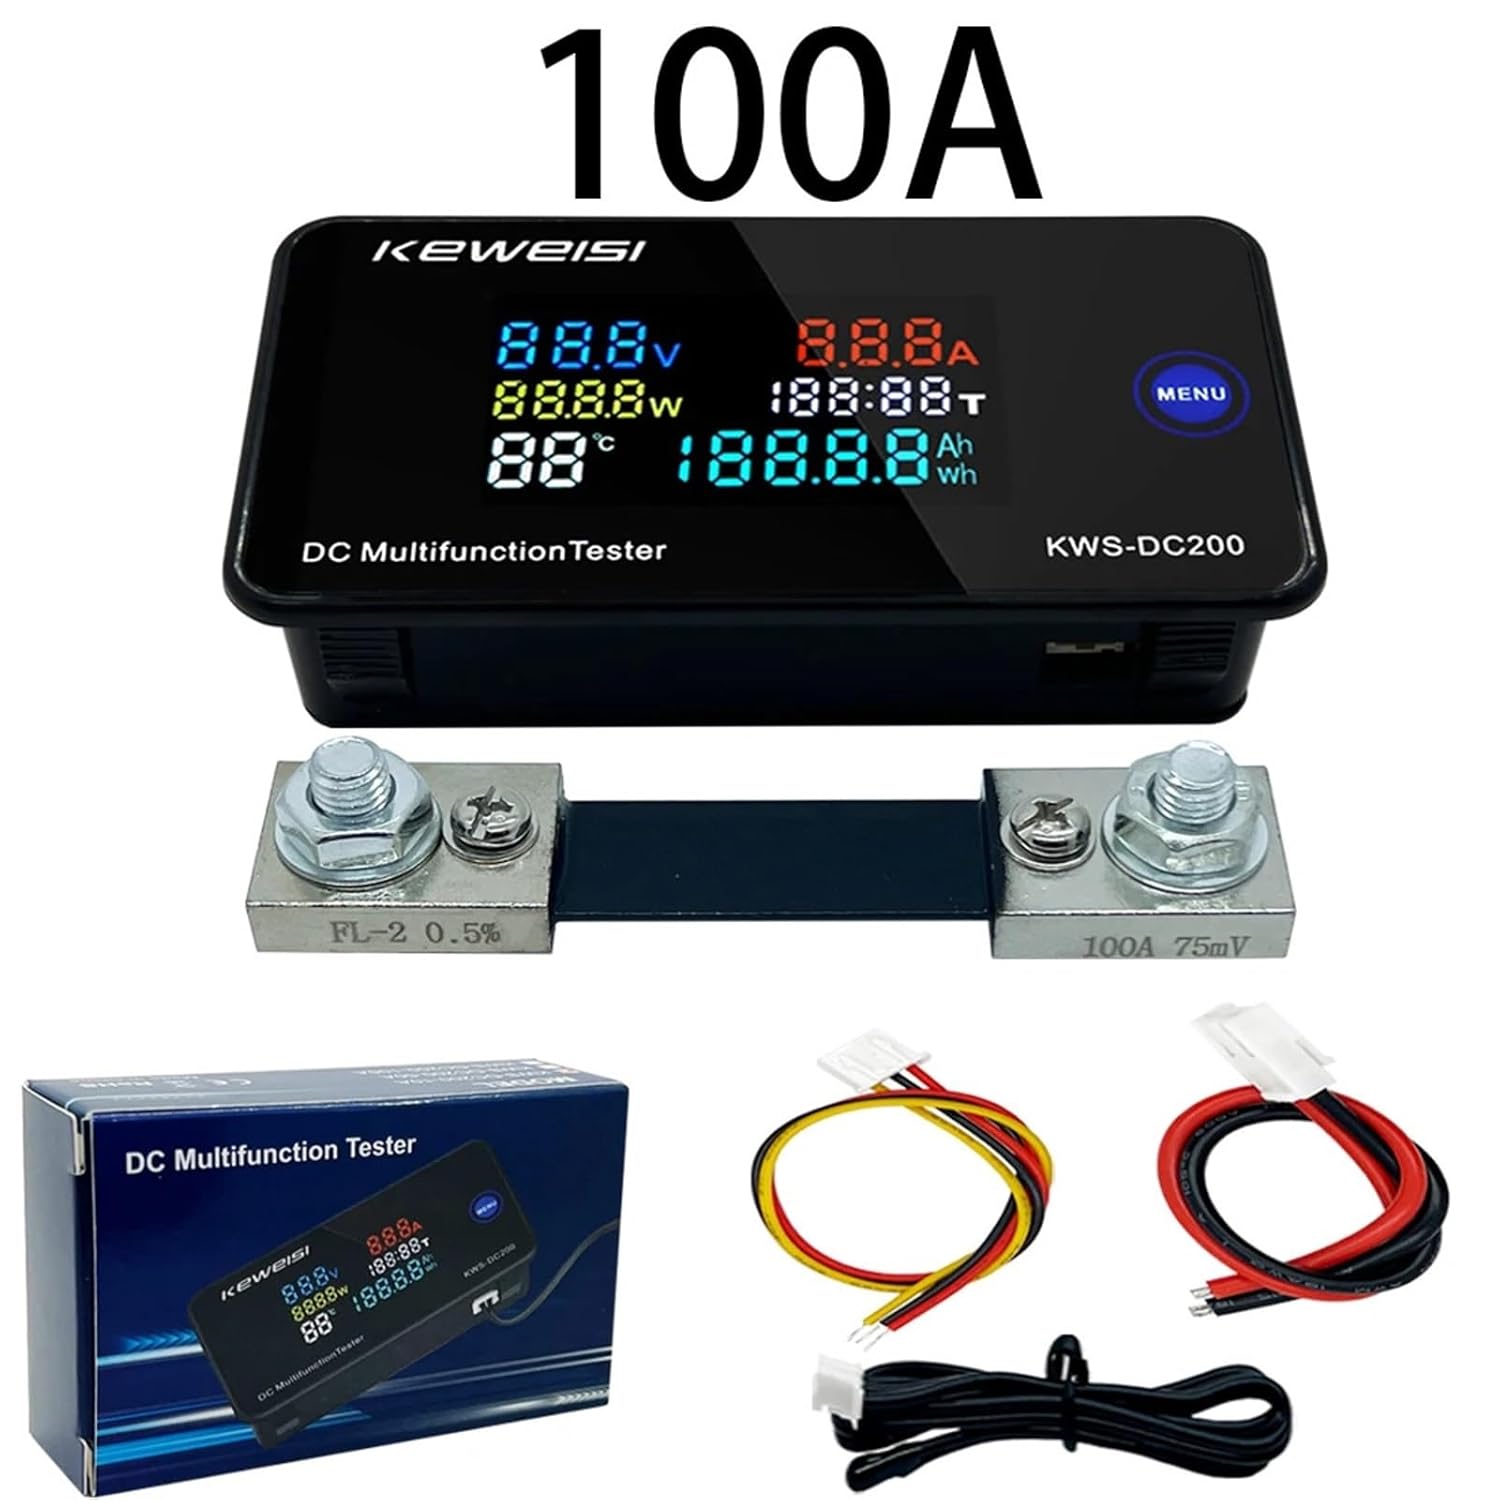
Figure 2.2: KWS-DC200 100A Model with Shunt. This image displays the 100A version of the KWS-DC200 meter, accompanied by its external current shunt and the necessary connecting wires for installation.
3. Specifications
The KWS-DC200 series offers different current measurement capabilities:
| Parameter | KWS-DC200-10A | KWS-DC200-50A | KWS-DC200-100A |
|---|---|---|---|
| Power Supply Voltage | 8-120V DC | 8-120V DC | 8-120V DC |
| Test Voltage Range | 0-200V DC | 0-200V DC | 0-200V DC |
| Current Range | 0-10A | 0-50A | 0-100A |
| Power Range | 0-2000W | 0-10000W | 0-20000W |
| Ampere-hour (Ah) | 0-19999Ah | 0-19999Ah | 0-19999Ah |
| Watt-hour (Wh) | 0-19999Wh | 0-19999Wh | 0-19999Wh |
| Time Measurement | 0-200H | 0-200H | 0-200H |
| Temperature Range | -9°C ~ 99°C | -9°C ~ 99°C | -9°C ~ 99°C |
Additional Specifications:
- Item Weight: 50 Grams
- Package Dimensions: 0.39 x 0.39 x 0.39 inches (approx. 10 x 10 x 10 mm)
- Power Supply Modes:
- Independent power supply: For measuring DC 0~200V.
- Direct power supply: For measuring DC 8~120V.

Figure 3.1: KWS-DC200 Meter and Cable Dimensions. This image provides detailed measurements for the KWS-DC200 meter (84.6mm x 44mm x 22.3mm) and its accompanying cables (100cm, 15cm, 15cm).

Figure 3.2: Current Shunt Dimensions. This image illustrates the physical dimensions of the 50A (120mm x 25mm x 18mm) and 100A (105mm x 25mm x 22mm) current shunts used with the KWS-DC200 meter.
4. Setup and Installation
Proper wiring is critical for accurate measurement and safe operation. Refer to the wiring diagrams below for your specific model (10A, 50A, or 100A).
4.1 Wiring Diagrams

Figure 4.1: KWS-DC200 Wiring Diagrams. This image displays three distinct wiring diagrams for the 10A, 50A, and 100A versions of the KWS-DC200 meter, showing how to connect the meter, shunt (for 50A/100A), power supply, and load.
General Wiring Principles:
- Power Supply: The meter requires a DC power supply between 8V and 120V. This can be the same power source as the circuit being measured (direct power supply) or a separate independent power supply.
- Voltage Measurement: Connect the voltage measurement wires directly across the points where you want to measure the voltage.
- Current Measurement:
- 10A Model: The 10A model typically has an internal shunt. Connect the load in series with the meter's current input terminals.
- 50A and 100A Models: These models require an external current shunt. The shunt must be installed in series with the load. The meter then connects to the shunt's voltage terminals to measure the current indirectly. Ensure correct polarity when connecting the shunt.
- Polarity: Always observe correct polarity (+ and -) for both power supply and measurement connections to prevent damage to the meter and the circuit.
5. Operating Instructions
The KWS-DC200 meter is designed for straightforward operation. The primary interface is the LED display and the 'MENU' button.
5.1 Display Modes
The meter cycles through various display parameters. Use the 'MENU' button to switch between different accumulated data views.
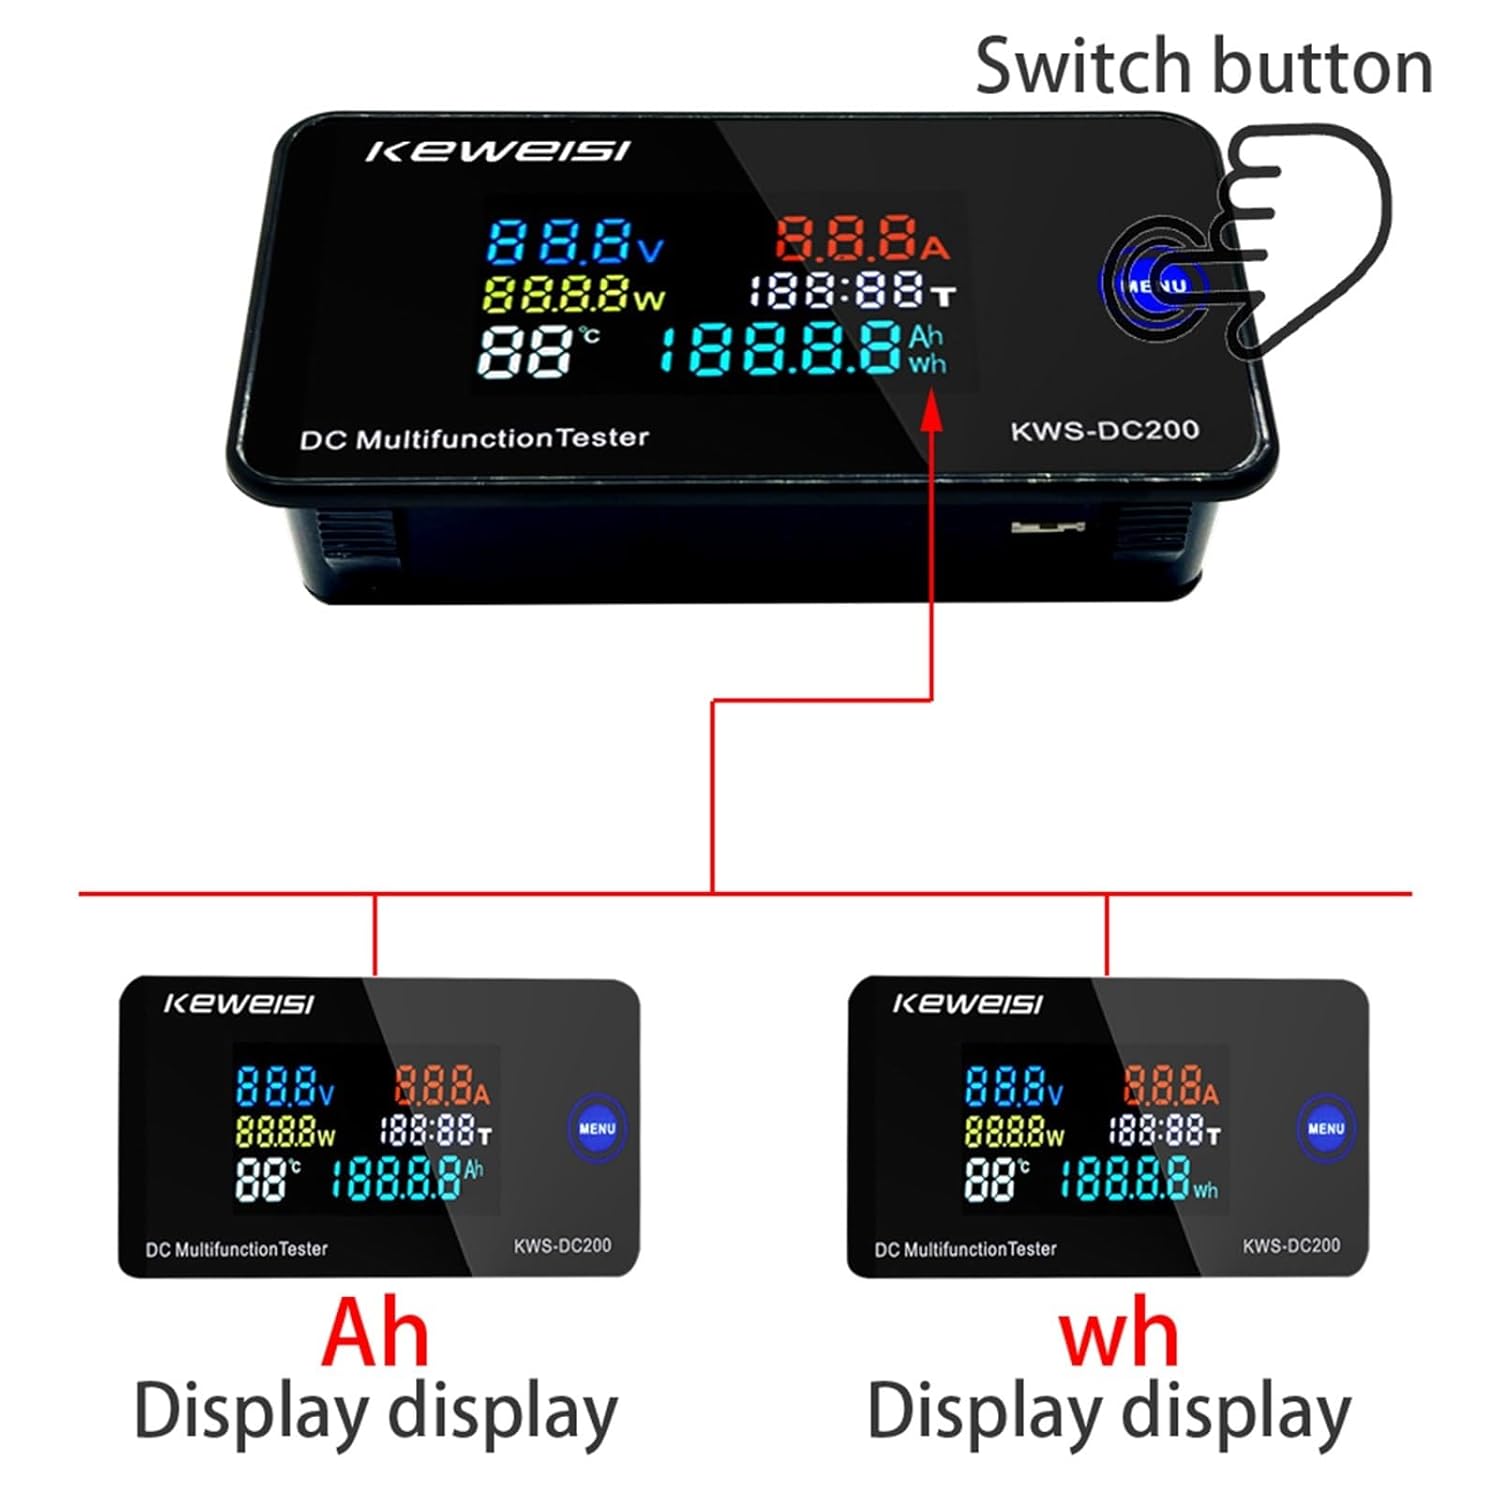
Figure 5.1: Display Modes (Ah and Wh). This image illustrates how the KWS-DC200 meter can display accumulated Ampere-hours (Ah) and Watt-hours (Wh) by pressing the 'MENU' button.
- Viewing Accumulated Data: Click the 'MENU' button on the panel to cycle through and view the usage of ampere-hours (Ah) and watt-hours (Wh).
5.2 Reset Function
To reset accumulated data (time, ampere-hours, and watt-hours) to zero:
- Resetting Data: Long press and hold the 'MENU' button for 3 seconds. This action will reset the accumulated time, ampere-hour, and watt-hour data to zero.
6. Calibration
The KWS-DC200 meter is equipped with numerical calibration functions for current and voltage to ensure accuracy. These adjustments are typically performed during manufacturing but can be fine-tuned if necessary.

Figure 6.1: Calibration Points and Zero Button. This image shows the internal components of the KWS-DC200, highlighting the current calibration screw (A), voltage calibration screw (V), and the zero button for current value reset. The sensor port is also visible.
- Current Calibration Screw: Labeled 'A' in Figure 6.1, this screw allows for fine adjustment of current readings.
- Voltage Calibration Screw: Labeled 'V' in Figure 6.1, this screw allows for fine adjustment of voltage readings.
- Current Value Zero Button: Press and hold this button for 3 seconds to reset the current value to zero. This is useful for ensuring accurate current measurements when no load is present.
Caution: Adjusting calibration screws should only be done by experienced users with appropriate reference equipment to avoid inaccurate readings or damage to the device.
7. Maintenance
To ensure the longevity and accurate performance of your KWS-DC200 meter, follow these maintenance guidelines:
- Cleaning: Use a soft, dry cloth to clean the display and casing. Do not use abrasive cleaners or solvents.
- Environment: Operate and store the meter in a dry environment, away from direct sunlight, extreme temperatures, and corrosive gases.
- Connections: Periodically check all wiring connections to ensure they are secure and free from corrosion.
- Avoid Impact: Protect the device from physical shocks and vibrations.
8. Troubleshooting
If you encounter issues with your KWS-DC200 meter, consider the following common troubleshooting steps:
- No Display:
- Check the power supply voltage. Ensure it is within the 8-120V DC range.
- Verify all power connections are secure and correctly polarized.
- Incorrect Readings:
- Voltage: Ensure voltage measurement wires are connected correctly across the load.
- Current: For 50A/100A models, verify the external shunt is correctly installed in series with the load and the meter is connected to the shunt's voltage terminals with correct polarity. For the 10A model, ensure the load is in series with the meter.
- Zero Current Reading: If current reads non-zero with no load, use the current value zero button (refer to Section 6).
- Calibration: If readings are consistently off, consider calibration (refer to Section 6, caution advised).
- Data Not Resetting: Ensure you are long-pressing the 'MENU' button for at least 3 seconds.
If problems persist, contact customer support for further assistance.
9. Warranty and Support
For warranty information and technical support, please refer to the product packaging or contact your retailer. Keep your purchase receipt as proof of purchase.
Manufacturer: EFUZCOCI