Introduction
This manual provides essential information for the proper setup, operation, and maintenance of your JOTTDSYL BLS 30A Electronic Speed Controller (ESC) for FPV racing drones. Please read this manual thoroughly before installation and use to ensure optimal performance and safety.
Specifications
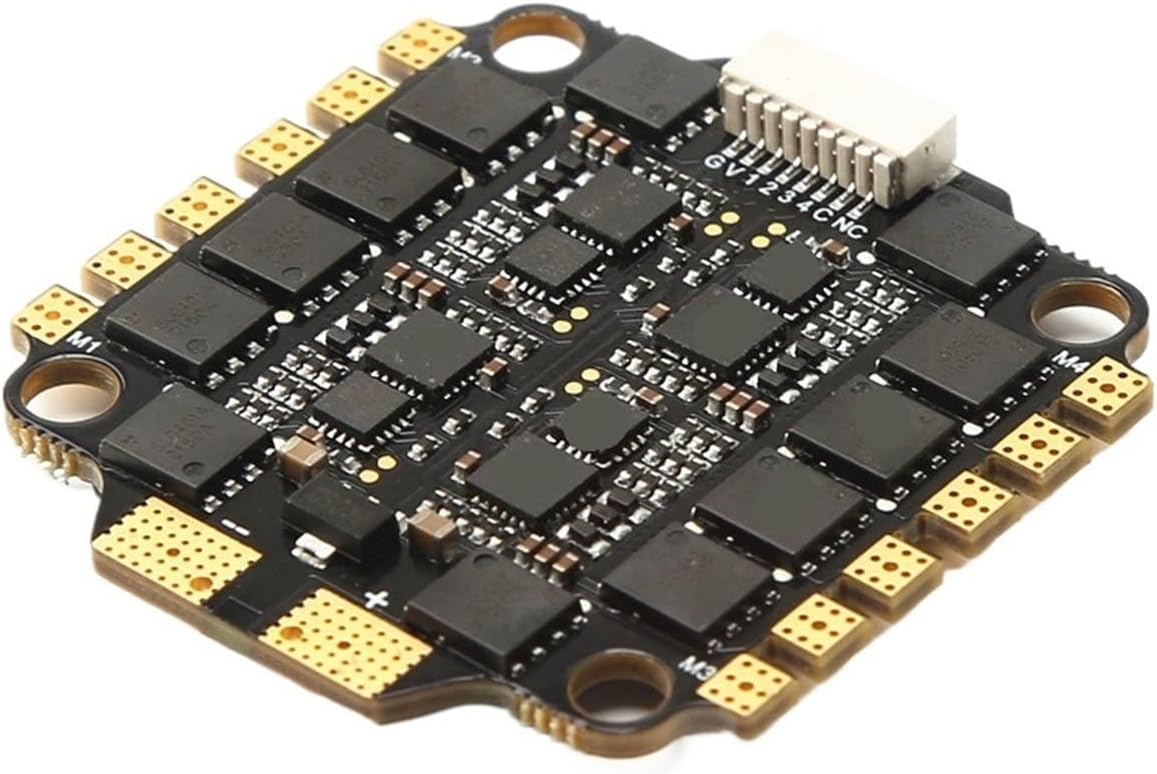
The JOTTDSYL BLS 30A ESC is a high-performance 4-in-1 electronic speed controller designed for FPV racing applications.
- Product Name: 4-in-1 30A BLHeli_S ESC
- Continuous Current: 30A
- Peak Current (10s): 35A
- Input Voltage: 2-6S LiPo
- BEC Output: 5V
- Firmware: BLHeli_S
- Dimensions: 36mm x 36mm
- Weight: Approximately 9 grams
- Programming: Supported
Note: The overall package weight is approximately 50 grams, which includes the ESC and accompanying accessories.
Setup
Proper installation and connection are crucial for the safe and effective operation of your ESC.
Package Contents
Verify that all components are present in your package:
- JOTTDSYL BLS 30A 4-in-1 ESC
- Power cables (red and black)
- Signal cable harness
- XT60 connector
- Capacitor (may vary by kit)

Connection Guidelines
- Mounting: Securely mount the 36x36mm ESC board to your drone frame using appropriate standoffs and screws. Ensure proper insulation to prevent short circuits.
- Power Connection: Solder the main power cables (red for positive, black for negative) from the XT60 connector to the designated battery pads (+BAT and -BAT) on the ESC. Ensure polarity is correct.
- Motor Connection: Connect the motor wires to the corresponding motor pads (M1, M2, M3, M4) on the ESC. The order of motor wires may need adjustment during initial setup in your flight controller software to ensure correct motor rotation.
- Flight Controller Connection: Connect the signal harness from the ESC to your flight controller (FC). This typically involves connecting telemetry, current sensor, and motor signal wires. Refer to your flight controller's manual for specific pinout diagrams.
- Capacitor Installation (if included): If a capacitor is provided, solder it to the main battery pads of the ESC. This helps filter electrical noise and protect the ESC from voltage spikes.
Operating Instructions
The ESC functions as a critical component in your drone's propulsion system, translating flight controller commands into motor speed adjustments.
Initial Configuration
- Firmware: The ESC comes pre-loaded with BLHeli_S firmware. This firmware is highly configurable and supports various protocols like DShot, Multishot, and Oneshot.
- Flight Controller Software: Use your flight controller's configuration software (e.g., Betaflight, EmuFlight) to configure the ESC settings. This includes motor direction, DShot protocol selection, and calibration if necessary.
- Motor Direction: After initial setup, verify motor rotation direction. If a motor spins in the wrong direction, reverse it in the flight controller software or by swapping two of the three motor wires (if using traditional PWM).
- Current Sensor: The ESC may provide current sensor data to the flight controller, allowing for real-time power consumption monitoring. Ensure this feature is enabled and calibrated in your FC software.
Flight Operation
Once configured, the ESC will receive signals from the flight controller to control the speed of each motor, enabling precise flight maneuvers. Always perform a pre-flight check to ensure all components are functioning correctly.
Maintenance
Regular inspection and proper handling will extend the lifespan of your ESC.
- Visual Inspection: Periodically check the ESC for any signs of physical damage, burnt components, or loose solder joints.
- Cleanliness: Keep the ESC free from dust, dirt, and moisture. Use compressed air or a soft brush to clean if necessary. Avoid using liquids.
- Heat Management: Ensure adequate airflow around the ESC during operation to prevent overheating. Excessive heat can damage components.
- Firmware Updates: Check for official BLHeli_S firmware updates periodically. Updating firmware can improve performance, add features, or fix bugs. Use the BLHeliSuite software for this process.
Troubleshooting
If you encounter issues with your ESC, consider the following common problems and solutions:
| Problem | Possible Cause | Solution |
|---|---|---|
| Motor not spinning or stuttering |
|
|
| ESC gets excessively hot |
|
|
| No power to flight controller (if FC powered by ESC BEC) |
|
|
For further assistance, consult online FPV community forums or contact your retailer.