Introduction
This manual provides essential instructions for the assembly, operation, and maintenance of your HOMCOM 3-in-1 Dressing Table. Please read this manual thoroughly before assembly and use to ensure safe and correct operation. Keep this manual for future reference.

Image: The HOMCOM 3-in-1 Dressing Table with its mirror open, revealing internal compartments, and the accompanying stool positioned in front.
Safety Instructions
- Always follow the assembly instructions carefully. Incorrect assembly can lead to instability and injury.
- Ensure all screws and fasteners are securely tightened before use. Periodically check and re-tighten as necessary.
- Do not exceed the maximum load capacities specified in the 'Specifications' section.
- Keep small parts and packaging materials away from children to prevent choking hazards.
- Anti-Tip Safety: This dressing table must be securely anchored to a wall using the provided anti-tip hardware to prevent tipping, especially in households with children.

Image: A diagram demonstrating the correct method for attaching the dressing table to a wall using the anti-tip device, emphasizing stability and safety.
Package Contents
Before beginning assembly, verify that all components listed below are present and undamaged. If any parts are missing or damaged, please contact customer support.

Image: The product packaging box with the HOMCOM logo, indicating a single package.
The package should contain:
- Dressing Table components
- Stool components
- Hardware pack (screws, dowels, anti-tip kit, etc.)
- Assembly Instructions manual
Assembly Instructions
Assembly is estimated to take approximately 30 minutes with two people. It is recommended to assemble the unit on a soft, clean surface to prevent scratches.
- Unpack and Identify Parts: Carefully remove all components from the packaging. Lay them out and compare them against the parts list in the separate assembly guide to ensure everything is present.
- Assemble the Main Dressing Table Frame: Follow the step-by-step diagrams in the assembly guide to connect the main panels using the provided hardware. Ensure all connections are firm.
- Install Drawers: Assemble the drawer boxes and install the drawer slides onto both the drawers and the main frame. Insert the drawers into their respective slots.
- Attach Mirror and Internal Storage: Secure the mirror assembly to the top section of the dressing table. Place the internal storage compartments as indicated.
- Assemble the Stool: Construct the stool frame and attach the wheels. Place the padded cushion on top. Ensure the wheels have functional brakes.
- Install Anti-Tip Device: Securely attach the anti-tip hardware to the back of the dressing table and to a solid wall stud, following the specific instructions provided with the anti-tip kit. This step is crucial for safety.
Note:
- Some components may require pre-drilled holes. Verify that all necessary holes are present before attempting to insert fasteners. If holes are missing, carefully mark and drill pilot holes to avoid splitting the material.
- Do not overtighten screws, as this can damage the engineered wood.
Operating Instructions
Your HOMCOM 3-in-1 Dressing Table offers versatile functionality:
1. Dressing Table Mode
- Mirror Access: Gently lift the top panel to reveal the mirror and the internal storage compartments. The mirror is designed to stay open for convenient use.
- Internal Storage: Utilize the dedicated jewelry organizer and other compartments under the mirror for small items like makeup, accessories, and skincare products.
- Drawers: The three spacious drawers provide additional storage for larger items.
- Side Hook: Use the integrated side hook to hang bags, robes, or other accessories.

Image: The dressing table with its mirror open, showcasing the hidden compartments, three pull-out drawers, and a side hook for hanging items.
2. Bedside Table Mode
- To convert to a bedside table, gently lower the mirror panel until it is flush with the tabletop. This creates a flat surface suitable for lamps, books, or other bedside essentials.

Image: The dressing table with its mirror closed, functioning as a compact bedside table, with the stool neatly tucked underneath.
3. Stool Usage
- The comfortable stool features smooth-rolling wheels for easy movement.
- Engage the wheel brakes when seated to ensure stability.
- When not in use, the stool can be conveniently stored under the dressing table to save space.

Image: The mobile stool with its padded cushion and wheels, shown being pushed under the dressing table for compact storage.
Maintenance
- Cleaning: Wipe the surfaces with a dry cloth for general dusting. For more thorough cleaning, use a damp cloth with a mild cleaner, then wipe dry immediately. Avoid abrasive cleaners or harsh chemicals.
- Glass Tray: Clean the transparent glass tray with a glass cleaner and a soft cloth to maintain clarity.
- Hardware: Periodically check all screws and fasteners to ensure they remain tight. Re-tighten if necessary to maintain structural integrity.
- Stool Wheels: Keep the stool wheels free of debris to ensure smooth movement.
Troubleshooting
- Missing Pre-drilled Holes: If you encounter components without necessary pre-drilled holes during assembly, carefully measure and mark the correct positions based on the assembly diagrams. Use a small drill bit to create pilot holes before inserting screws to prevent material damage.
- Drawers Not Sliding Smoothly: Ensure the drawer slides are correctly aligned and securely attached to both the drawer and the main unit. Check for any obstructions in the tracks.
- Unit Wobbles: Verify that all assembly screws are fully tightened. Ensure the unit is placed on a level surface. If wobbling persists, re-check the assembly steps. The anti-tip device, when properly installed, will also contribute to overall stability.
- Mirror Not Staying Open: Check the hinges for proper installation and function. Ensure no obstructions are preventing the mirror from fully extending and holding its position.
Specifications
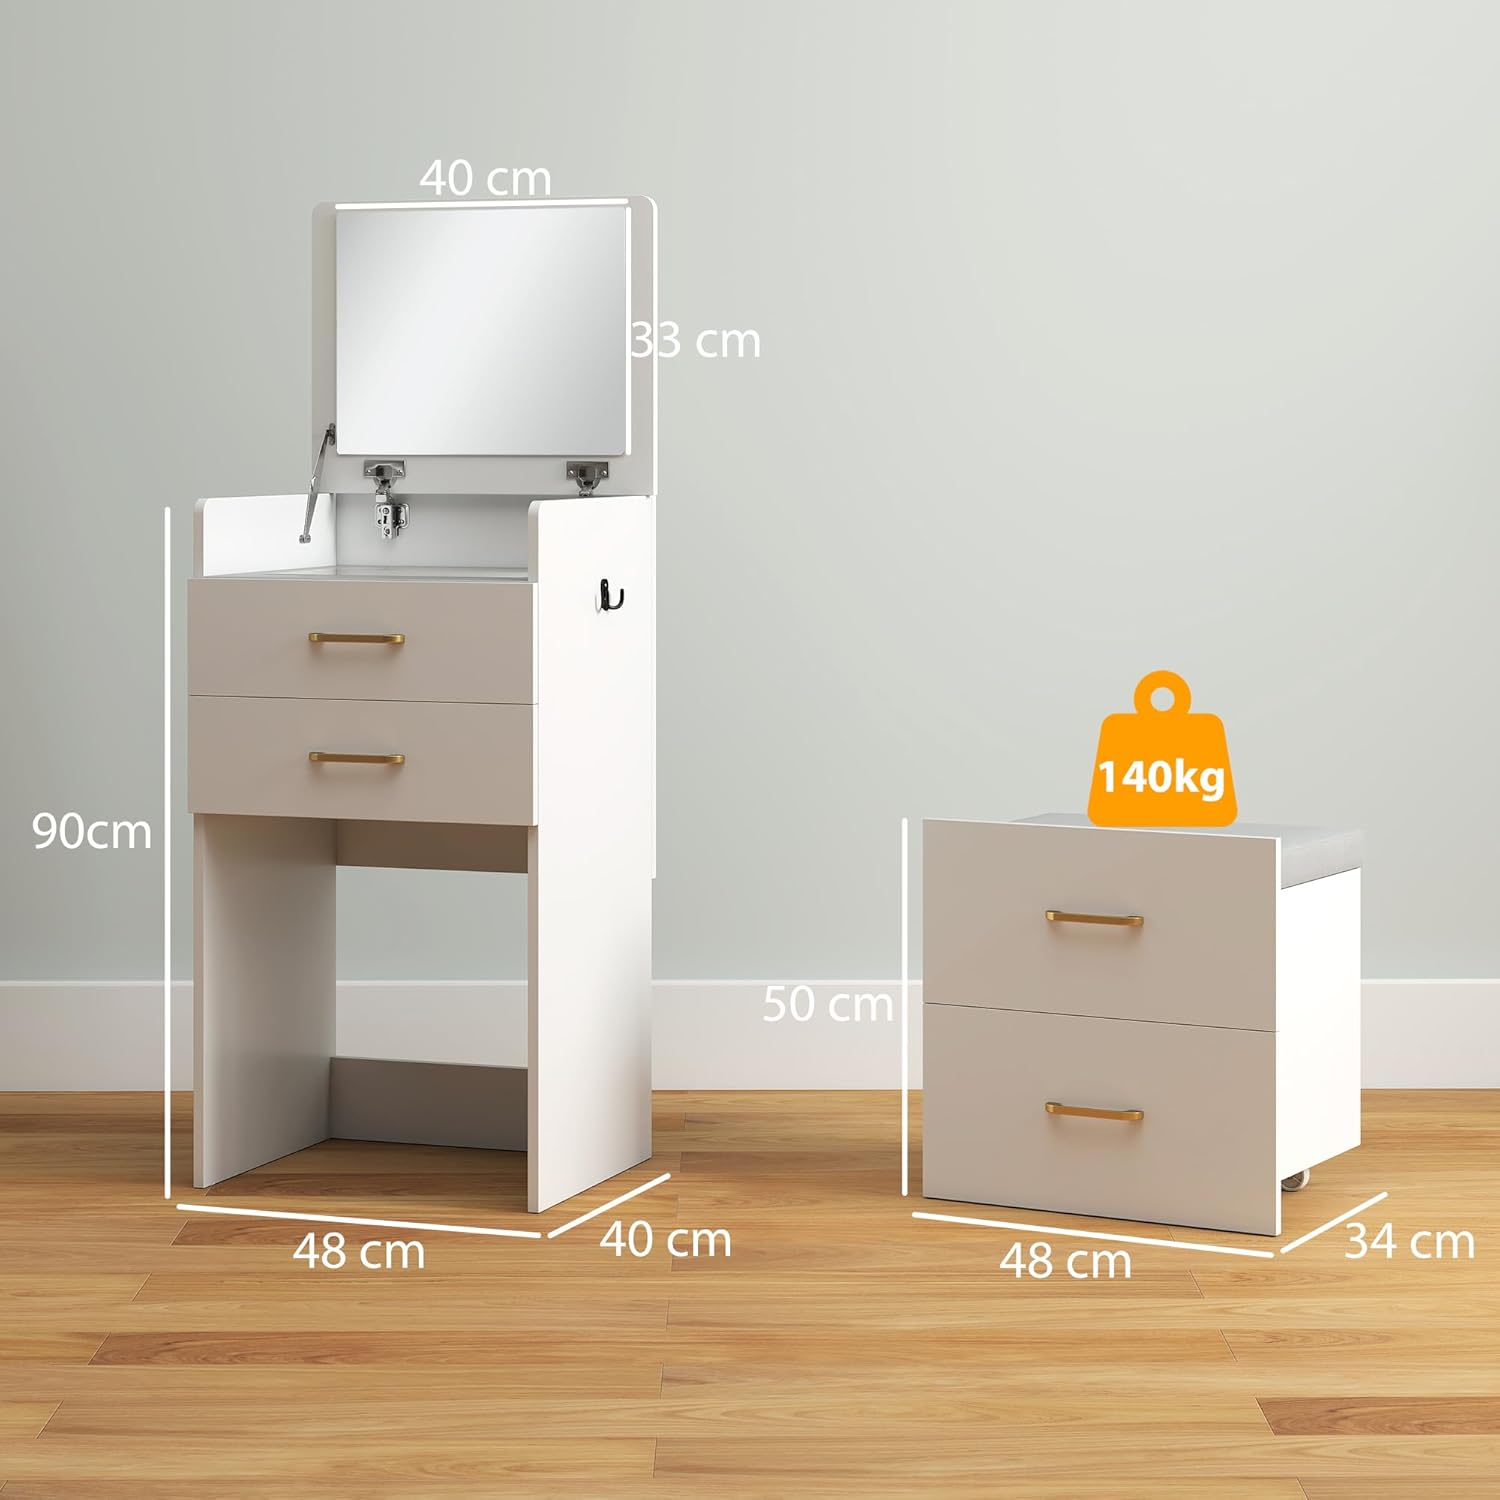
Image: A detailed diagram showing the dimensions of both the dressing table and the stool in centimeters.
| Feature | Detail |
|---|---|
| Model Number | 83D-001V00WT (FR83D-001V00WT0531) |
| Dressing Table Dimensions (L x W x H) | 48 cm x 40 cm x 90 cm |
| Stool Dimensions (L x W x H) | 48 cm x 34 cm x 50 cm |
| Item Depth | 40 cm |
| Seat Height | 50 cm |
| Color | White |
| Material | Engineered Wood, Glass |
| Seat Material Type | Polyester |
| Assembly Required | Yes |
| Max Load Capacity (Stool) | 140 kg |
| Max Load Capacity (Tabletop) | 25 kg |
| Max Load Capacity (Drawer) | 5 kg |
| Product Care Instructions | Wipe with a dry cloth, Wipe with a damp cloth |
Warranty and Support
For warranty information or assistance with your HOMCOM product, please refer to the warranty card included with your purchase or contact HOMCOM customer service directly. Please have your model number (83D-001V00WT) and purchase date available when contacting support.