Pard OS6-35/50/850/LRF-PARD
Pard Osprey 640-35 Dual-Spectral Binocular User Manual
Model: OS6-35/50/850/LRF-PARD
Introduction
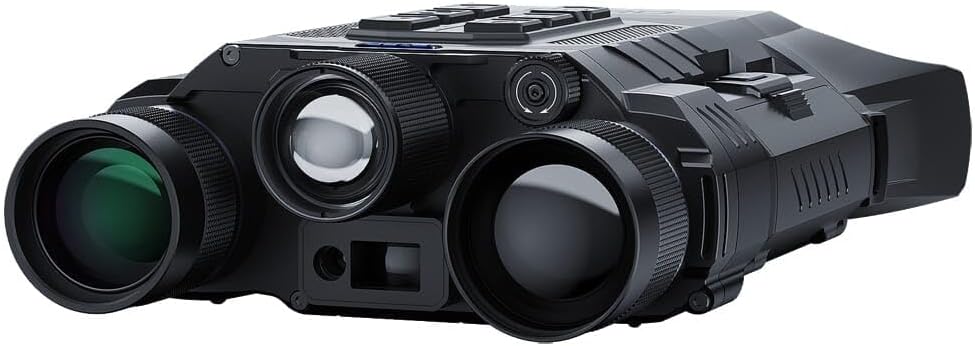
Image: The Pard Osprey 640-35 Dual-Spectral Binocular, showcasing its dual lenses and robust design.
The Pard Osprey 640-35 Dual-Spectral Binocular is an advanced optical device designed for enhanced observation in various conditions. It combines thermal imaging for long-distance detection with night vision for clear identification. This manual provides comprehensive instructions for the proper setup, operation, maintenance, and troubleshooting of your Osprey binocular.
The Osprey allows users to operate either thermal or night vision channels independently, or view them both simultaneously using the picture-in-picture feature. Its innovative design ensures clear target identification across thermal, night vision, and daytime scope channels.
Key Features
- Dual-Spectral Capability: Seamless integration of thermal and night vision for versatile observation.
- High-Performance Thermal Sensor: Features a Vanadium Oxide (Vox) sensor with ≤20mK NETD rating and 12µm pixel pitch for detailed thermal images in low contrast conditions.
- Integrated Laser Range Finder (LRF): Accurate 1200-yard true laser range finding capability.
- Adjustable Interpupillary Distance: Ensures comfortable viewing for various users.
- IP67 Waterproof Rating: Provides protection against dust and water immersion.
- Multiple Thermal Image Modes: Includes White Hot/Black, Hot/Red, Hot/Iron, Hot/Edge, and Sky options.
- Scene Modes: Three individual scene modes to enhance environmental characteristics.
- Picture-In-Picture (PIP): Allows 2x magnification of a target inset over the main image.
- Hot Image Tracking: Automatically tracks heat sources on the display.
- Standby Mode: Conserves power with instant wake-up functionality.
Setup and Initial Use
1. Unpacking and Inspection
Carefully remove the Pard Osprey binocular and all accessories from its packaging. Inspect the device for any signs of damage. Retain the packaging for future storage or transport.
2. Battery Installation
Locate the battery compartment. Insert the recommended batteries according to the polarity indicators. Ensure the compartment cover is securely closed to maintain the device's waterproof rating.
3. Powering On/Off
To power on the device, press and hold the power button (usually marked with a power symbol) until the display illuminates. To power off, press and hold the power button again until the display shuts down.
4. Adjusting Interpupillary Distance
The Osprey has a fully adjustable interpupillary range. Use the built-in wheel located on the bottom of the frame to adjust the distance between the eyepieces until you see a single, clear circular field of view.
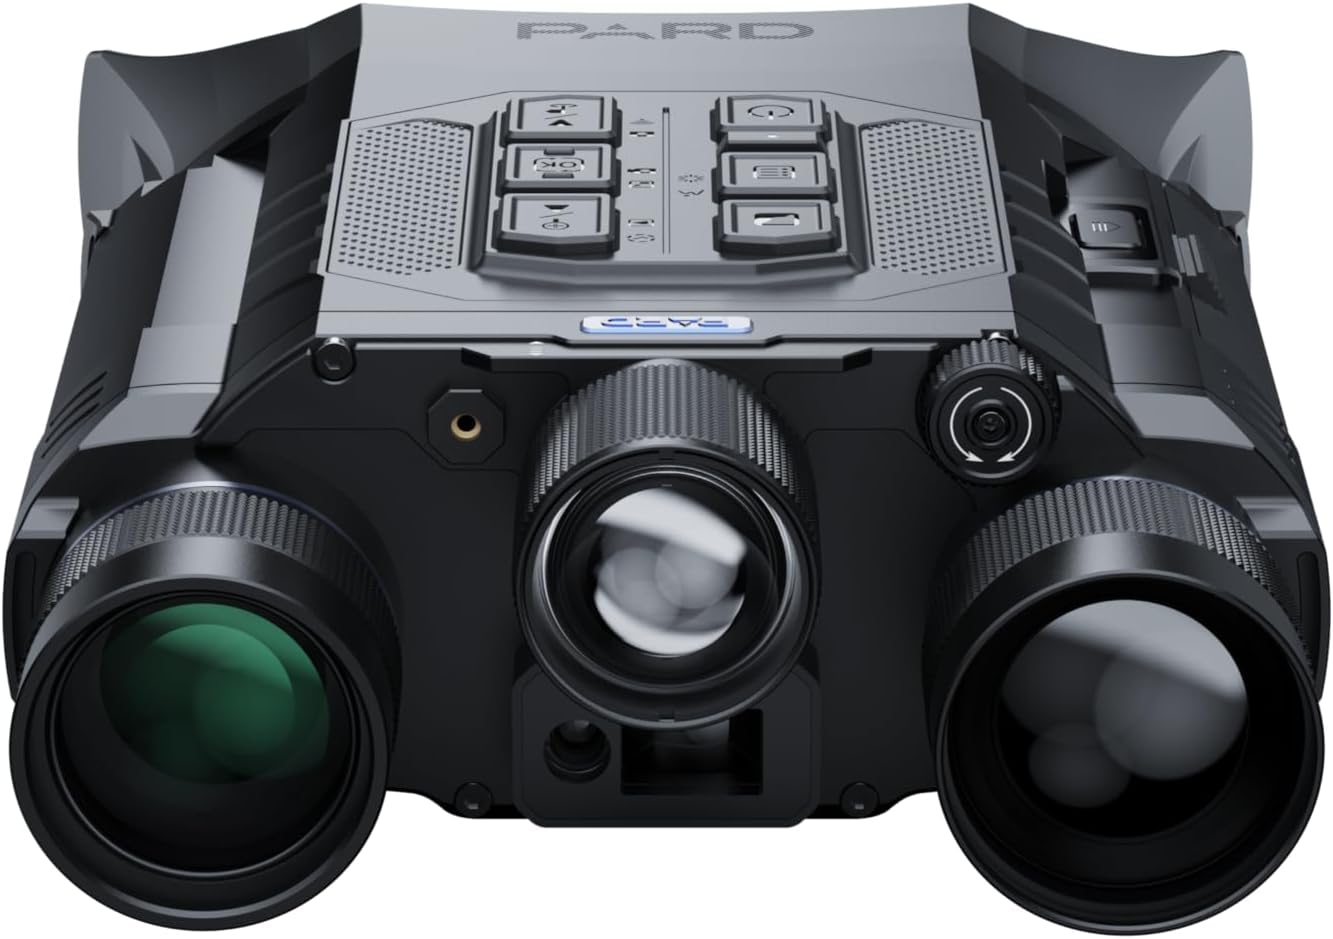
Image: Rear view of the Pard Osprey binocular, illustrating the adjustable eyepieces and the soft silicone eye cups designed to block peripheral light.
5. Diopter Adjustment
If applicable, adjust the diopter on the eyepiece (usually the right one) to compensate for differences in vision between your eyes. Look through the binocular at a distant object and rotate the diopter ring until the image is sharp for that eye, then adjust the main focus for both eyes.
Operating Instructions
Viewing Modes
The Osprey offers multiple viewing options:
- Thermal Mode: Provides detection capabilities based on heat signatures.
- Night Vision Mode: Enhances visibility in low-light conditions.
- Daytime Scope Mode: For use in well-lit environments.
- Picture-In-Picture (PIP): Activates a magnified 2x inset of the target area within the main view. This allows for detailed observation of a specific point while maintaining situational awareness of the broader scene.
Thermal Image Modes
Customize your thermal view by selecting from the following palettes:
- White Hot: Hot objects appear white.
- Black Hot: Hot objects appear black.
- Red Hot: Hot objects are highlighted in red.
- Iron Hot: Displays a spectrum of colors from black to white, with red and yellow in between.
- Edge: Highlights the edges of objects.
- Sky: A specialized mode for specific environmental conditions.
Scene Modes
The device features a quick switch function to instantly move between 3 individual scene modes. These modes enhance environmental characteristics to increase visibility and contrast, optimizing performance for different scenarios (e.g., forest, city, open field).
Hot Image Tracking
When activated, the Osprey can detect and display heat signatures on the screen. It will automatically track the hottest point in the field of view, helping you maintain focus on your target.
Laser Range Finder (LRF) Operation
To use the built-in LRF, aim the reticle at your target and activate the range finder function (refer to button layout for specific button). The distance to the target will be displayed on the screen. The LRF has a range of up to 1200 yards.
Standby Mode
To enter standby mode, briefly press the power button. The display will turn off, conserving battery life. To instantly awaken the device, quickly press the power button again.
Wi-Fi Connectivity
The Osprey supports Wi-Fi connectivity for remote viewing, recording, and firmware updates via a compatible mobile application. Refer to the app's instructions for pairing and usage.
Controls and Buttons
Familiarize yourself with the control buttons on the device. A typical layout includes:

Image: Top view of the Pard Osprey binocular, highlighting the arrangement of control buttons for power, menu, navigation, and recording functions.
- Power Button: On/Off, Standby.
- Menu Button: Accesses settings and options.
- Navigation Buttons (Up/Down/Left/Right/OK): For navigating menus and selecting options.
- Zoom Button: Adjusts magnification.
- Record Button: Initiates video recording.
- Photo Button: Captures still images.
- LRF Button: Activates the laser range finder.
Maintenance and Care
Cleaning the Lenses
Use a soft, lint-free cloth specifically designed for optical lenses. Gently wipe the lens surfaces to remove dust or smudges. For stubborn dirt, use a small amount of lens cleaning solution applied to the cloth, not directly to the lens.
Cleaning the Body
Wipe the body of the binocular with a soft, damp cloth. Avoid using abrasive cleaners or solvents, as these can damage the finish or internal components.
Storage
When not in use, store the Osprey binocular in its protective case in a cool, dry place, away from direct sunlight and extreme temperatures. Remove batteries if storing for extended periods to prevent leakage.
Waterproof Rating (IP67)
The device is rated IP67, meaning it is protected from dust ingress and can withstand immersion in water up to 1 meter for 30 minutes. Ensure all port covers and battery compartments are securely closed before exposure to water.
Troubleshooting
| Problem | Possible Cause | Solution |
|---|---|---|
| Device does not power on. | Low or dead batteries; incorrectly installed batteries. | Replace batteries with fresh ones; check battery polarity. |
| Image is blurry or out of focus. | Improper focus adjustment; dirty lenses; diopter not adjusted. | Adjust the focus wheel; clean lenses; adjust diopter for individual eye. |
| Laser Range Finder not working. | Obstruction in front of LRF; target too far or too close; low battery. | Ensure clear line of sight; check target distance within 1200 yards; replace batteries. |
| Wi-Fi connection issues. | Incorrect Wi-Fi settings; app not updated; interference. | Verify Wi-Fi settings on device and phone; update mobile app; move closer to device. |
| Display flickering or distorted. | Extreme temperature; software glitch. | Allow device to acclimate to ambient temperature; restart the device. |
Specifications
| Feature | Detail |
|---|---|
| Model Number | OS6-35/50/850/LRF-PARD |
| Thermal Sensor | Vanadium Oxide (Vox) |
| NETD Rating | ≤20mK |
| Pixel Pitch | 12µm |
| Lens | 35mm |
| IR Illuminator | 850nm |
| Laser Range Finder Range | Up to 1200 yards |
| Waterproof Rating | IP67 |
| Connectivity | Wi-Fi |
| Manufacturer | PARD USA |
| UPC | 850050408307 |
Warranty and Support
For detailed warranty information and terms of service, please refer to the official Pard USA website or contact their customer support directly. Keep your proof of purchase for warranty claims.
Customer Support: For technical assistance, repairs, or general inquiries, please visit the Pard Store on Amazon or the official PARD USA website.
Ask a question about this manual
Ask about setup, troubleshooting, compatibility, parts, safety, or missing instructions. Manuals+ will review the question and use this page’s manual context to help answer it.