1. Product Overview
This manual provides essential information for the proper installation, operation, and maintenance of the Generic YBSXS5012VP Carburetor. This carburetor is designed as a replacement part for specific Briggs & Stratton 18HP single cylinder engines, ensuring optimal fuel delivery and engine performance.
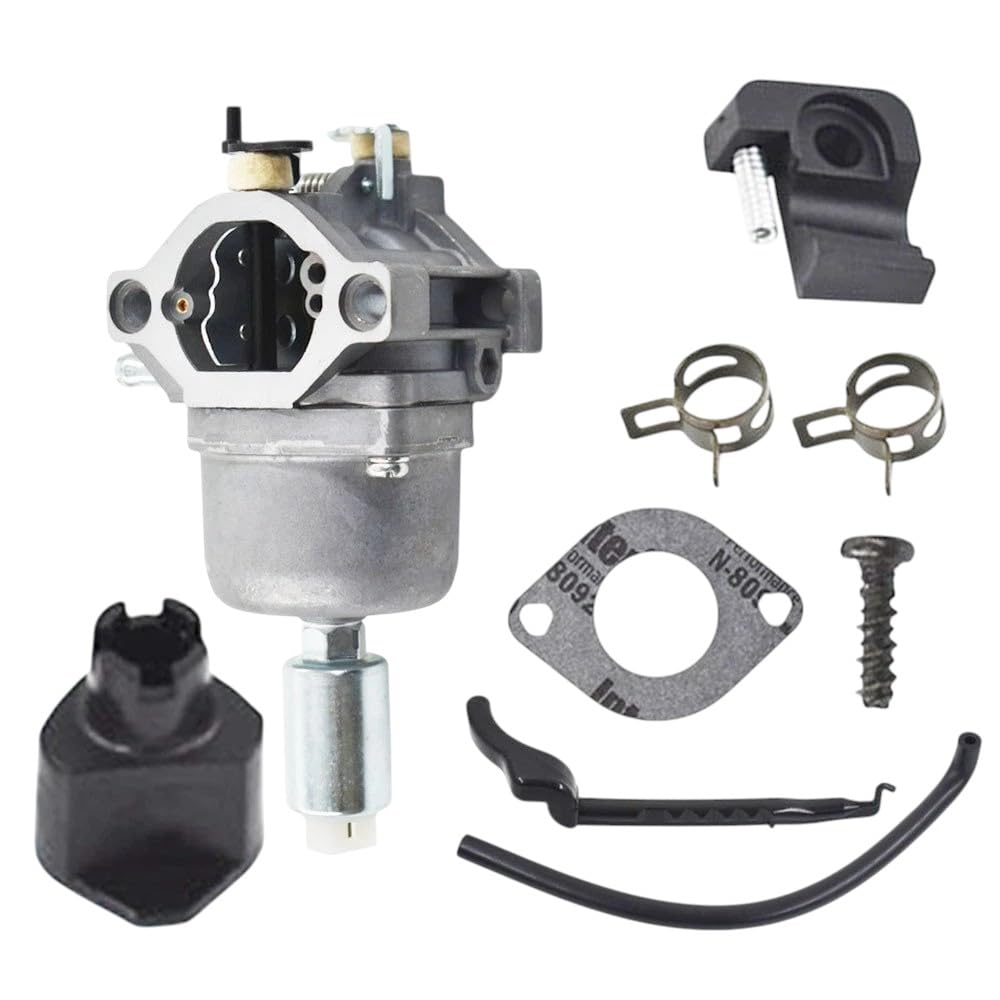
Figure 1: Front view of the Generic YBSXS5012VP Carburetor.
1.1 Compatibility
This carburetor is compatible with a wide range of Briggs & Stratton engines and equipment. Refer to the following list to confirm compatibility:
- Replaces Briggs & Stratton part numbers: 591731, 593514, 594593, 697141, 697190, 698445, 699109, 699937, 790418, 791858, 791888, 792171, 792358, 793224, 794572, 796109, 697153, 698083, 795115, 653202, 695547, 697014, 642592, 697634, 697776, 794422, 797008, 795366.
- Fits most 31A000, 31B000, 31C000 Model Engines.
- Suitable for 17.5 hp 310000 series engines.
- Compatible with Briggs & Stratton 18HP single cylinder Family YBSXS5012VP 274826.
- Fits various models including Murray rider (17.5HP), Huskee Rider (2002, 17.5HP), Troy Bilt Pony (310000 engine, 2010, 17.5 hp), Husqvarna 42" mower (17.5 HP), John Deere LA110 (Nikki carburetor), Yard Machines (2001, 17.5 hp), Sears 15.5HP mower (31c707 B&S INTEK OHV engine), Toro zero turn (WALBRO LMT carb 280H07-0166-E1).
- Also fits Craftsman LT1000 (16HP, 17.5 OHV 31C7070230E1, 2004 31H770297-E1, 18.5hp), Sears LT2000 (42" 20HP), Craftsman LT2000 (27375, 18 hp Intek engine, 17.5HP), Craftsman DLS 3500 (2007, 20 HP Engine, model # 917.287130), Craftsman Lawnmower (310777 0806 F1 070330ZE), Craftsman LTR 2000, and 18.5 hp OHV Cub Cadet.
2. Safety Information
Always prioritize safety when working with engine components and fuel systems. Failure to follow these safety guidelines may result in injury or damage to equipment.
- Disconnect Battery: Before beginning any work, disconnect the spark plug wire and the battery to prevent accidental engine startup.
- Fuel Handling: Gasoline is highly flammable. Work in a well-ventilated area, away from open flames, sparks, or other ignition sources. Use approved containers for fuel.
- Eye Protection: Always wear safety glasses or goggles to protect your eyes from debris and fuel splashes.
- Gloves: Wear appropriate gloves to protect your hands from fuel, oil, and sharp edges.
- Engine Heat: Allow the engine to cool completely before working on it to avoid burns.
- Proper Tools: Use the correct tools for each task to prevent damage to fasteners and components.
- Ventilation: Ensure adequate ventilation when working with fuel or cleaning agents.
3. Package Contents
Upon opening the package, verify that all components are present and undamaged. If any parts are missing or damaged, please contact customer support.

Figure 2: Complete carburetor kit including the main unit, gaskets, fuel line, and clamps.
The package typically includes:
- 1x Carburetor Unit
- Gaskets (for mounting)
- Fuel Line
- Clamps
- Other small accessories as pictured

Figure 3: Carburetor unit with a gasket and fuel line, ready for installation.
4. Setup and Installation
Follow these steps carefully for proper installation of the carburetor. If you are unsure about any step, consult a qualified technician.
4.1 Pre-Installation Checks
- Ensure the engine is cool and the spark plug wire is disconnected.
- Turn off the fuel supply valve, if present.
- Have a clean rag and a container ready to catch any spilled fuel.
4.2 Removal of Old Carburetor
- Carefully disconnect the fuel line from the old carburetor. Be prepared for some fuel spillage.
- Disconnect any throttle linkages, choke linkages, and electrical connections (e.g., fuel solenoid) attached to the carburetor. Note their positions for reassembly.
- Unbolt the old carburetor from the engine manifold. Remove any old gaskets.
- Inspect the intake manifold and air filter housing for any debris or damage. Clean as necessary.

Figure 4: Side view of the carburetor, highlighting the mounting points and fuel inlet.
4.3 Installation of New Carburetor
- Place new gaskets on the engine manifold and the air filter housing side, ensuring they are correctly aligned.
- Mount the new carburetor onto the engine, aligning it with the bolt holes.
- Secure the carburetor with the mounting bolts. Do not overtighten.
- Reconnect the throttle linkages, choke linkages, and any electrical connections (e.g., fuel solenoid). Ensure smooth movement of the throttle and choke.
- Connect the new fuel line to the carburetor's fuel inlet. Secure with clamps.

Figure 5: Detail of the throttle and choke linkage mechanism on the carburetor.

Figure 6: Close-up of the electrical connector, typically for a fuel shut-off solenoid.
4.4 Post-Installation Checks
- Double-check all connections: fuel line, linkages, and electrical wires.
- Ensure no tools or debris are left near moving engine parts.
- Reconnect the spark plug wire.
- Open the fuel supply valve. Check for any fuel leaks.
5. Operation
After successful installation, the carburetor is ready for operation. The carburetor's primary function is to mix air and fuel in the correct ratio for combustion.
- Initial Start-up: After installation, it may take a few extra cranks for the engine to start as the fuel system primes and the carburetor bowl fills with fuel.
- Choke Operation: For cold starts, engage the choke to enrich the fuel mixture. Disengage the choke once the engine warms up and runs smoothly.
- Throttle Control: The throttle lever controls engine speed by regulating the amount of air-fuel mixture entering the engine.
6. Maintenance
Regular maintenance helps ensure the longevity and optimal performance of your carburetor and engine.
- Fuel Quality: Always use fresh, clean fuel. Stale or contaminated fuel can clog carburetor passages. Consider using a fuel stabilizer if the equipment will be stored for extended periods.
- Fuel Filter: Regularly inspect and replace the fuel filter according to your engine's maintenance schedule. A clogged fuel filter can restrict fuel flow to the carburetor.
- Air Filter: Ensure the air filter is clean and properly installed. A dirty air filter can cause a rich fuel mixture and poor engine performance.
- External Cleaning: Keep the exterior of the carburetor clean from dirt, dust, and debris.
- Seasonal Storage: Before long-term storage, drain the fuel system or run the engine until it runs out of fuel to prevent gum and varnish buildup in the carburetor.
7. Troubleshooting
If you encounter issues after installing the carburetor, refer to the following common troubleshooting steps:
| Symptom | Possible Cause | Solution |
|---|---|---|
| Engine will not start | No fuel, clogged fuel filter, incorrect choke setting, loose electrical connection (fuel solenoid). | Check fuel level, replace fuel filter, adjust choke, ensure fuel solenoid is connected. |
| Engine runs rough or stalls | Dirty air filter, old/stale fuel, minor carburetor blockage, incorrect idle adjustment. | Clean/replace air filter, use fresh fuel, inspect carburetor for debris, adjust idle screw if accessible. |
| Fuel leaks from carburetor | Loose fuel line connection, damaged gasket, float needle issue. | Tighten fuel line, replace gaskets, inspect float and needle valve. |
| Engine lacks power | Dirty air filter, restricted fuel flow, carburetor not properly tuned. | Clean/replace air filter, check fuel filter and lines, ensure carburetor is correctly installed. |
If these steps do not resolve the issue, it is recommended to consult a professional engine mechanic.
8. Specifications
| Feature | Detail |
|---|---|
| Brand | Generic |
| Model Number | YBSXS5012VP (Replacement for various B&S models) |
| Manufacturer | PH |
| ASIN | B0F8W45BRD |
| Engine Compatibility | Briggs & Stratton 18HP single cylinder (YBSXS5012VP, 274826 family) |
| Construction Material | Durable, corrosion-resistant materials |
9. Warranty and Support
This product is designed for reliable performance. If you encounter any issues or have questions regarding the carburetor, please refer to the following:
- Missing Parts: If you receive the product with missing parts, please contact customer support immediately.
- Technical Assistance: For technical questions or troubleshooting assistance, please reach out to the seller via Amazon message.
- Feedback: If you have concerns or issues, please contact the seller before leaving negative or neutral feedback to allow for resolution.