1. Introduction
This manual provides essential instructions for the safe and efficient operation, installation, and maintenance of your ScitoLAB 550W Pond Air Pump and 50 L/Min Oilless Vacuum Pump. Please read this manual thoroughly before use and retain it for future reference.
2. Safety Information
Observe the following safety precautions to prevent injury and damage to the equipment:
- Ensure the power supply matches the pump's rated voltage (110V/60Hz).
- Do not operate the pump with a damaged power cord or plug.
- Ensure electrical connections are protected from moisture.
- Always disconnect power before performing any maintenance or cleaning.
- Do not block air intake or exhaust vents during operation.
- The pump generates heat; ensure adequate ventilation around the unit.
- This appliance is not intended for use by persons (including children) with reduced physical, sensory or mental capabilities, or lack of experience and knowledge, unless they have been given supervision or instruction concerning use of the appliance by a person responsible for their safety.
3. Package Contents
Upon unpacking, verify that all components are present and undamaged:
- 1 x 550W Pond Air Pump
- 1 x 50 L/Min Oilless Vacuum Pump
- 1 x Vacuum pressure gauge (for vacuum pump)
- 4 x Quick connectors (various sizes: 6mm/8mm/10mm/12mm)
- 1 x Gauge connector
- 1 x Aluminum silencer (for vacuum pump)
- 1 x Raw tape (PTFE tape)
- 1 x Plastic hose (39.37 inches)
- 4 x Rubber feet (for vacuum pump)
- 1 x L-shape Allen wrench (for pond air pump)
- 4 x Metal ties (for pond air pump)
- 1 x Silencer (for pond air pump)
- 1 x Double air release connector (for 0.354-inch ID hose) (for pond air pump)
- 4 x Rubber feet (for pond air pump)
- 4 x Screws for mounting rubber feet (for pond air pump)
- 1 x Instruction Manual

Figure 1: Overview of the ScitoLAB 550W Pond Air Pump and 50 L/Min Oilless Vacuum Pump with included accessories. The image displays both pump units along with various connectors, hoses, and sealing tape.
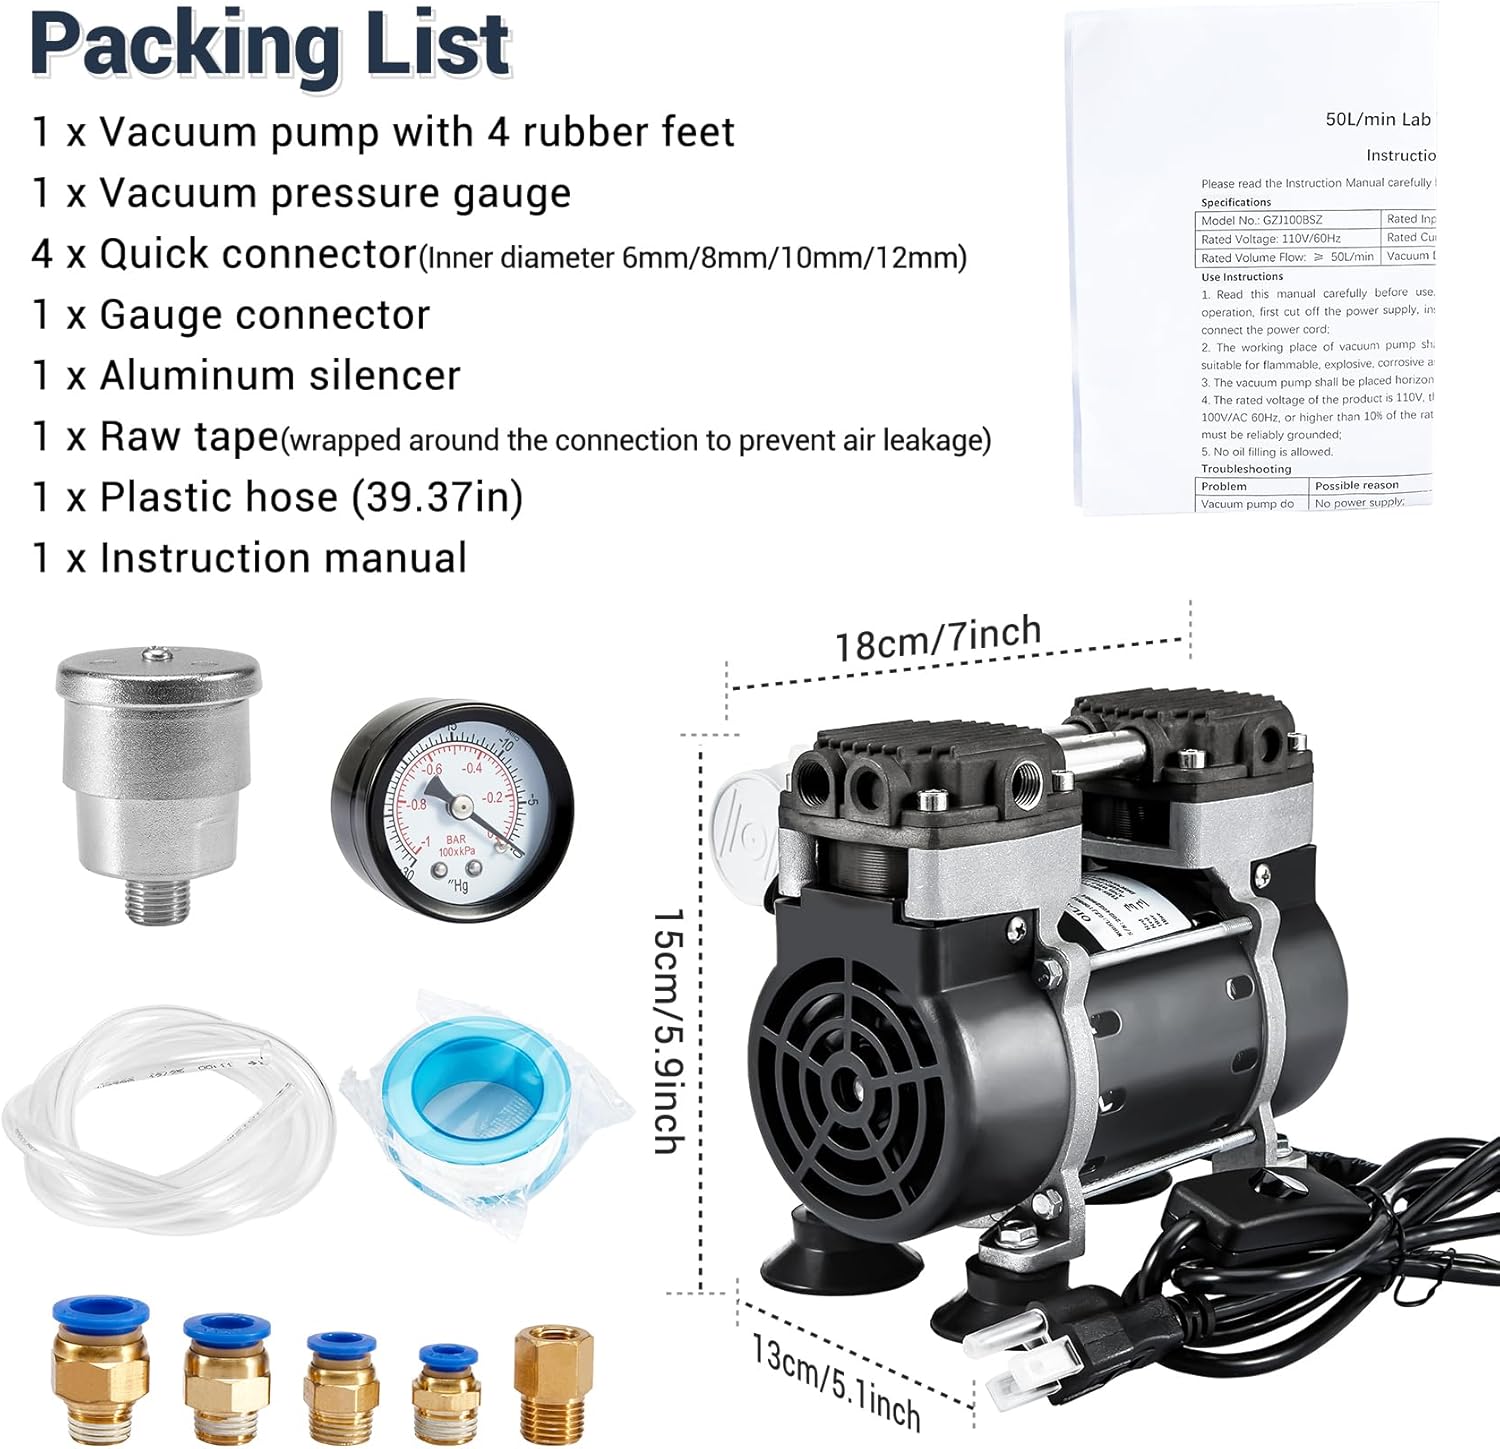
Figure 2: Detailed view of the packing list for the 50 L/Min Oilless Vacuum Pump, showing the vacuum pump, pressure gauge, quick connectors, gauge connector, aluminum silencer, raw tape, plastic hose, and instruction manual.

Figure 3: Detailed view of the packing list for the 550W Pond Air Pump, showing the pond air pump, L-shape Allen wrench, raw tape, metal ties, silencer, double air release connector, rubber feet, and screws for mounting.
4. Setup and Installation
4.1 Oilless Vacuum Pump Setup
- Attach Rubber Feet: Install the four silicone rubber feet at the bottom of the vacuum pump. These feet help stabilize the unit and cushion vibrations during operation.
- Connect Silencer: Screw the aluminum silencer onto the vacuum pump's intake port. This reduces operational noise.
- Install Vacuum Meter: Attach the vacuum pressure gauge to the designated port.
- Hose Connection: Use the provided plastic hose and quick connectors to establish the vacuum line. Wrap raw tape (PTFE tape) around threaded connections to ensure an airtight seal.
- Placement: Place the vacuum pump on a stable, horizontal surface in a well-ventilated area.
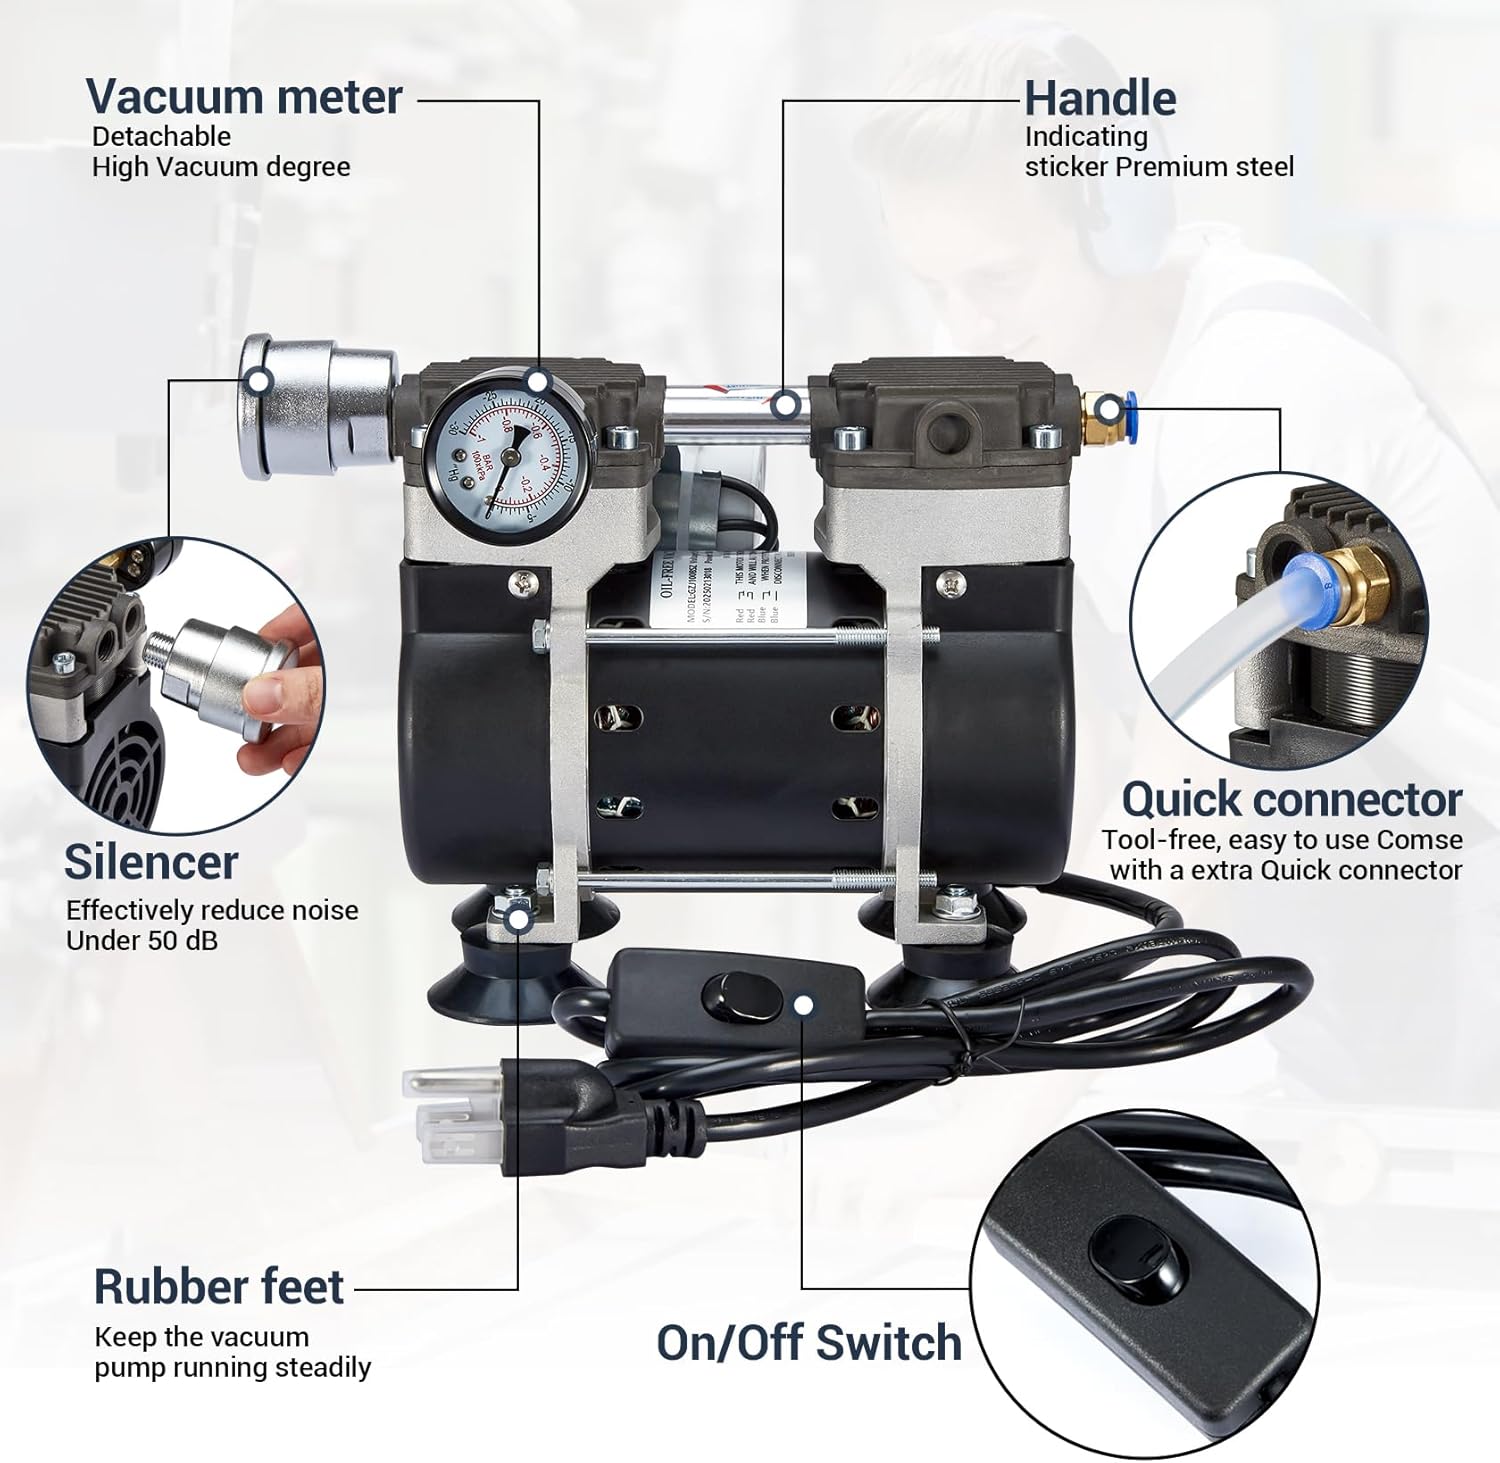
Figure 4: Diagram illustrating key components of the Oilless Vacuum Pump, including the vacuum meter, handle, quick connector, silencer, rubber feet, and on/off switch.
4.2 Pond Air Pump Setup
- Attach Rubber Feet: Secure the rubber feet to the bottom of the pond air pump using the provided screws. This helps stabilize the unit and reduce vibration.
- Connect Silencer: Install the silencer onto the air intake to minimize noise during operation.
- Air Release Connector: Attach the double air release connector to the pump's output. This connector is designed for 0.354-inch ID hoses.
- Hose Connection: Connect appropriate air hoses (not included) from the air release connector to air stones or diffusers placed in the pond. Use metal ties to secure hose connections.
- Placement: Position the pond air pump in a dry, protected location near the pond, ensuring it is elevated to prevent water ingress and has adequate ventilation.

Figure 5: The 550W Pond Air Pump shown in an outdoor pond environment, illustrating its intended use for aeration. The image highlights the pump's internal copper coils for efficiency.
5. Operating Instructions
5.1 Power Connection
Once all connections are secure, plug the power cord into a grounded 110V/60Hz electrical outlet. Both pumps feature an integrated on/off switch for convenient control without frequent unplugging.

Figure 6: Close-up of the Oilless Vacuum Pump's updated on/off switch, emphasizing its oil-free and maintenance-free design.

Figure 7: Image showing the Pond Air Pump's upgraded capacitor and on/off switch, indicating independent disconnection capability.
5.2 Starting and Stopping
- To start: Flip the on/off switch to the "ON" position.
- To stop: Flip the on/off switch to the "OFF" position.
Monitor the vacuum meter on the Oilless Vacuum Pump to ensure desired vacuum levels are achieved. For the Pond Air Pump, observe the aeration in the pond to confirm proper operation.
6. Maintenance
Both the 550W Pond Air Pump and the 50 L/Min Oilless Vacuum Pump are designed for low maintenance.
- Oil-Free Operation: Both pumps are oilless, eliminating the need for lubrication and reducing maintenance.
- Regular Cleaning: Periodically inspect air intake and exhaust vents for dust or debris accumulation. Clean as necessary to ensure unrestricted airflow.
- Connection Checks: Regularly check all hose connections and electrical cords for wear, damage, or leaks. Tighten or replace components as needed.
- Silencer Inspection: Ensure silencers are clear of obstructions to maintain noise reduction efficiency.
7. Troubleshooting
| Problem | Possible Cause | Solution |
|---|---|---|
| Pump does not start | No power supply; On/off switch is off; Damaged power cord. | Check power connection; Ensure switch is ON; Inspect and replace damaged cord. |
| Reduced air/vacuum output | Blocked intake/exhaust; Leaks in hose connections; Worn internal components. | Clear obstructions; Check and seal connections with PTFE tape; Contact support if internal issue suspected. |
| Excessive noise/vibration | Loose components; Improper placement; Silencer obstructed. | Check for loose parts; Ensure pump is on a stable, level surface; Clear silencer. |
| Pump overheats | Insufficient ventilation; Blocked cooling fins; Prolonged operation in high temperatures. | Ensure adequate space around pump; Clean cooling fins; Operate within specified temperature range (41-104 ℉). The pump has overheat protection and will stop if motor temp exceeds 284 ℉. |

Figure 8: Illustration of the Oilless Vacuum Pump's heat dissipation features, including double side-fans, heat sink design, and cooling top-fins, which contribute to continuous operation and extended machine life.

Figure 9: The Pond Air Pump featuring an overheat protection design with double side fans, which stops the unit if the motor temperature exceeds 284℉ (140℃).
8. Specifications
8.1 550W Pond Air Pump
- Power: 550 Watts (3/4 HP)
- Max. Air Volume: 5.2 CFM
- Rated Current: 2.5A
- Rated Voltage: 110V/60Hz
- Intake and Exhaust Holes: G1/4
- Working Temperature Range: 41-104 ℉ (5-40 ℃)
- Aeration Capacity: Up to 1-3 Acre ponds, 50 ft depth
- Noise Level: No more than 60dB
- Motor: All-copper coils for high efficiency and low heat generation.
- Features: Oil-free, maintenance-free, overheat protection (stops at >284 ℉).
8.2 50 L/Min Oilless Vacuum Pump
- Power: 180 Watts
- Max. Flow Rate: 50 L/Min
- Rated Voltage: 110V/60Hz (assumed from context, not explicitly stated for vacuum pump but for the overall product)
- Noise Level: Under 50 dB (with silencer)
- Features: Oil-free, maintenance-free, upgraded aluminum alloy silencer.
Figure 10: Dimensions of the 50 L/Min Oilless Vacuum Pump: approximately 18cm (7 inches) in height and 13cm (5.1 inches) in width.
Figure 11: Dimensions of the 550W Pond Air Pump: approximately 7.87 inches in height, 5.12 inches in width, and 10.63 inches in length.
9. Warranty and Support
For warranty information, technical support, or replacement parts, please refer to the documentation included with your purchase or contact ScitoLAB customer service directly. Keep your purchase receipt as proof of purchase.
Date First Available: March 10, 2025
ASIN: B0F8VWHFCT


