Introduction
This manual provides essential information for the installation, operation, and maintenance of your new Generic GX22 Carburetor Kit. This kit is designed as a direct replacement for specific Honda 4-stroke engines, ensuring efficient fuel delivery and optimal engine performance. Please read these instructions thoroughly before proceeding with installation or use.
Safety Information
Always prioritize safety when working with engine components. Failure to follow these safety guidelines may result in injury or damage to equipment.
- Ensure the engine is completely off and cooled down before beginning any work.
- Disconnect the spark plug wire to prevent accidental starting.
- Work in a well-ventilated area to avoid inhaling fuel fumes.
- Wear appropriate personal protective equipment, including safety glasses and gloves.
- Handle fuel with extreme care. Avoid spills and ensure no open flames or sparks are present.
- Keep all parts and tools away from children and pets.
- If you are unsure about any step, consult a qualified technician.
Package Contents
Verify that all components listed below are present in your kit before beginning installation. If any parts are missing, please contact the seller.
- 1x Carburetor
- 1x Fuel Line Kit
- 2x Primer Bulbs
- 1x Grommet
- 1x Gasket
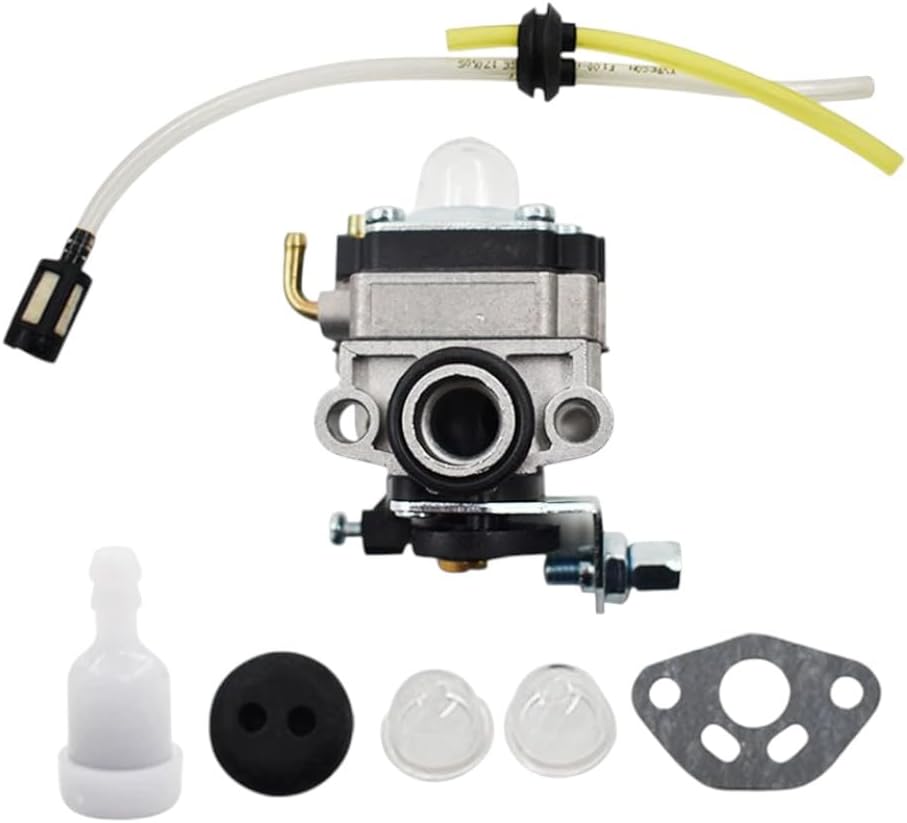
Image: All components of the carburetor kit, including the carburetor, fuel lines, primer bulbs, grommet, and gasket, are displayed on a white background.
Compatibility
This carburetor kit is compatible with the following Honda 4-stroke engine models:
- Honda GX22
- Honda GX25
- Honda GX31
- Honda GX35
- Honda FG100 Little Wonder Mantis Tiller
- Honda HHE31C Edger
- Honda HHT31S Trimmer series
- Honda UMK431 Trimmer series
The Manufacturer Part Number (MPN) for this carburetor is 16100-ZM5-803.
Installation Guide
This section provides general steps for replacing a carburetor. Specific procedures may vary slightly depending on your engine model. Refer to your engine's service manual for detailed instructions if needed.
- Preparation: Ensure the engine is cool and the fuel tank is empty or the fuel line is clamped. Disconnect the spark plug wire.
- Remove Air Filter Assembly: Carefully remove the air filter housing and air filter element to gain access to the carburetor.
- Disconnect Fuel Lines: Identify and disconnect the fuel lines connected to the old carburetor. Be prepared for minor fuel spills.
- Disconnect Throttle Linkage: Detach the throttle cable and any other linkages connected to the carburetor. Note their positions for reassembly.
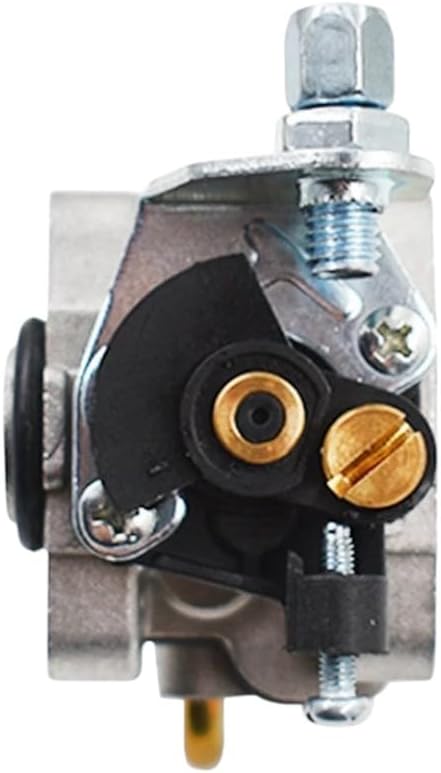
Image: Top view of the carburetor, highlighting the throttle linkage mechanism and adjustment screws.
- Remove Old Carburetor: Unbolt the old carburetor from the engine manifold. Remove any old gaskets.
- Install New Gasket: Place the new gasket provided in the kit onto the engine manifold, ensuring proper alignment.
- Mount New Carburetor: Position the new carburetor onto the gasket and secure it with the mounting bolts. Do not overtighten.
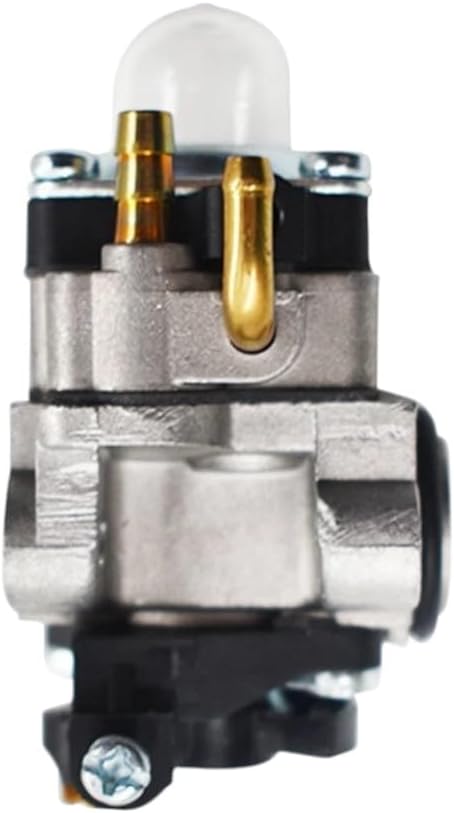
Image: Side view of the carburetor, showing the fuel inlet and outlet ports.
- Connect Throttle Linkage: Reattach the throttle cable and other linkages to the new carburetor. Ensure smooth operation.
- Connect Fuel Lines: Attach the new fuel lines from the kit to the carburetor and fuel tank. Ensure all connections are secure and leak-free. Replace the primer bulb and grommet if necessary.

Image: Bottom view of the carburetor, featuring the clear primer bulb and fuel connections.
- Reinstall Air Filter Assembly: Reattach the air filter element and housing.
- Final Checks: Double-check all connections, ensure no tools or debris are left in the engine area. Reconnect the spark plug wire.
Operation
After successful installation, follow these steps to start and operate your engine:
- Fill the fuel tank with the appropriate fuel type for your engine.
- Prime the carburetor by pressing the primer bulb several times until fuel is visible.
- Set the choke lever to the "Choke" or "Start" position (if applicable).
- Pull the starter cord firmly until the engine starts.
- Once the engine starts, gradually move the choke lever to the "Run" position.
- Allow the engine to warm up for a few minutes before operating under load.
The carburetor is pre-adjusted for optimal performance. No further adjustments should be necessary under normal operating conditions.
Maintenance
Regular maintenance helps ensure the longevity and reliable performance of your carburetor and engine.
- Fuel Quality: Always use fresh, clean fuel. Stale or contaminated fuel is a common cause of carburetor issues.
- Fuel Filter: Inspect and replace the fuel filter regularly to prevent debris from entering the carburetor.
- Air Filter: Keep the air filter clean to ensure proper air-fuel mixture. A dirty air filter can cause the engine to run rich.
- Storage: Before long-term storage, drain the fuel tank and run the engine until it stops to clear fuel from the carburetor, or use a fuel stabilizer.
- Inspection: Periodically inspect fuel lines, primer bulb, and gaskets for cracks, leaks, or signs of wear. Replace as needed.
Troubleshooting
Refer to the table below for common issues and potential solutions.
| Problem | Possible Cause | Solution |
|---|---|---|
| Engine will not start | No fuel, clogged fuel filter, no spark, incorrect choke setting, primer bulb not primed. | Check fuel level, replace fuel filter, check spark plug, adjust choke, prime carburetor. |
| Engine runs rough or stalls | Dirty air filter, stale fuel, fuel line obstruction, carburetor jets clogged. | Clean/replace air filter, use fresh fuel, check fuel lines, clean carburetor (if experienced). |
| Fuel leak | Loose fuel line connection, cracked fuel line, faulty gasket, damaged primer bulb. | Tighten connections, replace fuel lines, replace gasket, replace primer bulb. |
| Engine lacks power | Dirty air filter, restricted exhaust, incorrect engine speed adjustment. | Clean/replace air filter, check exhaust for blockages, ensure throttle linkage is free. |
If troubleshooting steps do not resolve the issue, it is recommended to consult a professional engine technician.
Specifications
| Brand | Generic |
| Model | Carburetor Kit |
| Manufacturer Part Number (MPN) | 16100-ZM5-803 |
| Item Model Number | 396606149251 |
| Additional Model Numbers | RY34421, RY34441, RY34442, RY34422 |
| Compatibility | Honda GX22, GX25, GX31, GX35, FG100, HHE31C, HHT31S, UMK431 series |
Warranty and Support
Specific warranty information for this Generic product is not provided in the product details. For any questions regarding product defects, missing parts, or technical support, please contact the seller directly through your purchase platform. Customer satisfaction is important, and the seller aims to respond to inquiries within 6 hours.


