1. Introduction
Welcome to the QHUDLV R39 Handheld Retro Gaming Console user manual. This guide provides essential information for setting up, operating, and maintaining your new device. The R39 console offers a portable gaming experience with a 4.0-inch IPS screen and a vast library of pre-loaded retro games.
2. Package Contents & Device Layout
Before you begin, please ensure all items are present in your package:
- QHUDLV R39 Handheld Retro Gaming Console
- USB Type-C Charging Cable
- User Manual (this document)
- Memory Card (64GB or 128GB, pre-installed)
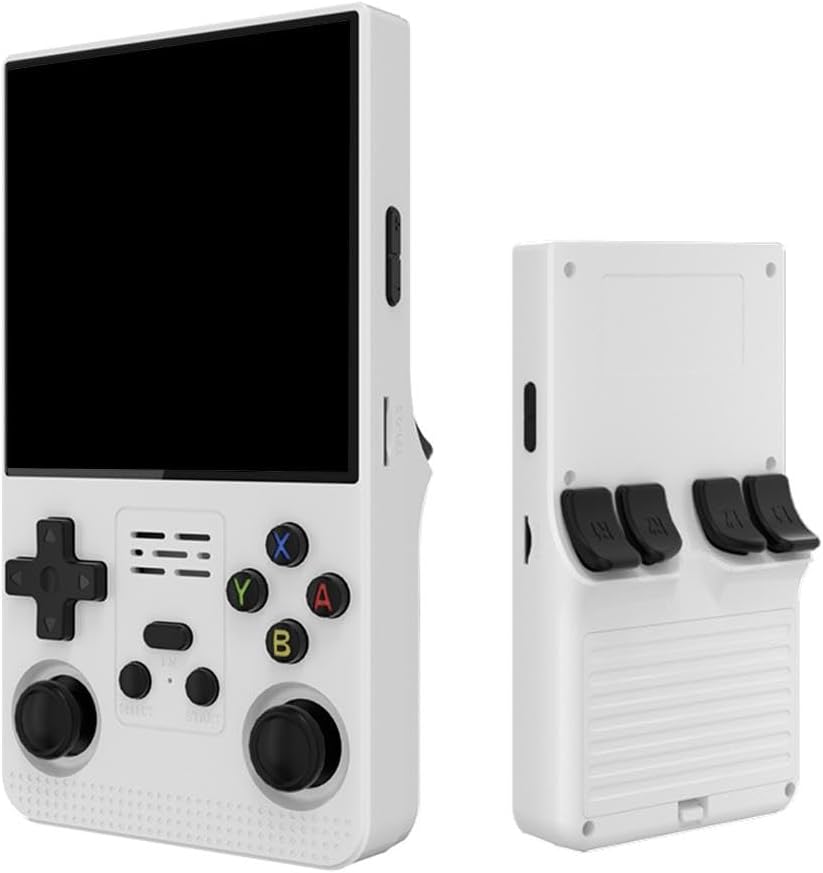
Image: Front and back view of the QHUDLV R39 Handheld Retro Gaming Console. The front shows the 4.0-inch screen, D-pad, dual analog joysticks, ABXY buttons, Select, Start, and Function buttons. The back features L1/L2/R1/R2 shoulder buttons.
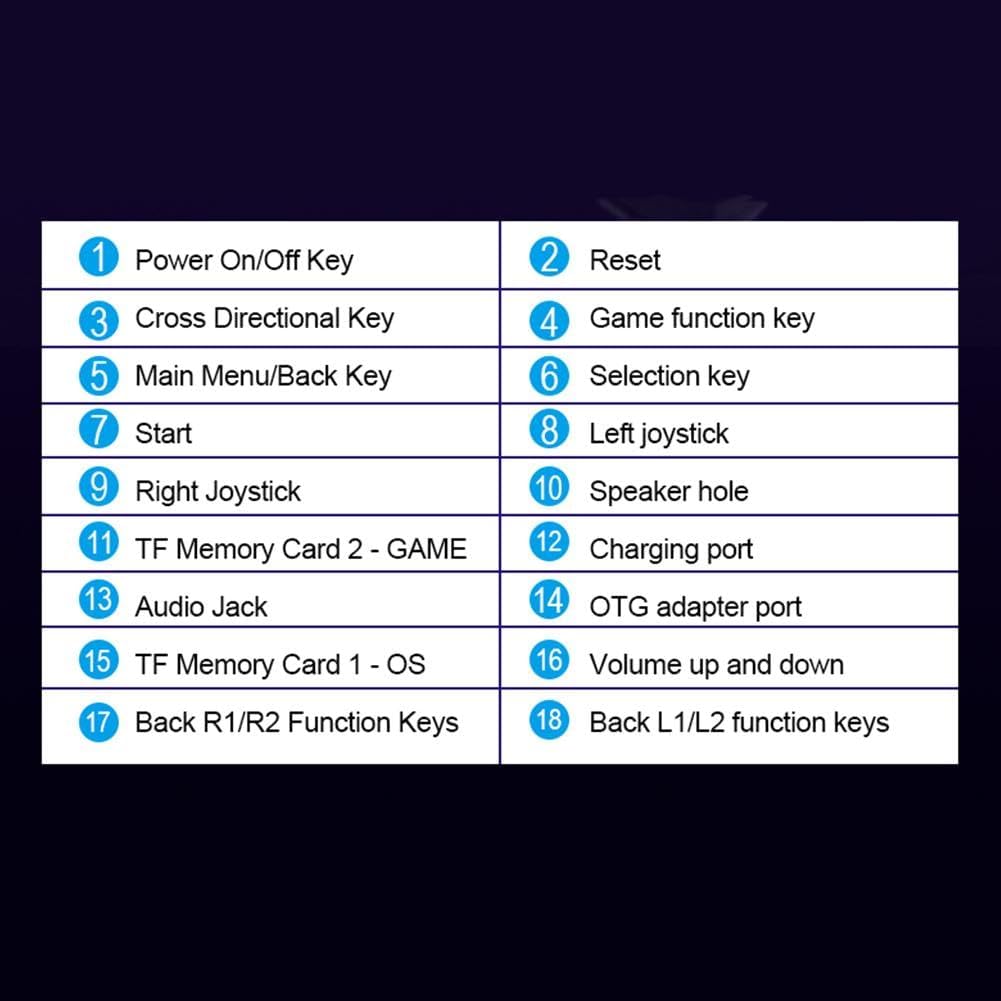
Image: Diagram illustrating the button layout and ports of the QHUDLV R39 console. Key components include Power On/Off, Reset, Cross Directional Key, Game Function Key, Main Menu/Back Key, Selection Key, Start, Left Joystick, Right Joystick, Speaker Hole, TF Memory Card 2 - GAME, Charging Port, Audio Jack, OTG Adapter Port, Volume Up and Down, Back R1/R2 Function Keys, and Back L1/L2 Function Keys.
3. Setup
3.1 Initial Charging
Before first use, fully charge your R39 console. Connect the provided USB Type-C cable to the charging port on the device and the other end to a compatible USB power adapter (not included). For efficient charging, use a charger with an output of at least 5V/2A (10W or higher).
3.2 Powering On/Off
- To power on: Press and hold the Power On/Off Key (labeled 1 in the diagram) until the screen illuminates.
- To power off: Press and hold the Power On/Off Key until the power-off options appear, then select to shut down.
- To reset: Use the Reset button (labeled 2 in the diagram) if the device becomes unresponsive.
3.3 Memory Card Insertion
The console comes with a pre-installed memory card containing the operating system and games. If you need to access or replace it:
- Locate the TF Memory Card slots (labeled 11 and 15 in the diagram).
- Gently push the card to eject it, or insert a new card until it clicks into place. Ensure the card is inserted in the correct orientation.
4. Operating Instructions
4.1 Navigating the Interface
- Use the Cross Directional Key (D-pad, labeled 3) or Left/Right Joysticks (labeled 8 & 9) to navigate through menus and game lists.
- Press the Selection Key (labeled 6) or the A button to confirm selections.
- Press the Main Menu/Back Key (labeled 5) or the B button to go back to the previous screen or menu.
- The Start button (labeled 7) is typically used to start games or confirm actions.
4.2 Playing Games
The R39 console supports over 30 simulators and comes pre-loaded with thousands of retro games. To play a game:
- Navigate to the desired emulator system using the D-pad or joysticks.
- Select an emulator and press the Selection Key or A button to enter its game list.
- Browse the available games and select your preferred title.
- Press Start or the A button to launch the game.
Video: A demonstration of a handheld retro game console, showcasing its portable design, 4.0-inch screen display, 4000mAh battery, dual joysticks, four back keys, and 3.5mm headphone jack. The video highlights the console's features and ease of use.
4.3 Adjusting Volume
Use the Volume Up and Down buttons (labeled 16 in the diagram) to adjust the audio output from the built-in speaker or connected headphones.
4.4 Connecting External Devices (OTG)
The console supports OTG (On-The-Go) functionality via the TYPE-C-OTG Data port (labeled 14). This allows for connection of external devices such as game controllers or for large screen output using an OTG adapter cable.

Image: The QHUDLV R39 console connected to an OTG adapter cable, demonstrating its capability for large screen output and connecting external controllers.
5. Maintenance
5.1 Cleaning
- Use a soft, dry cloth to clean the console's exterior.
- For the screen, use a microfiber cloth specifically designed for electronics. Avoid harsh chemicals or abrasive materials.
5.2 Battery Care
- Avoid exposing the console to extreme temperatures (hot or cold).
- Do not leave the console uncharged for extended periods. Charge it periodically even if not in use to maintain battery health.
- The built-in 3500mAh polymer battery is removable. Ensure proper handling if removing or replacing.
6. Troubleshooting
| Issue | Possible Cause | Solution |
|---|---|---|
| Console does not power on. | Low battery; device frozen. | Charge the console for at least 30 minutes. If still unresponsive, press the Reset button. |
| Games are not loading. | Memory card issue; corrupted game files. | Ensure the TF Memory Card is properly inserted. Try re-inserting the card. If the issue persists, the game file might be corrupted. |
| Poor screen quality. | Screen protector not removed; display settings. | Remove any protective film from the screen. Check display settings in the main menu for brightness or contrast adjustments. |
| Buttons are unresponsive. | Device frozen; physical damage. | Press the Reset button. If specific buttons remain unresponsive, contact customer support. |
7. Specifications
| Feature | Detail |
|---|---|
| Operating System | Open source Linux system |
| Screen Size | 4.0-inch IPS OCA fully laminated high-definition MiPI screen |
| Screen Resolution | 720*720 pixels |
| CPU | Rk3326, ARM 64-bit quad-core Cortex-A35 CPU up to 1.5GHZ |
| Memory | EMMC, 1GB+8GB |
| TF Card Support | 16G-256G |
| Speaker | Built-in 8W cavity speaker |
| Battery | Built-in 3500 mAh polymer lithium battery (removable, two-way protection) |
| Input Power | 5V 1.5-2A |
| Maximum Power Consumption | 5W |
| Battery Life | 6 hours (approx.) |
| Charging Time | 2 hours (approx.) |
| Charging Interface | TYPE-C |
| OTG Data Port | TYPE-C (supports external devices) |
| Headphone Jack | Standard 3.5mm jack |
| Product Size | 13.5*8.3*3.5 cm |
| Product Weight | 350g (packing weight) |
8. Warranty & Support
8.1 Warranty Information
Please refer to the product packaging or retailer's website for specific warranty details. Keep your proof of purchase for any warranty claims.
8.2 Customer Support
For technical assistance, troubleshooting beyond this manual, or general inquiries, please contact QHUDLV customer support through the retailer's platform or the official brand website.