1. Introduction
Thank you for choosing the Benass 8x8 Pop Up Canopy. This manual provides essential information for the safe and efficient setup, operation, and maintenance of your canopy. Please read these instructions thoroughly before assembly and retain for future reference.
2. Safety Information
- Always anchor the canopy securely. Use all provided sandbags, wind ropes, and ground nails to prevent the canopy from being lifted by wind.
- Do not use in high winds, heavy rain, or snow. Disassemble and store the canopy during adverse weather conditions to prevent damage or injury.
- Keep away from open flames and heat sources. The canopy fabric is not fireproof.
- Ensure proper clearance. Do not set up near power lines, trees, or other obstructions.
- Supervise children. Do not allow children to play unsupervised around or inside the canopy.
- Inspect before each use. Check all components for damage or wear. Do not use if any parts are damaged.
3. Package Contents
Verify that all components are present before beginning assembly:
- Canopy Frame (Pre-assembled)
- Canopy Top Fabric
- Roller Storage Bag
- 4 Sandbags
- Wind Ropes
- Ground Nails (Spiral type)

Image: All necessary accessories, including sandbags, ropes, and ground nails, are provided for secure setup.
4. Setup Instructions
Follow these steps for quick and easy assembly. It is recommended to have at least two people for initial setup, though one person can manage after familiarization.
- Step 1: Open the Canopy Frame. Remove the folded frame from the roller bag. With a partner, gently pull the frame outwards from opposing corners until it is partially expanded.
- Step 2: Secure the Canopy Top. Drape the canopy top fabric over the partially opened frame. Secure the fabric to the frame using the Velcro straps located at each corner and along the edges.
- Step 3: Push the Central Button. Stand under the canopy. Push the central lock mechanism upwards until it clicks into place, fully extending the frame.
- Step 4: Adjust Height and Install Sandbags. Press the red button on each leg to extend the legs to your desired height. There are three adjustable height settings. Fill the sandbags with sand or other heavy material and attach them to each leg for stability.
- Step 5: Install Wind Ropes and Ground Nails. Attach the wind ropes to the canopy corners. Secure the ropes to the ground using the spiral ground nails, pulling them taut at an angle away from the canopy.
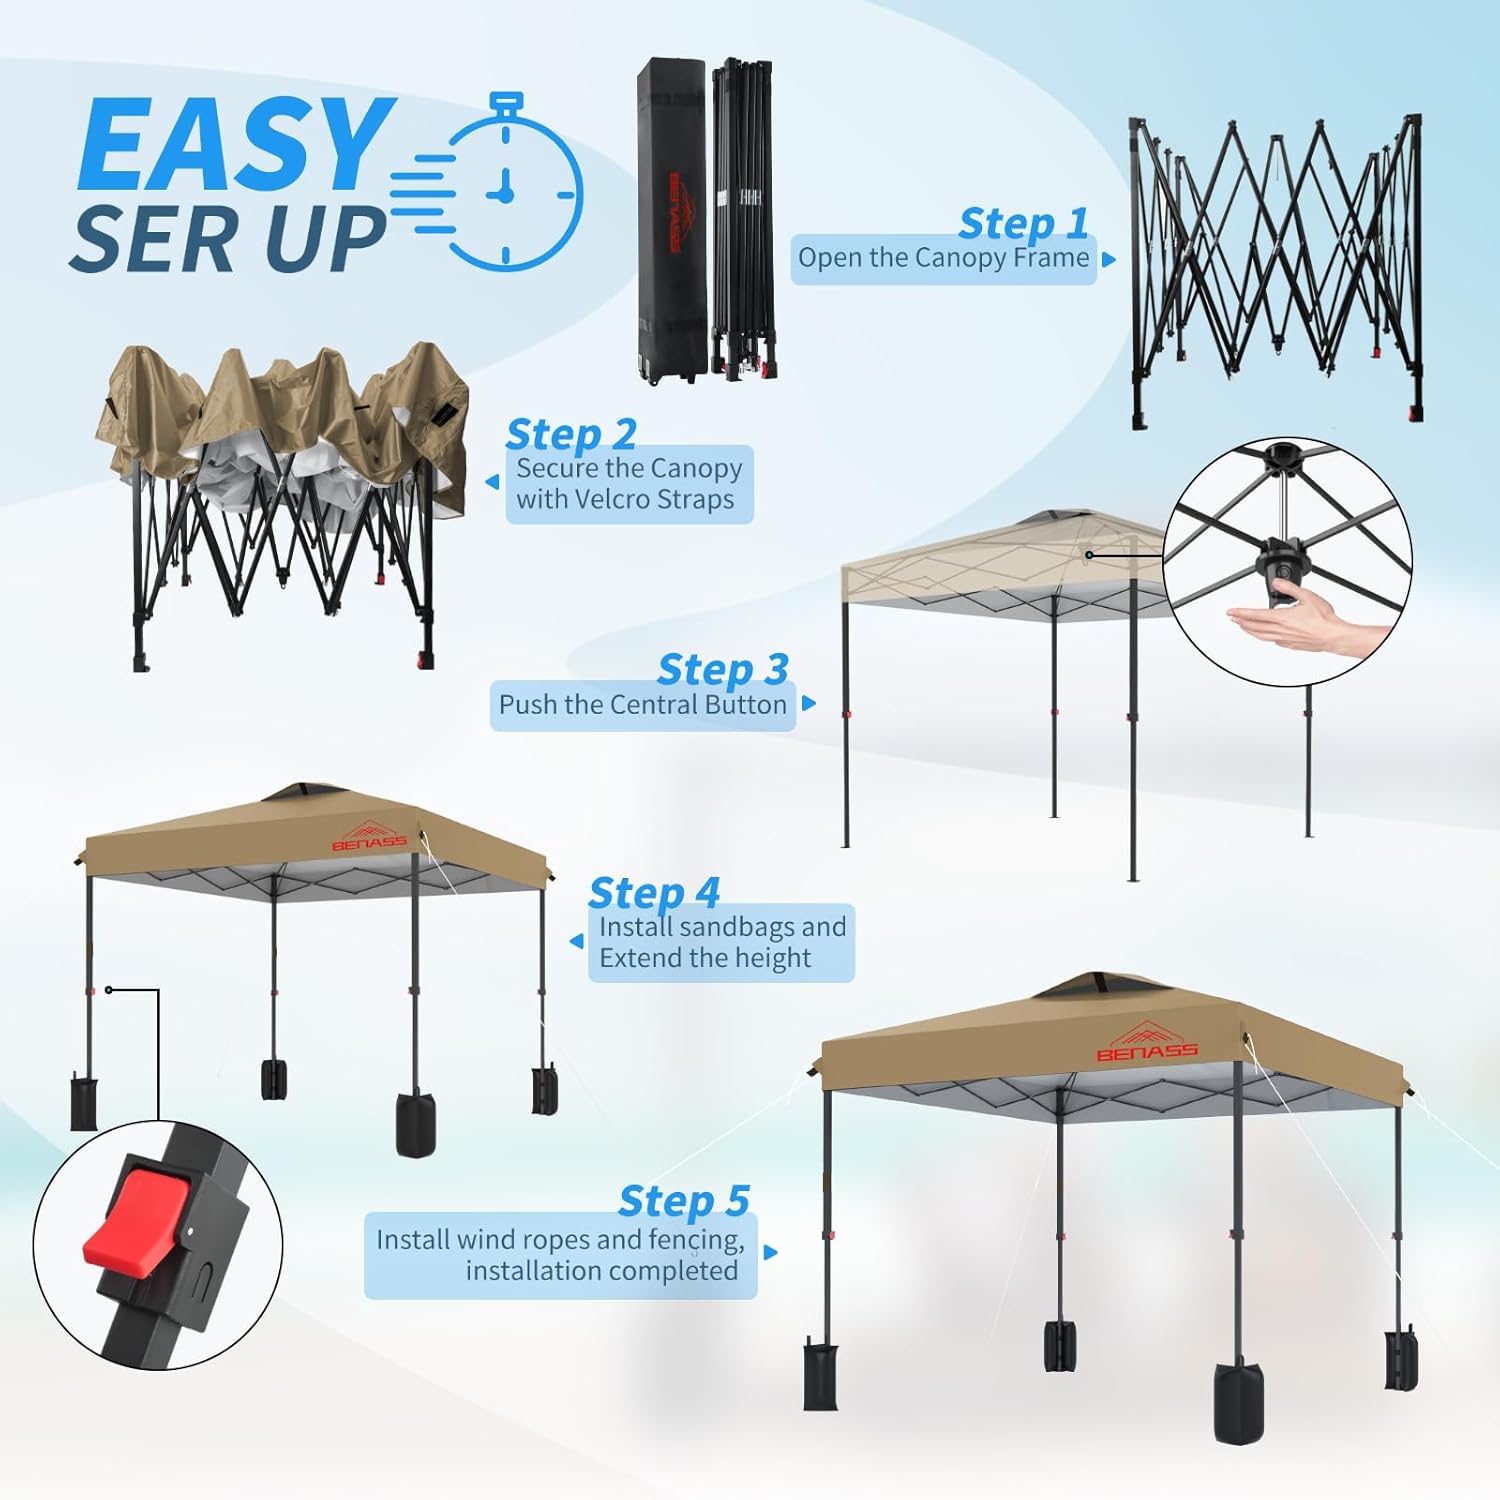
Image: Visual guide for the 5-step setup process, from opening the frame to securing with sandbags and ropes.

Image: Detail of the central push-lock mechanism for easy frame extension.

Image: Illustration of the three adjustable height options for the canopy.
5. Operating the Canopy
5.1 Adjusting Height
To adjust the height, press the red button on each leg and slide the inner leg section up or down to the desired position. Ensure all four legs are locked at the same height for stability.
5.2 Securing for Stability
Always use the provided sandbags, wind ropes, and ground nails. Fill sandbags completely for maximum weight. Attach wind ropes to the canopy corners and stake them into the ground at an angle to provide tension against wind. The canopy features two-way vents to help manage wind pressure.

Image: Close-up of the two air flow vents designed to increase wind flow and prevent uplift.

Image: Example of the stainless steel spiral ground nail for securing the canopy.
6. Maintenance
- Cleaning: Clean the canopy fabric with mild soap and water. Do not use harsh chemicals or abrasive cleaners. Allow the fabric to air dry completely before storage.
- Frame Care: Wipe down the alloy steel frame with a damp cloth to remove dirt and debris. Ensure all moving parts are clean and free of obstructions.
- Storage: Always disassemble the canopy and store it in its roller bag when not in use. Store in a cool, dry place away from direct sunlight to prolong its lifespan. Ensure the fabric is completely dry to prevent mildew.

Image: The roller storage bag with wheels for convenient transport and storage.

Image: Close-up of the waterproof fabric, showing water beading on the surface.
7. Troubleshooting
| Problem | Possible Cause | Solution |
|---|---|---|
| Canopy is unstable or sways. | Insufficient anchoring; uneven ground; strong winds. | Ensure all sandbags are filled and attached. Use wind ropes and ground nails. Relocate to level ground. Disassemble in strong winds. |
| Difficulty extending the frame. | Frame joints are stiff; not pulling from opposing corners evenly. | Ensure two people pull from opposing corners simultaneously. Check for any obstructions in the joints. Apply a silicone lubricant if necessary. |
| Water pooling on canopy top. | Canopy not fully taut; heavy rain. | Ensure the frame is fully extended and the fabric is securely attached and taut. Disassemble in heavy rain. |
8. Specifications
| Feature | Detail |
|---|---|
| Brand | Benass |
| Model Number | 8x8-KH |
| Material | Alloy Steel (Frame) |
| Color | Khaki |
| Product Dimensions | 96"L x 96"W x 106.32"H (8'L x 8'W x 8.86'H) |
| Adjustable Height | 8.2', 8.53', 8.86' |
| Item Weight | 32.3 pounds |
| Assembly Required | Yes |
| Recommended Uses | Event, Outdoor Activities, Party, Camping, Vendor |

Image: Diagram showing the 8x8 foot base dimensions and adjustable heights of 8.2, 8.53, and 8.86 feet.
9. Warranty and Support
The Benass 8x8 Pop Up Canopy comes with a one-year warranty, as mentioned in customer reviews, covering manufacturing defects. For support, replacement parts, or any inquiries, please contact Benass customer service through the retailer where the product was purchased.
Replacement top fabric and side panels are available for purchase. Search ASIN: B0F8VDDJSY for top canopy and B0F4DFS5QB for sidewalls on Amazon.com.