1. Introduction
Welcome to the user manual for your REVXON Adjustable Bicycle Kickstand. This manual provides essential information for the proper installation, operation, and maintenance of your kickstand. Please read these instructions carefully before use to ensure safe and effective functionality.
2. Product Features
- Compatibility: Designed for Bianchi Project 7, Project 5, Project 3, mountain bikes, road bikes, and other bicycles.
- Material: Constructed from high-quality aluminum alloy and stainless steel screws for durability and wear resistance.
- Stable Support: Features a wide foot bottom design with non-slip rubber padding for enhanced stability on various surfaces.
- Adjustable Height: Includes an adjustable screw for customizing kickstand length to suit different bike sizes and parking conditions.
- Concealed Spring-Loaded Latch: Ensures secure positioning when deployed or retracted.

Image Description: Two REVXON bicycle kickstands, illustrating their internal spring mechanism and durable construction, labeled 'Internal spring' and 'Long-lasting'.
3. Safety Information
- Ensure all mounting screws are tightened securely before each ride.
- Do not attempt to adjust or deploy the kickstand while the bicycle is in motion.
- Verify the kickstand is fully retracted and secured parallel to the bike frame before riding to prevent interference with the wheels or pedals.
- Always park your bicycle on a stable, level surface when using the kickstand to prevent tipping.
4. Package Contents
- 1 x REVXON Adjustable Bicycle Kickstand
- Mounting hardware (includes long bolt, aluminum alloy plate, and plastic pads)

Image Description: A single REVXON adjustable bicycle kickstand, showcasing its overall design and components.
5. Setup and Installation
Follow these steps to properly install your REVXON bicycle kickstand:
- Step 1: Identify Mounting Location
The kickstand is designed to mount on the rear chainstay of your bicycle. Ensure there is sufficient clearance for installation and operation. - Step 2: Prepare Mounting Area
Clean the chainstay area where the kickstand will be attached. Place the provided plastic pads on the chainstay to protect the bike frame from scratches. - Step 3: Position the Kickstand
Place the kickstand bracket against the chainstay, ensuring the rubber gasket (silicone gasket) is positioned between the bracket and the frame. - Step 4: Secure the Bracket
Insert the long bolt through the aluminum alloy plate and the kickstand bracket, then through the chainstay, and secure it with the nut on the opposite side. - Step 5: Tighten Screws
Use an appropriate tool (e.g., a 5mm hexagon socket for the M6 screw) to tighten the mounting screws firmly. Ensure the kickstand is stable and does not wobble. Do not overtighten.

Image Description: Detailed view of kickstand components, including the silicone gasket for frame protection, durable rivet joints, rubber non-slip feet for stability, and the alloy material construction.

Image Description: An exploded view of the kickstand, labeling key parts such as the M6 screw, adjustment button, hidden spring, and anti-slip foot pad, while highlighting features like three-point fixation, high elastic spring, and thickened material.
6. Operation
To deploy the kickstand, gently push it down with your foot until it locks into place, supporting your bicycle. To retract, push it forward until it clicks and is parallel to the bike frame, ensuring it does not interfere with riding.
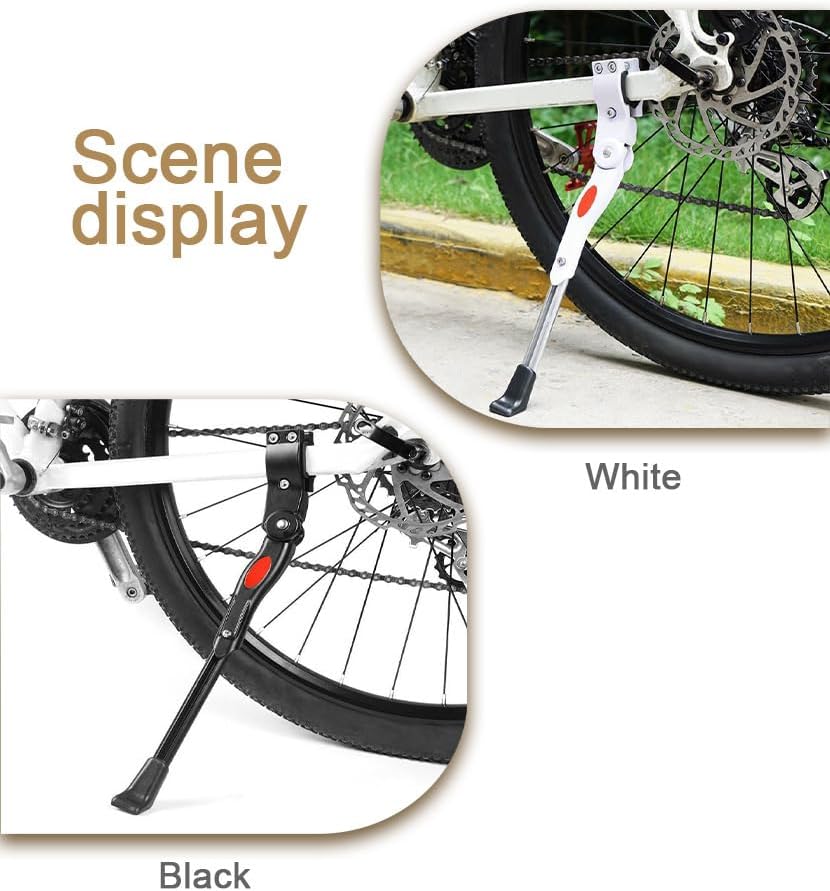
Image Description: Examples of the kickstand installed on bicycles, demonstrating its appearance in both black and white color options during use.
7. Height Adjustment
The kickstand's length can be adjusted to achieve optimal balance for your bicycle, accommodating different wheel sizes or parking conditions.
- Step 1: Locate Adjustment Mechanism
Identify the adjustment button or screw located on the kickstand shaft. - Step 2: Adjust Length
Loosen the adjustment mechanism (if applicable) or press the button to extend or retract the lower leg of the kickstand to your desired length. - Step 3: Test Stability
Once adjusted, ensure the bicycle stands securely and is balanced. Tighten any loosened adjustment screws to lock the length in place.

Image Description: A comparison showing an adjustable kickstand on a bicycle versus a non-adjustable one, illustrating the flexibility and benefits of the adjustable model.
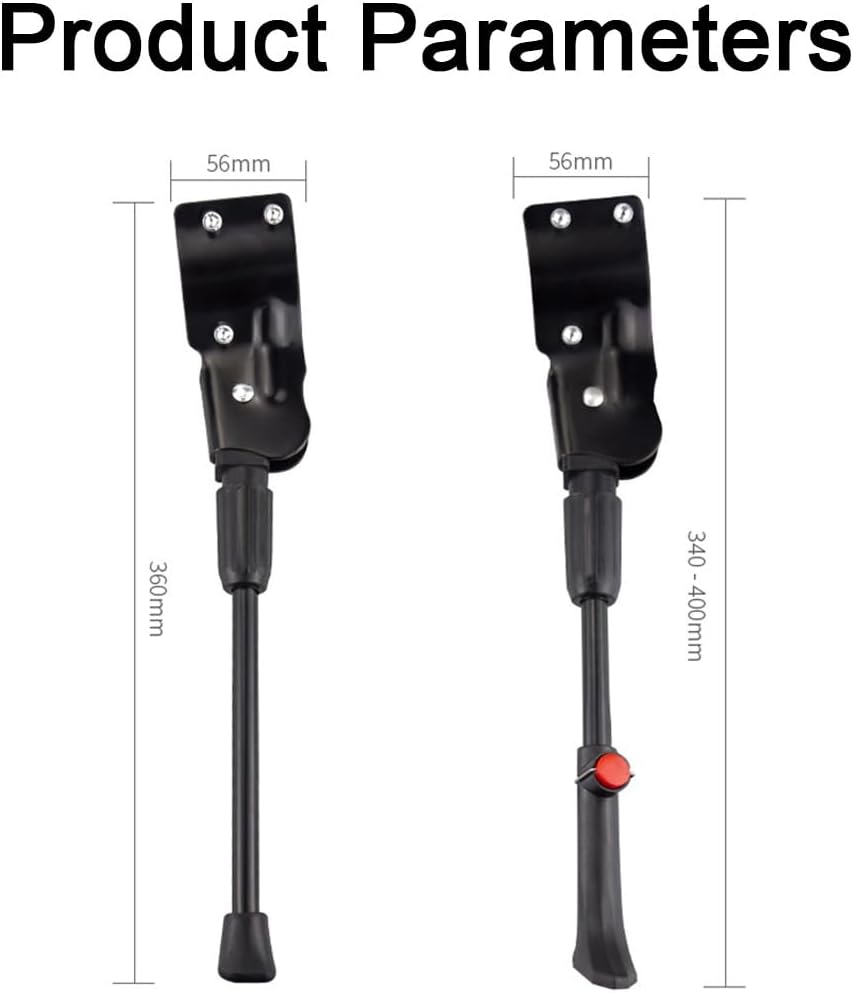
Image Description: Diagram illustrating the dimensions of the kickstand, including its adjustable length range (340-400mm) and mounting plate width (56mm).
8. Maintenance
- Regularly check all mounting screws for tightness to prevent loosening during use.
- Keep the kickstand clean from dirt, mud, and debris, especially around the adjustment and pivot points.
- Lubricate moving parts (e.g., the spring mechanism and pivot points) periodically with a light oil to ensure smooth operation.
- Inspect the rubber foot for wear and tear; replace if necessary to maintain its anti-slip properties and prevent damage to surfaces.
9. Troubleshooting
- Issue: Kickstand is loose or wobbles after installation.
Solution: Check and tighten all mounting screws. Ensure the plastic pads are correctly positioned between the kickstand bracket and the bike frame. - Issue: Bicycle is unstable when parked.
Solution: Adjust the kickstand length to achieve better balance for your specific bicycle and parking surface. Ensure the parking surface is level. - Issue: Kickstand does not retract or deploy smoothly.
Solution: Clean any dirt or debris from the kickstand's mechanism and apply a light lubricant to the pivot points and spring.
10. Specifications
| Attribute | Value |
|---|---|
| Product Dimensions | 0.39 x 0.39 x 0.39 inches (approximate, as per product data) |
| Item Weight | 2.2 pounds |
| Manufacturer | REVXON |
| Model Number | REVXON-82876924-02 |
11. Warranty and Support
REVXON is committed to customer satisfaction. For any questions or issues regarding your bicycle kickstand, please do not hesitate to contact our customer service team. We offer prompt and efficient after-sale service to ensure a positive purchasing experience.
For assistance, please contact us via email. Our professional customer service is available to help until you are satisfied with the solution.