LANKELEISI RV800PLUS
LANKELEISI RV800 Plus Electric Fatbike User Manual
Model: RV800PLUS
1. Introduction
This manual provides essential information for the safe and efficient operation, maintenance, and troubleshooting of your LANKELEISI RV800 Plus Electric Fatbike. Please read this manual thoroughly before your first ride and keep it for future reference.

Figure 1: LANKELEISI RV800 Plus Electric Fatbike. This image shows the full electric fatbike from a front-side angle, highlighting its robust frame, fat tires, and integrated battery.
2. Safety Guidelines
Always prioritize safety when operating your electric fatbike. Failure to follow these guidelines may result in injury or damage to the bike.
- Wear a Helmet: Always wear a certified bicycle helmet when riding.
- Pre-Ride Check: Before each ride, check tire pressure, brake function, battery level, and ensure all quick releases are securely fastened.
- Obey Traffic Laws: Follow all local traffic laws and regulations.
- Weather Conditions: Exercise caution when riding in wet or slippery conditions. The bike has an IP54 waterproof rating, meaning it can be used in rain, but extreme caution is advised.
- Weight Limit: Do not exceed the maximum load capacity of 200 kg (440 lbs).
- Age Appropriateness: This bike is designed for adult riders.
3. Setup and Assembly
Your LANKELEISI RV800 Plus electric fatbike comes 90% pre-assembled. The following steps outline the final assembly required before your first ride.
3.1. Unboxing and Package Contents
Carefully remove all components from the packaging. Verify that all items listed below are present:
- 1x LANKELEISI RV800 PLUS Electric Bike
- 1x Front Fender
- 1x Rear Fender
- 1x Charger
- 1x Key
- 1x Multi-function Hex Wrench
- 1x Lock
- 1x User Manual (this document)
3.2. Assembly Steps
- Install the Handlebar: Attach the handlebar to the stem, ensuring it is centered and the brake levers and shifters are in a comfortable position. Tighten the stem bolts securely using the provided hex wrench.
- Attach the Front Wheel: Carefully align the front wheel with the fork dropouts. Ensure the brake rotor slides correctly into the brake caliper. Secure the quick release or axle nuts.
- Install the Pedals: Identify the left (L) and right (R) pedals. The left pedal threads counter-clockwise, and the right pedal threads clockwise. Apply a small amount of grease to the threads and tighten them firmly with a wrench.
- Mount the Seat Post and Saddle: Insert the seat post into the frame's seat tube. Adjust the saddle height to a comfortable riding position where your leg has a slight bend at the knee when the pedal is at its lowest point. Secure the quick release or seat post clamp.
- Install Fenders: Attach the front and rear fenders using the provided hardware. Ensure they are securely mounted and do not interfere with wheel rotation.
- Charge the Battery: Before your first ride, fully charge the battery. Refer to the "Charging the Battery" section for detailed instructions.
4. Operating Your Electric Fatbike
Understanding the controls and features of your RV800 Plus is key to an enjoyable riding experience.
4.1. Battery and Charging
The bike is equipped with a removable 48V 20Ah Samsung lithium-ion battery, integrated into the frame for protection.
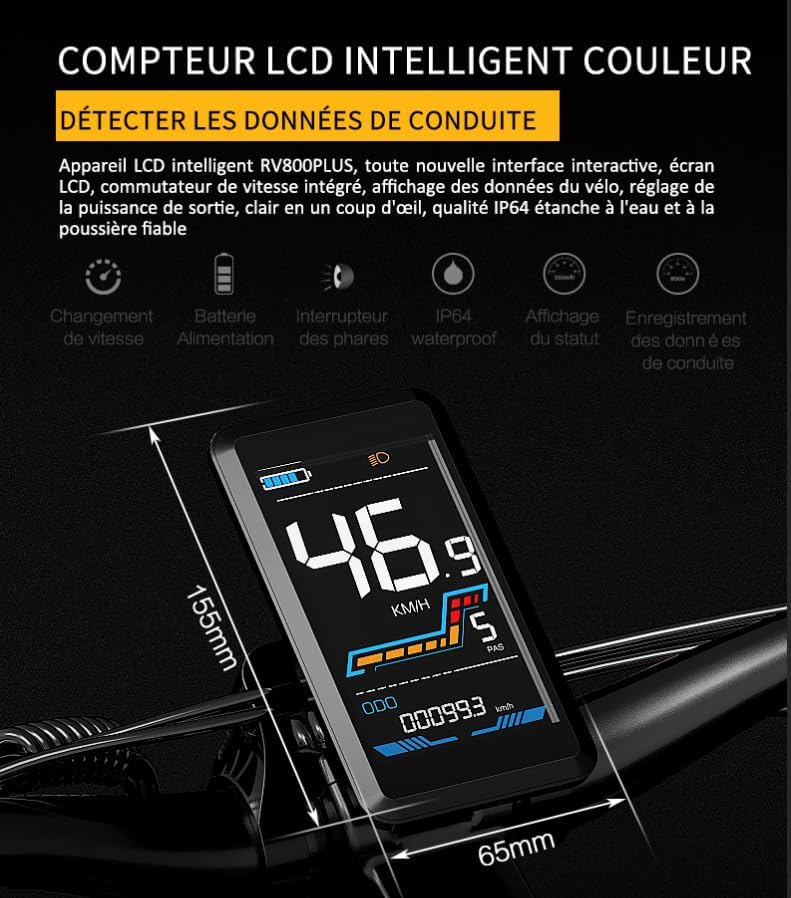
Figure 2: Integrated Samsung Lithium Battery. This image illustrates the 48V 20Ah Samsung lithium battery, which is integrated and concealed within the bike's frame, highlighting its waterproof design and protection panel.
- Charging Time: A full charge takes approximately 6-7 hours using the provided 48V3A fast charger.
- Charging Procedure:
- Ensure the bike is turned off.
- Connect the charger to the charging port on the bike (or remove the battery to charge it separately).
- Plug the charger into a standard wall outlet.
- The charger indicator light will change when charging is complete.
- Range: The battery provides an estimated range of 60-70 km (37-43 miles) in pure electric mode and 130-150 km (80-93 miles) in pedal-assist mode. Actual range may vary based on terrain, rider weight, and riding style.
4.2. LCD Display and Controls
The intelligent color LCD display provides real-time riding data and allows you to control various functions of the bike.

Figure 3: Intelligent Color LCD Display. This image shows the RV800PLUS intelligent LCD display, highlighting its interactive interface, integrated speed switch, bike data display, power output adjustment, and IP64 waterproof and dustproof rating.
- Power On/Off: Press and hold the power button on the display to turn the bike on or off.
- Assist Levels: Use the '+' and '-' buttons to adjust the level of pedal assistance (typically 0-5 levels). Level 0 provides no assistance, while higher levels provide more motor power.
- Information Display: The display shows speed (current, average, max), distance (trip, total), battery level, and assist level.
- Headlight Control: The display may have a button to turn the headlight on or off.
4.3. Riding Modes
- Pedal Assist Mode (PAS): The motor provides assistance as you pedal. The amount of assistance depends on the selected assist level.
- Pure Electric Mode (Throttle): Use the throttle (if equipped) to propel the bike without pedaling. This mode consumes battery power more quickly.
- Manual Mode: Ride the bike like a traditional bicycle with no motor assistance.
4.4. Gearing and Braking
- Shimano 7-Speed Drivetrain: Use the Shimano M310-7 finger shifter and M315 rear derailleur to change gears. Shift to a lower gear for climbing hills and a higher gear for flat terrain or downhill riding.
- Hydraulic Disc Brakes: The bike features front and rear hydraulic disc brakes with a 180mm rotor. These provide strong and consistent stopping power. Apply both brakes simultaneously for optimal stopping performance. The brakes also have a power-off function, cutting motor power when applied.
5. Maintenance
Regular maintenance ensures the longevity and safe operation of your electric fatbike.
- Cleaning: Clean the bike regularly with a damp cloth. Avoid high-pressure washing directly on electrical components.
- Tire Pressure: Check tire pressure before each ride. The KENDA 26*4.0 fat tires require specific pressure, typically lower than standard bike tires. Refer to the tire sidewall for recommended pressure range.
- Brake Inspection: Regularly check brake pads for wear and brake fluid levels (if applicable). Ensure brake levers feel firm and responsive.
- Chain Lubrication: Lubricate the chain regularly, especially after riding in wet conditions, to prevent rust and ensure smooth shifting.
- Bolt Tightness: Periodically check all bolts and fasteners for tightness, especially on critical components like the handlebars, seat post, and wheels.
- Battery Care: Store the battery in a cool, dry place. If storing for extended periods, charge it to 50-70% every 2-3 months.
- Professional Service: For complex repairs or electrical issues, consult a qualified bicycle mechanic or the manufacturer's support.
6. Troubleshooting
This section addresses common issues you might encounter with your electric fatbike.
| Problem | Possible Cause | Solution |
|---|---|---|
| Bike does not power on | Battery not charged; Battery not properly seated; Loose electrical connection | Charge battery; Ensure battery is fully inserted; Check all visible connections |
| Motor not assisting | Assist level set to 0; Brake levers engaged; Loose motor cable | Increase assist level; Release brake levers; Check motor cable connection |
| Brakes feel spongy | Air in hydraulic line; Worn brake pads | Bleed brake system (professional recommended); Replace brake pads |
| Gears not shifting smoothly | Derailleur out of adjustment; Dirty or dry chain | Adjust derailleur (refer to Shimano manual or professional); Clean and lubricate chain |
If you encounter issues not listed here or if solutions do not resolve the problem, please contact customer support.
7. Specifications
Detailed technical specifications for the LANKELEISI RV800 Plus Electric Fatbike.
| Feature | Specification |
|---|---|
| Brand | LANKELEISI |
| Model | RV800PLUS |
| Motor | Bafang High-Speed Brushless Motor |
| Torque | 70 Nm |
| Battery | Samsung 48V 20Ah Lithium-ion (Removable) |
| Charger | 48V3A Fast Charger |
| Charging Time | 6-7 hours |
| Max Speed | 25 km/h (15.5 mph) |
| Range (Pure Electric) | 60-70 km (37-43 miles) |
| Range (Pedal Assist) | 130-150 km (80-93 miles) |
| Frame Material | 6061 Aluminum Alloy |
| Tires | KENDA 26*4.0 Rubber Fat Tires |
| Brakes | Hydraulic Disc Brakes (180mm rotor) |
| Crankset | 46T Aluminum Alloy Crankset |
| Seat | Comfortable Sport Seat |
| Front Suspension | Oil Spring Double Crown Fork |
| Rear Suspension | Pneumatic Rear Shock Absorber |
| Gears | Shimano M310-7 Finger Shifter & M315 Rear Derailleur (7-speed) |
| Product Dimensions | 203 cm * 115 cm * 90-103 cm (Length * Height * Handlebar Height) |
| Applicable Height | 165-200 cm (5'5" - 6'7") |
| Max Load | 200 kg (440 lbs) |
| Waterproof Level | IP54 (can be used in rain) |
| Net Weight | 35.5 kg (78.2 lbs) (including battery) |

Figure 4: LANKELEISI RV800 Plus Dimensions. This diagram provides detailed measurements of the bike, including total length, wheelbase, seat height, handlebar height, and recommended rider height range.

Figure 5: 6061 Aluminum Alloy Frame. This image highlights the robust 6061 aluminum alloy frame, emphasizing its heat-treated, corrosion-resistant, rust-resistant, and stable design for enhanced safety and durability.

Figure 6: Bafang High-Speed Brushless Motor. This image displays the Bafang high-speed brushless motor, illustrating its internal star gear design that amplifies torque and improves energy conversion efficiency, leading to reduced energy consumption, quiet operation, and enhanced range and climbing performance.

Figure 7: Four-Bar Linkage Rear Suspension. This image details the four-bar linkage rear suspension system, including the pneumatic rear shock absorber, which significantly improves shock resistance and absorption performance, supporting a maximum load of 200 kg.

Figure 8: Double Shoulder Oil Spring Suspension Fork. This image illustrates the double shoulder oil spring suspension fork with a lockable feature, designed to enhance riding comfort and collision resistance, especially with the 26x4.0 inch wide tires that offer anti-slip and anti-vibration functions.
8. Warranty and Support
LANKELEISI provides the following warranty for the RV800 Plus Electric Fatbike:
- Frame: 3 years
- Controller, Charger, and Battery: 12 months
- Other Electrical Parts: 3 months
For warranty claims, technical support, or any questions not covered in this manual, please contact LANKELEISI customer service through your purchase platform or the official website.