1. Introduction
This manual provides instructions for the safe and effective use of the Mcbazel Digital Micrometer. This precision instrument is designed for accurate measurements in various applications, offering a measurement range of 0-25mm with an accuracy of 0.001mm. Please read this manual thoroughly before operation and retain it for future reference.

Figure 1.1: Digital Micrometer Components Overview
2. Safety Information
- Always handle the micrometer with care to avoid damage to the measuring surfaces.
- Keep the instrument clean and dry. Do not expose it to extreme temperatures, humidity, or corrosive substances.
- Avoid dropping the micrometer or subjecting it to strong impacts, as this can affect its accuracy.
- Do not attempt to disassemble or modify the micrometer, as this will void the warranty and may cause damage.
3. Product Features
- High Precision: Offers a measurement range of 0-25mm with an accuracy of 0.001mm, suitable for professional applications.
- Clear LCD Display: Features an easy-to-read digital LCD screen for quick and accurate readings.
- Unit Conversion: Seamlessly switch between metric (mm) and imperial (inch) units with a dedicated button.
- Zero Function: Allows for instant zero-setting at any point, facilitating differential measurements.
- Durable Construction: Equipped with a hard alloy steel measuring head, designed for resistance against rust and wear, ensuring long-term accuracy.
- Long-Life Battery: Powered by a CR2032 3V lithium battery, providing extended operational life.
- Protective Storage: Includes a robust PP+ABS storage box for safe transportation and protection of the instrument.

Figure 3.1: Alloy Steel Rod and Clear LCD Display
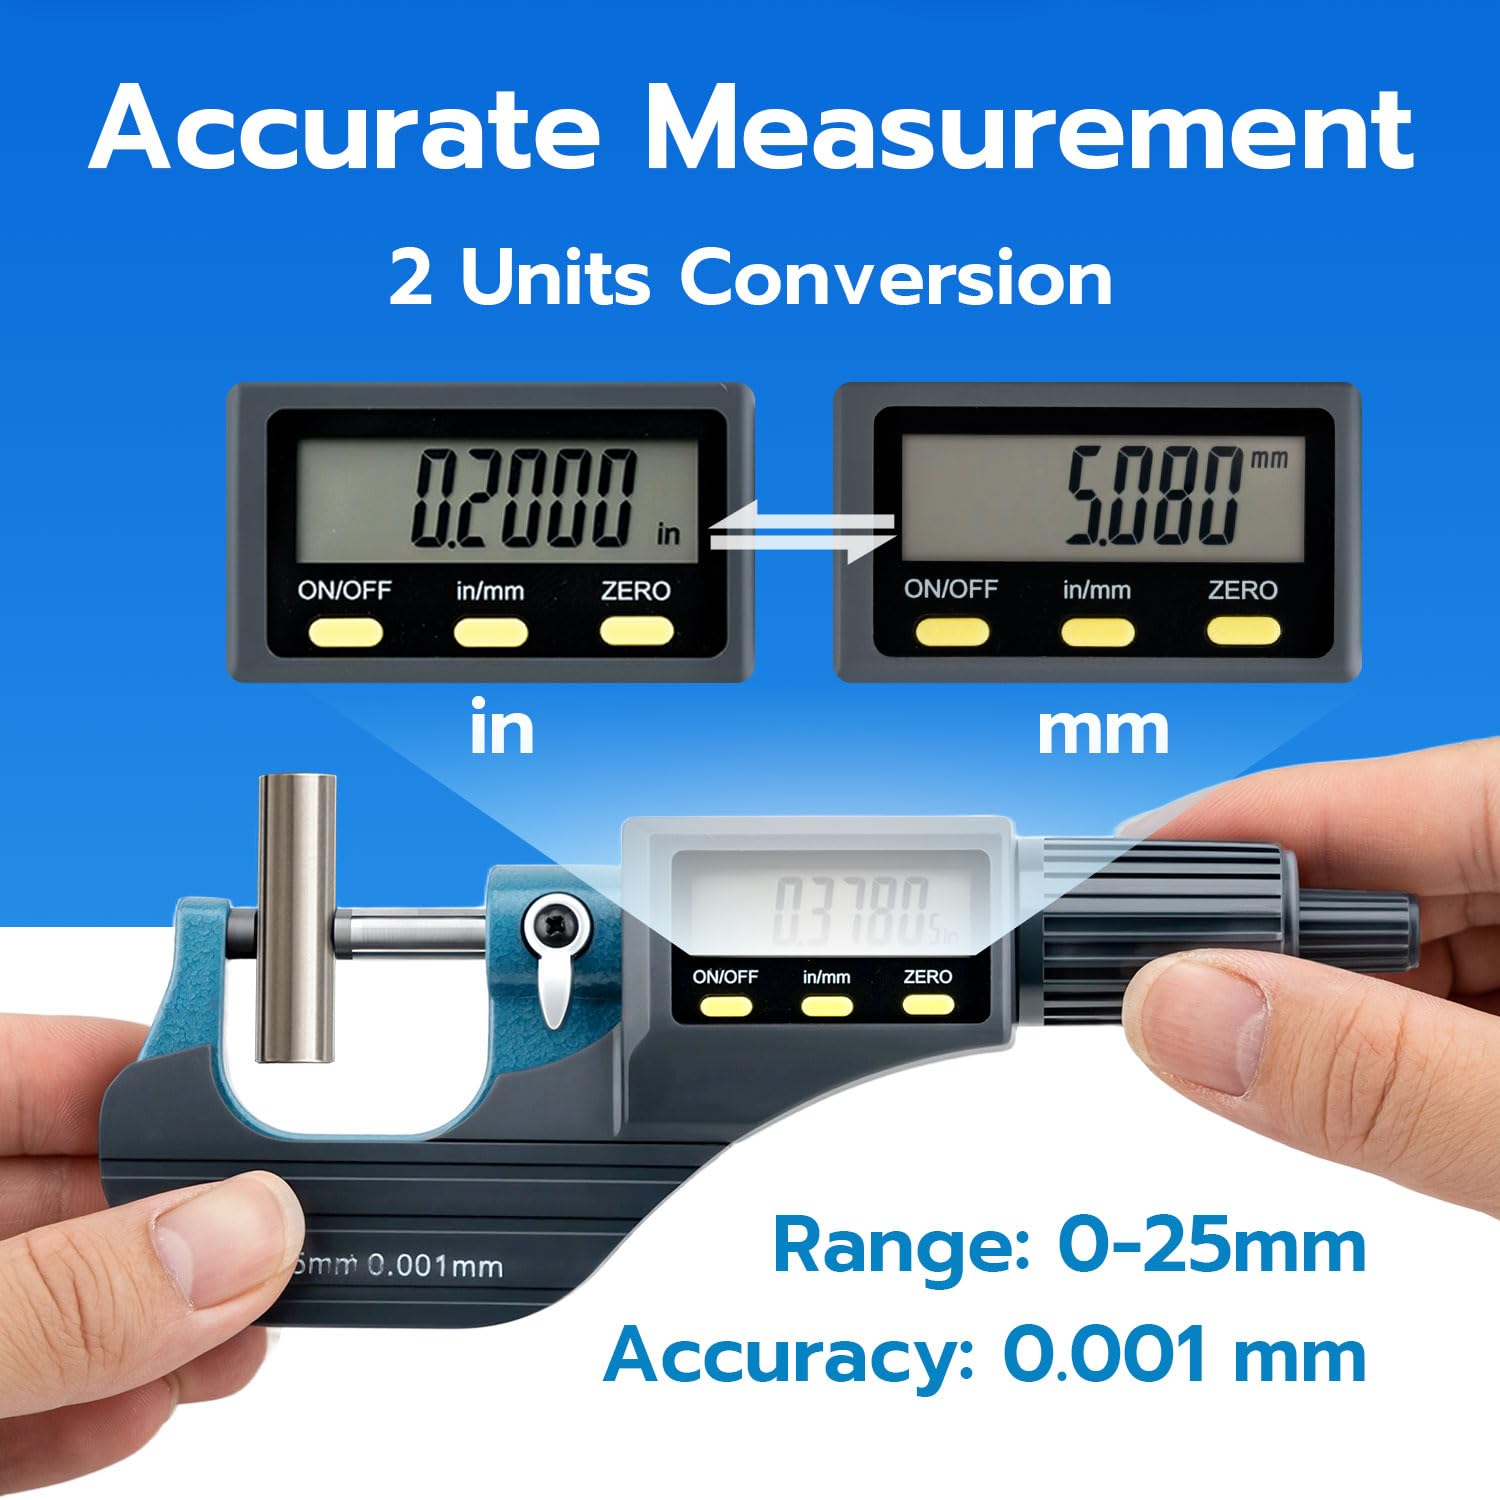
Figure 3.2: Accurate Measurement and Unit Conversion
4. Setup
4.1 Battery Installation
The micrometer requires one CR2032 3V lithium battery (included). Follow these steps to install the battery:
- Locate the battery cover on the side of the micrometer.
- Use the provided battery cover opener (or a small coin) to gently twist and open the battery cover.
- Insert the CR2032 battery with the positive (+) pole facing upwards.
- Replace the battery cover and twist to secure it.
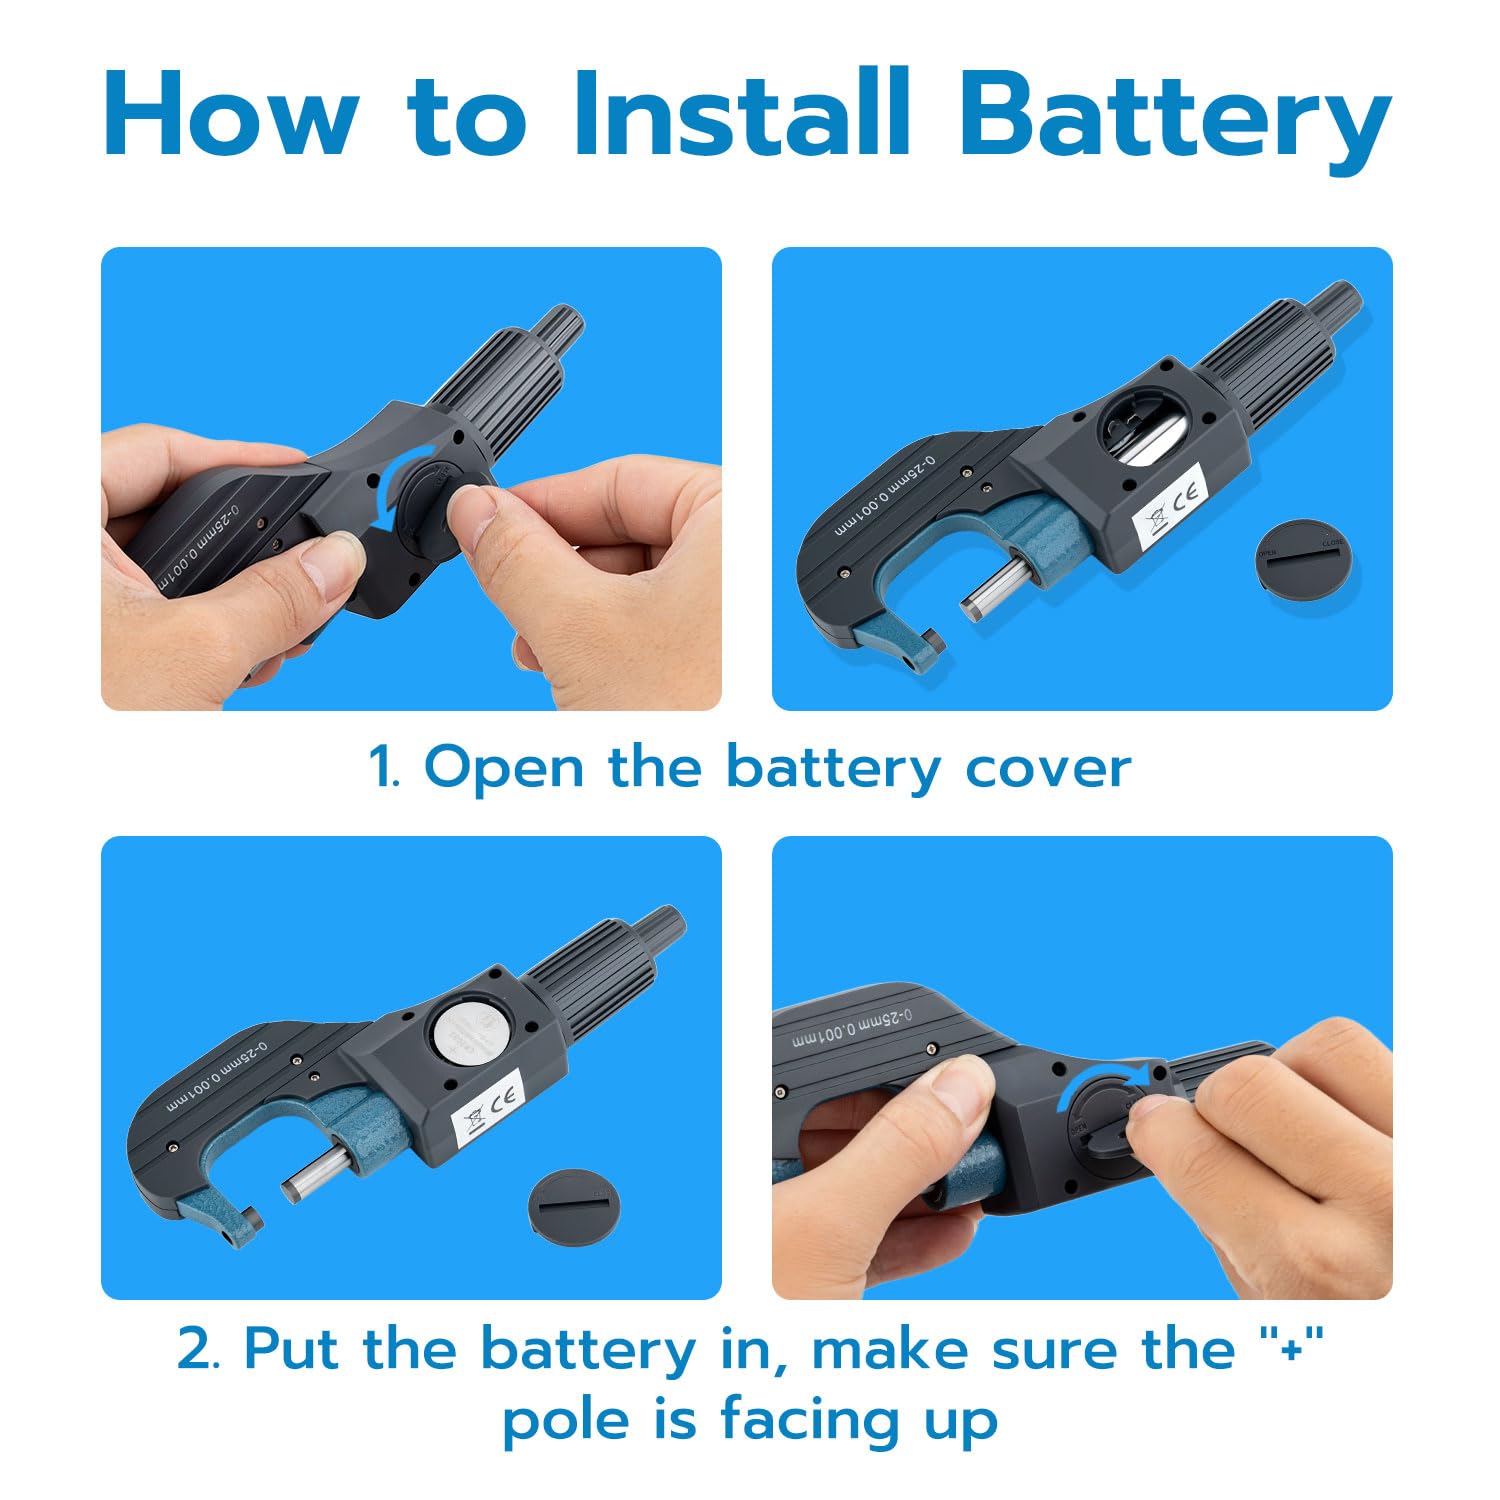
Figure 4.1: Battery Installation Steps
5. Operation
5.1 Controls Overview
Refer to Figure 1.1 for the location of the following controls:
- ON/OFF Key: Press to power the device on or off.
- in/mm Key: Press to toggle the measurement unit between inches (in) and millimeters (mm).
- ZERO Key: Press to reset the display to zero at any point. This is useful for relative measurements.
- Quick Drive: Rotate for rapid adjustment of the measuring rod to quickly approach the object.
- Friction Drive: Rotate for fine adjustment and to apply consistent measuring force, ensuring accurate and repeatable readings.
- Locking Device: Turn to secure the measuring rod in position, preventing accidental movement after a measurement has been taken.
5.2 Taking a Measurement
- Preparation: Before first use or after battery replacement, clean the alloy test surfaces thoroughly with a soft, dry cloth to ensure no dust or debris affects accuracy.
- Power On: Press the ON/OFF key to turn on the micrometer.
- Zero Setting: Gently close the measuring surfaces until they meet. Press the ZERO key to set the display to 0.000mm (or 0.0000in). This calibrates the micrometer for accurate readings.
- Unit Selection: If desired, press the in/mm key to switch between metric and imperial units.
- Position Object: Open the measuring surfaces using the Quick Drive. Place the object to be measured between the measuring surfaces.
- Coarse Adjustment: Use the Quick Drive to bring the measuring surfaces close to the object.
- Fine Adjustment: Use the Friction Drive for fine adjustment. Rotate it until the object is held gently and the display stabilizes. The friction drive ensures consistent measuring pressure.
- Read Measurement: Read the measurement directly from the LCD display.
- Lock Measurement (Optional): If you need to retain the reading, turn the Locking Device to secure the measuring rod.
- Power Off: Press the ON/OFF key to turn off the micrometer when finished.
6. Maintenance
6.1 Cleaning
- After each use, wipe the measuring surfaces and the body of the micrometer clean with a soft, dry, lint-free cloth.
- Ensure no dust, oil, or debris remains on the measuring surfaces, as this can significantly impact accuracy.
- Do not use harsh chemicals, solvents, or abrasive materials for cleaning.
6.2 Storage
- When not in use, store the micrometer in its protective PP+ABS storage box.
- Store the box in a dry, well-ventilated area, away from direct sunlight, extreme temperatures, and high humidity.
- For extended storage periods, it is recommended to remove the CR2032 battery to prevent potential leakage and damage to the electronic components.

Figure 6.1: Compact and Portable Design with Storage Box
7. Troubleshooting
- Display not turning on:
- Check battery installation. Ensure the positive (+) pole is facing up.
- Replace the CR2032 battery if it is depleted.
- Ensure the ON/OFF key is pressed firmly. - Inaccurate readings:
- Clean measuring surfaces thoroughly to remove any dust or debris.
- Ensure the micrometer is zeroed correctly before each measurement.
- Avoid applying excessive force during measurement; use the friction drive for consistent pressure. - Display flickering or erratic:
- The battery may be low. Replace the CR2032 battery.
- If issues persist, try resetting the device by removing and reinserting the battery. - Unit conversion not working:
- Ensure the in/mm key is pressed correctly. If unresponsive, try replacing the battery.
8. Specifications
| Feature | Specification |
|---|---|
| Measurement Range | 0-25mm |
| Accuracy | 0.001mm |
| Battery Type | CR2032 3V Lithium Battery |
| Measuring Head Material | Hard Alloy Steel |
| Body Material | ABS |
| Product Weight | 330 g |
| Product Dimensions (L x W x H) | 17.8 x 0.55 x 0.1 cm |
| Model Number | QFC30TZ (Manufacturer Part No: MT-gf-020734) |
9. Package Contents
The following items are included in your product package:
- 1 x Electronic Digital Micrometer Caliper (Model QFC30TZ)
- 1 x CR2032 3V Lithium Battery
- 1 x Storage Box
- 1 x Battery Cover Opener (small disc tool)
- 1 x User Manual
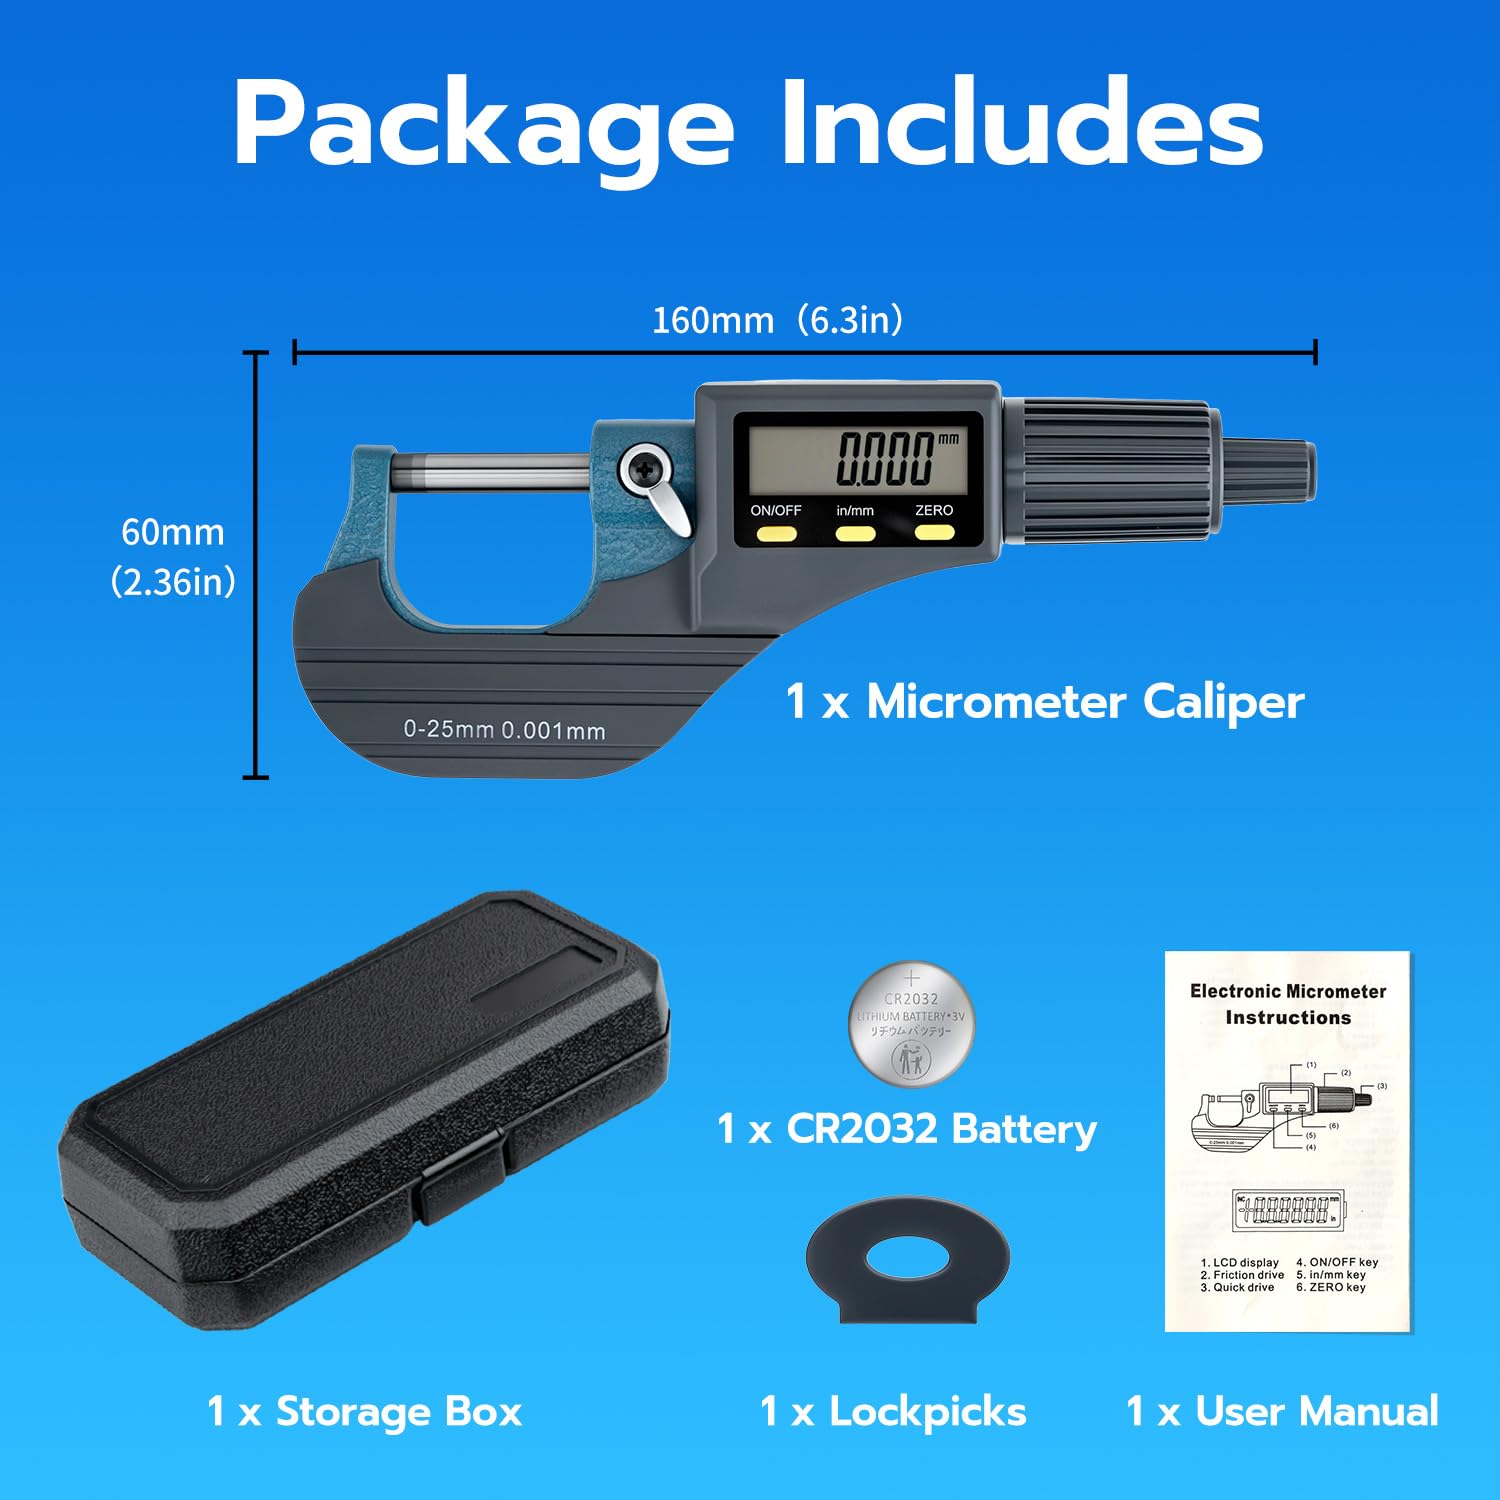
Figure 9.1: Package Contents and Dimensions
10. Warranty Information
Mcbazel products are manufactured to high-quality standards. For specific warranty terms and conditions, please refer to the warranty card included with your purchase or visit the official Mcbazel website. Please retain your proof of purchase for any warranty claims.
11. Support
If you encounter any issues or have questions regarding your Mcbazel Digital Micrometer that are not addressed in this manual, please contact Mcbazel customer support. You can typically find contact information on the official Mcbazel website or through the retailer where you purchased the product.