1. Product Overview
The ELIVED YD0084 Pillar TV Mount is designed for securely mounting 26-60 inch flat or curved televisions to various types of columns and pillars without drilling. It offers full motion capabilities, including swivel and tilt, to optimize your viewing experience.
Key Features:
- Versatile Pillar Compatibility: Supports poles with a diameter of 3 to 17.7 inches (circumference 13 to 55 inches). Compatible with various shapes including round, rectangular, square, hexagonal, triangular, and beam, made from materials like wood, concrete, brick, or metal.
- Wide TV Compatibility: Fits most 26-60 inch flat/curved screens with VESA patterns ranging from 100x100mm to 400x400mm. Supports TVs weighing up to 77 lbs.
- No-Drilling Design: Utilizes heavy-duty straps and stainless steel ratchet buckles for a secure installation without damaging the pillar.
- Full Motion Viewing: Allows for +/-90° swivel, 5° upward tilt, 15° downward tilt, and +/-3° screen level adjustment. Extends up to 19.6 inches from the pillar and retracts to 3.4 inches.

Image: The ELIVED Pillar TV Mount is compatible with various column shapes including rectangular, circular, hexagonal, square, triangular, and beam, supporting diameters from 3 to 17.7 inches and circumferences from 13 to 55 inches.
2. Safety Information
Please read and understand all instructions before installation and use. Failure to do so may result in personal injury, property damage, or voiding of warranty.
- Weight Capacity: Do not exceed the maximum weight capacity of 77 lbs (35 kg). This mount is intended for use only with the maximum weights indicated.
- TV Size and VESA: Ensure your TV's size (26-60 inches) and VESA pattern (100x100mm to 400x400mm) are compatible with this mount.
- Pillar Integrity: Verify that the pillar or column you intend to use is structurally sound and can support the combined weight of the mount and your television.
- Installation Personnel: Installation requires at least two persons to ensure safety and proper alignment.
- Children: Keep children away from the installation area during setup.
- Tools: Use appropriate tools for installation. Do not overtighten screws.
3. Parts List
Before installation, ensure all parts are present and undamaged. If any parts are missing or defective, contact ELIVED customer support.
| Part | Description | Quantity |
|---|---|---|
| A | Pillar Mounting Plate Assembly | 1 |
| B | TV VESA Plate | 1 |
| C | Articulating Arms | 1 set |
| D | Heavy-Duty Ratchet Straps | 2 |
| E | Stainless Steel Ratchet Buckles | 2 |
| F | TV Mounting Hardware (screws, spacers, washers) | 1 set |
| G | Hex Key / Wrench | 1 |
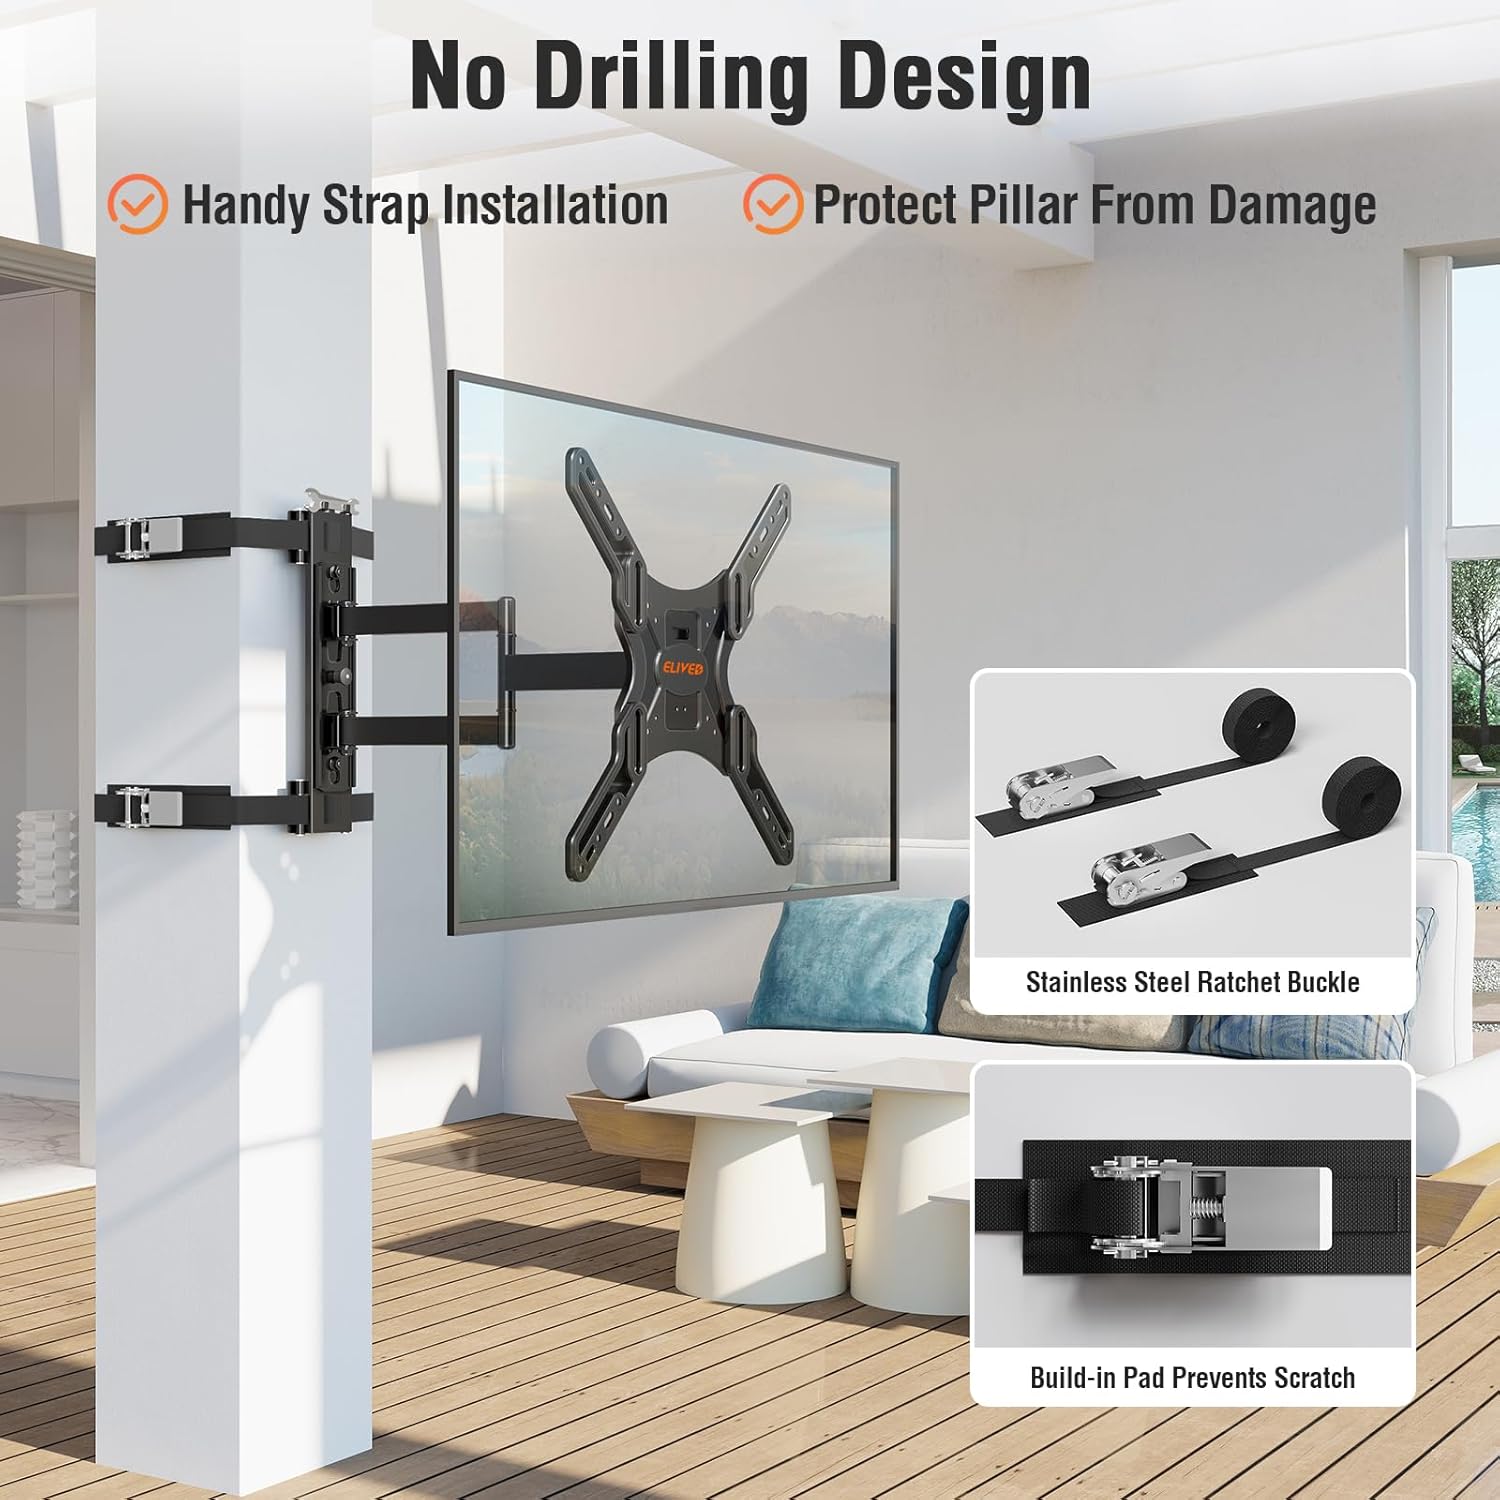
Image: The no-drilling design features heavy-duty straps and stainless steel ratchet buckles with built-in pads to protect the pillar from damage.
4. Setup Instructions
Follow these steps carefully for a secure installation. This process requires at least two people.
- Attach VESA Plate to TV:
- Carefully place your TV face down on a soft, clean surface.
- Align the TV VESA plate (Part B) with the mounting holes on the back of your TV.
- Select the appropriate screws, washers, and spacers from the TV mounting hardware (Part F) that fit your TV's VESA pattern.
- Secure the VESA plate to the TV, ensuring all screws are tightened firmly but do not overtighten.
- Strap Pillar Mounting Plate onto Column:
- Position the Pillar Mounting Plate Assembly (Part A) at the desired height on your column.
- Thread the heavy-duty ratchet straps (Part D) through the slots on the mounting plate and around the column.
- Insert the straps into the stainless steel ratchet buckles (Part E) and tighten them securely. Ensure the built-in pads on the straps are positioned to protect the pillar surface.
- Use the ratchet mechanism to achieve a very tight and stable fit. The mounting plate should not move or slide.
- Hang and Secure TV:
- With the help of a second person, carefully lift the TV with the attached VESA plate.
- Hook the VESA plate onto the articulating arms of the Pillar Mounting Plate Assembly.
- Engage the safety locking mechanisms on the VESA plate to secure the TV to the mount. Ensure the TV is firmly seated and locked in place.

Image: Visual guide for the three main installation steps: attaching the VESA plate to the TV, strapping the mount to the column, and hanging the TV.
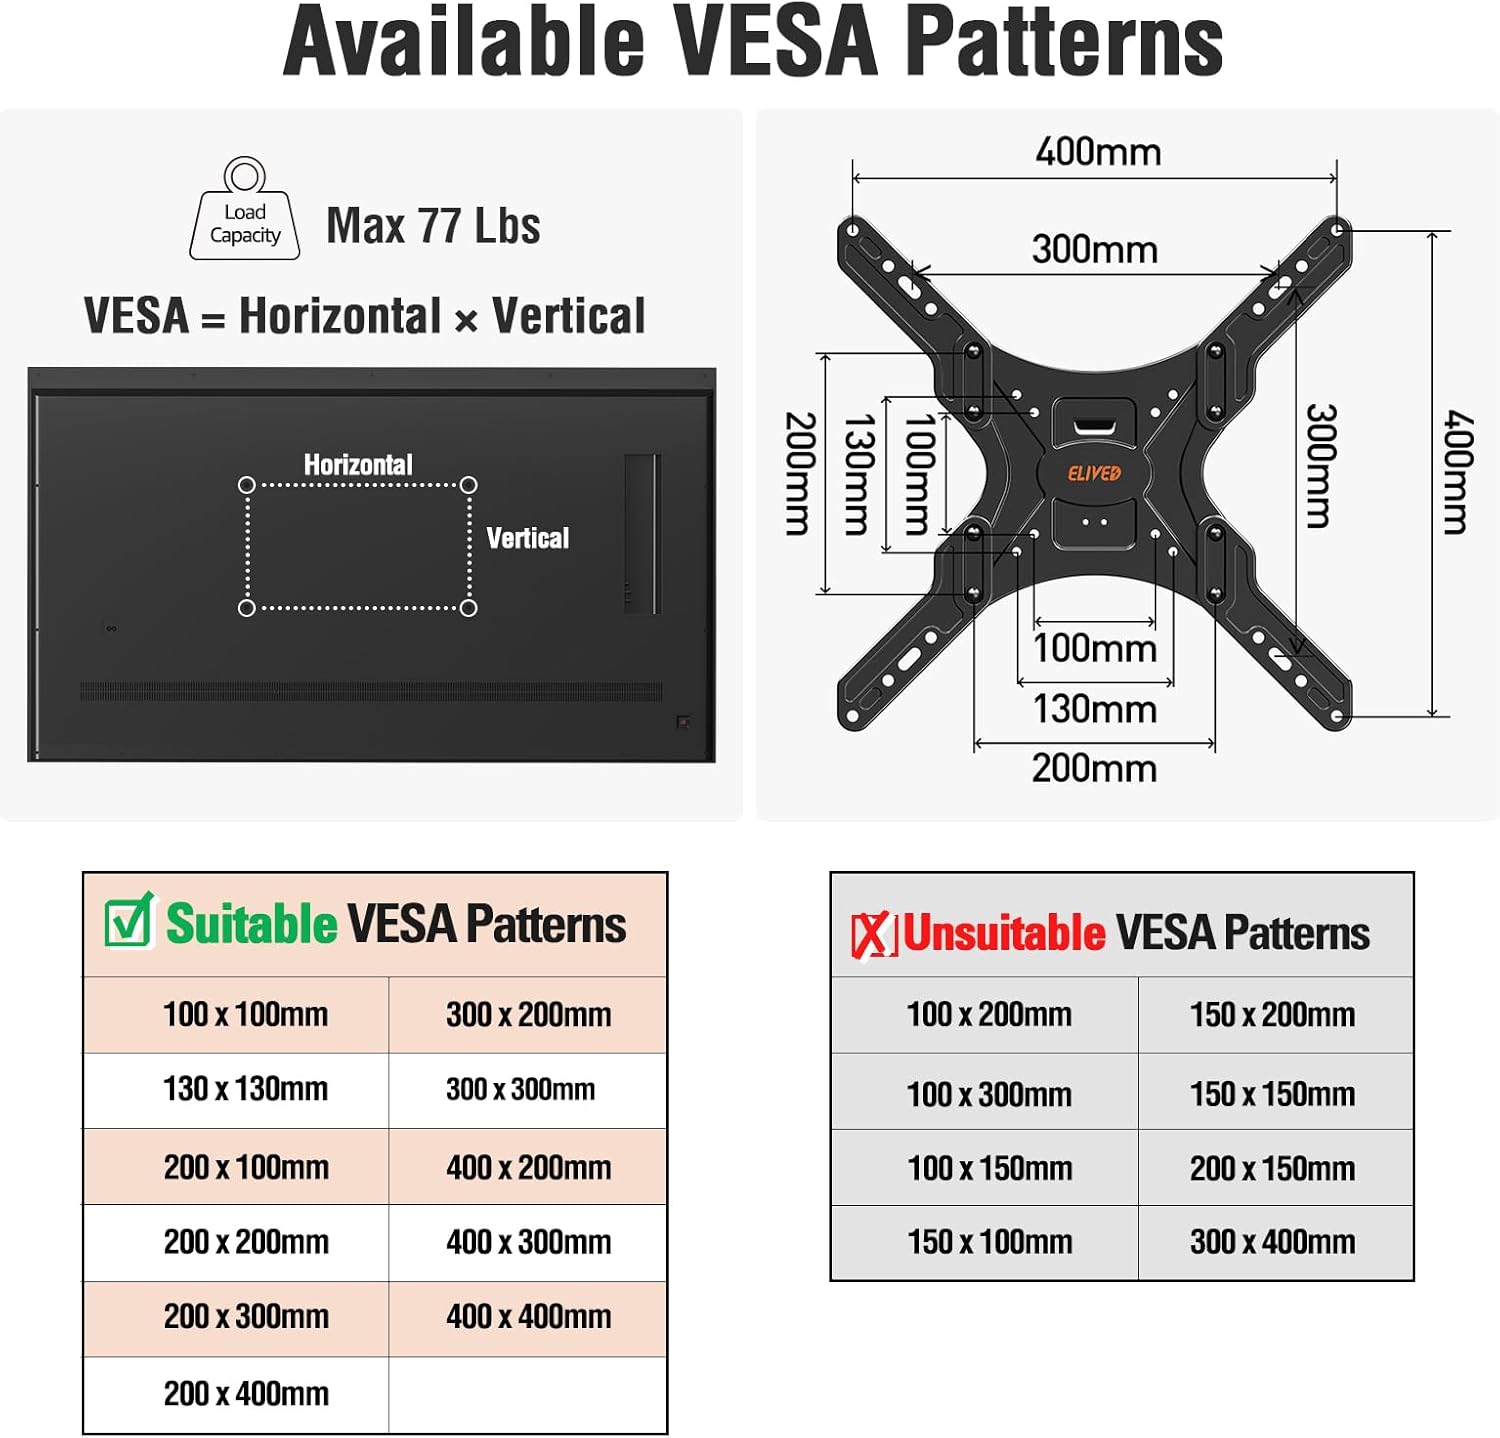
Image: This diagram illustrates the maximum load capacity of 77 lbs and lists suitable VESA patterns from 100x100mm to 400x400mm.
5. Operating the TV Mount
The ELIVED YD0084 mount provides flexible viewing options once installed.
Adjustments:
- Swivel: The TV can be swiveled up to +/-90° left or right, depending on TV size and pillar position. Gently push the TV to the desired angle.
- Tilt: The TV can be tilted 5° upwards and 15° downwards. Loosen the tilt knobs on the VESA plate, adjust the angle, and then retighten the knobs to secure the position.
- Extension and Retraction: The articulating arms allow the TV to extend up to 19.6 inches from the pillar and retract to a minimum distance of 3.4 inches. Gently pull or push the TV to adjust the distance.
- Screen Level Adjustment: After installation, you can make a fine-tune level adjustment of +/-3° to ensure the TV is perfectly horizontal. This adjustment is typically done by rotating the TV plate slightly on the main arm.

Image: The mount allows for flexible viewing, enabling the TV to be positioned towards various areas such as a balcony, dining area, or leisure area.
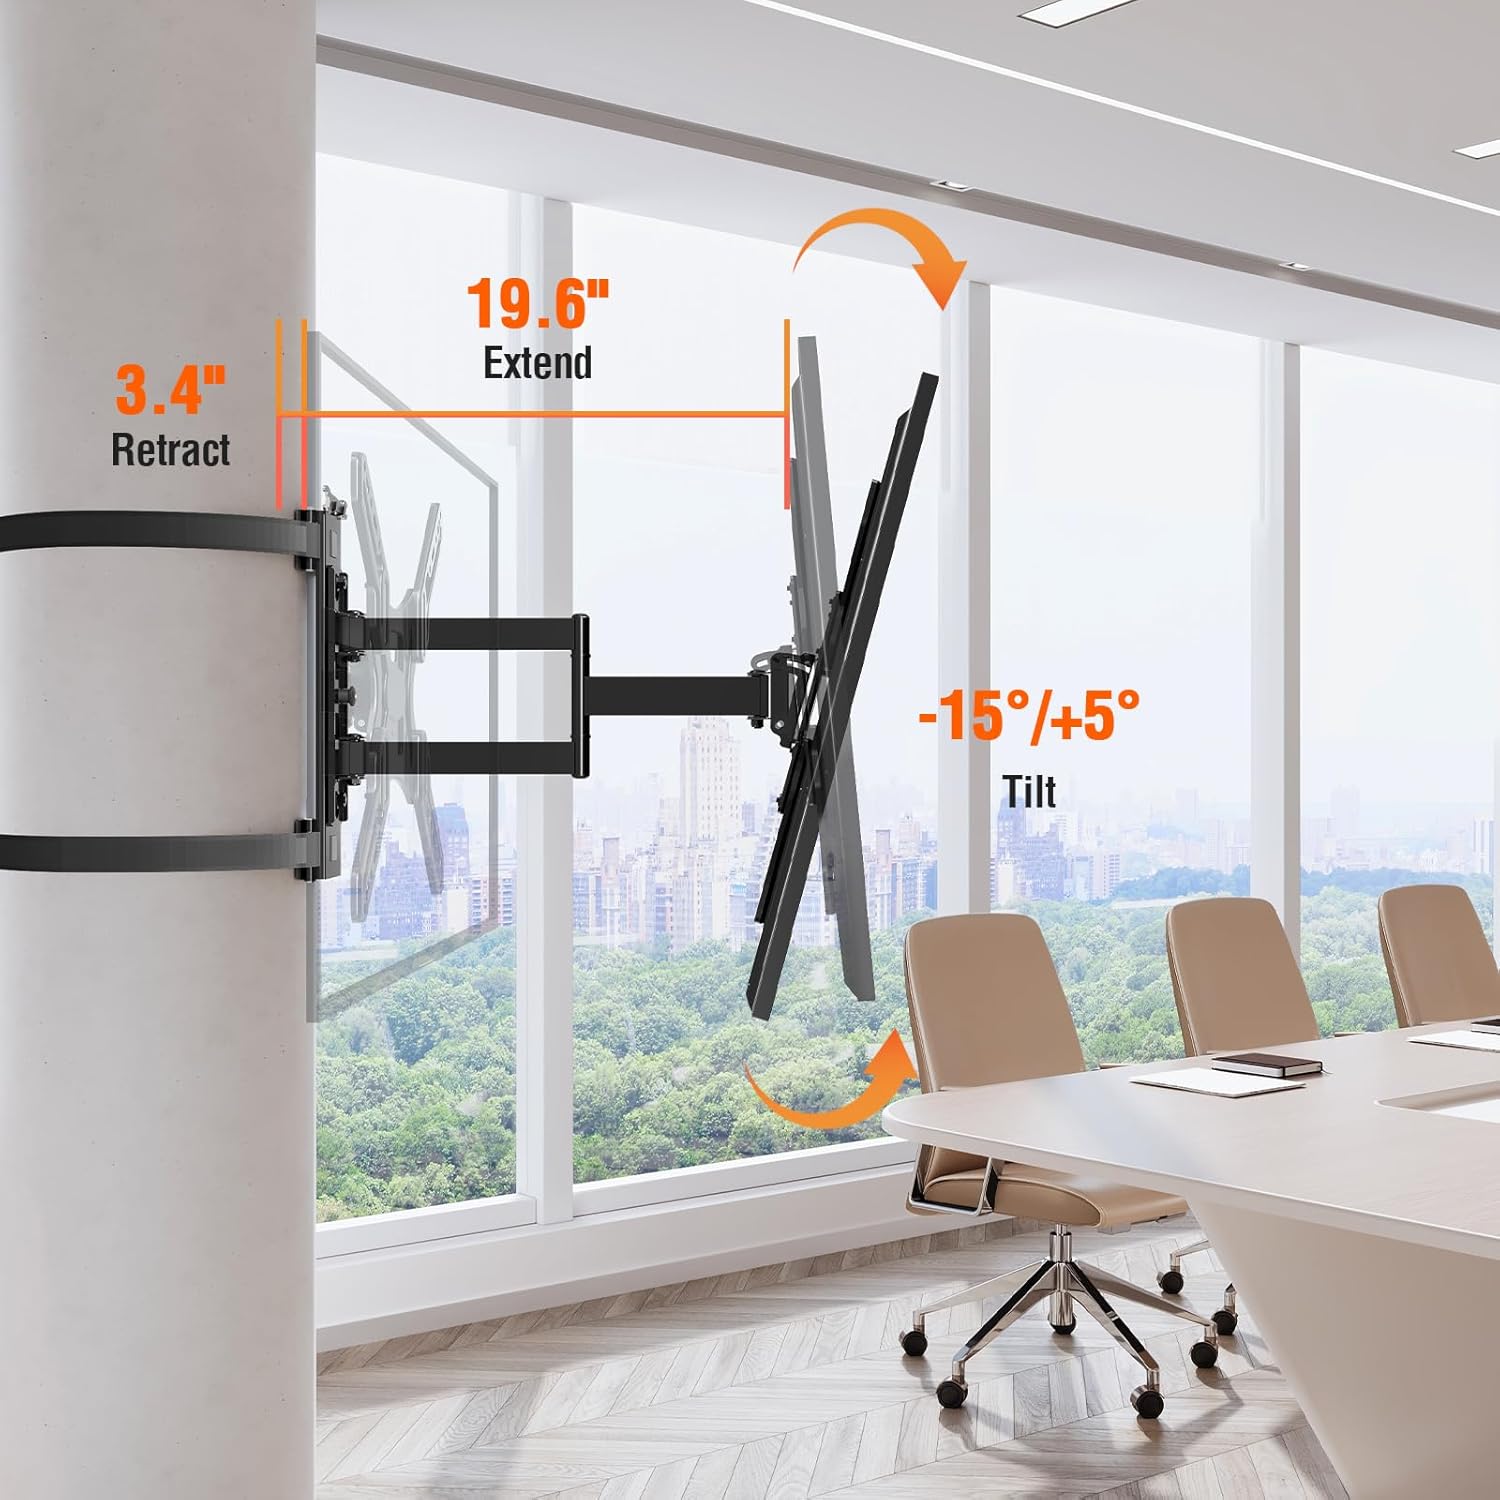
Image: The mount extends from 3.4 inches to 19.6 inches and offers a tilt range of -15 degrees (down) to +5 degrees (up).

Image: The mount provides a full range swivel capability of +/-90 degrees, allowing for wide viewing angles.

Image: The mount allows for a fine-tune level adjustment of +/-3 degrees to ensure the TV is perfectly horizontal post-installation.
6. Maintenance
Regular maintenance helps ensure the longevity and safe operation of your TV mount.
- Cleaning: Wipe the mount with a soft, dry cloth. Do not use abrasive cleaners or solvents.
- Periodic Checks: Periodically check all screws and connections to ensure they remain tight and secure. Re-tighten if necessary.
- Strap Inspection: Inspect the ratchet straps and buckles for any signs of wear, fraying, or damage. Replace immediately if any damage is found.
- Moving the Mount: If you need to move the mount to a new location, carefully follow the disassembly and reassembly instructions.
7. Troubleshooting
If you encounter issues during or after installation, refer to the following common problems and solutions.
- TV is not level: Use the +/-3° screen level adjustment feature. If the issue persists, recheck the installation of the VESA plate on the TV and the main mounting plate on the pillar.
- Mount feels loose on the pillar: Ensure the ratchet straps are tightened to their maximum secure tension. Inspect the straps and buckles for damage. The pillar must be within the specified diameter/circumference range.
- Difficulty with swivel or tilt: Check for any obstructions. For tilt, ensure the tilt knobs are loosened before adjustment and retightened afterward. If movement is stiff, apply a small amount of silicone-based lubricant to the moving joints.
- Missing parts: Refer to the parts list (Section 3). If any parts are missing, contact ELIVED customer support for assistance.
8. Specifications
| Specification | Detail |
|---|---|
| Brand | ELIVED |
| Model | YD0084 |
| Compatible TV Sizes | 26-60 inches |
| Maximum Load Capacity | 77 lbs (35 kg) |
| VESA Compatibility | 100x100mm to 400x400mm |
| Mounting Type | Column Mount (No-Drill) |
| Movement Type | Articulating, Swivel, Tilt |
| Swivel Range | +/-90° |
| Tilt Range | Up 5°, Down 15° |
| Screen Level Adjustment | +/-3° |
| Extension from Pillar | 3.4 inches (retracted) to 19.6 inches (extended) |
| Pillar Diameter Compatibility | 3-17.7 inches |
| Pillar Circumference Compatibility | 13-55 inches |
| Material | Metal |
| Color | Black |
| Item Weight | 10.06 pounds |
| Package Dimensions | 16.34 x 11.77 x 2.8 inches |
9. Warranty and Support
ELIVED products are manufactured with quality and care. For warranty information, technical support, or to report missing/damaged parts, please contact ELIVED customer service through the retailer where the product was purchased or visit the official ELIVED website.
Please retain your proof of purchase for warranty claims.