FANPYY MU261 printhead
User Manual for TSC Barcode Machine Printhead
Model: MU261 printhead (and compatible models)
1. Product Overview
This manual provides essential information for the installation, operation, maintenance, and troubleshooting of the FANPYY Thermal Printhead, compatible with various TSC barcode machine models including MH241, MH240, MH340, MH341, MH641, MH640, MH261, and MU261. This printhead is designed for high-precision printing performance, ensuring clarity and fine lines for professional printing applications such as receipts and labels.

Figure 1: Front view of the FANPYY Thermal Printhead. This image displays the main printing element and the overall compact design of the printhead.
2. Specifications
| Feature | Detail |
|---|---|
| Model Numbers | MH241, MH240, 203DPR, MH340, MH341, 305DPI, MH641, MH640, 600DPI, MH261, MU261 |
| Compatibility | Compatible with various TSC barcode machine models |
| Printing Technology | Thermal |
| Durability | Lifespan up to 50KM printing length |
| Material | Wear-resistant, corrosion-resistant, high temperature resistant |
| Power Consumption | Low power design |
| Package Dimensions | 0.39 x 0.39 x 0.39 inches |
| Item Weight | 3.53 ounces |
| Number of pieces | 1 |
3. Setup and Installation
Proper installation of the thermal printhead is crucial for optimal performance and longevity. Always ensure the printer is powered off and disconnected from the power source before beginning installation.
- Preparation: Turn off the barcode machine and unplug it from the power outlet. Open the printer cover to access the printhead assembly area.
- Remove Old Printhead (if applicable): Carefully disconnect any cables or ribbons attached to the old printhead. Unscrew or unclip the old printhead from its mounting bracket. Handle with care to avoid damage to other components.
- Inspect New Printhead: Before installation, visually inspect the new FANPYY printhead for any signs of damage. Ensure all connectors are clean and free of debris.
- Install New Printhead: Align the new printhead with the mounting points in the barcode machine. Gently secure it using the appropriate screws or clips. Do not overtighten.
- Connect Cables: Reconnect all necessary cables and ribbon connectors to the new printhead. Ensure connections are firm and correctly oriented. Refer to your barcode machine's specific manual for exact wiring diagrams if needed.
- Close and Test: Close the printer cover. Reconnect the power cord and turn on the barcode machine. Perform a test print to verify proper installation and functionality.
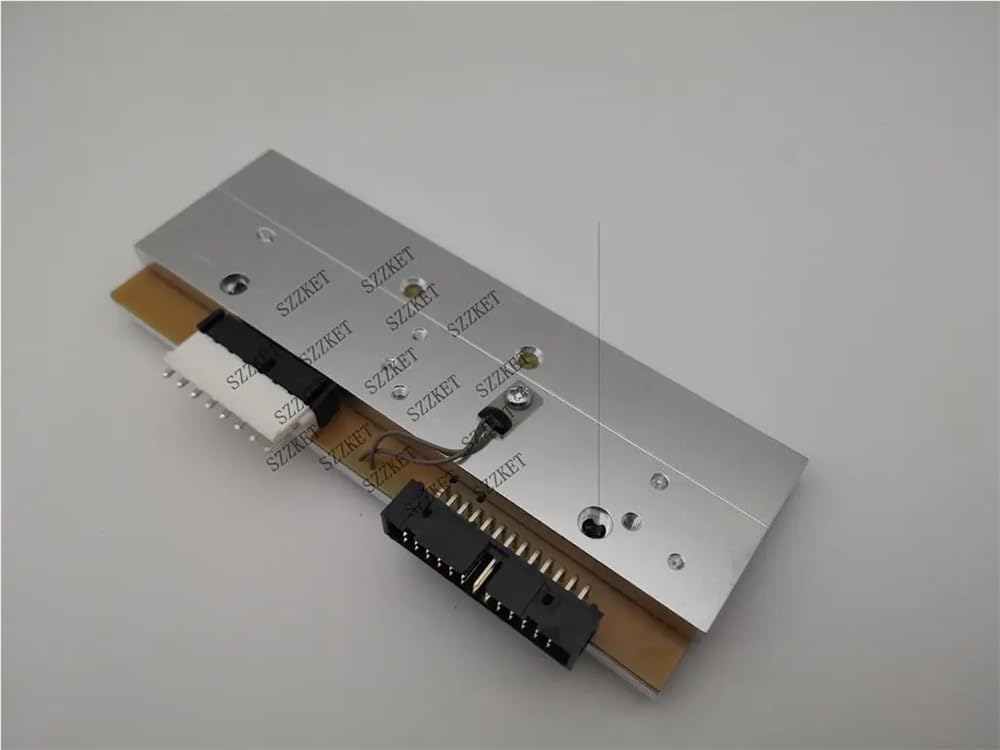
Figure 2: Underside of the printhead, revealing the electronic connectors and circuitry. This view is important for proper connection during installation.

Figure 3: Side profile of the printhead, showing its robust metal casing and the precise alignment of components. This perspective helps in understanding its physical dimensions and mounting orientation.

Figure 4: Detailed view of the printhead's underside, focusing on the various electrical connectors. Proper connection of these interfaces is critical for the printhead's functionality.
4. Operating Instructions
Once installed, the thermal printhead operates as an integral part of your barcode machine. Its function is to generate heat precisely to create images and text on thermal paper or labels.
- Power On: Ensure your barcode machine is powered on and ready for operation.
- Load Media: Load the appropriate thermal paper or labels into your barcode machine according to its specific instructions. Ensure the media is correctly aligned.
- Send Print Job: Send your desired print job from your computer or connected device to the barcode machine. The printhead will receive data and apply heat to the thermal media, creating the print.
- Monitor Print Quality: Periodically check the print quality. If prints appear faded, streaky, or incomplete, refer to the maintenance and troubleshooting sections.

Figure 5: Top view of the printhead, illustrating the print surface where thermal transfer occurs and the screw holes for secure mounting.
5. Maintenance
Regular maintenance extends the lifespan of your printhead and ensures consistent print quality. Always power off and unplug the printer before performing any cleaning or maintenance.
- Cleaning the Printhead:
- Use a lint-free cloth dampened with isopropyl alcohol (99% pure) to gently wipe the thermal element of the printhead.
- Wipe in one direction to avoid spreading debris.
- Allow the printhead to dry completely before closing the printer and powering it on.
- Clean the printhead regularly, especially if you notice a decrease in print quality or after every few rolls of labels/paper.
- Cleaning the Platen Roller: While cleaning the printhead, also clean the platen roller (the rubber roller that feeds the media). Use isopropyl alcohol to remove any adhesive residue or dust.
- Avoid Abrasives: Never use abrasive materials or harsh chemicals to clean the printhead, as this can cause permanent damage.

Figure 6: Rear view of the printhead, displaying the primary circuit board and various connection ports. This area should be kept clean and free from dust to ensure proper electrical contact.
6. Troubleshooting
If you encounter issues with your printhead, refer to the following common troubleshooting steps:
| Problem | Possible Cause | Solution |
|---|---|---|
| Faded or Light Prints | Dirty printhead; incorrect media type; low heat setting (printer specific) | Clean the printhead (see Maintenance); ensure you are using thermal media; adjust heat settings in printer driver/firmware. |
| Streaks or Gaps in Print | Dust or debris on printhead; damaged print element | Clean the printhead thoroughly; if problem persists, the printhead may be damaged and require replacement. |
| No Print Output | Printhead not properly installed; loose cable connection; printer error | Verify printhead installation and cable connections; check printer status and error messages; restart printer. |
| Printhead Overheating | Excessive print density setting; poor ventilation | Reduce print density setting; ensure adequate ventilation around the printer. |
For issues not covered here, please consult your barcode machine's specific user manual or contact customer support.
7. Warranty and Support
This FANPYY Thermal Printhead comes with a 12-month warranty service from the date of purchase. This warranty covers defects in materials and workmanship under normal use.
The warranty does not cover:
- Damage caused by improper installation or use.
- Damage caused by accidents, abuse, neglect, or unauthorized modification.
- Normal wear and tear.
For warranty claims, technical assistance, or any questions regarding the product, please contact our professional technical support team. Please have your purchase information and product model number ready when contacting support.
Contact information for support can typically be found on the product packaging or the manufacturer's official website.
Ask a question about this manual
Ask about setup, troubleshooting, compatibility, parts, safety, or missing instructions. Manuals+ will review the question and use this page’s manual context to help answer it.