SOLAFANS 96V 70A Modbus
SOLAFANS 96V 70A MPPT Solar Controller User Manual
Model: 96V 70A Modbus
Product Overview
The SOLAFANS 96V 70A Modbus MPPT Solar Controller is designed for efficient solar energy management, featuring a high-definition touch screen and multi-language support. It is equipped with advanced Maximum Power Point Tracking (MPPT) technology to maximize solar panel utilization and ensure optimal battery charging.
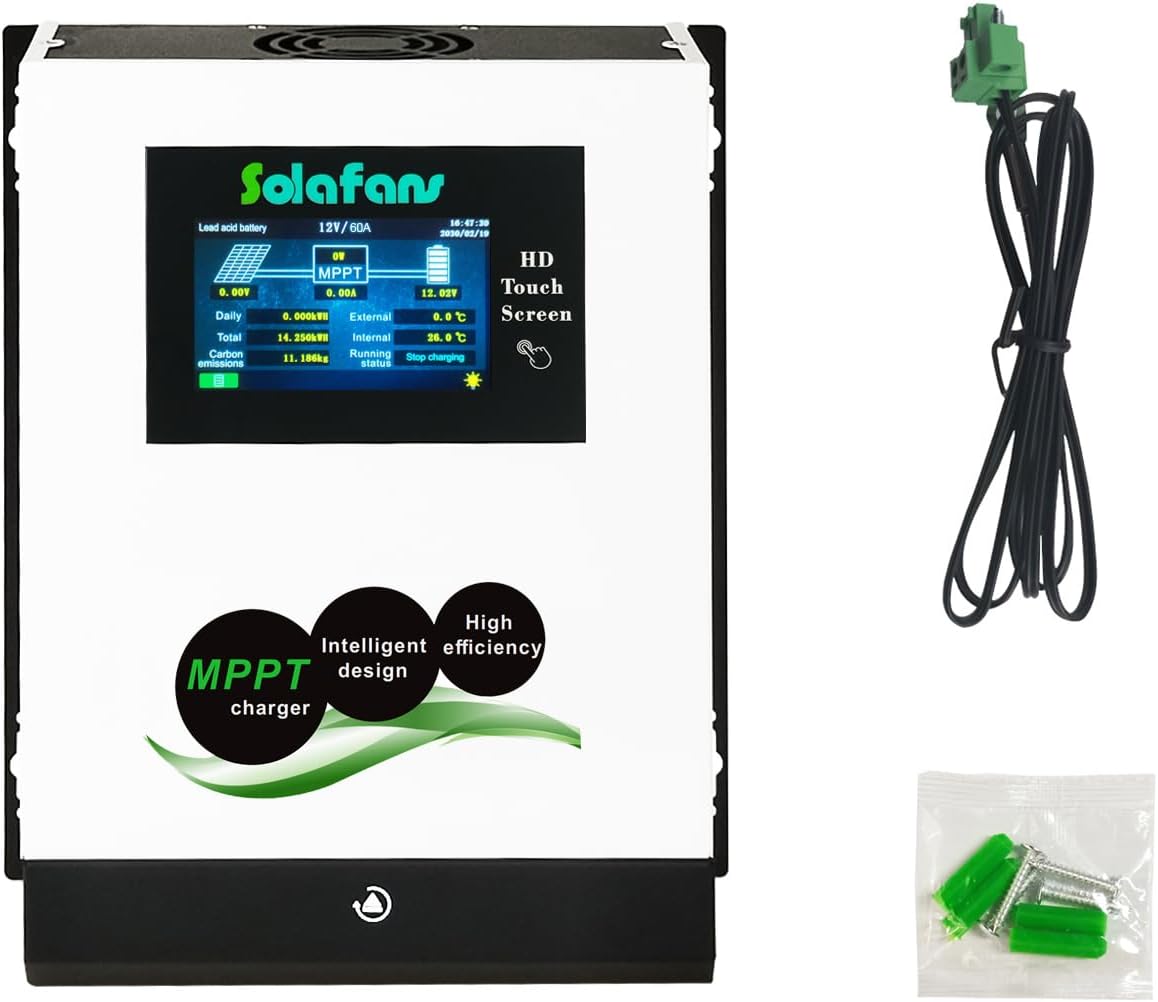
Figure 1: SOLAFANS 96V 70A MPPT Solar Controller and accessories.
Key Features:
- Multi-language Support: English, Chinese, and Japanese options available.
- HD 4.3" Touch Screen: Intuitive interface with automatic sleep mode for power saving.
- Built-in Bluetooth Applet: Enables convenient monitoring and control via a mobile application.
- Communication Protocols: Supports RS485 or MODBUS for integration into monitoring systems.
- Battery Reactivation: Automatically revives deeply discharged batteries when solar power is available.
- Wide Battery Compatibility: Supports Lead acid, Gel, Liquid, and Lithium battery types.
- High Efficiency: PV module utilization rate up to 99%, conversion efficiency up to 98.1%.
- Comprehensive Protection: Includes safeguards against overcharge, over-discharge, reverse connection, over-voltage, short circuit, and high temperature.
- Broad Application: Ideal for off-grid solar systems, RVs, boats, and other similar setups.
Setup and Installation
Proper installation is crucial for the safe and efficient operation of your MPPT solar controller. Please follow these steps carefully.
Component Identification:
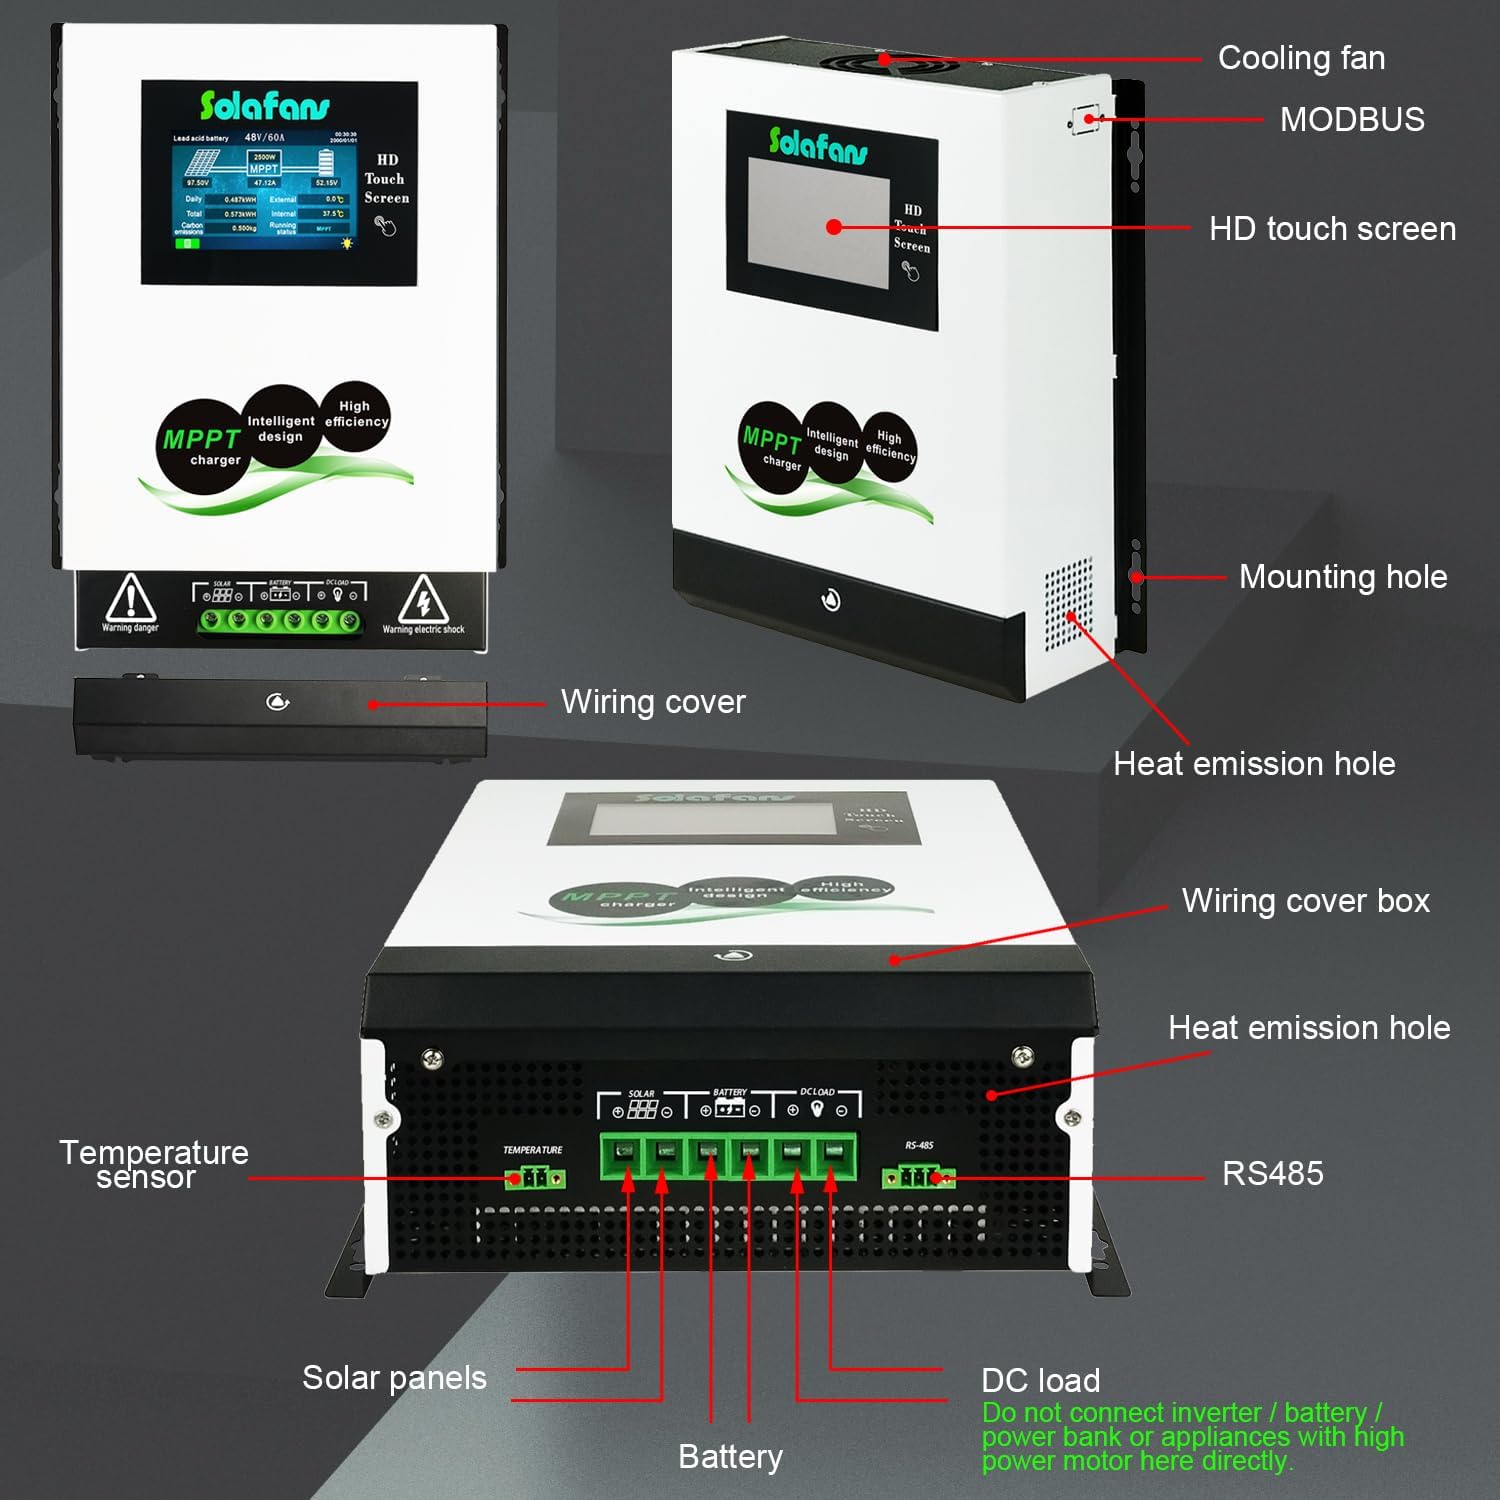
Figure 2: Rear and side view of the controller with labeled components including temperature sensor, solar panel inputs, battery terminals, DC load, RS485, and heat emission holes.
- Cooling Fan: Ensures optimal operating temperature.
- HD Touch Screen: Main interface for monitoring and settings.
- MODBUS/RS485 Port: For external communication and monitoring.
- Mounting Hole: For secure installation.
- Heat Emission Hole: Facilitates heat dissipation.
- Wiring Cover Box: Protects wiring connections.
- Temperature Sensor: Monitors ambient and internal temperatures.
- Solar Panels Input: Connect your PV array here.
- Battery Terminals: Connect to your battery bank.
- DC Load Output: For connecting DC appliances. Note: Do not connect inverters, battery banks, or high-power motors directly to this port. Connect inverters to the battery.
Wiring Sequence:
Always connect components in the specified order to prevent damage to the controller or other system components.
- Connect the Battery: First, connect the battery to the controller's battery terminals. Ensure correct polarity (positive to positive, negative to negative).
- Connect Solar Panels: Next, connect the solar panels to the controller's PV input terminals. Verify correct polarity.
- Connect DC Load (Optional): If using, connect your DC loads to the DC load output terminals.

Figure 3: Easy connection diagram showing solar panel, DC combiner box, solar controller, battery, inverter, DC load, and home appliances connections.
Operating Instructions
The controller features an intuitive HD touch screen for direct operation and a Bluetooth applet for remote monitoring.
Touch Screen Operation:
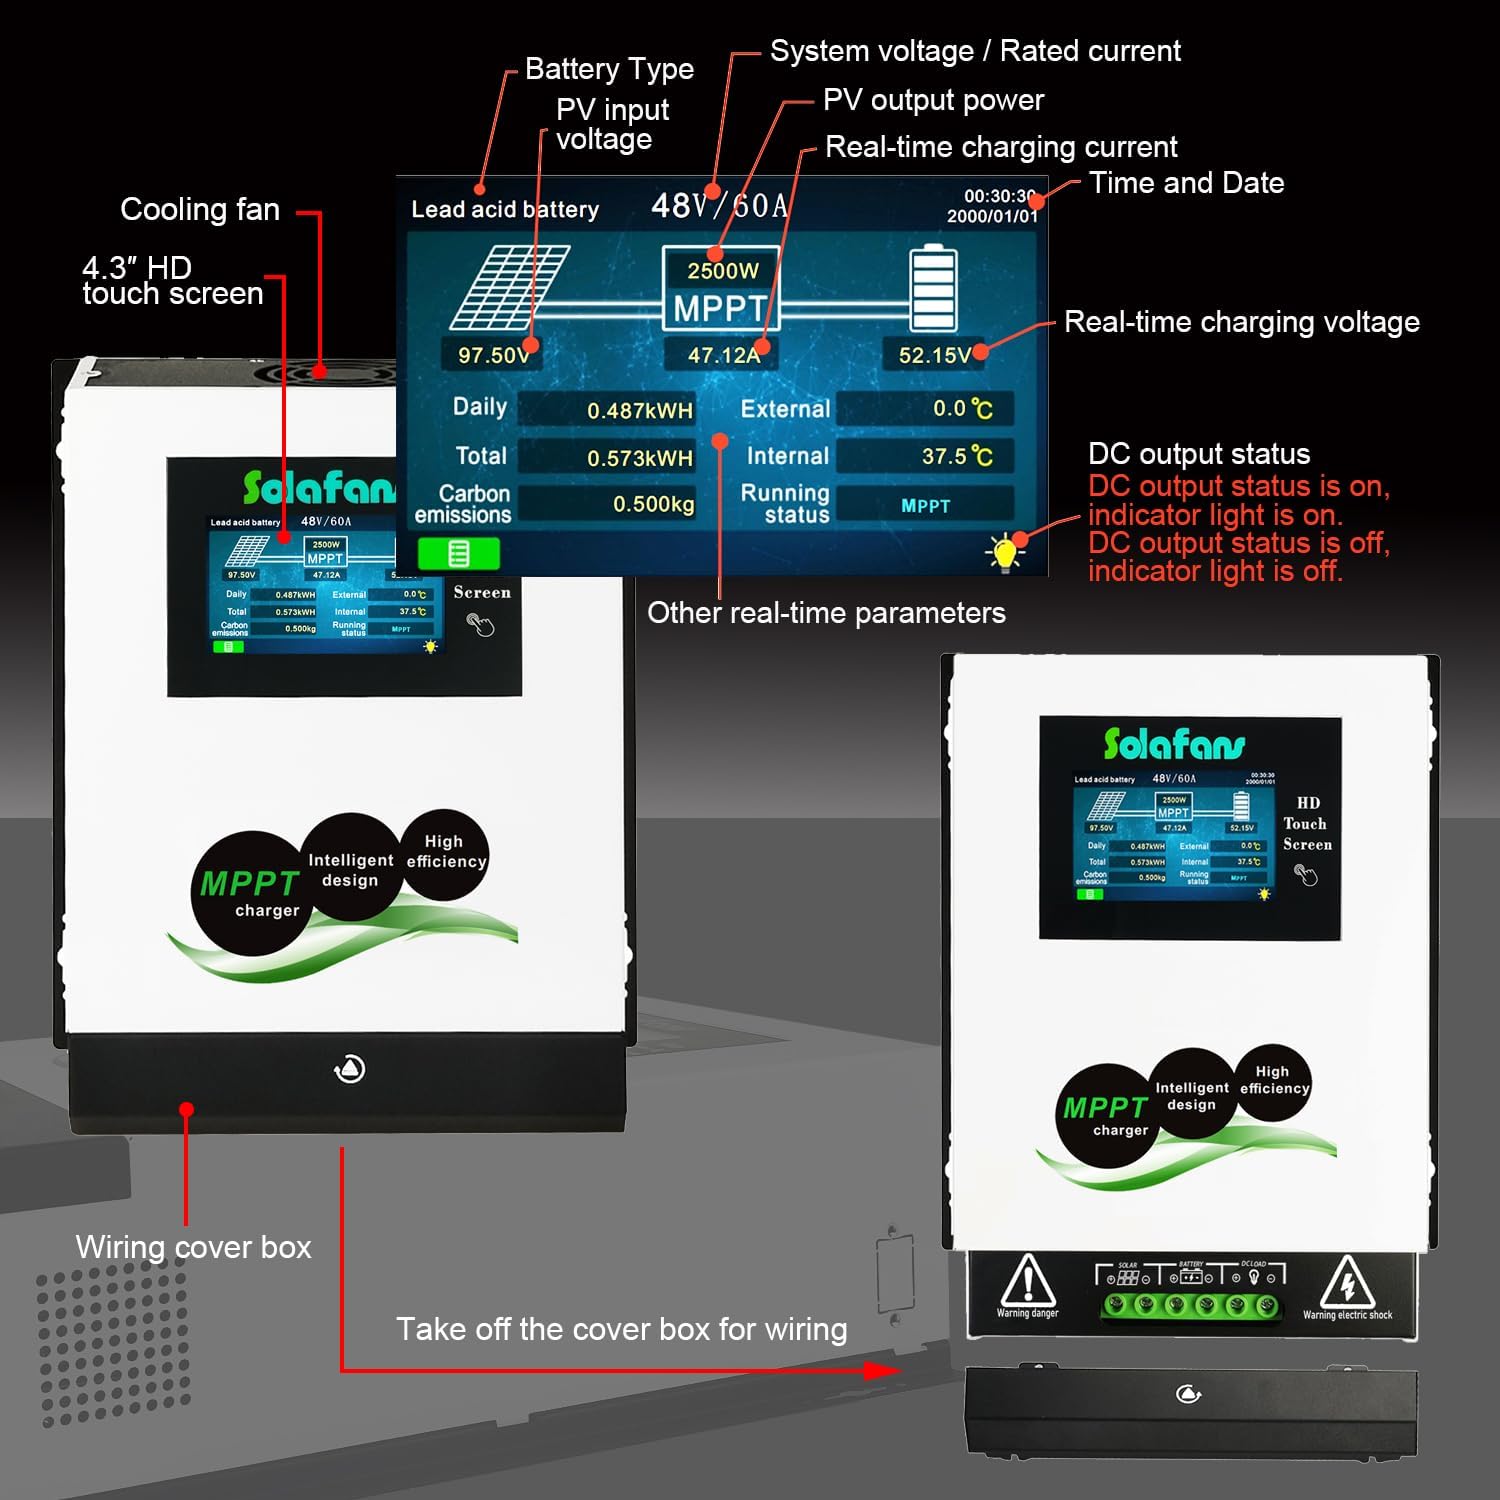
Figure 4: Detailed view of the 4.3" HD touch screen showing PV input voltage, PV output power, real-time charging current, battery type, system voltage, and other parameters.
The 4.3" HD touch screen displays real-time system data, including:
- Battery Type and Voltage
- PV Input Voltage
- PV Output Power
- Real-time Charging Current
- Time and Date
- Real-time Charging Voltage
- Daily Power Generation
- Total Power Generation
- Carbon Emissions
- Internal and External Temperatures
- Running Status (e.g., Float charging)
- DC Output Status
The screen will automatically enter sleep mode after a period of inactivity to conserve power.
Bluetooth Applet Connection:
The controller features a built-in Bluetooth applet for convenient remote monitoring and parameter adjustment via your smartphone. Ensure your phone's location (GPS) and Bluetooth are enabled before connecting.
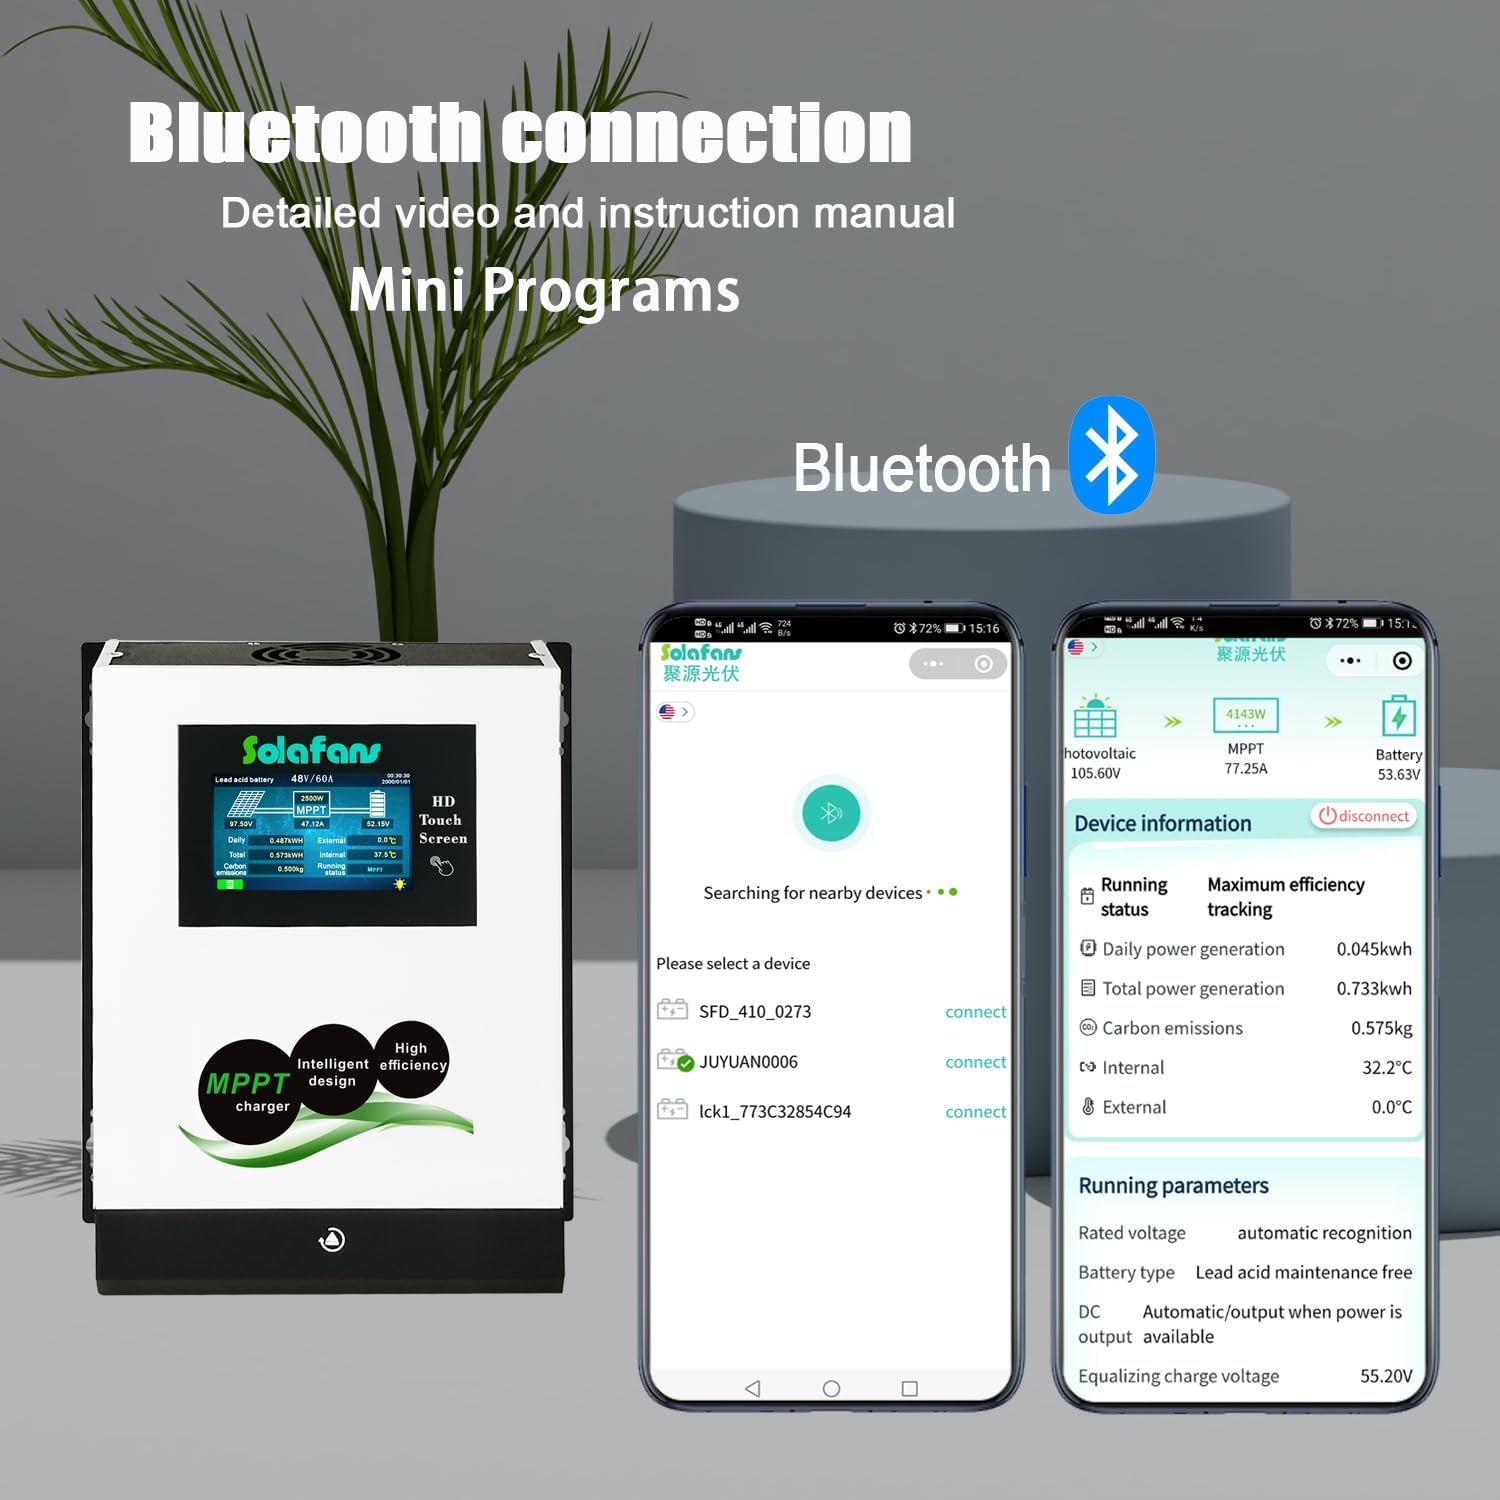
Figure 5: Bluetooth connection interface on a smartphone, displaying device information and running parameters.
To connect:
- Open the WeChat application on your smartphone.
- Click the search icon and type "JUYUAN SOLAR" to find the mini program.
- Open the "JUYUAN SOLAR" mini program.
- The app will search for nearby devices. Select your controller (e.g., "JUYUAN") and click "connect".
- Once connected, you can view device information and running parameters.
- To add the mini program to your phone's home screen for quick access, click the menu option (often three dots or a share icon) and select "Add to Home".
Note: Some mobile phones may require authorization for WeChat in the phone's settings (e.g., App -> WeChat -> Permissions -> Dropzone -> Allow) for the mini program to function correctly. Deleting WeChat will also remove the mini program.
Video 1: Instructions on how to use the Bluetooth mini program with the controller.
Communication Protocols (Modbus/RS485):
The controller supports both Modbus and RS485 communication protocols, offering flexibility for integration into various monitoring systems.

Figure 6: Visual representation of controllers configured for RS485 (left) and Modbus (right) communication. Modbus is recommended for users requiring register address, function code, or energy management platform integration.
- RS485 Communication: Suitable for general use without specific advanced requirements.
- MODBUS Communication: Recommended for users who need to communicate with the controller through a monitoring system (e.g., SCADA) and require access to register addresses or function codes.
Maintenance
Regular maintenance ensures the longevity and optimal performance of your SOLAFANS MPPT solar controller.
- Cleanliness: Keep the controller clean and free from dust and debris. Use a soft, dry cloth for cleaning.
- Ventilation: Ensure that the cooling fan and heat emission holes are not obstructed to allow for proper heat dissipation.
- Connections: Periodically check all wiring connections for tightness and signs of corrosion. Loose connections can lead to overheating and poor performance.
- Environmental Conditions: Ensure the controller is installed in a dry, well-ventilated area, away from direct sunlight and extreme temperatures.
- Firmware Updates: Check the manufacturer's website or app for any available firmware updates to ensure your controller has the latest features and bug fixes.
Troubleshooting
This section provides solutions to common issues you might encounter with your solar charge controller.
| Problem | Possible Cause | Solution |
|---|---|---|
| Controller not powering on. | No battery connected or battery voltage too low. Reverse polarity connection. | Ensure battery is connected first with correct polarity. Check battery voltage; if too low, charge it externally. |
| No charging from solar panels. | Solar panels not connected, reverse polarity, insufficient sunlight, or PV voltage too low/high. | Verify solar panel connections and polarity. Check sunlight conditions. Ensure PV voltage is within the controller's operating range (DC180V max working, DC220V max open circuit). |
| Battery not charging fully. | Incorrect battery type setting, undersized solar array, or high load. | Check battery type setting on the controller. Ensure solar array size is adequate for your battery bank and load. Reduce load if necessary. |
| Bluetooth applet not connecting. | Bluetooth/GPS not enabled on phone, incorrect app permissions, or controller not discoverable. | Enable Bluetooth and GPS on your phone. Check WeChat app permissions (Dropzone/Allow). Restart the controller. |
| Over-temperature warning. | Poor ventilation, high ambient temperature, or obstructed cooling fan. | Ensure adequate airflow around the controller. Clear any obstructions from the cooling fan and heat emission holes. Consider relocating to a cooler environment if ambient temperature is consistently high. |
For issues not listed here, please refer to the full user manual or contact SOLAFANS customer support.
Specifications
Detailed technical specifications for the SOLAFANS 96V 70A Modbus MPPT Solar Controller.
| Feature | Specification |
|---|---|
| Model | 96V 70A Modbus |
| Max PV Input Working Voltage | DC180V |
| Max PV Open Circuit Voltage | DC220V |
| Rated Current | 70A |
| Max PV Input Power (96V System) | 7700W |
| Battery Voltage Support | 48V, 60V, 72V, 84V, 96V (Auto/Manual Set) |
| Supported Battery Types | Lead acid, Gel, Liquid, Lithium battery etc. |
| Charging Models | MPPT, Equalizing Charge, Floating Charge |
| PV Modules Utilization Rate | ≤99% |
| Conversion Efficiency Rate | Up to 98.1% |
| Static Power Consumption | ≤5W |
| Noise Level | ≤50dB |
| Display | HD 4.3" Touch Screen |
| Communication | Bluetooth, RS485, MODBUS |
| Dimensions (L x W x H) | 9.69 x 3.94 x 11.89 inches (24.6 x 10.0 x 30.2 cm) |
| Item Weight | 7.26 pounds (3.3 Kilograms) |
| Material | Iron shell and aluminum cooling plate |
| Certifications | CE, PSE, SGS, METI Registration |

Figure 7: Detailed specifications table for various SOLAFANS MPPT controller models, including PV input power for different battery voltages.
Warranty and Support
SOLAFANS products are manufactured with high quality standards. For warranty information and technical support, please refer to the documentation included with your product or visit the official SOLAFANS website.
Contact Information:
- Manufacturer: JUYUAN
- Brand: SOLAFANS
- For specific inquiries, please contact your point of purchase or the manufacturer directly.
The setting password for MPPT parameter settings is typically found on page 19 of the physical user manual.
Ask a question about this manual
Ask about setup, troubleshooting, compatibility, parts, safety, or missing instructions. Manuals+ will review the question and use this page’s manual context to help answer it.