1. Introduction
This manual provides detailed instructions for the installation, operation, and maintenance of your SOLAFANS 48V 80A MPPT Solar Charge Controller, model SF48V8090. This device is designed to efficiently manage power from your solar panels to charge batteries in various off-grid and RV applications. Please read this manual thoroughly before use to ensure proper functionality and safety.
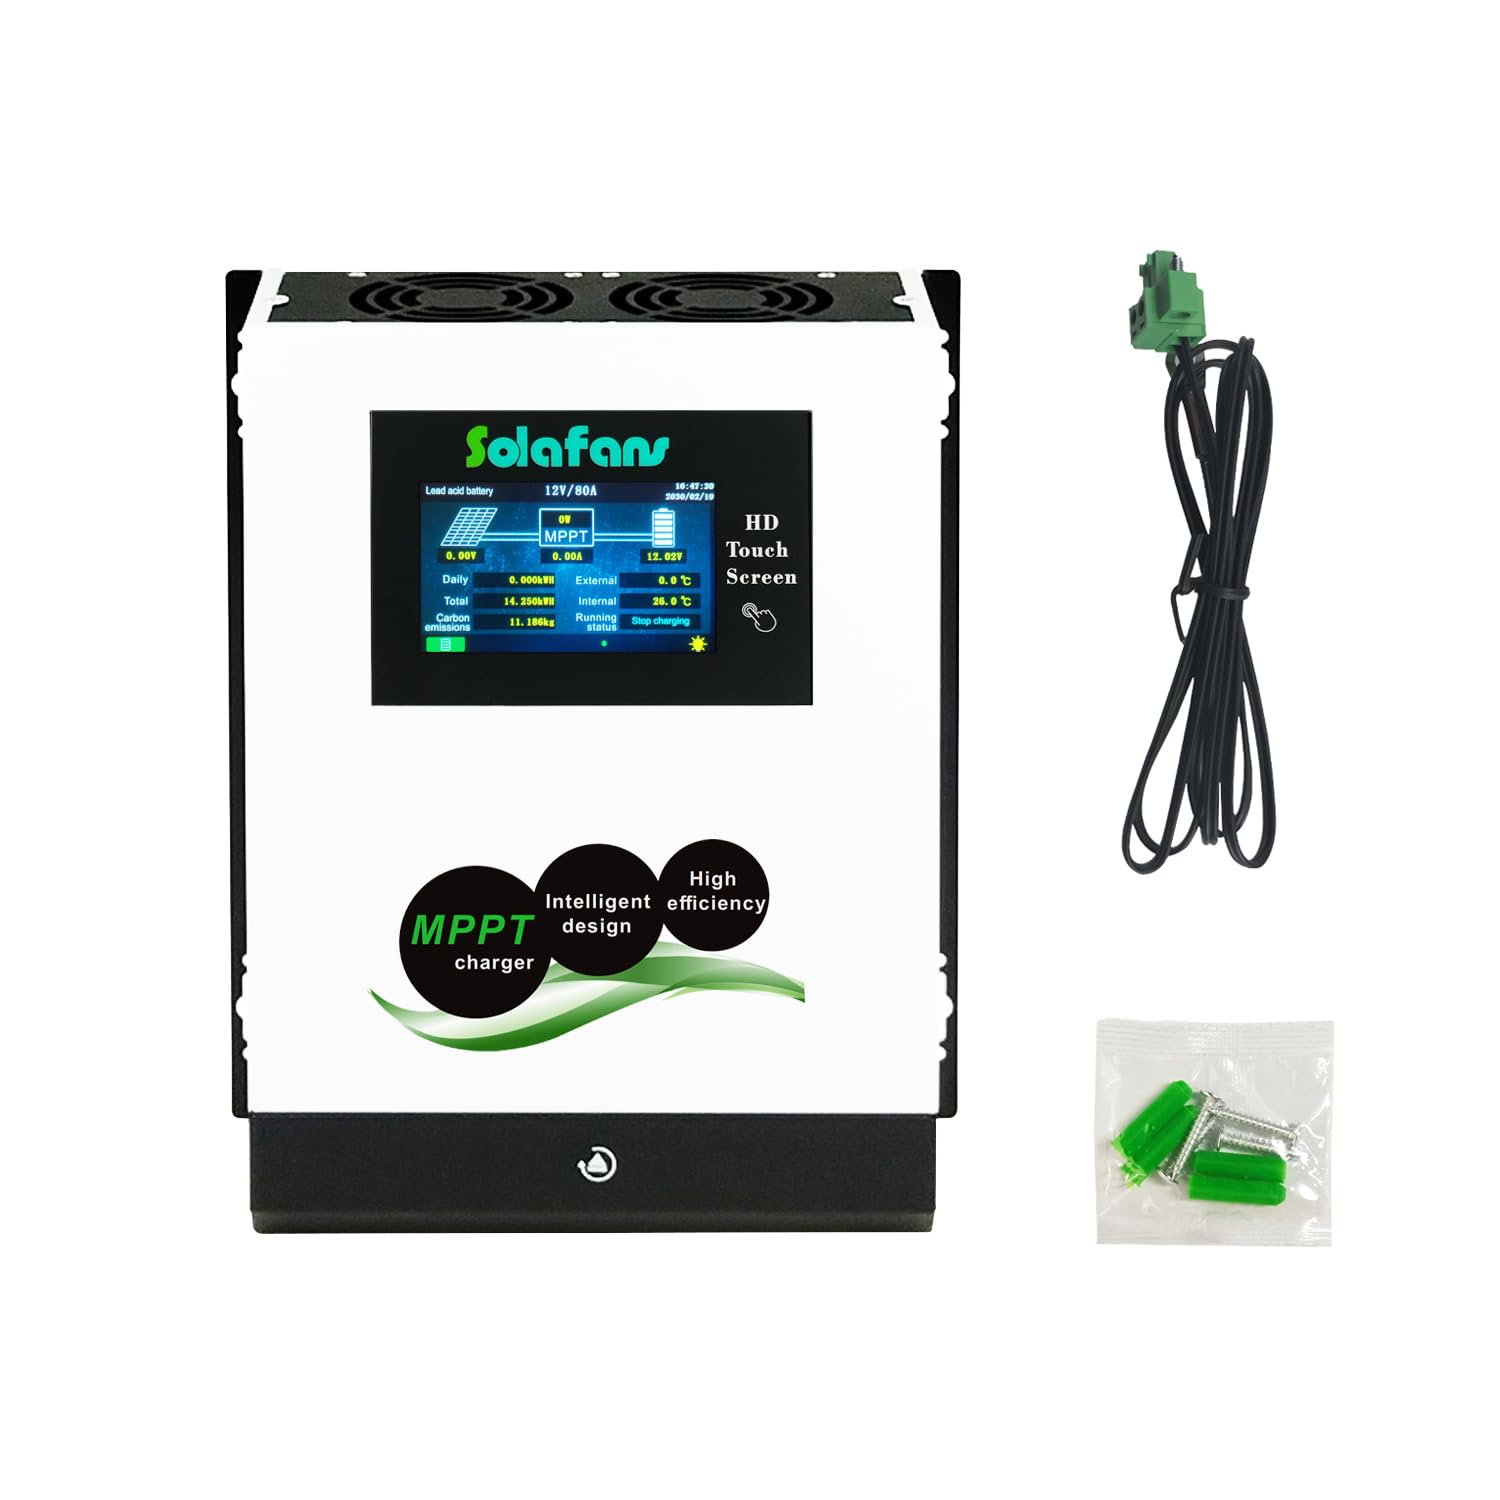
Figure 1: SOLAFANS 48V 80A MPPT Solar Charge Controller and included accessories.
2. Safety Instructions
- Always connect the battery to the controller first, then connect the solar panels. Disconnect in the reverse order.
- Ensure all wiring is correctly polarized (+ to + and - to -) to prevent damage to the controller and connected devices.
- Do not connect an inverter, battery, power bank, or high-power motor appliances directly to the controller's DC load output. Connect these directly to the battery.
- Install the controller in a well-ventilated area, away from flammable materials and direct sunlight.
- Ensure proper grounding for safety.
- Avoid touching live electrical components. Use insulated tools.
- Keep children away from the solar power system.
3. Product Features
The SOLAFANS SF48V8090 MPPT Solar Charge Controller offers advanced features for optimal solar power management:
- Multi-Language Support: English, Chinese, and Japanese.
- 4.3" HD Touch Screen: Intuitive interface with automatic sleep mode.
- Built-in Bluetooth Applet: For convenient monitoring and control via a mobile device.
- Communication Protocols: RS485 or MODBUS options available.
- Battery Re-activation: Automatically wakes up deeply discharged batteries when solar power is available.
- Wide Battery Compatibility: Supports Lead Acid, Gel, Liquid, and Lithium battery types.
- System Voltage: Automatic recognition for 12V, 24V, 48V, and manual setting for 36V.
- High PV Input Voltage: Maximum solar panel input working voltage up to DC150V, with Voc up to DC170V.
- High Efficiency: PV module utilization rate ≤99%, conversion efficiency up to 98.1%.
- Robust Design: Iron shell and aluminum cooling plate for effective heat dissipation.
- Comprehensive Protections: Includes over charge, over discharge, reverse connection, over voltage, short circuit, and high temperature protection.
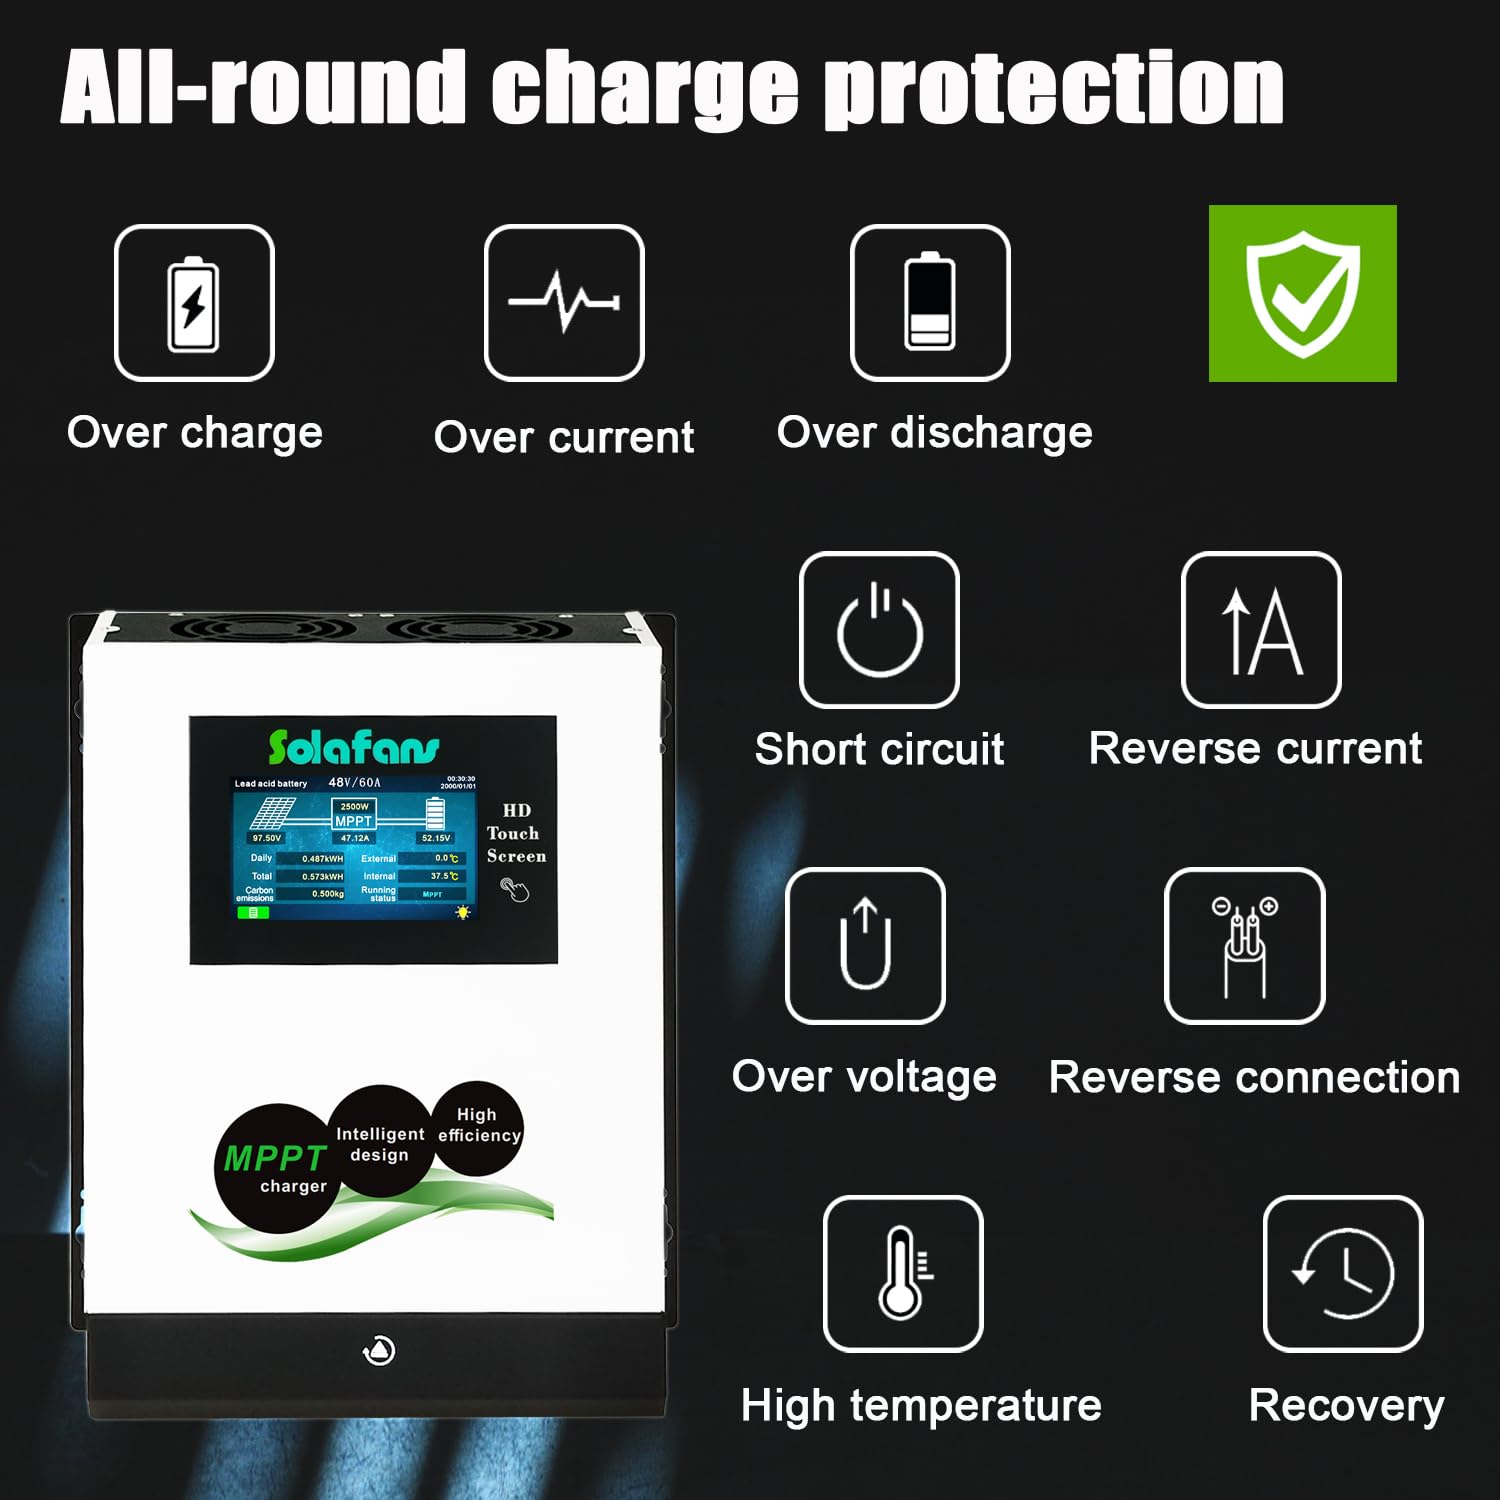
Figure 2: Key features of the SOLAFANS MPPT Solar Charge Controller.
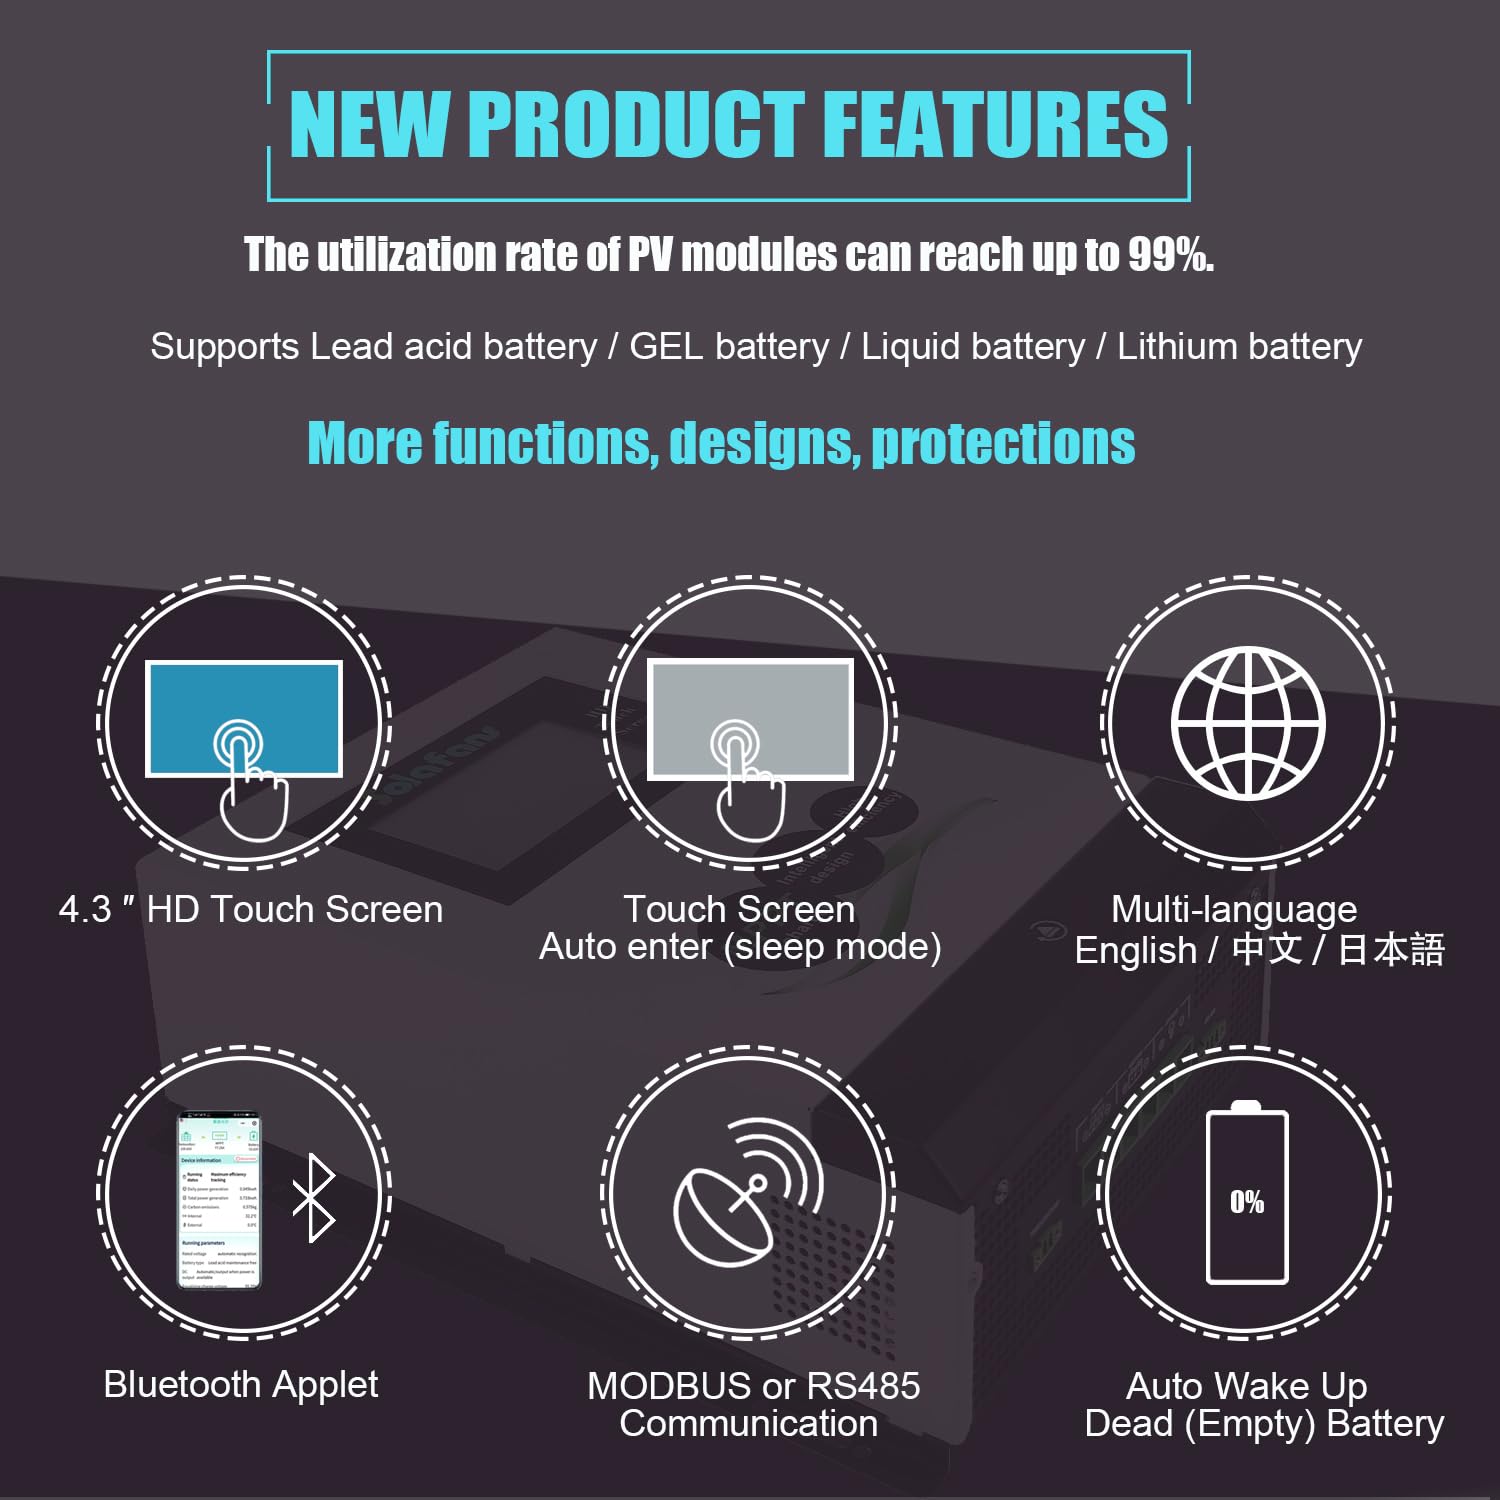
Figure 3: All-round charge protection mechanisms.
4. Setup and Installation
4.1 Component Identification
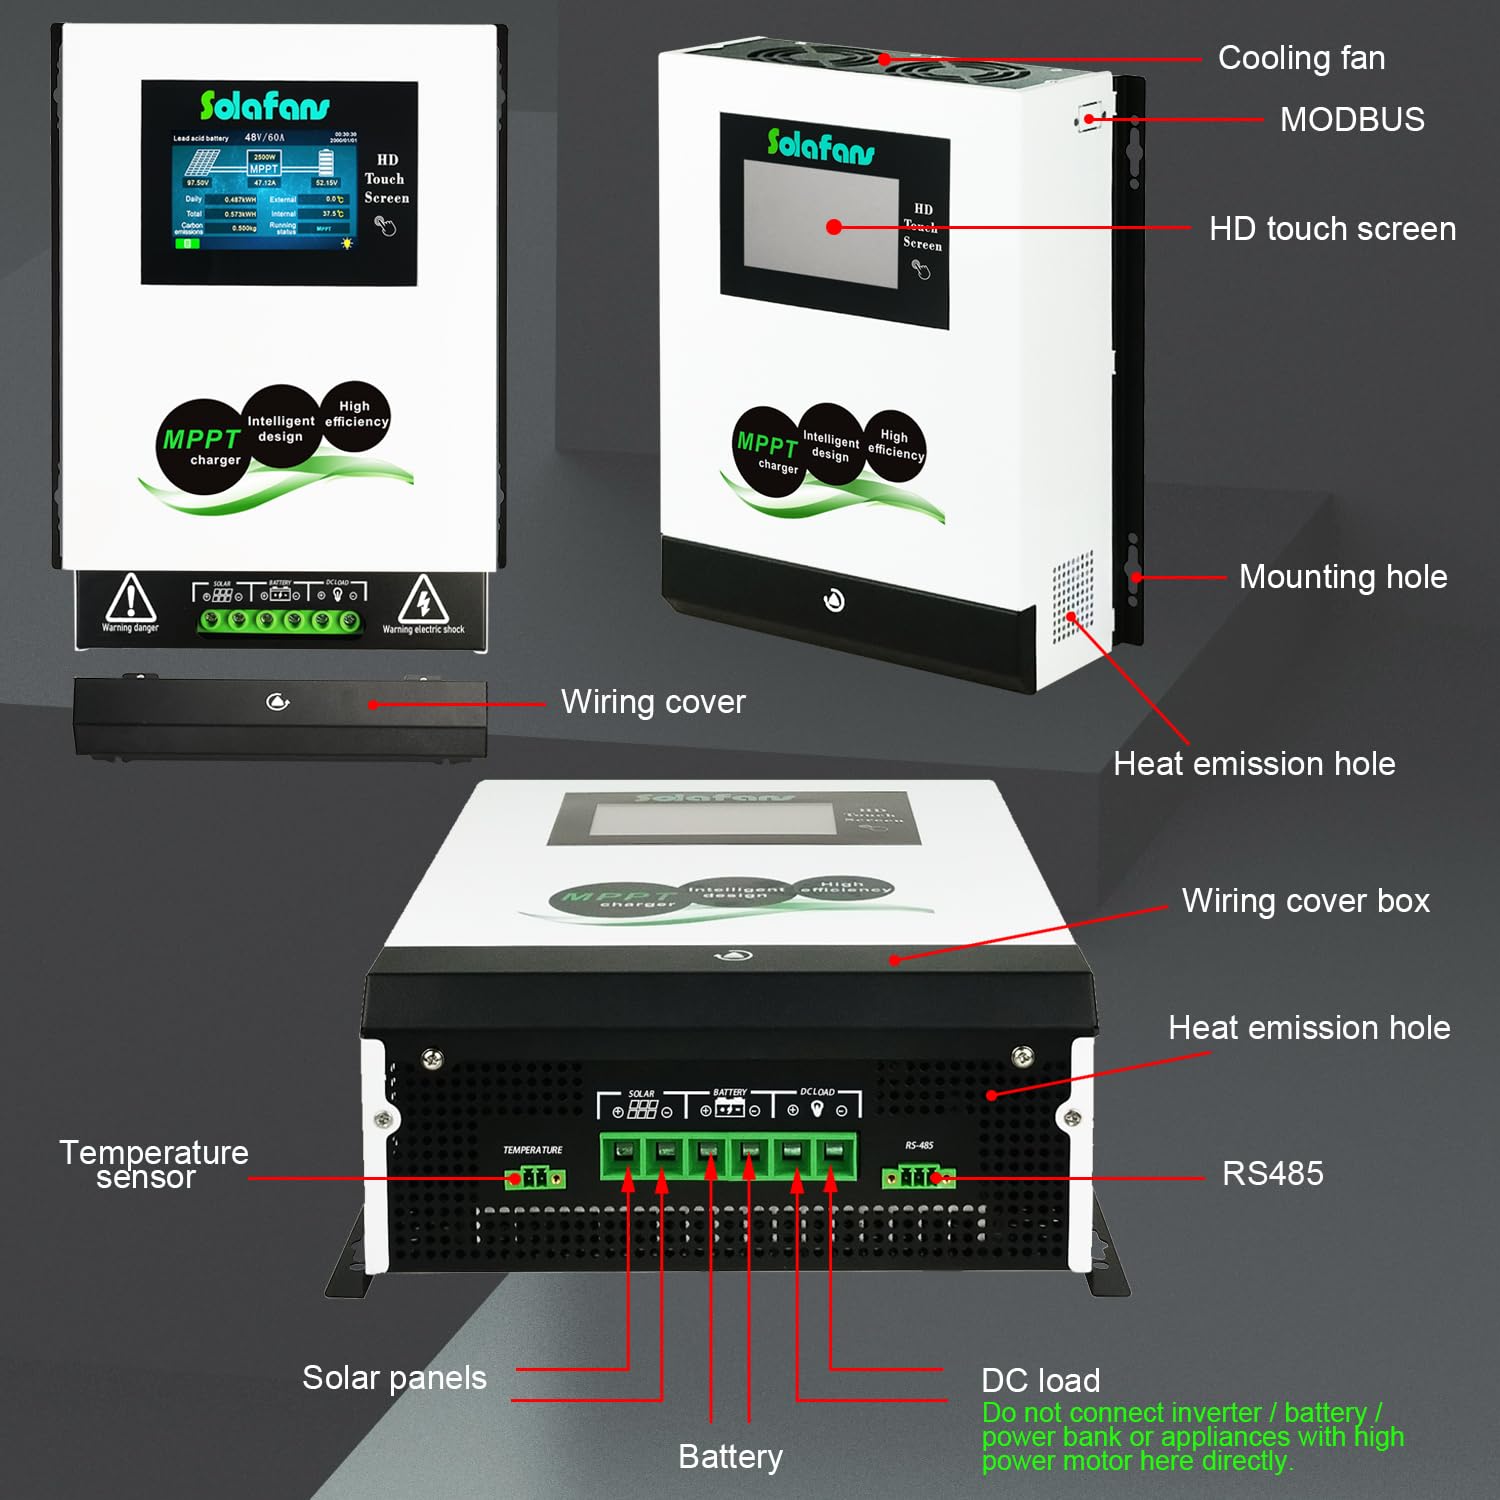
Figure 4: Front, side, and back views of the controller with labeled components.
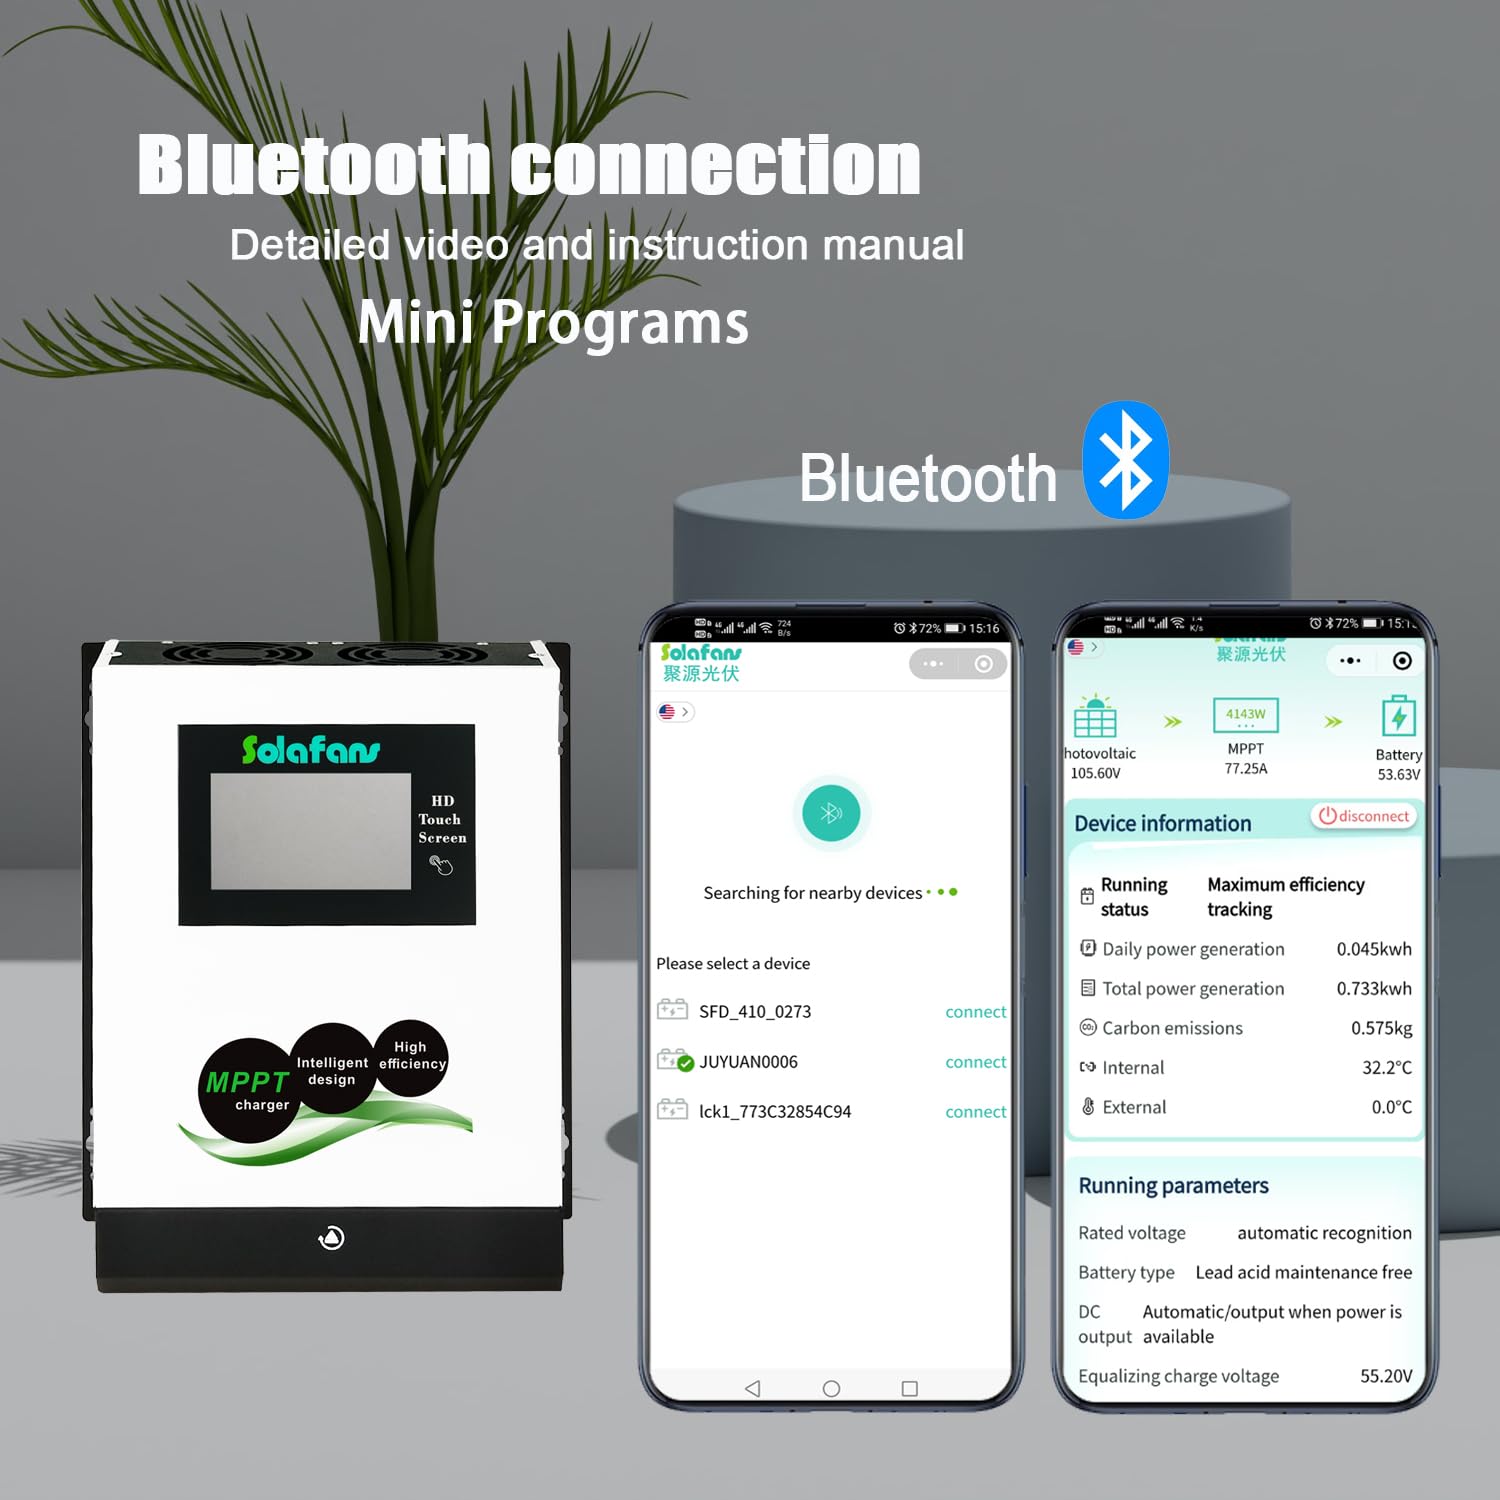
Figure 5: Detailed view of the controller's connection ports.
4.2 Wiring Instructions
Follow these steps for safe and correct wiring:
- Connect the Battery: First, connect the battery to the controller's battery terminals. Ensure correct polarity.
- Connect Solar Panels: Next, connect the solar panels to the controller's PV input terminals. Ensure correct polarity.
- Connect DC Load (Optional): If using, connect your DC load to the controller's DC load terminals. Remember not to connect high-power devices or inverters here.
- Temperature Sensor: Connect the temperature sensor to the designated port for accurate battery temperature compensation.
- Communication (Optional): If using RS485 or MODBUS, connect the respective communication cables.

Figure 6: Example of a complete solar power system connection.
4.3 Communication Protocol Selection
The controller supports both RS485 and MODBUS communication protocols. Choose the appropriate protocol based on your system requirements.
- For users without specific monitoring system requirements, either protocol can be used.
- If you intend to communicate with a monitoring system (e.g., SCADA, energy management platform) that requires specific register addresses or function codes, select MODBUS communication.
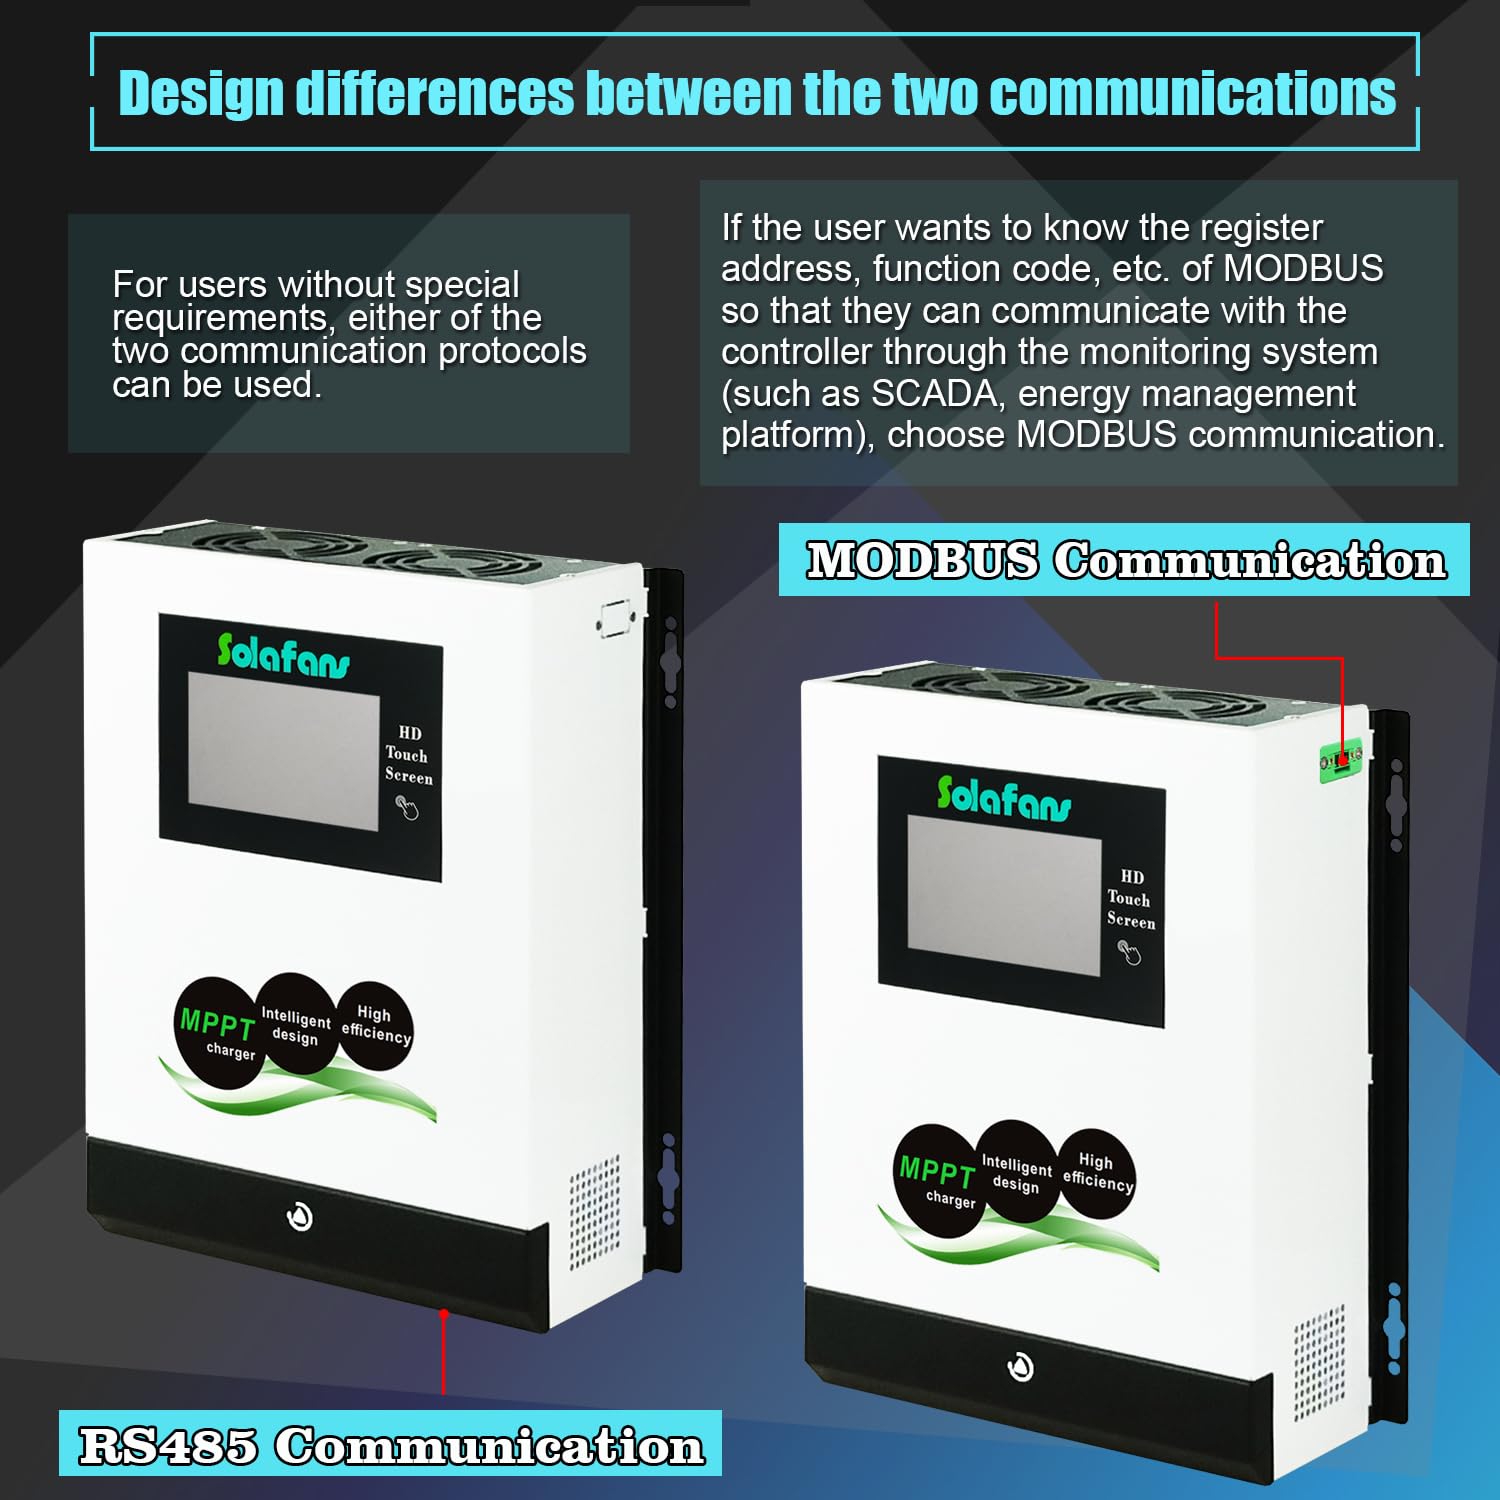
Figure 7: Design differences between RS485 and MODBUS communication models.
5. Operating Instructions
5.1 Touch Screen Operation
The 4.3" HD touch screen provides real-time data and allows for easy configuration. The screen can automatically enter sleep mode to conserve energy.
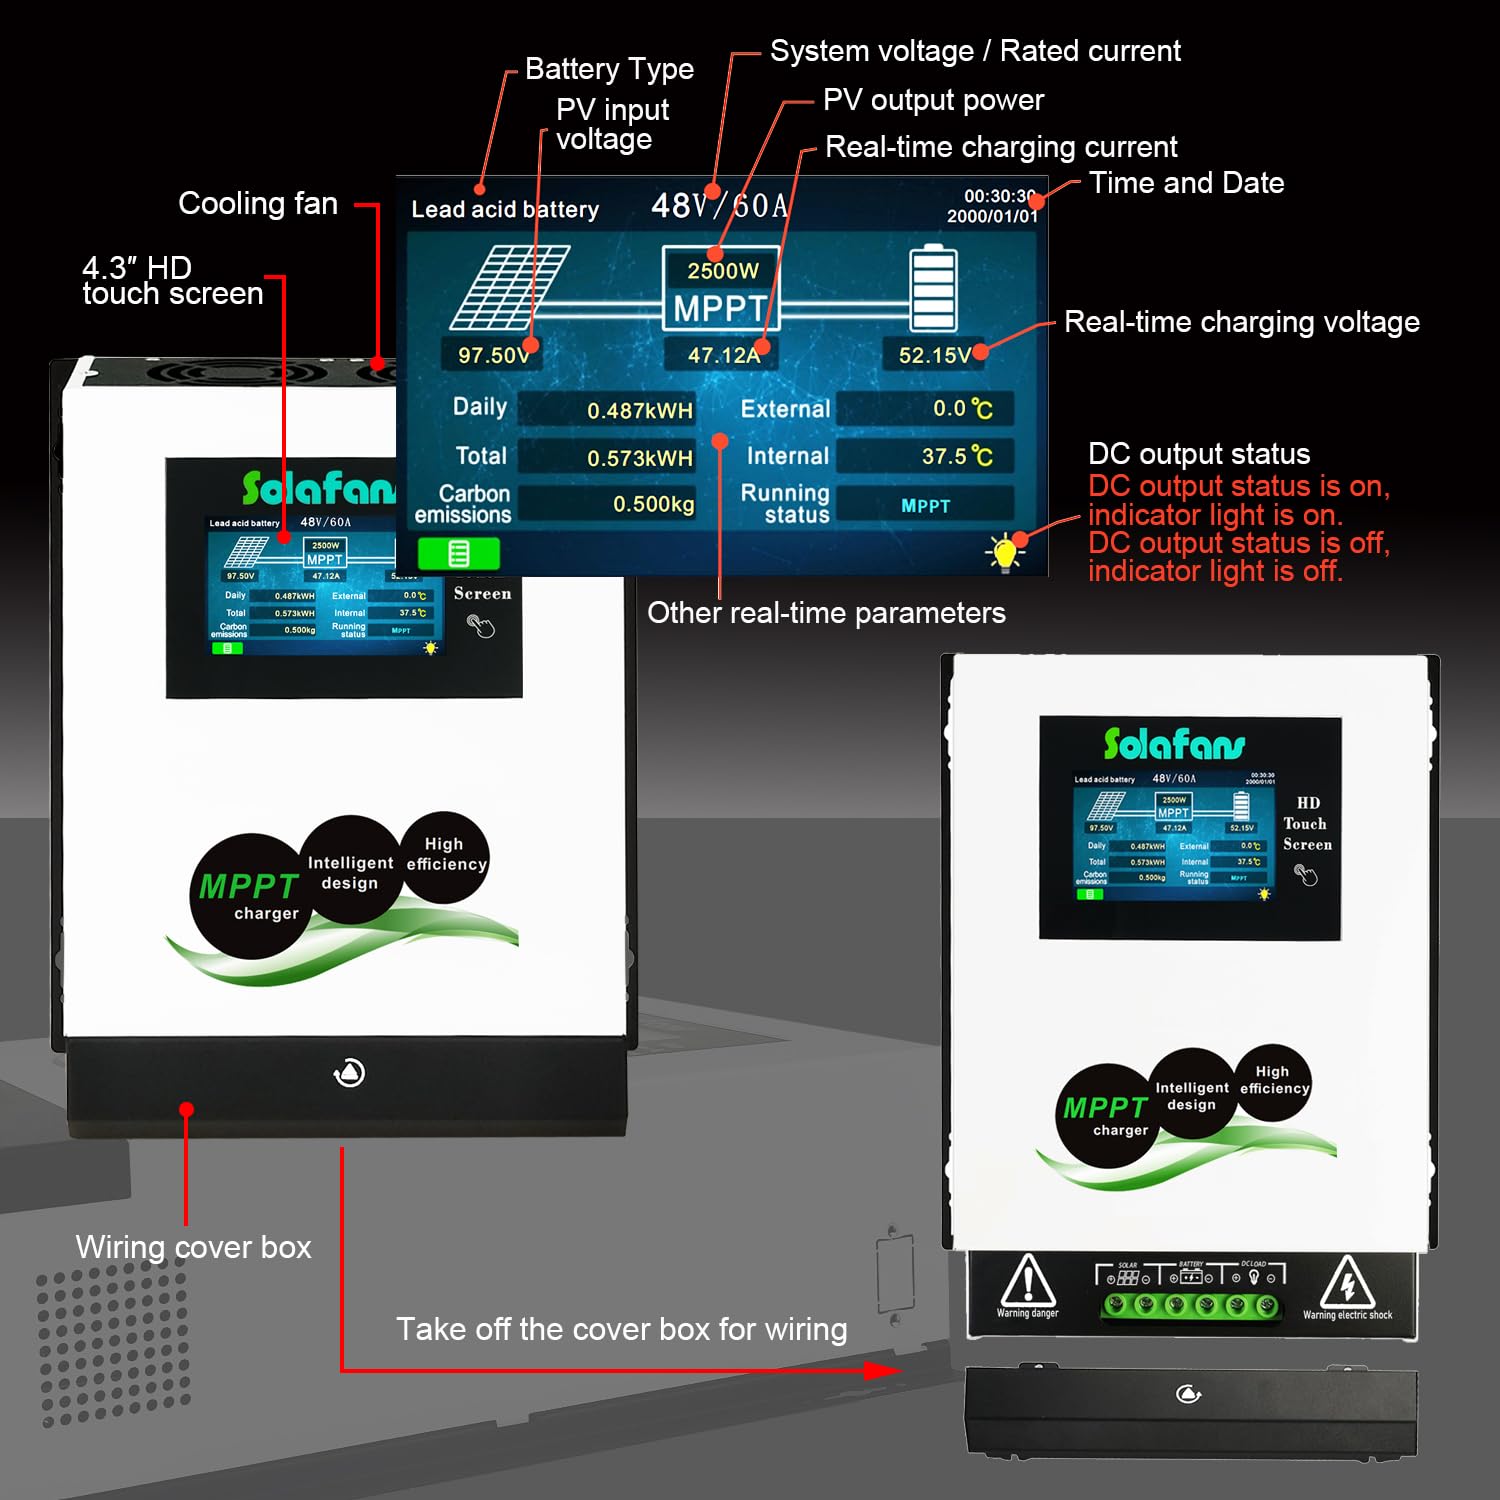
Figure 8: Touch screen interface displaying real-time system parameters.
5.2 Bluetooth Connection
Utilize the built-in Bluetooth applet for remote monitoring and parameter adjustments via your smartphone or tablet. Refer to the specific app instructions for pairing and usage.

Figure 9: Bluetooth connection and mobile app interface.
5.3 Battery Reactivation
The controller features an automatic battery re-activation function. It can detect and attempt to wake up deeply discharged or 'dead' batteries when sufficient solar power is available, extending battery life.

Figure 10: Battery reactivation feature and compatible battery types.
5.4 DC Load Control
The controller offers various DC load control modes, including Auto, Time control, and PV control, allowing you to manage power delivery to your DC loads efficiently.
5.5 Supported Battery Types
The SOLAFANS SF48V8090 is compatible with a range of battery chemistries:
- Lead Acid Battery
- Gel Battery
- Liquid Battery
- Lithium/LiFePO4 Battery
6. Specifications
| Specification | Value |
|---|---|
| Brand | SOLAFANS |
| Model Number | SF48V8090 |
| Item Weight | 8.36 pounds (3.8 Kilograms) |
| Product Dimensions | 9.69"L x 3.94"W x 11.89"H |
| Display Type | Touchscreen (4.3" HD) |
| Voltage | 48 Volts (DC) |
| Material | Metal |
| Included Components | MPPT controller |
| Max PV Input Voltage | DC150V (Voc up to DC170V) |
| Conversion Efficiency | Up to 98.1% |
| Static Power Consumption | ≤5W |
| Noise Level | ≤50dB |
| Certifications | FCC, RoHS, CE, PSE, SGS, METI Registration |
| UPC | 694743904994 |
7. Troubleshooting
This section addresses common issues and their potential solutions.
- Issue: MPPT parameter setting password.
Solution: The setting password is typically found on page 19 of the full user manual. - Issue: Controller not functioning without a solar panel.
Solution: The MPPT solar controller requires both a solar panel (or PV simulator) and a battery to operate. - Issue: Incorrect connection order.
Solution: Always connect the battery to the controller first, then connect the solar panels. Disconnect in the reverse order. - Issue: Using multiple controllers.
Solution: Multiple controllers can be connected in parallel, but they cannot be connected in series. - Issue: Inverter connected to controller's DC load output.
Solution: Do not connect an inverter to the controller's DC load output. Connect the inverter directly to the battery to prevent damage to the controller's DC load function. - Issue: Determining controller size for a 200W solar panel.
Solution: For a 12V battery system, a 20A MPPT controller is generally suitable for a 200W solar panel. Adjust based on your specific system voltage and total PV wattage.
8. Maintenance
Regular maintenance ensures the longevity and optimal performance of your solar charge controller:
- Cleaning: Periodically clean the controller's exterior, especially the cooling fans and heat emission holes, to prevent dust buildup and ensure proper heat dissipation. Use a soft, dry cloth.
- Connection Checks: Regularly inspect all wiring connections for tightness and corrosion. Loose connections can lead to power loss or overheating.
- Environmental Inspection: Ensure the installation environment remains dry, well-ventilated, and free from obstructions that could impede airflow.
- Firmware Updates: Check the manufacturer's website or app for any available firmware updates to ensure your controller has the latest features and bug fixes.
9. Warranty and Support
SOLAFANS products undergo 100% full load burn-in testing before shipping to ensure quality. For specific warranty terms, duration, or to obtain technical support, please contact SOLAFANS directly through their official channels or the retailer from whom the product was purchased. Please have your model number (SF48V8090) and purchase information ready when contacting support.