
Gyxel C025-340
Gyxel C025-340 Dual Swing Gate Opener Instruction Manual
Model: C025-340
1. Product Overview
The Gyxel C025-340 Dual Swing Gate Opener is a heavy-duty electric opener kit designed for driveway, home, and garden swing gates. It supports gates up to 660lb per leaf and 16ft in length. This system offers robust performance, multiple power options, and intelligent safety features for reliable and convenient gate automation.

Image: Seamless remote control automatic gate opening for convenient access.
Key Features:
- High-Performance Motor System: Equipped with a robust 60W motor for gates up to 660lbs or 16ft per leaf, ensuring smooth and stable operation with minimal energy consumption.
- Universal Compatibility: Designed for various residential and commercial applications, compatible with steel, wood, and vinyl gates. Supports both pull-to-open and push-to-open configurations.
- Multiple Power Options: Operates with standard 110V AC, optional 24V battery backup (not included), or solar panel charging system (solar components not included).
- Intelligent Safety Features: Includes smart chip-controlled arms with obstruction detection, auto-close security function, soft start/stop technology, and IP55 weather resistance for extreme temperatures (-7°F to 131°F).
- Complete Package: Comes with 2 remote controls (100ft range, expandable to 120 remotes) and a manual release key.
2. Package Contents
Verify that all components listed below are included in your package:
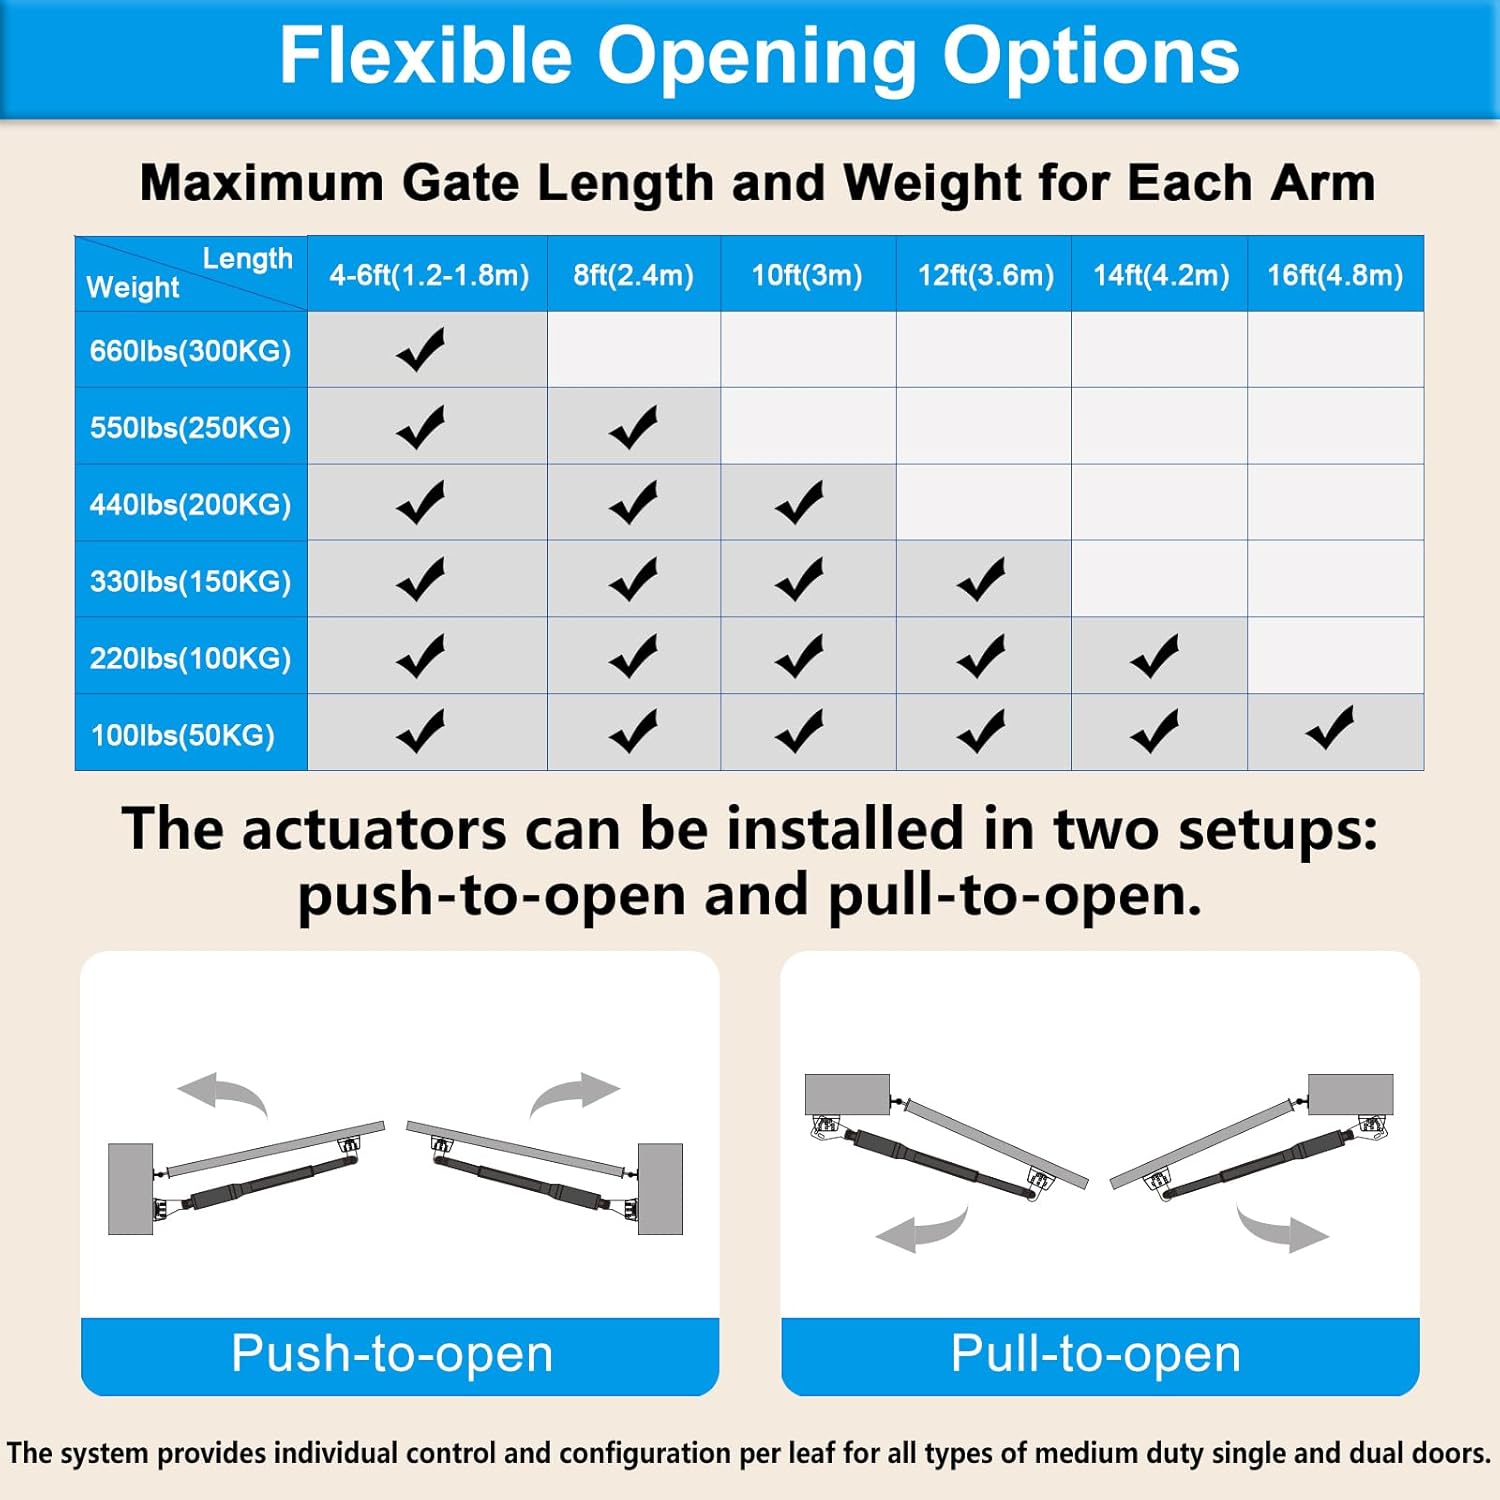
Image: Two remote controls with 100ft operation range, visor clip, and keychain.

Image: Automatic Dual Swing Gate Opener Part List, showing gate openers, control box kit, remote controls, rubber stopper, manual release keys, post brackets, front post brackets, bolts, clevis pins, hairpin clips, post pivot brackets, spanner, warning signs, and cables.
- Gate Opener (2 pcs)
- Control Box (1 pc)
- Control Box Screws Pack
- Remote Control (2 pcs)
- Remote Clip (2 pcs)
- Rubber Stopper (1 pc)
- Rubber Stopper Screw (2 pcs)
- Manual Release Key (2 pcs)
- Post Bracket (4 pcs)
- Front Post Bracket (2 pcs)
- Post Pivot Bracket (2 pcs)
- Bolt (12 pcs)
- Clevis Pin (4 pcs)
- Hairpin Clip (4 pcs)
- Spanner (Adjust Limit Switch)
- Warning Sign (2 pcs)
- 26 Feet Cable
- 6 Feet Cable With Plug
3. Specifications
| Specification | Detail |
|---|---|
| Manufacturer | Gyxel |
| Item Weight | 30 pounds |
| Package Dimensions | 35.7 x 10.2 x 8.9 inches |
| Size | Dual Swing Gate Opener |
| Color | Black |
| Material | Metal |
| Batteries Included? | Yes |
| Batteries Required? | Yes |
| Battery Cell Type | Alkaline |
| Max Gate Weight | 660 lbs per leaf |
| Max Gate Length | 16 ft per leaf |
| Motor Power | 60W DC Motors |
| Weather Resistance | IP55, -7°F to 131°F |

Image: Flexible Opening Options - Maximum Gate Length and Weight for Each Arm.
4. Setup and Installation
Proper installation is crucial for the safe and efficient operation of your Gyxel C025-340 Dual Swing Gate Opener. Follow these steps carefully.
4.1 Wiring the Control Board
Ensure the control board is properly wired before proceeding with physical installation. The green wire is used to connect with Ground. If not needed, insulate it. For AC 110V power, the red wire is the live wire and the blue wire is the neutral wire. You may use a connector to secure these connections.
Video: C025 Gate Opener Installation Video of Wiring. This video demonstrates how to correctly wire the control board for AC electricity.
4.2 Mounting the Gate Opener
Assemble the gate and post brackets as shown. Fix the gate opener to both brackets using a clevis pin and secure it with a hairpin clip. Determine the mounting position by closing the gate manually and holding the opener in place. Mark the drill holes on the gate body. Drill the holes and install the post and gate brackets securely. When using a single leaf gate opener, connect the cable to the Motor 2 port.
Video: Installation Video of C025 Gate Opener. This video provides a step-by-step guide for the physical installation of the gate opener components.
4.3 Adjusting Limit Switches
The gate opener features adjustable limit switches (A and B) to control the opening and closing angles. If the gate does not open fully, fine-tune limit switch A by moving it to the left to increase the opening angle. If the gate does not close fully, fine-tune limit switch B. Moving it to the left decreases the closing angle, while moving it to the right increases it.

Image: Customizable Opening Options, illustrating push-to-open and pull-to-open configurations.
5. Operating Instructions
Your Gyxel C025-340 Dual Swing Gate Opener can be operated using the included remote controls or an optional keypad.
5.1 Remote Control Operation
The remote controls allow you to open and close your gate from up to 100 feet away. Press the designated button on the remote to activate the gate opener.

Image: Open your gate from 100 ft away with the remote control.
5.2 Keypad Operation and Programming
The optional keypad provides an alternative method for controlling your gate. It features a waterproof design and supports 4-digit passcodes and IC card swiping.
Video: Gate Keypad Function & Installation Programming Video. This video details how to add the keypad to the gate opener, operate it, program master and user passcodes, add IC cards, check battery power, and utilize anti-spying features.
5.2.1 Keypad Overview
The keypad features a backlight, buzzer sounds, and a lithium battery. It has a Type-C charging port and a power ON/OFF/Reset button accessible via a pin on the back.
5.2.2 Adding Keypad to Gate Opener
To add the keypad, short press the "Learn" button on the control board until the RF LED turns blue. Enter your 4-digit passcode followed by #. The keypad's green LED will indicate a successful RF signal transmission, and the controller's RF LED will blink.
5.2.3 Operating the Keypad
Enter your 4-digit passcode followed by # to control the gate opener. Channel 1 (default 1111#) controls a single gate (Open-Stop-Close), and Channel 2 (default 2222#) controls both gates (Open-Stop-Close).
5.2.4 Programming Master Passcode
The default master passcode is 0000. To program a new master passcode (e.g., 8888):
- Enter 0000 and *. The keypad will sound a long beep.
- Enter 69 and #. The keypad will sound a long beep.
- Enter a new master passcode (e.g., 8888) and #. The keypad will sound a long beep followed by a short beep to confirm.
5.2.5 Erasing and Modifying User Passcodes
To erase all user passcodes (reset to default 1111 for Channel 1, 2222 for Channel 2):
- Enter your master passcode (e.g., 8888) and *.
- Enter 00 and #. The keypad will sound a long beep, confirming all passcodes have been deleted.
To modify a user passcode (e.g., set Channel 1 to 5555):
- Enter your master passcode (e.g., 8888) and *.
- Enter 01 (for Channel 1) and #. The keypad will sound a long beep.
- Enter the new 4-digit passcode (e.g., 5555) and #. The keypad will sound a long beep followed by a short beep to confirm.
5.2.6 Adding IC Card
To add an IC card to a channel (e.g., Channel 1):
- Enter your master passcode (e.g., 8888) and *.
- Enter 01 (for Channel 1) and #. The keypad will sound a long beep.
- Swipe the IC card over the keypad. A short beep confirms success.
5.2.7 Battery Power Checking
To check the keypad's battery power:
- Enter your master passcode (e.g., 8888) and *.
- Enter 89 and #. A long beep means the battery has a serviceable life. A short beep accompanied by a lit red light means the battery needs charging.
5.2.8 User Passcode Anti-Spying
The keypad includes an anti-spying function. To prevent your passcode from being spied on, you can enter any numerical buttons (0-9) before and after your actual 4-digit passcode, ensuring the correct passcode is entered in the right order, followed by #.
6. Maintenance
Regular maintenance ensures the longevity and optimal performance of your gate opener.
- Visual Inspection: Periodically check all mounting hardware, brackets, and gate components for signs of wear, damage, or loose connections. Tighten any loose bolts or screws.
- Lubrication: Lubricate moving parts of the gate and opener arms as recommended in the detailed manual to ensure smooth operation.
- Cleanliness: Keep the gate opener arms and control box free from dirt, debris, and insects. Ensure the limit switches are clear of obstructions.
- Battery Check: If using a battery backup, regularly check the battery's charge status and replace it if it no longer holds a charge.
- Safety Features: Periodically test the obstruction detection feature to ensure it functions correctly.
7. Troubleshooting
If you encounter issues with your gate opener, refer to the following troubleshooting tips. For complex problems, contact customer support.
7.1 Power Supply Issues
If the control board does not receive power, check the fuses and power connections. The control board has a 3A fuse for the AC transformer and a 10A fuse on the board itself. Use a test pen or multimeter to verify power at various points.
Video: Control Board Power Supply Abnormality Detection. This video guides you through checking the power supply to the control board and identifying potential issues with fuses or connections.
Video: Multimeter Detects Abnormal Power Supply on Control Board. This video demonstrates how to use a multimeter to diagnose power supply issues on the control board.
7.2 Gate Not Opening/Closing
- Check Power: Ensure the control board is receiving power (refer to 7.1).
- Remote/Keypad Battery: Replace batteries in remote controls or charge the keypad if necessary.
- Obstructions: Clear any physical obstructions in the gate's path.
- Limit Switches: Verify that the limit switches are correctly set and not preventing full movement.
- Manual Release: If the gate is stuck, use the manual release key to operate it manually.
7.3 Keypad Not Responding
- Power On: Ensure the keypad is powered on by pressing the ON/OFF button on the back.
- Battery: Charge the keypad's lithium battery if it's low.
- Reset: If the keypad is unresponsive, remove the dust plug from the back case and press and hold the reset button for about 10 seconds. This will reset all passcodes and IC cards to factory default.
8. Warranty and Support
Gyxel provides comprehensive support for your gate opener:
- 30-Day Return Policy: For returns or exchanges.
- 12-Month Warranty: Covers manufacturing defects and malfunctions under normal use.
- Lifetime Technical Assistance: Professional engineers are available to respond within 24 hours for any technical issues.
If you have any issues, please follow the instructions in this manual. If possible, take a video and send it to us. That will help us diagnose the problem accurately and provide better after-sales service.
Ask a question about this manual
Ask about setup, troubleshooting, compatibility, parts, safety, or missing instructions. Manuals+ will review the question and use this page’s manual context to help answer it.