1. Introduction
This manual provides detailed instructions for the assembly, operation, and maintenance of your DurayLoly 63-inch Gaming Desk. Please read all instructions carefully before beginning assembly and retain this manual for future reference. This desk is designed to enhance your gaming or work setup with integrated LED lighting, convenient power outlets, and versatile storage solutions.

Figure 1: Fully assembled DurayLoly 63-inch Gaming Desk.
2. Safety Information
- Ensure all components are securely fastened before use.
- Do not overload shelves or the desktop beyond specified weight limits.
- Keep liquids away from electrical outlets and connections.
- Avoid placing hot items directly on the desk surface without protection.
- Children should be supervised when near the desk, especially during assembly.
3. Package Contents
Verify that all parts are present before beginning assembly. Refer to the included parts list in your physical manual for specific component identification.

Figure 2: All desk components unboxed and laid out for assembly.
4. Setup and Assembly
Follow these steps to assemble your DurayLoly Gaming Desk. It is recommended to have a second person assist with certain steps.
Video 1: Unboxing and initial assembly overview of the gaming desk.
- Unpack Components: Carefully remove all parts from the packaging. Organize them by type and size. Refer to the parts list to ensure all pieces are present.
- Assemble the Main Frame: Connect the main metal frame pieces using the provided screws and tools. Ensure all connections are snug but do not overtighten until the desk is fully assembled.
- Attach Desktop Panels: Secure the main desktop panels to the assembled frame. Align pre-drilled holes and fasten with screws.
- Install Storage Drawers: Assemble the fabric drawers according to the instructions. Insert them into their designated slots on the side shelving unit.
- Mount Power Outlet Strip: Carefully place the integrated power outlet strip into its designated cutout on the desktop. Secure it with the provided screws. Connect the power cable.
- Attach Monitor Stand: Position the monitor stand on the desktop as desired and secure it. This elevates your monitor for ergonomic viewing.
- Install Side Shelving and Hooks: Attach the side shelving units. The design allows for reversible installation (left or right side). Install the S-hooks onto the metal grid for hanging accessories.
- Connect LED Lights: Adhere the LED light strip to the underside of the monitor stand or desired location. Connect it to the power supply.
- Final Tightening: Once all components are in place, go back and securely tighten all screws.
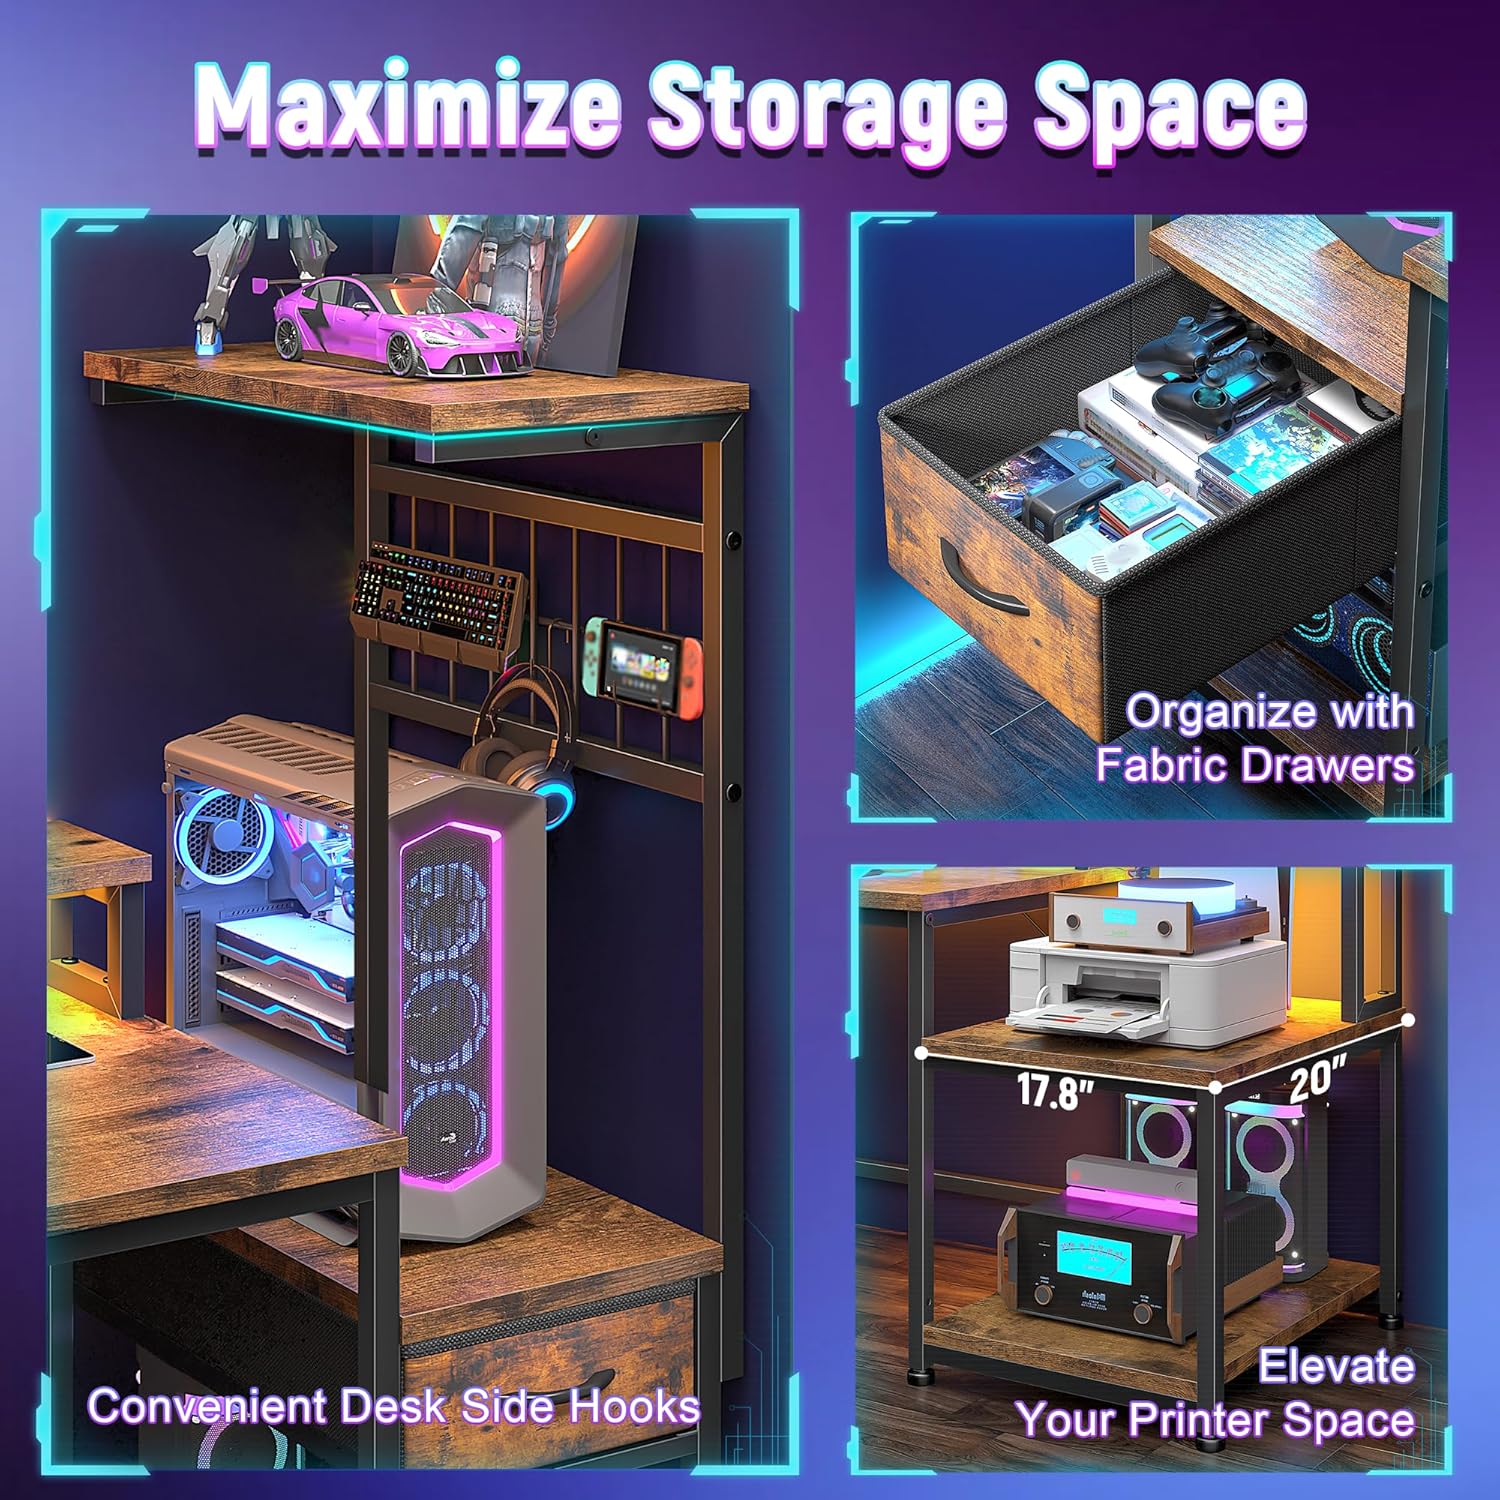
Figure 3: Partial assembly of the desk, highlighting the drawer and shelving unit.
5. Operating Instructions
5.1. LED Lighting System
The desk features an integrated LED lighting system with customizable colors and modes.
- Power On/Off: Use the remote control to turn the LED lights on or off.
- Color Selection: Select from 20 static colors using the color buttons on the remote.
- Dynamic Modes: Choose from 20 dynamic modes (e.g., flash, strobe, fade) to create different ambiance.
- Brightness Adjustment: Adjust the brightness levels using the 'BRIGHT+' and 'BRIGHT-' buttons.
- Memory Function: The system retains your last selected settings when powered off and on.

Figure 4: The desk's LED lighting system showcasing various color options.
5.2. Integrated Power & Charging Station
The desk includes a built-in power strip for convenient device charging and power access.
- AC Outlets: Features 3 standard AC outlets (125V/12A) for powering monitors, computers, and other electronics.
- USB Ports: Includes 1 USB-A port (5V/2A) and 1 Type-C port (5V/2A) for charging mobile devices.
- Usage: Simply plug your devices into the appropriate ports. Ensure the desk's main power cable is connected to a wall outlet.
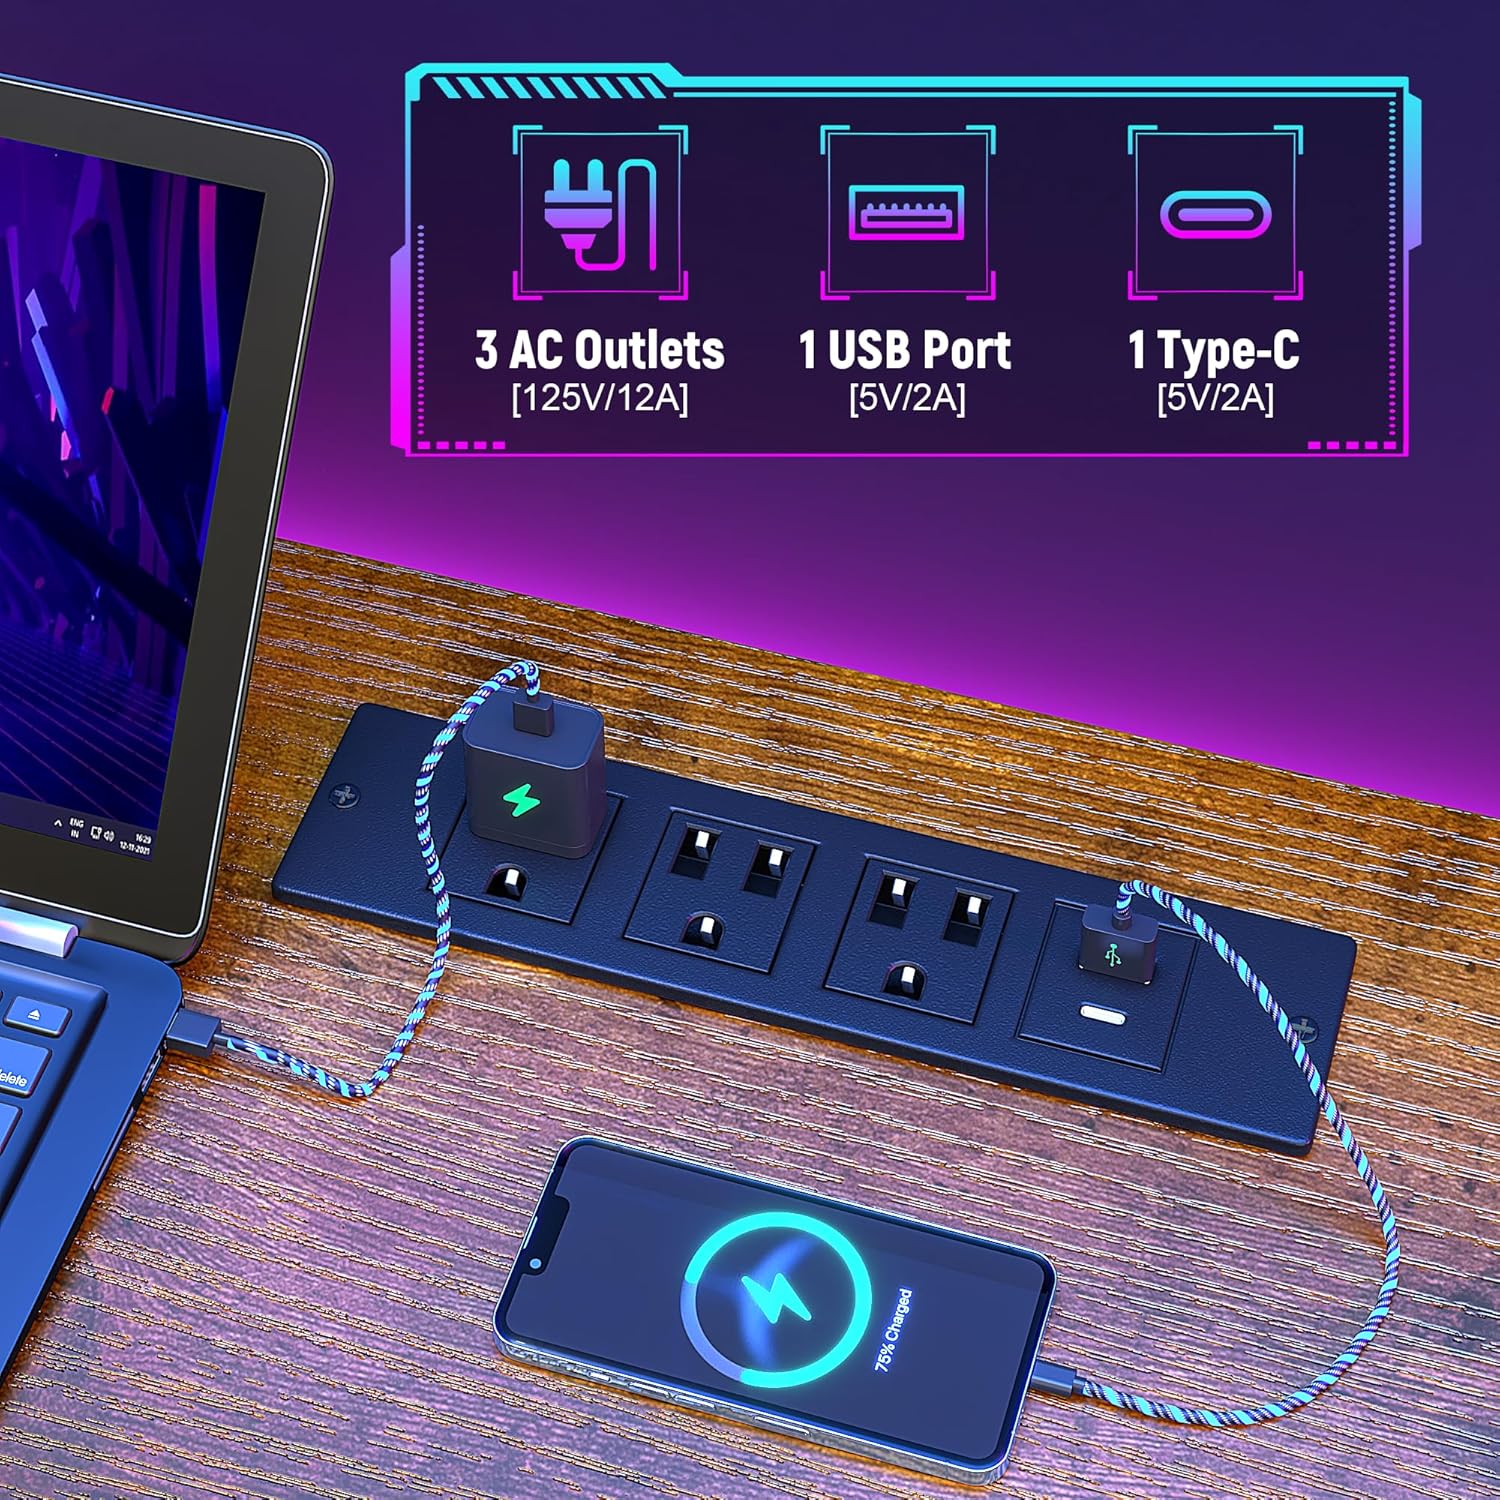
Figure 5: Detail of the integrated power strip with AC outlets and USB ports.
5.3. Flexible Storage Solutions
Utilize the various storage options to keep your workspace organized.
- Fabric Drawers: Use the pull-out fabric drawers for storing smaller items, documents, or gaming accessories.
- Shelving Units: The multi-tiered shelves provide space for printers, consoles, books, or decorative items.
- S-Hooks: Hang headphones, cables, or other peripherals on the integrated S-hooks for easy access.

Figure 6: Side view of the desk, illustrating the hanging hooks and storage shelves.
5.4. Ergonomic Monitor Stand
The elevated monitor stand promotes better posture and frees up desktop space.
- Optimal Viewing: Place your monitor(s) on the stand to raise them to an ergonomic eye level, reducing neck and eye strain.
- Space Optimization: The space beneath the monitor stand can be used for storing keyboards, mice, or other small items when not in use.

Figure 7: Visual representation of ergonomic posture with and without a monitor stand.
6. Maintenance
- Cleaning: Wipe the desk surfaces with a soft, damp cloth. Avoid harsh chemicals or abrasive cleaners that may damage the finish.
- Dusting: Regularly dust all surfaces, including shelves and the LED strip, to maintain appearance and functionality.
- Hardware Check: Periodically check all screws and connections to ensure they remain tight. Retighten if necessary.
- Cable Management: Keep cables organized to prevent tripping hazards and maintain a tidy workspace.
7. Troubleshooting
| Problem | Possible Cause | Solution |
|---|---|---|
| Desk is wobbly | Loose screws; uneven floor | Tighten all assembly screws. Adjust the non-slip feet on the desk legs to stabilize on uneven surfaces. |
| LED lights not working | Power disconnected; remote battery low; faulty strip | Ensure the LED strip is properly connected to its power source and the desk is plugged in. Replace remote control batteries. Contact support if the issue persists. |
| Power outlets not functioning | Desk not plugged in; circuit breaker tripped; faulty outlet strip | Verify the desk's main power cable is securely plugged into a working wall outlet. Check your home's circuit breaker. Test with another device. |
| Drawer not sliding smoothly | Obstruction; improper assembly | Check for any items blocking the drawer. Ensure the drawer was assembled correctly and is seated properly in its slot. |
8. Specifications
| Feature | Detail |
|---|---|
| Brand | DurayLoly |
| Product Dimensions | 19.6"D x 63"W x 51"H |
| Color | Brown (Rustic Brown finish) |
| Style | Modern |
| Top Material Type | Wood |
| Base Type | Metal |
| Number of Shelves | 2 |
| Power Outlets | 3 AC Outlets (125V/12A) |
| USB Ports | 1 USB Port (5V/2A), 1 Type-C Port (5V/2A) |
| LED Lighting | 20 static colors, 20 dynamic modes, remote control, memory function |
| Assembly Required | Yes |
9. Warranty and Support
For warranty information, product support, or to purchase replacement parts, please contact DurayLoly customer service through the retailer where the product was purchased or visit the official DurayLoly website. Please have your model number (B0F8Q63BBH) and purchase date available when contacting support.
DurayLoly Store: Visit the DurayLoly Store on Amazon


