Arionyx DOP-107HE425
Arionyx H Series Teaching Pendant HMI User Manual
Models: DOP-107HE425, DOP-107HE465, DOP-107HE46A, DOP-107HE42A
Brand: Arionyx
1. Introduction
This manual provides comprehensive instructions for the installation, operation, and maintenance of the Arionyx H Series Teaching Pendant Human Machine Interface (HMI). The H Series is designed for industrial applications, offering robust performance and user-friendly interaction for controlling and monitoring various systems.
Key Features:
- Durability and Ruggedness: Designed for extreme industrial conditions, featuring water resistance and other protective characteristics.
- High-Resolution Display and Touchscreen: Equipped with high-resolution touchscreens for clear images and responsive operation.
- Wide Range of Communication Interfaces and Protocol Support: Supports multiple communication interfaces for versatile integration.
- User-Friendly Programming and Configuration Tools: Offers intuitive programming software, typically with drag-and-drop interfaces and extensive graphic libraries.
- Data Logging and Analysis: Includes capabilities for storing production data and event logs.
2. Setup and Installation
2.1 Unpacking and Initial Inspection
Carefully unpack the HMI unit and inspect it for any signs of damage during transit. Verify that all components listed in the packing list are present. If any damage or missing parts are found, contact your supplier immediately.
2.2 Product Overview

Figure 2.2.1: Front view of the Arionyx H Series Teaching Pendant HMI, showing the display screen, control buttons, and emergency stop button.

Figure 2.2.2: Back view of the Arionyx H Series Teaching Pendant HMI, illustrating the rear casing and cable entry point.

Figure 2.2.3: Underside view of the Arionyx H Series Teaching Pendant HMI, showing the cable connection and mounting features.
2.3 Model Description and Dimensions
Understanding the model description is crucial for identifying specific features and specifications of your HMI unit. Refer to the diagram below for a detailed breakdown of the model numbering system.
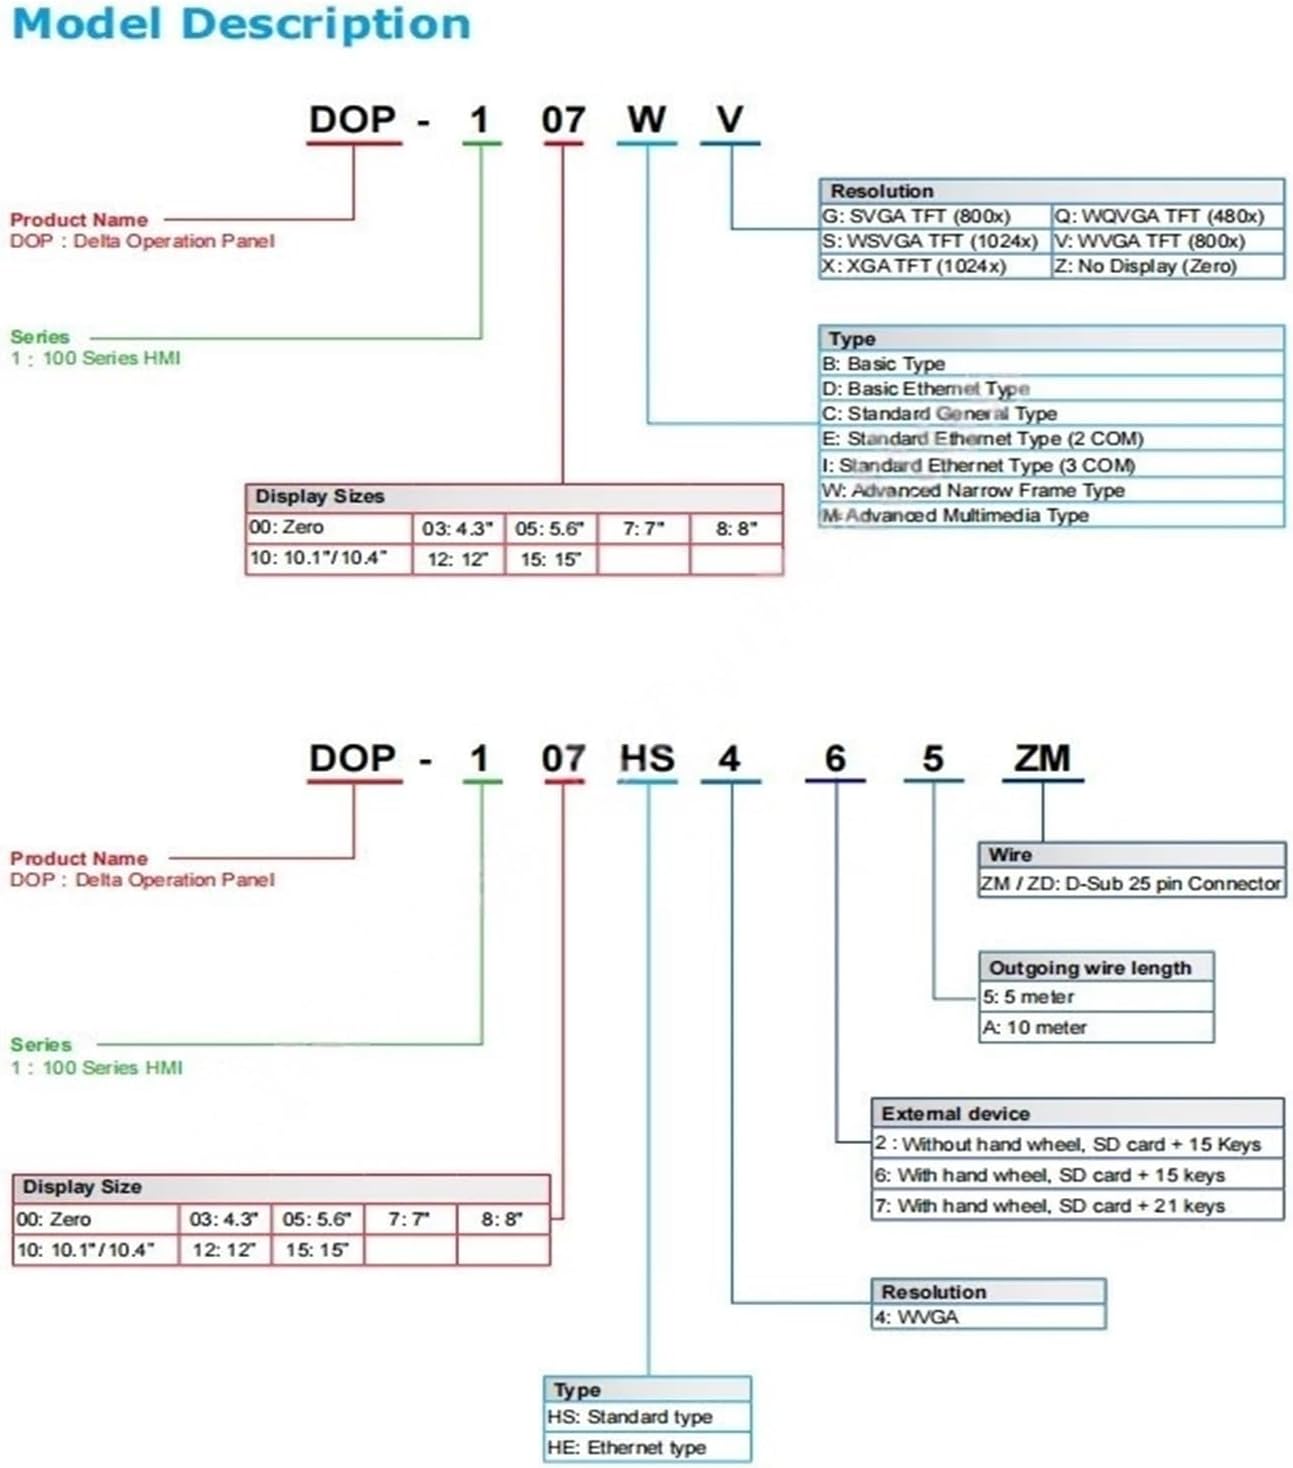
Figure 2.3.1: Arionyx HMI Model Description Diagram, detailing product name, series, display sizes, resolution, type, wire, outgoing wire length, and external device options.
The physical dimensions of the HMI are important for proper integration into your system. The following diagram provides detailed measurements.

Figure 2.3.2: Dimensional drawing of the Arionyx H Series Teaching Pendant HMI, showing various measurements in millimeters and inches.
2.4 Electrical Connections
Ensure all power and communication cables are connected securely according to the system's wiring diagram. Refer to the specific wiring instructions provided with your equipment for detailed connection procedures. Always ensure power is disconnected before making or breaking any electrical connections.
2.5 Mounting
The HMI is designed for handheld operation or can be mounted using appropriate fixtures. Ensure the mounting location is stable, free from excessive vibration, and within the specified operating temperature range. Allow adequate space for ventilation and cable routing.
3. Operating Instructions
3.1 Powering On/Off
- Power On: Connect the HMI to a compatible power source. The device will typically boot up automatically.
- Power Off: It is recommended to shut down the HMI through the software interface if available, or by safely disconnecting the power supply after ensuring all operations are complete.
3.2 Touchscreen Operation
The HMI features a high-resolution touchscreen for intuitive interaction. Use a finger or a non-abrasive stylus for input. Avoid using sharp objects that could damage the screen surface.
3.3 Button Functions
The HMI is equipped with physical buttons for critical functions:
- MENU: Accesses the main menu or system settings.
- ESC: Returns to the previous screen or cancels an operation.
- ENTER: Confirms a selection or input.
- PRE / NEXT: Navigates through pages, options, or data entries.
- AUTO / MODE / HOME: Specific function buttons for automated modes, changing operational modes, or returning to a home screen, depending on the application.
- RUN / PAUSE / STOP: Control buttons for starting, pausing, or stopping processes.
- Emergency Stop Button (Red): Immediately halts all connected operations. This is a critical safety feature. Press firmly to activate. Twist to reset.
3.4 Programming and Configuration
The HMI utilizes user-friendly programming software for creating and configuring user interfaces. This software typically includes drag-and-drop functionality and extensive graphic libraries. Refer to the separate programming software manual for detailed instructions on application development and deployment.
3.5 Data Logging and Analysis
The HMI supports data logging capabilities, allowing for the storage of production data and event logs. This data can be used for performance analysis, troubleshooting, and process optimization. Consult the programming manual for information on configuring data logging parameters and accessing logged data.
4. Maintenance
4.1 Cleaning
To clean the HMI, power off the device and gently wipe the screen and casing with a soft, lint-free cloth dampened with a mild, non-abrasive cleaning solution. Avoid using harsh chemicals, solvents, or abrasive materials that could damage the display or casing. Ensure no liquid enters the device.
4.2 Storage
When not in use for extended periods, store the HMI in a cool, dry place, away from direct sunlight, extreme temperatures, and high humidity. Protect it from dust and physical impact.
4.3 General Care
- Avoid dropping or subjecting the HMI to severe shocks.
- Do not attempt to open or repair the unit yourself, as this will void the warranty and may cause further damage.
- Ensure proper ventilation around the unit during operation to prevent overheating.
5. Troubleshooting
This section provides solutions to common issues you might encounter. If the problem persists after following these steps, please contact technical support.
| Problem | Possible Cause | Solution |
|---|---|---|
| Device does not power on. | No power supply; loose power cable; faulty power adapter. | Check power connection; ensure power source is active; try a different power outlet or adapter if available. |
| Touchscreen unresponsive. | Screen calibration issue; software freeze; physical damage. | Restart the device; recalibrate the touchscreen (refer to programming manual); inspect for physical damage. |
| Communication error with connected device. | Incorrect cable connection; wrong communication settings; incompatible protocol. | Verify cable integrity and connection; check communication parameters (baud rate, parity, data bits); ensure protocol compatibility. |
| Display is dim or flickering. | Backlight settings; power supply issue; hardware malfunction. | Adjust brightness settings; ensure stable power supply; contact support if problem persists. |
6. Specifications
The following table outlines the general specifications for the Arionyx H Series Teaching Pendant HMI. Specific models may have variations.
| Attribute | Detail |
|---|---|
| Product Name | Arionyx H Series Teaching Pendant HMI |
| Models Covered | DOP-107HE425, DOP-107HE465, DOP-107HE46A, DOP-107HE42A |
| Display Type | High-Resolution Touchscreen |
| Durability | Industrial-grade, water-resistant design |
| Communication Interfaces | Multiple interfaces supported (e.g., Ethernet, Serial - specific to model) |
| Data Logging | Supported for production data and event logs |
| Package Dimensions | 0.39 x 0.39 x 0.39 inches (approximate shipping dimensions) |
| Item Weight | 6.61 pounds |
| Manufacturer | Arionyx |
7. Warranty and Support
7.1 Warranty Information
Arionyx products are manufactured to high-quality standards. For specific warranty terms and conditions, please refer to the warranty card included with your product or visit the official Arionyx website. Typically, the warranty covers defects in materials and workmanship under normal use.
7.2 Technical Support
If you encounter any issues that cannot be resolved using the troubleshooting guide, or require further assistance, please contact Arionyx technical support. Have your product model number and serial number ready when contacting support.
For support, please visit the official Arionyx website or contact your local distributor.
Ask a question about this manual
Ask about setup, troubleshooting, compatibility, parts, safety, or missing instructions. Manuals+ will review the question and use this page’s manual context to help answer it.