1. Introduction
This manual provides essential information for the safe and effective use of your NASTIMA 12V 5000mAh Li-ion replacement battery. This battery is designed for specific Neato Botvac D Series and Botvac robot vacuum cleaners. Please read this manual thoroughly before installation and use to ensure optimal performance and longevity of your battery.
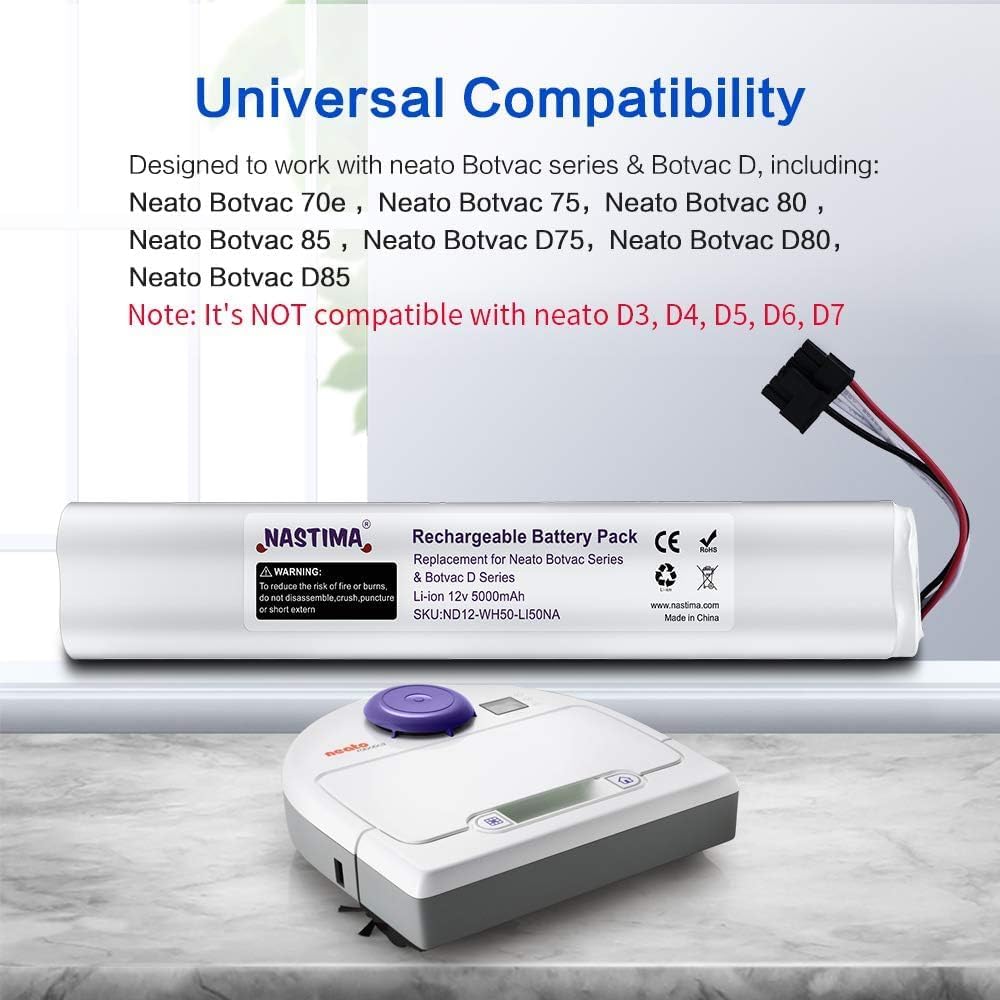
Image 1.1: NASTIMA 12V 5000mAh Li-ion Replacement Battery. This image shows the cylindrical battery pack with its connector cable.
2. Safety Information
Always adhere to the following safety guidelines to prevent injury or damage to the battery and your device.
- WARNING: To reduce the risk of fire or burns, do not disassemble, crush, puncture, or short circuit externally.
- Do not expose the battery to high temperatures or direct sunlight.
- Keep the battery away from water or other liquids.
- Do not use the battery if it shows signs of damage, swelling, or leakage.
- Dispose of used batteries according to local regulations. Do not dispose of in household waste.
The NASTIMA battery features advanced circuitry with built-in safeguards, including:
- Temperature deviation protection
- Over-current protection
- Over-charge protection
- Over-discharge protection
- Short circuit protection
- Over-voltage protection

Image 2.1: Icons representing the safety and convenience features of the NASTIMA battery, including various protection mechanisms.
3. Setup & Installation
This NASTIMA battery is compatible with the following Neato robot vacuum cleaners:
- Neato Botvac D Series: D85, D80, D75
- Neato Botvac: 70e, 75, 80, 85
- Part Numbers: 945-0129, 945-0174
Note: This battery has a 4-wire connector and is NOT compatible with Neato D3, D4, D5, D6, D7 models.

Image 3.1: Visual representation of the NASTIMA battery and compatible Neato Botvac D Series and Botvac models (70e, 75, 80, 85, D75, D80, D85).
Battery Installation Steps:
- Power Off: Ensure your Neato robot vacuum cleaner is powered off and disconnected from its charging base.
- Access Battery Compartment: Locate the battery compartment on the underside of your robot vacuum. This usually involves removing a few screws and a cover plate. Refer to your vacuum cleaner's original manual for specific instructions on accessing the battery.
- Remove Old Battery: Carefully disconnect the old battery's connector from the vacuum's port. Remove the old battery.
- Install New Battery: Connect the NASTIMA replacement battery's 4-wire connector to the corresponding port in the vacuum cleaner. Ensure the connection is secure.
- Secure Battery: Place the new battery into the compartment.
- Close Compartment: Replace the battery compartment cover and secure it with the screws.
- Initial Charge: Place the robot vacuum back on its charging base for an initial full charge before its first use.

Image 3.2: A visual guide demonstrating the process of replacing a battery in a robotic vacuum cleaner.
4. Operation
Once the NASTIMA replacement battery is correctly installed and fully charged, your Neato robot vacuum cleaner will operate as usual. The advanced Li-ion technology provides enhanced performance compared to original NiMH batteries.
- Extended Run Time: Expect a longer working time of approximately 70-90 minutes per charge, compared to the typical 50-70 minutes of original 3.6Ah batteries.
- No Memory Effect: Lithium-ion batteries do not suffer from memory effect, meaning you can charge them at any time without reducing their overall capacity.

Image 4.1: A graphic comparing the run time of a NASTIMA 5000mAh battery (90-120 minutes) against an original 3000mAh battery (50-70 minutes).
Initial Use:
For the first few cleaning cycles after installation, allow the battery to fully discharge and then fully recharge. This helps the vacuum's battery management system calibrate to the new battery's capacity.
5. Maintenance
Proper maintenance ensures the longevity and optimal performance of your NASTIMA Li-ion battery.
Charging:
- Always use the original charging base and adapter provided with your Neato robot vacuum cleaner.
- Ensure the charging contacts on both the vacuum and the base are clean and free of debris.
- Allow the battery to fully charge before each cleaning cycle for best results.
Storage:
- If storing the battery for an extended period (more than one month), ensure it is charged to approximately 50-80% capacity.
- Store the battery in a cool, dry place, away from direct sunlight and extreme temperatures.
- The NASTIMA Li-ion battery exhibits low self-discharge (approximately 1% per month), retaining 80% capacity even after 800 charge cycles.

Image 5.1: A bar chart illustrating the superior cycle life of the NASTIMA Li-ion battery (800 cycles) compared to an original Ni-MH battery (200 cycles).

Image 5.2: A graphic comparing the long-term capacity retention of NASTIMA Li-ion batteries (80% after 800 cycles) versus other Ni-MH batteries (15% after 200 cycles).
6. Troubleshooting
If you encounter issues with your NASTIMA replacement battery, refer to the following common problems and solutions:
| Problem | Possible Cause | Solution |
|---|---|---|
| Battery not charging or holding charge. | Loose connection, faulty charging base, or initial calibration needed. | Ensure battery connector is firmly seated. Clean charging contacts on vacuum and base. Allow for several full charge/discharge cycles for calibration. If issues persist, contact support. |
| Robot dies mid-cleaning cycle unexpectedly. | Battery not fully charged, incorrect battery type for model, or battery degradation. | Ensure battery is fully charged before use. Verify your vacuum model is listed as compatible (D85, D80, D75, 70e, 75, 80, 85). If the battery is old, consider replacement. |
| Robot displays an error related to the battery. | Battery not recognized, or internal fault. | Remove and re-install the battery. Ensure all connections are secure. Consult your vacuum's manual for specific error codes. If the error persists, contact NASTIMA support. |
7. Specifications
Detailed technical specifications for the NASTIMA 12V 5000mAh Li-ion Replacement Battery:
- Model Number: ND12-WH50-LI50NA
- Battery Type: Lithium Ion (Li-ion)
- Voltage: 12 Volts
- Capacity: 5000 Milliamp Hours (5.0Ah)
- Energy: 60Wh
- Amperage: 5 Amps
- Reusability: Rechargeable
- Battery Cell Composition: Lithium Ion
- Battery Weight: 400 Grams
- Compatible Models: Neato Botvac D series (D85, D80, D75), Neato Botvac (75, 70e, 80, 85), and part numbers 945-0129, 945-0174.
- Certifications: CE, RoHS

Image 7.1: A graphic detailing key battery parameters such as voltage, capacity, and battery type.
Video 7.1: This video demonstrates the NASTIMA battery's performance parameters and lists compatible Neato Botvac models.
8. Warranty & Support
NASTIMA is committed to providing high-quality products and customer satisfaction.
- Warranty: This product comes with a 1-year warranty from the date of purchase.
- Satisfaction Guarantee: We offer a 35-day satisfaction guarantee. If you are not 100% satisfied, you may be eligible for a refund.
- Customer Support: If you have any problems or questions regarding your NASTIMA battery, please contact us via email. Our support team is available to assist you within 24 hours.

Image 8.1: A graphic highlighting NASTIMA's 12-month warranty and 30-day money-back guarantee.