Introduction
Thank you for choosing the IDEALHOUSE Full Size Bed Frame. This manual provides detailed instructions for the assembly, operation, maintenance, and troubleshooting of your new bed frame. Please read this manual carefully before assembly and retain it for future reference.
Safety Information
- Keep all packaging materials away from children to prevent choking hazards.
- Assemble the bed frame on a soft, clean surface (e.g., carpet) to prevent scratches.
- Ensure all bolts and screws are securely tightened before use. Periodically check and re-tighten as needed.
- Do not use power tools for assembly as this may overtighten and damage components.
- Do not stand or jump on the bed frame.
- Always use the recommended mattress size and thickness to ensure proper fit and safety.
- If any parts are missing or damaged, do not proceed with assembly. Contact customer support immediately.
Package Contents
Please verify that all components listed below are present before beginning assembly. All parts are conveniently packed in one box.
- Headboard (Adjustable)
- Footboard
- Side Rails (Left and Right)
- Wooden Slats (Quantity: 12)
- Storage Drawers (Quantity: 4, with wire netting and rollers)
- Hardware Pack (Bolts, Screws, Allen Wrench, etc.)
- Assembly Instructions (This manual)

Image: Overview of the IDEALHOUSE Full Size Bed Frame with all components and key dimensions.
Setup and Assembly Instructions
Follow these steps carefully for proper assembly. It is recommended to have two people for assembly.
- Unpack and Identify Parts: Lay out all components on a soft, clean surface. Compare them with the parts list to ensure everything is present.
- Assemble Headboard and Footboard: Attach the headboard and footboard panels to their respective support frames using the provided hardware. Ensure all connections are snug but do not overtighten.
- Attach Side Rails: Connect the side rails to the assembled headboard and footboard. Secure them firmly with the appropriate bolts.
- Install Wooden Slats: Place the wooden slats across the bed frame, ensuring they are evenly spaced and secured to the side rails. The frame includes EVA sponge strips to reduce noise, ensure these are properly aligned.

Image: Detail of the bed frame's sturdy construction, including EVA sponge for noise reduction and durable wooden slats.
- Assemble Storage Drawers: Each of the four wire netting drawers comes with rollers. Attach the rollers to the bottom of each drawer.

Image: Detail of the functional heavy-duty wheels on the storage drawers.
- Insert Drawers: Slide the assembled drawers into the designated spaces under the bed frame. Each drawer has a small screw fixture that aligns with a hole to prevent it from slipping out.

Image: Illustration of the drawer fixture design, showing how a small screw aligns to prevent the drawer from slipping out.
- Final Check: Ensure all connections are secure and the bed frame is stable before placing a mattress on it.
Operating Instructions
Using the Storage Drawers
The bed frame features four wire netting storage drawers designed for convenient access. Simply pull the drawers out from under the bed to access your stored items. Push them back in until they are flush with the bed frame. The integrated rollers ensure smooth operation.
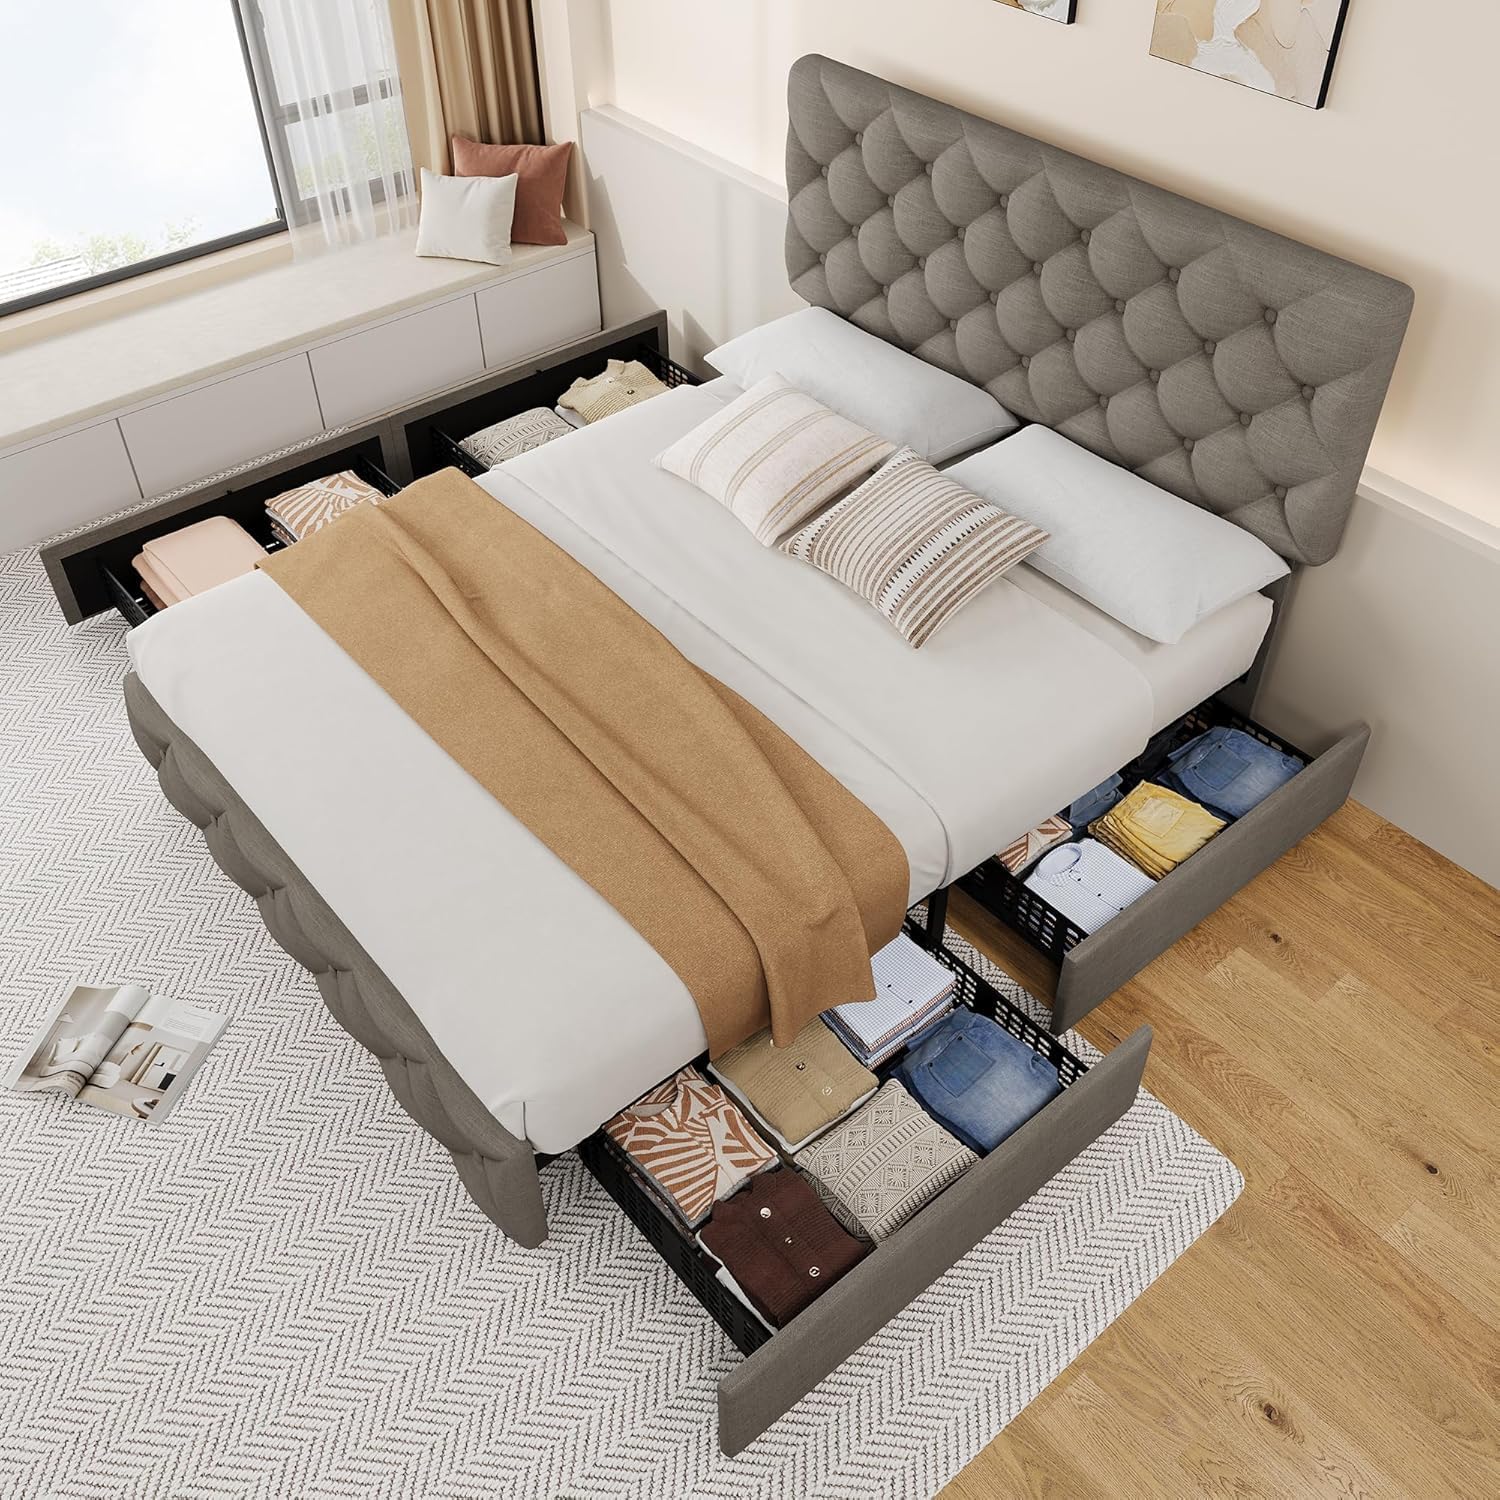
Image: The bed frame with all four storage drawers extended, demonstrating ample storage space for various items.
Adjusting the Headboard Height
The upholstered headboard is adjustable to accommodate mattresses of varying heights (8-12 inches). To adjust the headboard, loosen the bolts connecting the headboard to the frame, slide the headboard to your desired height (between 39.4 and 45.7 inches), and then re-tighten the bolts securely.

Image: Visual representation of the adjustable headboard, illustrating the height range from 42.9 to 45.7 inches to fit different mattress thicknesses.
Anti-slip Mattress Design
The bed frame features an embedded design with a slightly protruding footboard. This design helps to prevent the mattress from sliding off the frame, ensuring it stays securely in place.

Image: Diagram showing the anti-slip mattress design, where the embedded frame prevents the mattress from shifting.
Maintenance
- Cleaning: For the linen upholstered parts, gently spot clean with a damp cloth and mild detergent if necessary. Avoid harsh chemicals. For the metal and wood components, wipe with a dry or slightly damp cloth.
- Hardware Check: Periodically (every 3-6 months) check all bolts and screws to ensure they remain tight. Re-tighten if any feel loose to maintain stability and prevent noise.
- Drawer Care: Keep the drawer rollers free from dust and debris to ensure smooth operation.
Troubleshooting
| Problem | Possible Cause | Solution |
|---|---|---|
| Bed frame is wobbly or noisy. | Loose bolts or screws. | Check and re-tighten all assembly hardware. Ensure EVA sponge strips are correctly placed on slats. |
| Drawers do not slide smoothly. | Debris in rollers or tracks; rollers not properly installed. | Clean rollers and tracks. Verify rollers are securely attached and facing the correct direction. |
| Mattress slides on the frame. | Mattress not properly seated; anti-slip feature not engaged. | Ensure the mattress is fully pushed against the headboard and footboard to engage the anti-slip design. |
| Headboard height cannot be adjusted. | Bolts are too tight. | Loosen the headboard adjustment bolts sufficiently before attempting to slide the headboard. Re-tighten after adjustment. |
Specifications
- Brand: IDEALHOUSE
- Model Number: 8H37us5N38TivuuI_E5sfgD5t
- ASIN: B0F8NRDL3C
- UPC: 199414592772
- Size: Full
- Color: Light Grey
- Material: Engineered Wood, Linen
- Product Dimensions (L x W x H): 78" x 57" x 45.7"
- Item Weight: 82.23 Pounds
- Weight Capacity: Up to 1000 pounds
- Recommended Mattress Thickness: 8-12 inches
- Adjustable Headboard Height: 39.4" to 45.7"
- Drawer Dimensions (L x W x H, each): 27.2" x 19.7" x 5.3"
- Assembly Required: Yes
Warranty
Specific warranty details may vary. Please refer to your purchase documentation or contact the seller directly for information regarding warranty coverage and terms.
Customer Support
If you have any questions, require assistance with assembly, or encounter any issues with your IDEALHOUSE bed frame, please do not hesitate to contact the seller, IdealHouse Direct. They are committed to responding within 24 hours to assist you.
For further assistance, you may visit the IDEALHOUSE Store on Amazon.


