
Dtirszxy Remote Control
Instruction Manual
Replacement Remote Control for Various Smart TVs
Introduction
This instruction manual provides comprehensive guidance for the Dtirszxy replacement remote control. It covers setup, operation, maintenance, and troubleshooting to ensure optimal performance with your compatible Smart TV models, including Edenwood, Salora, and HKC.
This remote control is designed as a direct replacement and typically requires no programming. While it aims to replicate original functionality, some advanced features specific to your original remote may not be fully supported.
Product Overview

Figure 1: Front and back view of the Dtirszxy replacement remote control. The front shows all buttons, while the back shows the ergonomic design and battery compartment cover.

Figure 2: Side profile of the Dtirszxy replacement remote control, highlighting its curved ergonomic design.
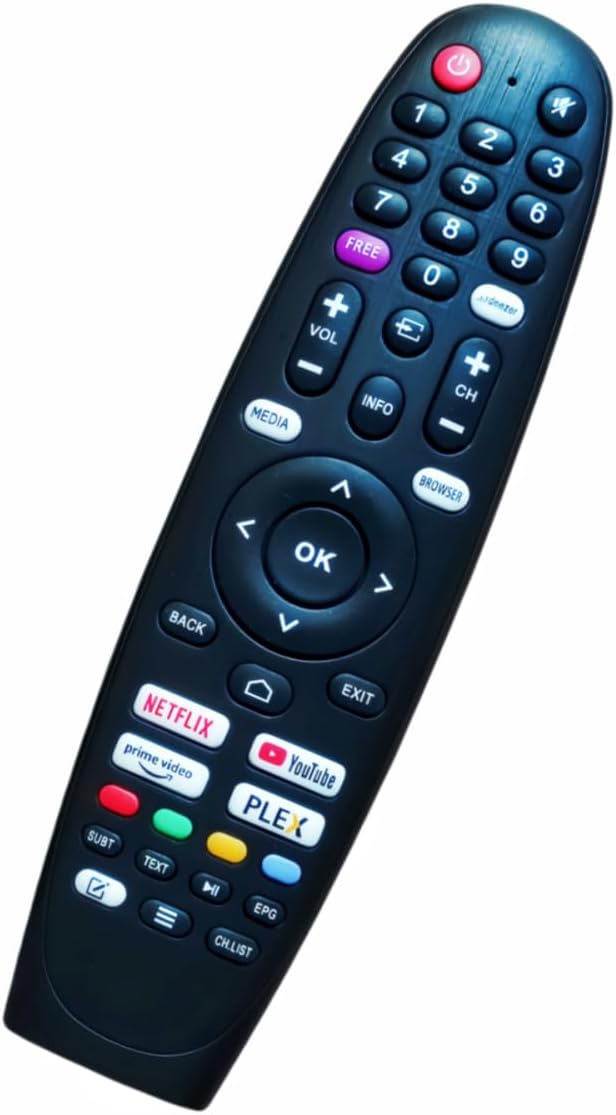
Figure 3: Angled front view of the Dtirszxy replacement remote control, showing the button layout from a different perspective.
Setup
1. Battery Installation
The remote control requires AAA batteries for operation. Ensure correct polarity when inserting the batteries.
- Locate the battery compartment on the back of the remote control.
- Slide the battery compartment cover downwards to open it.
- Insert two (2) AAA batteries, matching the positive (+) and negative (-) terminals as indicated inside the compartment.
- Slide the battery compartment cover back into place until it clicks securely.
2. Initial Use
This replacement remote control is designed for direct use with compatible TV models and typically requires no programming. Once batteries are installed, point the remote towards your TV and test its functions.
- Ensure there are no obstructions between the remote control and the TV's infrared receiver.
- Confirm your TV is powered on.
- Press the Power button () to test basic functionality.
Operating Instructions
Familiarize yourself with the button layout and their primary functions:
Figure 4: Detailed view of the remote control's button layout.
- Power Button (): Turns the TV on or off.
- Number Buttons (0-9): Directly input channel numbers.
- Volume Up/Down (VOL +/-): Adjusts the TV's volume level.
- Channel Up/Down (CH +/-): Changes the TV channel.
- Mute Button (): Mutes or unmutes the TV sound.
- Navigation Pad (Up, Down, Left, Right, OK): Navigates through menus and confirms selections.
- Back Button: Returns to the previous screen or menu.
- Home Button (): Accesses the TV's main smart hub or home screen.
- Netflix, YouTube, Prime Video, Plex Buttons: Direct access buttons for popular streaming services.
- Media Button: Accesses media playback controls or media input.
- Info Button: Displays information about the current program or input.
- Browser Button: Opens the TV's web browser.
- Exit Button: Exits the current menu or application.
- SUBT (Subtitle): Toggles subtitles on/off.
- TEXT (Teletext): Accesses teletext services (if supported by TV).
- EPG (Electronic Program Guide): Opens the electronic program guide.
- CH.LIST (Channel List): Displays the channel list.
Note: The functionality of certain buttons may vary slightly depending on your specific TV model and its operating system. Some advanced features or specific smart TV functions might not be fully supported by this replacement remote.
Maintenance
Cleaning the Remote Control
To maintain the remote control's appearance and functionality, follow these cleaning guidelines:
- Use a soft, dry cloth to wipe the surface of the remote control.
- For stubborn dirt, slightly dampen the cloth with water or a mild, non-abrasive cleaner.
- Avoid using harsh chemicals, abrasive cleaners, or solvents, as these can damage the remote's finish or internal components.
- Do not allow liquids to enter the remote control.
Battery Replacement
Replace batteries when the remote control becomes unresponsive or its range decreases. Always replace both batteries at the same time with new ones of the same type (AAA).
- Remove old batteries promptly to prevent leakage, which can damage the remote.
- Dispose of used batteries according to local regulations.
Troubleshooting
If you encounter issues with your remote control, refer to the following common problems and solutions:
| Problem | Possible Cause | Solution |
|---|---|---|
| Remote is not working at all. |
|
|
| Some buttons are unresponsive. |
|
|
| Remote has short range. |
|
|
If the problem persists after trying these solutions, please contact customer support.
Specifications
- Model Number: Remote Control
- Compatible Devices: Television (Edenwood, Salora, HKC Smart TVs as listed in product description)
- Power Source: 2 x AAA Batteries (not included)
- Color: Blue
- Max Number of Supported Devices: 1
- Special Feature: NO
- Manufacturer: Dtirszxy
Warranty and Support
Warranty Information
This product comes with a 90-day No-worry warranty from the date of purchase. This warranty covers manufacturing defects and ensures the remote control functions as described. Please retain your proof of purchase for warranty claims.
Customer Support
For any questions, issues, or compatibility inquiries not covered in this manual, please contact our customer support team. We offer an 18-hour online reply service.
Before purchasing, if your TV model is not explicitly mentioned in the product title, it is recommended to contact the seller first to confirm compatibility.
Seller: H-ZHENYI
Ask a question about this manual
Ask about setup, troubleshooting, compatibility, parts, safety, or missing instructions. Manuals+ will review the question and use this page’s manual context to help answer it.