
1. Introduction
Thank you for choosing the Inefala 10-inch HD Touchscreen Car Radio. This device is designed to enhance your driving experience with advanced features such as Wireless CarPlay, Android Auto, GPS navigation, Bluetooth 5.0, FM/RDS radio, and a 32-band equalizer. This manual provides detailed instructions for installation, operation, and maintenance to ensure optimal performance and longevity of your car stereo.
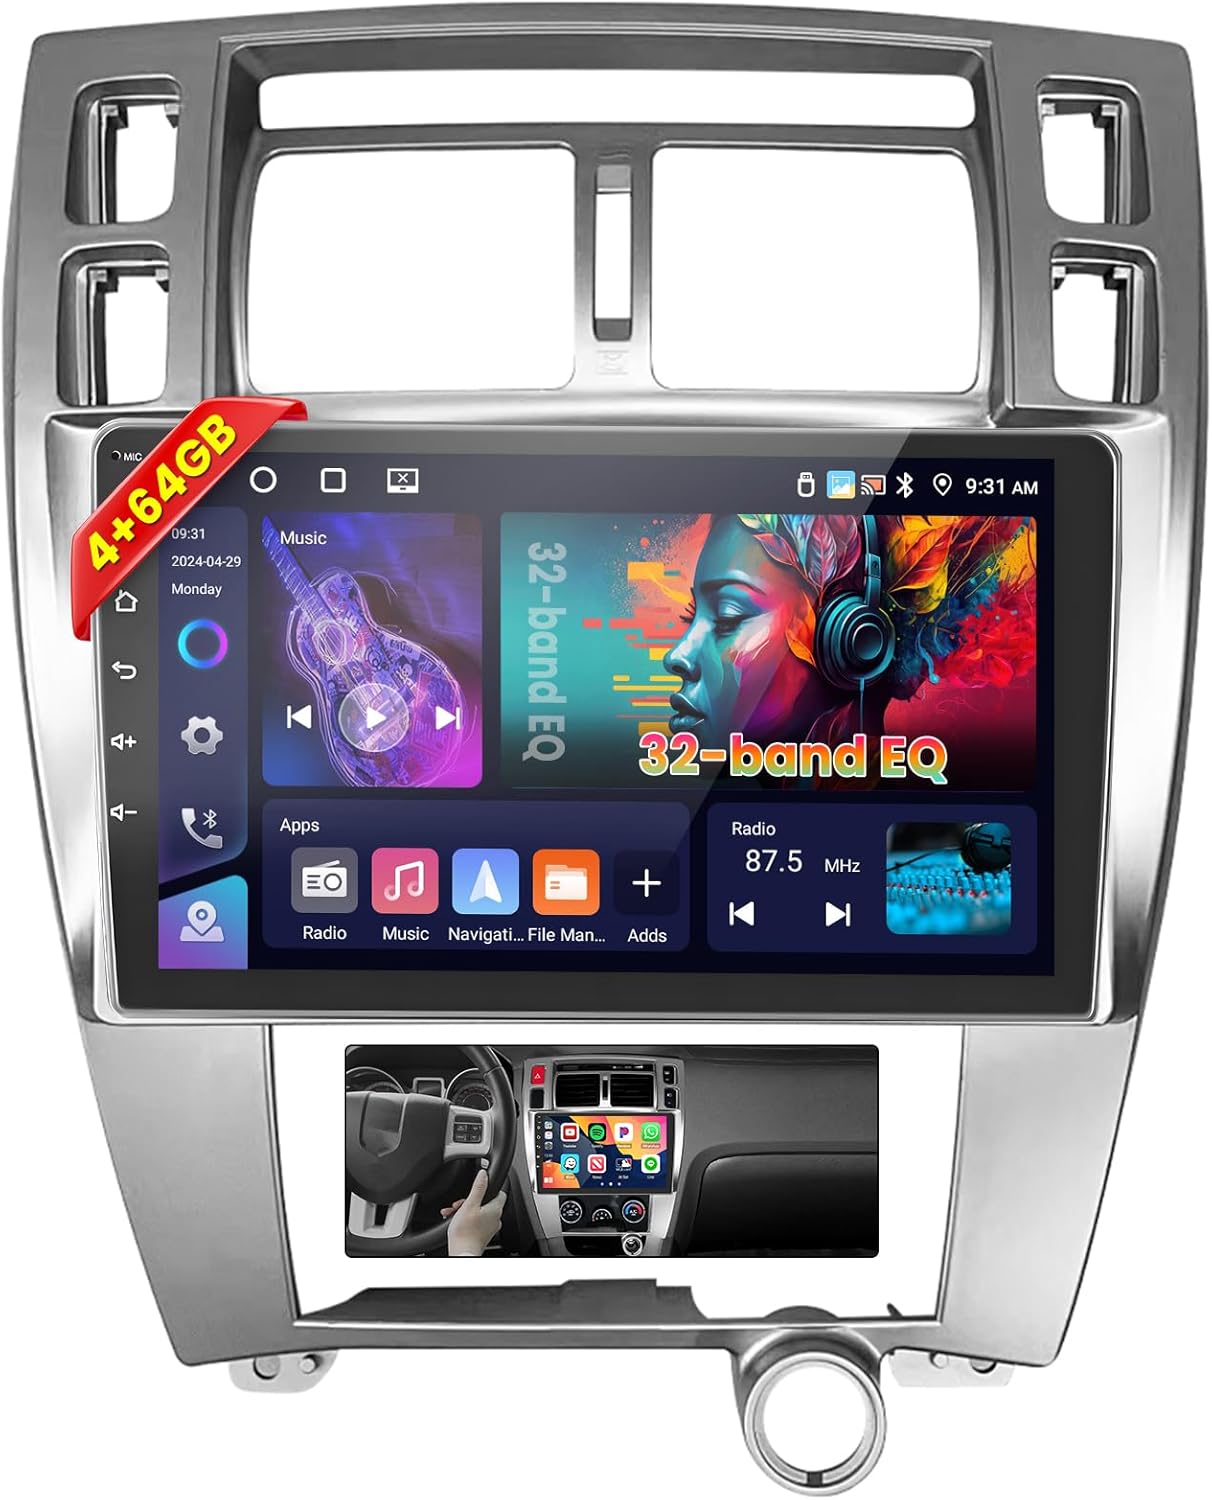
Image 1.1: Inefala 10-inch HD Touchscreen Car Radio with custom frame for Hyundai Tucson.
2. Package Contents
Please verify that all items listed below are included in your package:
- 1 x Android Car Stereo
- 1 x Power Cable
- 1 x GPS Antenna
- 1 x Accessories (specific components may vary)
- 1 x Backup Camera Input Cable
- 1 x RCA Cable
- 2 x USB Cable
- 2 x Mounting Bracket
- 4 x Screw
- 1 x Instruction Manual (this document)
- 1 x Backup Camera
- 1 x External Microphone

Image 2.1: Visual representation of the items included in the package.
3. Product Overview
The Inefala car radio features a 10-inch HD touchscreen with a resolution of 1280*720, powered by an Android system and a 4-Core processor with 4GB RAM and 64GB ROM. It integrates seamlessly with your vehicle's existing systems and offers a wide range of connectivity options.

Image 3.1: Key features including CarPlay, Android Auto, WiFi, SWC, Bluetooth, EQ, HD display, and GPS.
4. Installation Guide
4.1. Pre-Installation Check
- Ensure the vehicle's ignition is off and the battery is disconnected before starting installation.
- Confirm compatibility with your Hyundai Tucson (2006-2009) model.
- Gather all necessary tools (screwdrivers, wire strippers, electrical tape, etc.).
4.2. Wiring Diagram
Refer to the wiring diagram below for proper connection of the car stereo components. Incorrect wiring can cause damage to the unit or vehicle's electrical system.

Image 4.1: Detailed wiring diagram for the Inefala car stereo, showing connections for power, RCA, USB, camera, radio, and GPS antennas.
4.3. Mounting the Unit
- Carefully remove the original car radio and dashboard trim.
- Connect the power cable, RCA cables, USB cables, GPS antenna, and backup camera input cable according to the wiring diagram.
- Secure the new Inefala car radio into the dashboard using the provided mounting brackets and screws.
- Reinstall the dashboard trim.

Image 4.2: Comparison of the Hyundai Tucson dashboard before and after the Inefala car radio installation.
5. Initial Setup
5.1. Power On and Basic Settings
- Reconnect the vehicle battery and turn on the ignition.
- The unit will boot up. Follow the on-screen prompts for initial language, time zone, and date settings.
- Adjust display brightness and sound volume to your preference.
5.2. Wi-Fi Connection
To access online features, connect the unit to a Wi-Fi network:
- Go to Settings > Network & Internet > Wi-Fi.
- Turn on Wi-Fi and select your desired network from the list.
- Enter the password if prompted and connect.

Image 5.1: Illustration of connecting to Wi-Fi to enable app downloads and online services.
6. Operating Instructions
6.1. Wireless CarPlay & Android Auto
Connect your smartphone wirelessly to access navigation, music, calls, and more directly on the car stereo display.
- Ensure Bluetooth and Wi-Fi are enabled on your smartphone.
- On the car stereo, select the CarPlay or Android Auto application.
- Follow the on-screen instructions to pair your device.

Image 6.1: Visual representation of iOS CarPlay and Android Auto interfaces on the car stereo.
6.2. GPS Navigation
The unit supports both online and offline navigation. Download offline maps for areas with limited internet access.
- Access navigation applications from the main menu.
- For online maps, ensure Wi-Fi or a mobile hotspot is connected.
- For offline maps, download them in advance via a Wi-Fi connection.

Image 6.2: GPS navigation interface showing options for online and offline map usage.
6.3. Bluetooth 5.0
Enjoy hands-free calling and high-quality audio streaming via Bluetooth 5.0.
- Go to the Bluetooth application.
- Enable Bluetooth on your phone and search for the car stereo (e.g., "Inefala Car Stereo").
- Pair the devices. You can now make/receive calls and play music wirelessly.

Image 6.3: Bluetooth 5.0 functionality for hands-free communication and audio playback.
6.4. FM/RDS Radio
Tune into your favorite radio stations with clear reception and RDS information.
- Open the Radio application.
- Use the scan function to automatically search for available stations or manually tune to a frequency.
- RDS (Radio Data System) provides station information where available.

Image 6.4: FM/RDS radio interface with frequency display and station presets.
6.5. Audio Equalizer (32-Band EQ)
Customize your audio experience with the built-in 32-band equalizer.
- Access the EQ settings from the audio menu.
- Adjust individual frequency bands to create your preferred sound profile.
- Pre-set equalizer modes (e.g., Jazz, Pop, Rock) are also available.

Image 6.5: User interface for the 32-band equalizer, allowing precise audio adjustments.
6.6. Steering Wheel Control (SWC)
Integrate with your vehicle's steering wheel controls for safe and convenient operation.
- Go to Settings > SWC.
- Follow the on-screen instructions to map your steering wheel buttons to the desired functions (e.g., volume, track skip, mode).

Image 6.6: Illustration of steering wheel control functionality and wiring for integration.
6.7. Mirror Link
Mirror your smartphone screen directly onto the car stereo display for both Android and iOS devices.
- Connect your phone via USB or Wi-Fi.
- Open the Mirror Link application on the stereo.
- Follow the prompts on both devices to establish the connection.

Image 6.7: Example of a smartphone screen mirrored onto the car stereo display.
6.8. Backup Camera
The included backup camera provides a clear view of the area behind your vehicle when reversing.
- When the vehicle is shifted into reverse gear, the display will automatically switch to the backup camera view.
- Parking guidelines may be displayed to assist with maneuvering.

Image 6.8: Backup camera view with parking assist lines and features like HD rear view, waterproof, and night vision.
6.9. Display Settings (UI Themes, Split Screen)
Customize the visual appearance and layout of your car stereo.
- UI Themes: Navigate to Settings > Display > Themes to choose from various interface designs.
- Split Screen: Some applications support split-screen mode, allowing two apps to run simultaneously. Drag an app icon to one side of the screen to activate.

Image 6.9: Examples of different UI desktop themes and homepage layouts.

Image 6.10: Various full-screen and split-screen display configurations for different applications.
7. Specifications
Detailed technical specifications for the Inefala Car Radio:
| Feature | Specification |
|---|---|
| Product Dimensions | 4.53 x 12.32 x 15.35 inches |
| Item Weight | 7.92 pounds |
| Model Number | e9f426e2-f8db-48cf-924a-24dda22ae96f |
| Display Size | 10.1 inches |
| Display Resolution | 1280*720 HD |
| Operating System | Android |
| Processor | 4-Core |
| RAM | 4GB |
| ROM | 64GB |
| Connectivity Technology | Bluetooth 5.0, USB, Wi-Fi |
| Controller Type | Android, iOS |
| Audio Output Mode | Stereo |
| Surround Sound Channel Configuration | 5.1 |
| Video Encoding | MKV/RMVB/AVI/MP4/MDV etc. |
| Compatible Devices | Smartphone/for Hyundai Tucson 2006-2009 |
8. Troubleshooting
If you encounter issues with your car stereo, please refer to the following common troubleshooting steps:
- No Power: Check all power connections and fuses. Ensure the vehicle battery is properly connected.
- No Sound: Verify speaker connections. Check volume levels and EQ settings. Ensure the correct audio source is selected.
- GPS Signal Loss: Ensure the GPS antenna is properly installed and has a clear view of the sky.
- Bluetooth Pairing Issues: Ensure Bluetooth is enabled on both devices and they are within range. Try restarting both the stereo and your phone.
- Touchscreen Unresponsive: Try restarting the unit. If the issue persists, a factory reset may be necessary (note: this will erase all user data).
- CarPlay/Android Auto Not Connecting: Ensure your phone's operating system is up to date. Check USB cable connection if using wired. Verify Wi-Fi and Bluetooth are active for wireless connections.
For persistent issues, please contact customer support.
9. Maintenance
To ensure the longevity and optimal performance of your Inefala car radio, follow these maintenance guidelines:
- Cleaning the Screen: Use a soft, lint-free cloth to gently wipe the touchscreen. For stubborn smudges, dampen the cloth slightly with water or a screen-safe cleaner. Avoid harsh chemicals or abrasive materials.
- Software Updates: Periodically check for software updates through the system settings to ensure you have the latest features and bug fixes. A stable Wi-Fi connection is required for updates.
- Environmental Conditions: Avoid exposing the unit to extreme temperatures, direct sunlight for prolonged periods, or excessive moisture.
- Cable Management: Ensure all cables are securely connected and not pinched or damaged.
10. Warranty and Support
Inefala provides a 24-month quality assurance period for this product from the date of purchase. We are responsible for handling all quality issues within this timeframe.
10.1. Protection Plans
Additional protection plans may be available for purchase:
- 2-Year Protection Plan: Extends coverage for 24 months.
- 3-Year Protection Plan: Extends coverage for 36 months.
- Complete Protect: A comprehensive plan covering eligible past and future purchases.
10.2. Customer Support
For any questions, technical assistance, or warranty claims, please contact Inefala customer support directly. You can reach us via email at inefalatech@163.com. We aim to reply within 24 hours.
11. Safety Information
Please read and adhere to the following safety guidelines:
- Do not operate the device in a way that distracts you from driving. Always prioritize road safety.
- Avoid exposing the unit to water or excessive moisture.
- Do not attempt to disassemble or repair the unit yourself. Refer all servicing to qualified personnel.
- Ensure proper ventilation around the unit to prevent overheating.
- Keep the unit away from strong magnetic fields.