
Z425
Instruction Manual for Aftermarket Carburetor
Model: John Deere Z425 Zero Turn Mower
Introduction
This manual provides essential information for the installation, operation, and maintenance of your new aftermarket carburetor. Please read this manual thoroughly before use to ensure proper function and longevity of the product.
This carburetor is designed as a direct replacement for the original carburetor on John Deere Z425 Zero Turn Mowers, ensuring compatibility and ease of installation.
Safety Information
Always observe safety precautions when working with fuel systems and engine components. Ensure the engine is cool and disconnected from its power source before beginning any work. Wear appropriate personal protective equipment (PPE) such as gloves and eye protection.
- Ensure proper ventilation when working with fuel.
- Keep open flames and ignition sources away from fuel and carburetor.
- Dispose of old fuel and parts responsibly.
- If unsure about any procedure, consult a qualified technician.
Package Contents
Upon opening the package, verify that all components are present and undamaged. The package should contain:
- 1 x Aftermarket Carburetor Assembly
- Multiple Gaskets (as pictured)

Image: Front view of the carburetor assembly with included gaskets. This shows the main body of the carburetor and the different shapes of gaskets provided for installation.
Setup and Installation
This carburetor is designed for easy installation as a direct replacement. Follow these general steps for installation. Refer to your John Deere Z425 Zero Turn Mower's service manual for specific instructions and torque specifications.
- Preparation: Ensure the engine is off and cool. Disconnect the battery. Drain the fuel tank or clamp the fuel line to prevent spills.
- Remove Air Filter Assembly: Carefully remove the air filter housing and any associated ducting to gain access to the carburetor.
- Disconnect Linkages and Hoses: Disconnect the throttle linkage, choke linkage, and fuel line from the old carburetor. Note their positions for reassembly.
- Remove Old Carburetor: Unbolt the old carburetor from the engine manifold. Be careful not to drop any small parts. Remove and discard old gaskets.
- Install New Gaskets: Place the new gaskets in their correct positions on the engine manifold and the carburetor. Ensure they are clean and properly aligned.
- Mount New Carburetor: Carefully position the new carburetor onto the manifold studs. Secure it with the original nuts, tightening them evenly to the manufacturer's specifications.
- Reconnect Linkages and Hoses: Reconnect the throttle and choke linkages, ensuring they operate smoothly without binding. Reconnect the fuel line securely.
- Reinstall Air Filter Assembly: Reattach the air filter housing and any removed ducting.
- Final Checks: Reconnect the battery. Refill the fuel tank if drained, or unclamp the fuel line. Check for any fuel leaks before starting the engine.

Image: Side view of the carburetor, showing the fuel inlet and points for linkage attachment. This perspective highlights the connection points for the fuel line and control cables.
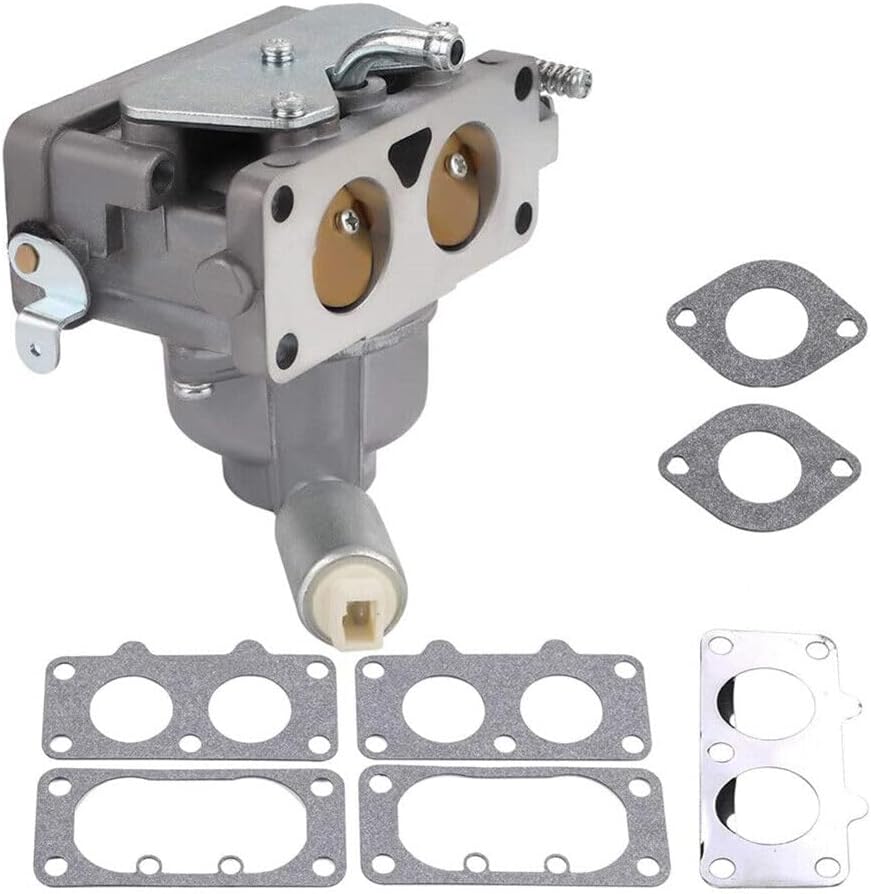
Image: Angled view of the carburetor, illustrating the mounting holes and some internal components. This view helps in understanding how the carburetor attaches to the engine and the general layout of its parts.
Operating Instructions
Once the new carburetor is installed, the engine should start and run smoothly. No complicated adjustments are typically needed for this direct replacement part.
- Initial Start-up: After installation, prime the fuel system if necessary (refer to your mower's manual). Start the engine and allow it to warm up.
- Idle Adjustment (if necessary): While this carburetor is pre-set, if the idle speed is not correct, locate the idle speed screw (if present) and adjust it slightly until the engine idles smoothly at the recommended RPM for your mower.
- Mixture Adjustment (rarely needed): For most applications, the mixture is factory-set. Only adjust if experiencing significant performance issues and after consulting a professional.
Maintenance
Proper maintenance of your carburetor and fuel system will ensure long-lasting and reliable performance.
- Fuel Quality: Always use fresh, clean fuel. Stale or contaminated fuel is a common cause of carburetor issues. Consider using a fuel stabilizer, especially during storage.
- Fuel Filter: Regularly inspect and replace the fuel filter according to your mower's maintenance schedule. A clogged fuel filter can restrict fuel flow to the carburetor.
- Air Filter: Keep the air filter clean. A dirty air filter can cause the engine to run rich and affect carburetor performance.
- Storage: Before long-term storage, either run the engine until it runs out of fuel or drain the fuel system to prevent gum and varnish buildup in the carburetor.
Troubleshooting
If you encounter issues after installing the new carburetor, consider the following common problems and solutions:
| Problem | Possible Cause | Solution |
|---|---|---|
| Engine won't start | No fuel, clogged fuel filter, incorrect choke setting, spark plug issue. | Check fuel level, replace fuel filter, ensure choke is set correctly, inspect/replace spark plug. |
| Engine runs rough/stalls | Dirty air filter, stale fuel, vacuum leak (improperly seated gaskets). | Clean/replace air filter, use fresh fuel, re-check carburetor mounting and gasket sealing. |
| Fuel leaks | Loose fuel line connection, damaged fuel line, improperly seated float bowl. | Tighten connections, inspect fuel lines for cracks, ensure float bowl is sealed correctly. |

Image: Bottom view of the carburetor, revealing the float bowl and additional mounting points. This view is useful for understanding the fuel reservoir and how the carburetor is secured from below.
Specifications
| Attribute | Detail |
|---|---|
| Product Type | Aftermarket Carburetor Replacement |
| Compatibility | John Deere Z425 Zero Turn Mower |
| Brand | Generic |
| Model Number | Generic (Manufacturer Part Number: 1) |
| Item Weight | 1 pound |
| Product Dimensions | 1 x 1 x 1 inches |
| Country of Origin | China |
Warranty and Support
This product is an aftermarket replacement part. For specific warranty information, please refer to the seller or retailer from whom you purchased this item. General support for installation and troubleshooting can often be found through online resources or by consulting a professional small engine mechanic.
For further assistance, please contact the seller directly via the platform where the purchase was made.
Ask a question about this manual
Ask about setup, troubleshooting, compatibility, parts, safety, or missing instructions. Manuals+ will review the question and use this page’s manual context to help answer it.