
DWVO MADWV5kLOz
DWVO 5-Tier Shoe Cabinet User Manual
Model: MADWV5kLOz
Introduction
Thank you for choosing the DWVO 5-Tier Shoe Cabinet. This large capacity wooden shoe storage cabinet is designed to organize your footwear efficiently while adding a modern farmhouse aesthetic to your entryway, closet, or living room. Featuring five adjustable shelves and push-to-open doors with a unique herringbone pattern, it offers versatile storage for various shoe heights. This manual provides detailed instructions for assembly, operation, maintenance, and troubleshooting to ensure optimal use and longevity of your product.
Safety Information
Please read all instructions carefully before assembly and use. Keep this manual for future reference.
- Anti-Tipping Hardware: It is crucial to install the included anti-tip hardware to securely anchor the shoe cabinet to a wall. This prevents accidental tipping, especially in households with children or pets. Failure to do so can result in serious injury.
- Weight Distribution: Distribute weight evenly across shelves. Avoid placing excessively heavy items on the top surface or on a single shelf.
- Assembly: Assemble the unit on a soft, clean surface to prevent scratches. Ensure all connections are tight before use.
- Children Safety: Do not allow children to climb on or play with the cabinet. Keep small parts away from children during assembly.

Figure 1: Importance of Anti-Tipping Hardware. Always secure the cabinet to the wall to prevent falling hazards, especially with children present.
Parts List
Before beginning assembly, ensure all parts listed below are present and undamaged. If any parts are missing or damaged, please contact customer support.
| Part | Description | Quantity |
|---|---|---|
| A | Top Panel | 1 |
| B | Bottom Panel | 1 |
| C | Side Panels | 2 |
| D | Fixed Shelves | 3 |
| E | Adjustable Shelves | 2 |
| F | Doors with Herringbone Pattern | 2 |
| G | Back Panel | 1 |
| H | Pine Legs | 4 |
| I | Anti-Tip Hardware Kit | 1 |
| J | Assembly Hardware (screws, dowels, cam locks, etc.) | 1 Set |
Note: Tools for assembly are included.
Setup and Assembly
Follow these steps carefully for proper assembly. It is recommended to have two people for assembly.
Step 1: Prepare the Workspace and Identify Parts
Clear a spacious area and lay out all components on a soft, clean surface to prevent damage. Refer to the Parts List to identify each piece.
Step 2: Attach Pine Legs to the Bottom Panel
Secure the four (4) pine legs (H) to the underside of the bottom panel (B) using the provided screws. Ensure they are tightened firmly.

Figure 2: Stable Wood Legs. Ensure legs are securely fastened to the base.
Step 3: Assemble the Frame
Attach the side panels (C) to the bottom panel (B) and then to the top panel (A) using the appropriate assembly hardware (J). Follow the diagrams in the included instruction booklet for precise alignment of dowels and cam locks. Ensure the raised edges of the top panel are facing upwards.

Figure 3: Spacious Top Surface with Raised Edges. These edges prevent items from falling off.
Step 4: Install Fixed Shelves
Slide the three (3) fixed shelves (D) into their designated slots within the cabinet frame. Secure them with the provided hardware.
Step 5: Attach Back Panel
Carefully align and attach the back panel (G) to the rear of the cabinet frame using the small nails or screws provided. Ensure the cabinet is square before securing the back panel.
Step 6: Install Doors
Attach the two (2) doors (F) to the cabinet frame using the hinges and push-to-open mechanisms. Ensure the herringbone pattern aligns correctly. Adjust hinges if necessary for proper door alignment and smooth operation.
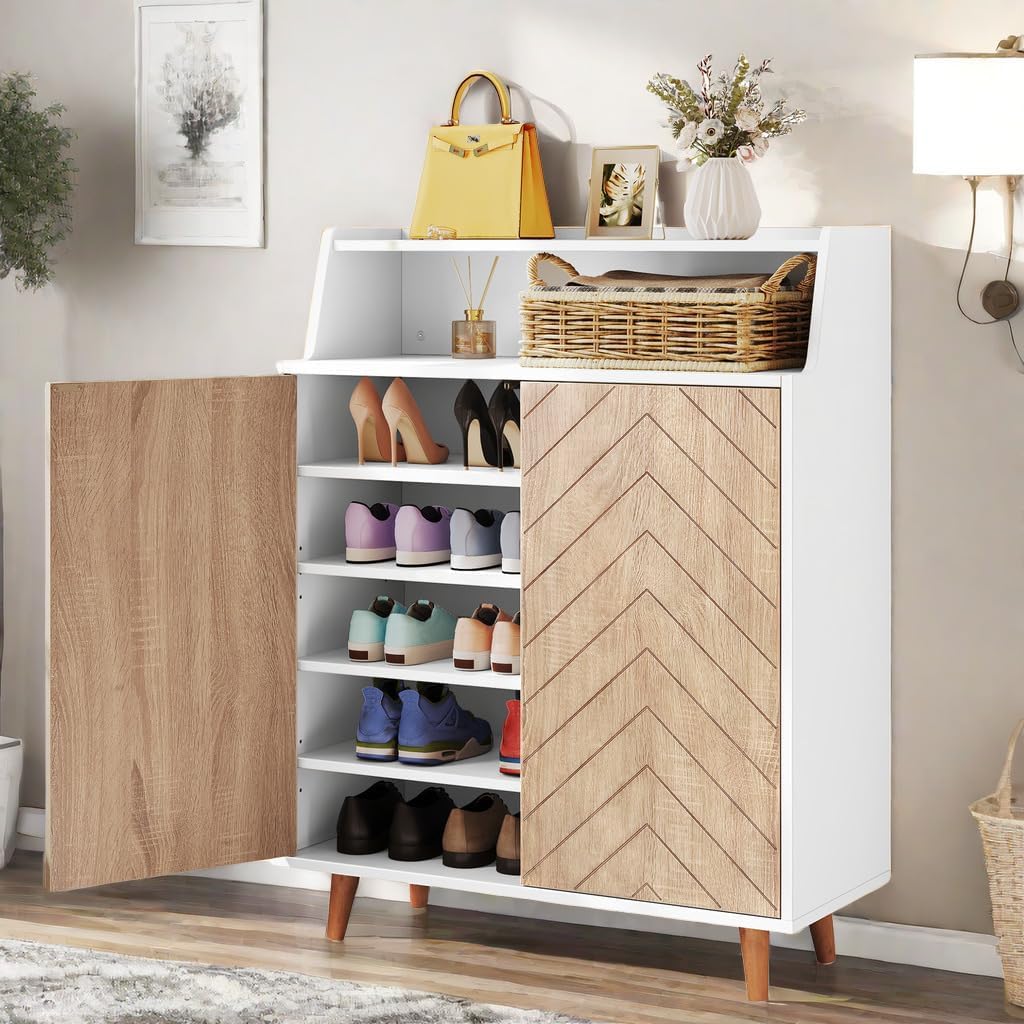
Figure 4: Assembled Cabinet with Doors. Note the unique herringbone pattern on the doors.
Step 7: Insert Adjustable Shelves
Place the two (2) adjustable shelves (E) into the desired positions using the shelf pins. You can adjust their height later based on your storage needs.
Step 8: Secure with Anti-Tip Hardware
Using the anti-tip hardware kit (I), secure the cabinet to a wall. This is a critical safety step. Follow the specific instructions provided with the anti-tip kit for proper installation.
Operating Instructions
Adjusting Shelves
The DWVO Shoe Cabinet features two adjustable shelves, allowing you to customize the storage space for different shoe heights, from flats to boots. To adjust a shelf, simply remove the shelf pins from their current holes, reposition the shelf to the desired height, and reinsert the pins into the corresponding holes on both sides. Ensure the shelf is level and securely seated on all four pins.

Figure 5: Adjustable Shelves. Customize shelf height for various shoe types.
Using Push-to-Open Doors
The cabinet is equipped with push-to-open mechanisms for a sleek, handle-free design. To open a door, gently press on the center of the door panel. The door will spring open slightly, allowing you to pull it fully open. To close, simply push the door firmly until it clicks into place.

Figure 6: Spring Magnetic Door. Provides a handle-free, streamlined aesthetic.
Maintenance
Proper care will extend the life and appearance of your shoe cabinet.
- Cleaning: Wipe surfaces with a soft, damp cloth. Avoid harsh chemicals or abrasive cleaners, as they may damage the finish.
- Spills: Immediately wipe up any spills to prevent moisture damage to the engineered wood.
- Inspection: Periodically check all screws and connections to ensure they remain tight. Retighten if necessary.
- Sunlight Exposure: Avoid prolonged exposure to direct sunlight, which can cause fading or warping.
Troubleshooting
| Problem | Possible Cause | Solution |
|---|---|---|
| Cabinet wobbles or is unstable. | Loose connections; uneven floor; anti-tip hardware not installed. | Ensure all screws are tightened. Place cabinet on a level surface or use shims if needed. Install anti-tip hardware as instructed. |
| Doors do not close properly or are misaligned. | Hinges are loose or misaligned; push-to-open mechanism is not properly installed. | Adjust hinge screws to align doors. Re-check installation of push-to-open mechanisms. Ensure no obstructions. |
| Shelves are not level or fall out. | Shelf pins are not fully inserted or are missing; shelf is overloaded. | Ensure all four shelf pins are fully inserted into the correct holes. Do not overload shelves; distribute weight evenly. |
| Scratches on floor. | Cabinet moved without care; missing foot pads. | Ensure anti-scratch foot pads are attached to the pine legs. Lift, do not drag, the cabinet when moving. |
Specifications
| Feature | Detail |
|---|---|
| Brand | DWVO |
| Model Number | MADWV5kLOz |
| Color | White |
| Material | Engineered Wood |
| Product Dimensions (D x W x H) | 13.77"D x 29.52"W x 41.53"H |
| Item Weight | 68.34 Pounds |
| Number of Shelves | 5 (3 fixed, 2 adjustable) |
| Special Features | Anti-Tipping, With Adjustable Shelves, Push-to-Open Doors |
| Assembly Required | Yes |
| Installation Type | Bolt on (Floor Mount) |
| UPC | 199449054191 |

Figure 7: Product Dimensions. Refer to this diagram for precise measurements.
Warranty and Support
Your DWVO Shoe Cabinet is designed for durability and functionality. For any issues or inquiries, please refer to the following:
- Returns: This product is eligible for a 30-day easy return policy. Please refer to your purchase platform for specific return instructions.
- Customer Support: For assistance with assembly, missing parts, or any other product-related questions, please contact DWVO customer support through the retailer's platform where you made the purchase.
Related documentsMADWV5kLOz

Ask a question about this manual
Ask about setup, troubleshooting, compatibility, parts, safety, or missing instructions. Manuals+ will review the question and use this page’s manual context to help answer it.