
1. Introduction
The Klortecer SL-MINI Cold Welding Machine is an innovative extension designed to enhance your existing TIG welding setup. This device enables precise, material-friendly pulse welding, ideal for applications requiring minimal heat input and high accuracy. It features a high-performance charging capacitor circuit that delivers ultra-short energy pulses (1 to 999 ms), generating high amperage for precise spot connections without extensive heating of the workpiece.
This manual provides comprehensive instructions for the safe and efficient operation of your SL-MINI unit. Please read it thoroughly before use.
2. Safety Instructions
Always adhere to general welding safety practices in addition to the following specific instructions:
- Electrical Safety: Ensure the unit is connected to a compatible AC 220V 50Hz power source. Verify all connections are secure before operation.
- Ventilation: Operate in a well-ventilated area to prevent accumulation of welding fumes.
- Personal Protective Equipment (PPE): Always wear appropriate PPE, including welding helmet, gloves, and protective clothing, to guard against arc flash, heat, and sparks.
- Workpiece Safety: Secure the workpiece properly. Be aware of hot surfaces after welding.
- Children and Bystanders: Keep children and unauthorized personnel away from the welding area.
- Maintenance: Disconnect power before performing any maintenance or adjustments.
3. Product Overview
The SL-MINI unit is designed for precision pulse welding, offering advanced control over welding parameters.

Figure 1: Klortecer SL-MINI Cold Welding Machine and included accessories. This image displays the main control unit, a foot pedal, connection cables, and several ceramic nozzles.
Key Features:
- High-Tech Pulse Control: Adjustable welding time and interval from 1 to 999 ms, pulse frequency 1-20 Hz, and touch ratio 1-99%. Ensures perfectly reproducible and homogeneous weld spots.
- Versatile Operating Modes: Includes single pulse, continuous welding/TIG, and 2T/4T functions (button operation or continuous operation without constant pedal pressure).
- Precision Welding: Minimizes heat-affected zone, ideal for thin stainless steel sheets, battery nickel strips, model repairs, and mold repairs. Prevents deformation, burns, and oxidation.
- Plug & Play Installation: Easy integration into the control line of 1-3 phase TIG/TIG devices (AC 220V 50Hz, output 3-48V). Compatible with MOS and IGBT welding machines.
- Compact and Portable: Dimensions of 125 x 80 x 70 mm and a weight of approximately 740g, making it highly mobile.
4. Package Contents
Upon unpacking, please verify that all the following components are included:
- Main Control Unit (SL-MINI)
- Power Supply Cable
- Connection Cable (for TIG machine interface)
- Foot Pedal (Control Switch)
- Ceramic Nozzles (angled inner and outer, 3 sets)
- User Manual
5. Setup
The SL-MINI is designed for tool-free, Plug & Play installation. Follow these steps to connect the unit:
- Power Connection: Connect the power supply cable to the AC220V input on the rear of the SL-MINI unit and then to a suitable power outlet.
- TIG Machine Interface: Connect the provided connection cable from the "Welding Machine Interface" port on the SL-MINI to the control line of your TIG welding machine.
- Control Switch (Foot Pedal): Connect the foot pedal cable to the "Control Switch" port on the SL-MINI.
- Power On: Flip the main power switch on the rear of the SL-MINI unit to the "On" position.
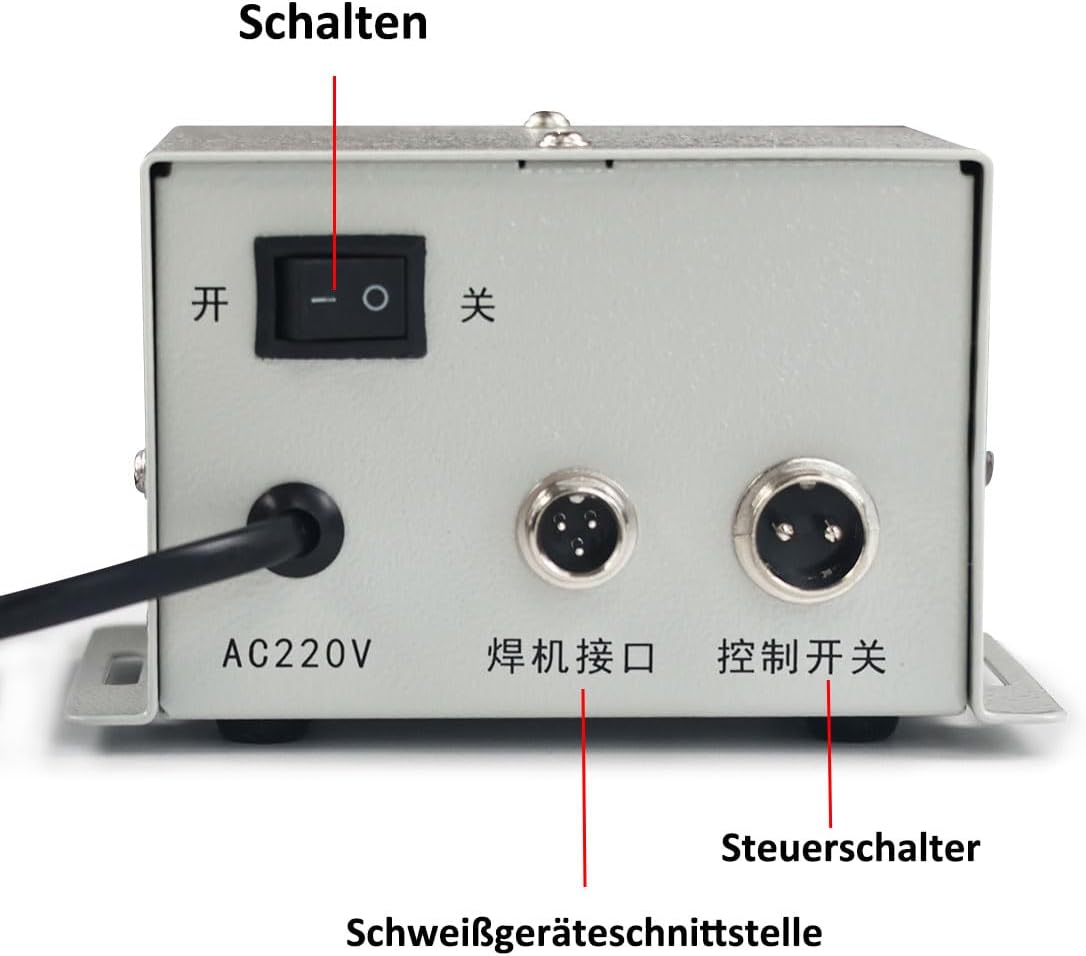
Figure 2: Rear panel of the SL-MINI unit, indicating the power switch, AC220V power input, welding machine interface, and control switch (foot pedal) connection points.
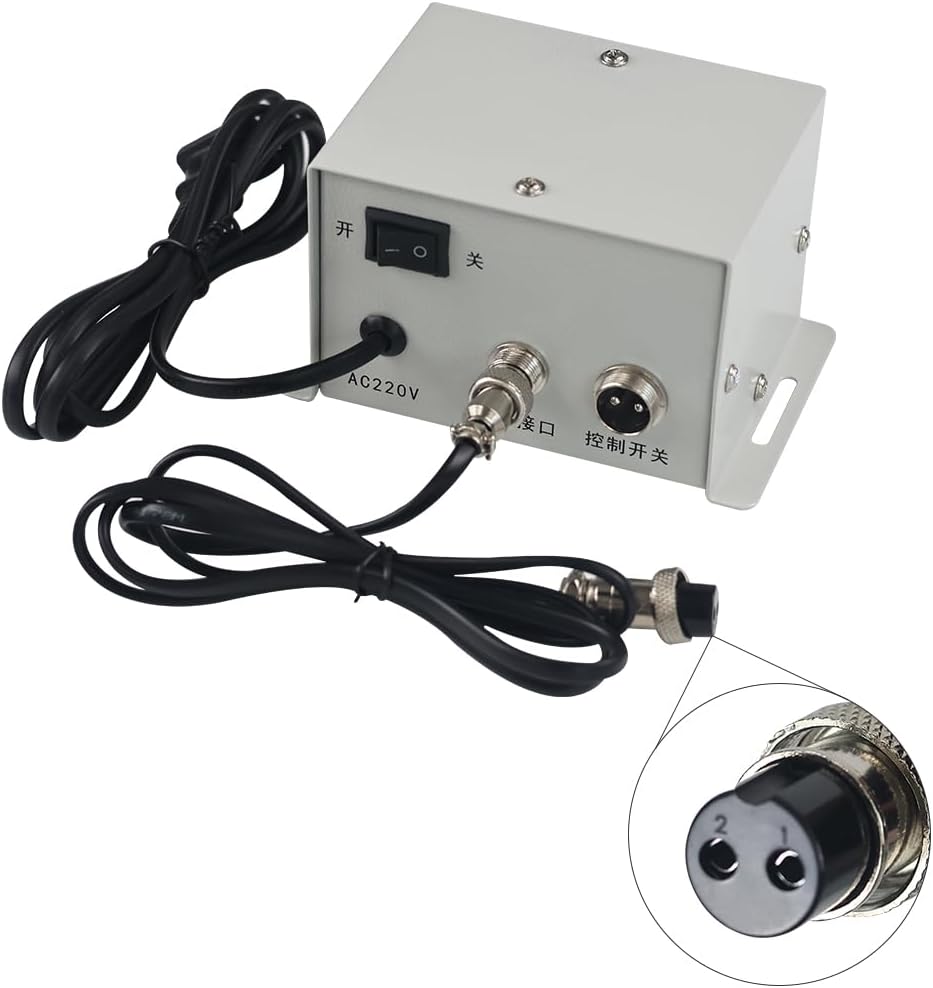
Figure 3: Example of the connection cable properly inserted into the welding machine interface port on the SL-MINI unit.
6. Operating Instructions
The SL-MINI offers precise control over welding parameters through its front panel interface.

Figure 4: Front control panel of the SL-MINI, showing digital displays for TIME/FREQ and TIME/DUTY, along with control buttons for POINT, LINE, TIG, STORAGE, MODE, and FUNC, and adjustment buttons.
6.1. Front Panel Controls:
- Digital Displays: Two displays show "TIME/FREQ" (welding time/frequency) and "TIME/DUTY" (pulse duration/duty cycle).
- Adjustment Buttons (+/-): Used to increase or decrease the values shown on the digital displays.
- POINT Button: Activates single pulse welding mode.
- LINE Button: Activates continuous pulse welding mode.
- TIG Button: Activates standard TIG welding mode (if applicable, or bypasses pulse function).
- STORAGE Button: Used to save and recall up to 20 individual welding programs.
- MODE Button: Cycles through different parameter settings for adjustment (e.g., welding time, pause time, frequency, duty cycle).
- FUNC Button: Toggles between 2T and 4T operating modes.
6.2. Setting Parameters:
Use the MODE button to select the parameter you wish to adjust (e.g., welding pulse duration, pause time, frequency). Once selected, use the +/- buttons to set the desired value. The unit allows for precise adjustment of welding time and pause duration from 1 to 999 milliseconds.
6.3. 2T/4T Function:
- 2T (Two-Touch) Mode: Press and hold the foot pedal (or trigger) to start welding; release to stop.
- 4T (Four-Touch) Mode: Press and release the foot pedal (or trigger) to start welding; press and release again to stop. This mode is useful for longer welds as it eliminates the need to continuously hold the pedal.
Toggle between 2T and 4T modes using the FUNC button.
6.4. Program Storage:
The SL-MINI can store up to 20 individual welding programs. To save a program, set all desired parameters, then press and hold the STORAGE button until the display indicates a program slot. Use the +/- buttons to select a slot, then press STORAGE again to confirm. To recall a program, briefly press STORAGE, select the program number, and press STORAGE again.
7. Applications
The SL-MINI Cold Welding Machine is suitable for a variety of precision welding tasks:
- Precision Spot Welding: Ideal for thin stainless steel sheets, such as those found in kitchen and bathroom fixtures, or in model making.
- Battery Cell Welding: Suitable for welding battery cells and nickel strips in E-Mobility and rechargeable battery applications.
- Local Repairs: Effective for repairs and welding on molds, cast parts, or hydraulic cylinders where minimal heat input is crucial.
8. Maintenance
Regular maintenance ensures the longevity and optimal performance of your SL-MINI unit:
- Cleaning: Keep the unit clean and free from dust and debris. Use a dry, soft cloth for cleaning. Do not use abrasive cleaners or solvents.
- Connections: Periodically check all cables and connections for wear or damage. Ensure they are securely fastened.
- Storage: Store the unit in a dry, clean environment when not in use.
- Inspection: Regularly inspect the ceramic nozzles and replace them if they show signs of wear or damage.
For internal repairs or complex issues, contact qualified service personnel. Do not attempt to open the casing yourself.
9. Troubleshooting
If you encounter issues with your SL-MINI, refer to the following common problems and solutions:
| Problem | Possible Cause | Solution |
|---|---|---|
| Unit does not power on. | No power supply; power cable loose; main switch off. | Check power outlet; ensure power cable is securely connected; verify main switch is in "On" position. |
| No welding output. | Incorrect TIG machine connection; incorrect settings; TIG machine fault. | Verify connection cable to TIG machine; check SL-MINI operating mode and parameters; ensure TIG machine is functioning correctly. |
| Inconsistent weld spots. | Incorrect pulse settings; worn nozzles; improper workpiece preparation. | Adjust TIME/FREQ and TIME/DUTY parameters; replace ceramic nozzles; ensure workpiece is clean and properly grounded. |
| Foot pedal unresponsive. | Foot pedal cable loose or damaged; incorrect 2T/4T mode. | Check foot pedal connection; ensure cable is not damaged; verify 2T/4T mode setting. |
If the problem persists after attempting these solutions, please contact customer support.
10. Specifications
| Feature | Detail |
|---|---|
| Model Number | SL-MINI |
| Manufacturer | Klortecer |
| Power Type | AC |
| Input Voltage | AC 220V 50Hz (for SL-MINI unit) |
| Output Voltage (to TIG machine) | 3 – 48V |
| Pulse Duration Adjustment | 1 – 999 ms |
| Pulse Frequency | 1 – 20 Hz |
| Duty Cycle (Touch Ratio) | 1 – 99 % |
| Program Storage | Up to 20 individual programs |
| Dimensions (L x W x H) | 125 x 80 x 70 mm (approx. 4.92 x 3.15 x 2.76 inches) |
| Weight | Approx. 740 g |
| Standby Power Consumption | Less than 3.5 W |

Figure 5: Physical dimensions of the SL-MINI unit, showing its compact size.

Figure 6: The SL-MINI unit held in a hand, illustrating its ultra-compact design for maximum mobility.
11. Warranty and Support
Specific warranty details are not provided within this manual. For warranty information, technical support, or service inquiries, please refer to the product packaging, your purchase documentation, or contact your retailer or the manufacturer directly.
Manufacturer: Klortecer