1. Introduction
This manual provides essential information for the safe and effective installation, operation, and maintenance of your G GX9 In-Ground Adjustable Basketball Hoop. Please read all instructions carefully before assembly and use. Retain this manual for future reference.
2. Safety Information
Always prioritize safety during installation and use. Failure to follow safety guidelines may result in injury or damage to the product.
- Ensure the installation site is level and clear of obstructions.
- Always have at least two adults for assembly and installation.
- Do not hang on the rim or backboard.
- Regularly inspect all components for wear or damage.
- Keep children away from the hoop during height adjustment.
3. Components Overview
The G GX9 In-Ground Adjustable Basketball Hoop system includes the following main components:
- Shatterproof Polycarbonate Backboard (45 inches wide)
- Standard 18-inch Dunkable Rim with Double Shock Absorption Springs
- Adjustable Height Mechanism with Hand Crank
- All-in-One Anchor Pole System
- Protective Pole Pad
- PE Corner Protection for Backboard

Figure 3.1: The 45-inch wide and 28-inch high shatterproof backboard, illustrating its multi-layer construction for durability.

Figure 3.2: Visual breakdown of key components, including the standard 18-inch rim, PE backboard, double shock-absorption springs, full iron frame for strength, PE corner protection, and the effortless one-handed adjustment mechanism.
4. Setup and Installation
The G GX9 In-Ground Basketball Hoop requires permanent installation into the ground. This process involves preparing the site, installing the anchor system, and then assembling the main hoop structure. It is a multi-day process due to concrete curing times.
4.1 Site Preparation
- Select a level area free from overhead obstructions and underground utilities.
- Ensure adequate space around the playing area for safety.
4.2 Anchor Pole Installation
The all-in-one anchor pole system is designed to simplify installation. Follow these general steps:
- Dig a Hole: Dig a round hole with approximate dimensions of 21.5 inches deep and 18 inches in diameter.
- Place Anchor System: Position the anchor system, including any specified bricks and bottom rods, into the hole according to the detailed instructions provided in your product packaging. Ensure it is level and correctly oriented.
- Pour Concrete: Pour concrete into the hole, encasing the anchor system. Allow the concrete to cure completely as per concrete manufacturer guidelines (typically 24-72 hours or more, depending on conditions).
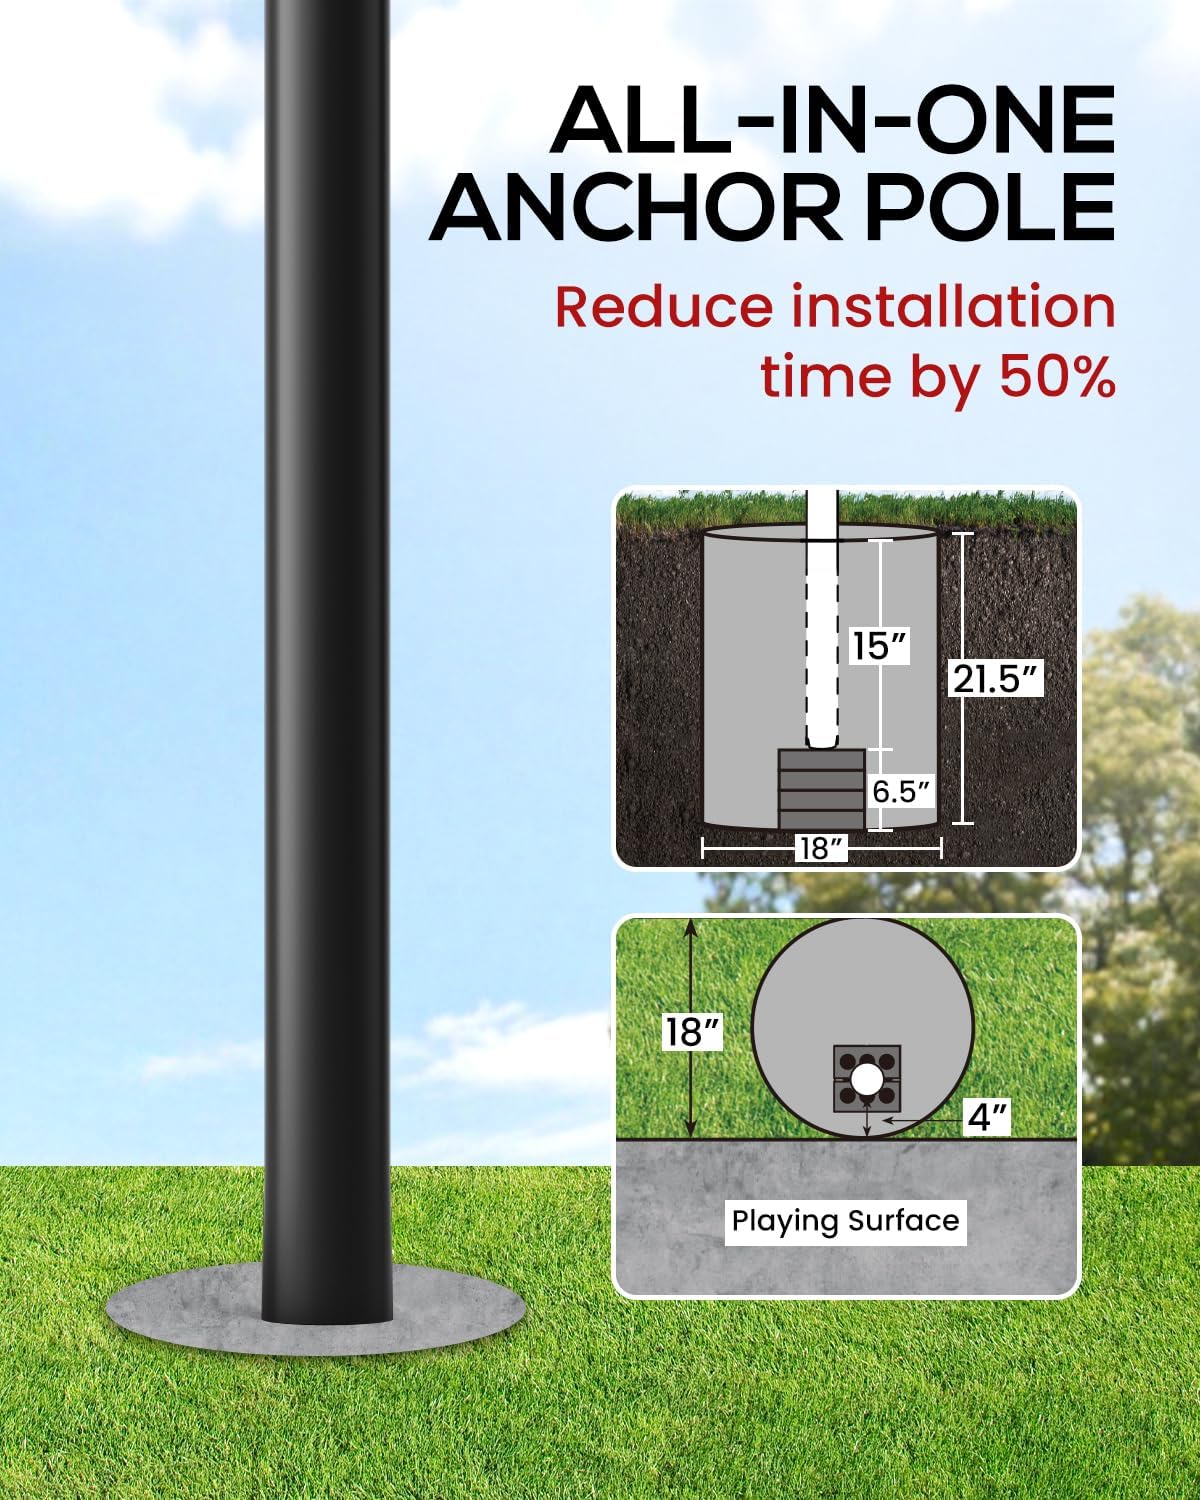
Figure 4.1: Detailed diagram showing the dimensions and steps for installing the all-in-one anchor pole, including digging a hole, placing bricks and bottom rods, and pouring cement.

Figure 4.2: A three-step guide for anchor pole installation: 1) Digging a 21.5"x18" round hole, 2) Placing bricks and bottom rods, and 3) Pouring cement, designed to reduce installation time.
4.3 Hoop Assembly
Once the concrete has fully cured, proceed with assembling the remaining components:
- Attach the main pole to the cured anchor system.
- Mount the backboard and rim assembly to the pole.
- Install the height adjustment mechanism.
- Secure the protective pole pad.
Refer to the detailed assembly instructions included in your product packaging for specific hardware and steps.
5. Operating Instructions
5.1 Height Adjustment
The G GX9 basketball hoop features an adjustable height mechanism, allowing the rim to be set between 7.5 feet and 10 feet. This versatility accommodates players of all ages and skill levels.
- Locate the hand crank on the main pole.
- Turn the crank clockwise to raise the backboard and rim, or counter-clockwise to lower it.
- A measuring tape (included) can be affixed to the pole to accurately determine the current height.
- To prevent unauthorized adjustment, the crank handle can be removed by pulling out the retaining pin.

Figure 5.1: A user operating the hand crank for effortless height adjustment.

Figure 5.2: This image illustrates the adjustable height feature of the basketball hoop, demonstrating its range from 7.5 feet to 10 feet, suitable for various age groups.

Figure 5.3: This image visually explains the adjustable height range of the basketball hoop, from 7.5 feet to 10 feet, with an inset showing the adjustment mechanism.
6. Maintenance
Regular maintenance ensures the longevity and safe operation of your basketball hoop. Specific maintenance instructions are not provided in this document. However, general recommendations include:
- Cleaning: Clean the backboard and pole periodically with mild soap and water. Avoid abrasive cleaners.
- Inspection: Regularly check all bolts, nuts, and connections for tightness. Tighten as necessary.
- Net Replacement: Replace the net if it becomes worn or damaged.
- Pole Pad Care: Remove the pole pad when not in use to prolong its life, especially in harsh weather conditions.
7. Troubleshooting
Specific troubleshooting steps are not provided in this document. For issues not covered in the assembly or operating instructions, please refer to the contact information for support.
8. Specifications
| Feature | Detail |
|---|---|
| Brand | G GX9 |
| Model Name | G GX9 |
| Size | 45IN |
| Material | Polyethylene (PE), Polycarbonate (Frame) |
| Color | Black |
| Item Weight | 24 Kilograms |
| Indoor/Outdoor Usage | Outdoor |
| Special Feature | Adjustable Height, In-Ground Basketball Hoop |
| Mounting Type | In-Ground |
| Minimum Height | 7.5 Feet |
| Frame Material | Polycarbonate |
| Assembly Required | Yes |

Figure 8.1: A comparison chart showing different backboard materials (PC, PET, PVC, PE) and their respective maximum/minimum temperatures, Shore Hardness, and strength, emphasizing the superior performance of the PC backboard used in the G GX9 hoop.
9. Warranty and Support
Specific warranty details and direct support contact information are not provided in this manual. Please refer to your purchase documentation or the manufacturer's official website for the most current warranty policy and customer support options.