ExploreHorizon PHO_0UZPCHOG
ExploreHorizon Nugget Ice Maker Countertop 44Lbs/24Hrs User Manual
Model: PHO_0UZPCHOG | Brand: ExploreHorizon
1. Important Safeguards
Please read all instructions carefully before operating the appliance. Retain this manual for future reference.
- Ensure the ice maker is placed on a stable, level surface away from direct sunlight and heat sources.
- Do not immerse the appliance, power cord, or plug in water or other liquids.
- Supervise children when the appliance is in use.
- Do not operate the appliance with a damaged cord or plug. Contact qualified service personnel for repair.
- Use only potable water in the ice maker.
- Unplug the appliance before cleaning or when not in use for extended periods.
- Do not disassemble or attempt to service the machine by non-professionals.
- Ensure proper ventilation around the unit. Maintain at least 5 inches of clearance on all sides.
2. Product Overview
The ExploreHorizon Nugget Ice Maker is designed to produce chewable nugget ice efficiently. It features a compact design, self-cleaning function, and simple one-key operation.

Figure 2.1: Front view of the ExploreHorizon Nugget Ice Maker, showing the control panel, ice bin, and included ice scoop.
2.1 Components
- Ice Maker Unit
- Ice Scoop
- Instruction Manual (this document)
2.2 Key Features
- High Ice Output: Produces up to 44 pounds of ice per day.
- Rapid Ice Production: Ice ready in approximately 10-15 minutes.
- Chewable Nugget Ice: Creates soft, chewable ice cubes ideal for beverages.
- Self-Cleaning Function: Automated cleaning process for hygiene.
- Compact Design: Suitable for countertops, RVs, and dorm rooms.

Figure 2.2: Illustration of the ice maker's daily output capacity and rapid ice production time.

Figure 2.3: Example of chewable nugget ice in a beverage, demonstrating its desirable texture.
3. Setup
- Unpack the Appliance: Carefully remove the ice maker from its packaging. Remove all packing materials, tapes, and labels.
- Placement: Place the ice maker on a flat, stable, and heat-resistant surface. Ensure there is at least 5 inches of clearance around the unit for proper ventilation. Avoid placing it near heat sources or in direct sunlight.
- Initial Cleaning: Before first use, clean the interior of the ice maker. Refer to the "Maintenance" section for detailed cleaning instructions.
- Power Connection: Plug the power cord into a grounded electrical outlet (110V).
- First Use Recommendation: For optimal performance, allow the unit to sit upright for at least 2 hours before plugging it in, especially if it was transported horizontally. Discard the first few batches of ice to ensure cleanliness.
4. Operating Instructions
4.1 Adding Water
Open the lid and fill the water reservoir with potable water up to the MAX fill line. Do not overfill.
4.2 Making Ice
- Ensure the water reservoir is filled.
- Press the POWER button on the control panel to start the ice-making cycle. The indicator light will illuminate.
- The ice maker will begin producing ice within 10-15 minutes.
- When the ice basket is full, the "ICE FULL" indicator will light up, and the machine will pause. Remove ice to resume production.
- When the water level is low, the "ADD WATER" indicator will light up. Add more water to the reservoir to continue ice production.
- To stop ice production, press the POWER button again.

Figure 4.1: The ice maker positioned on a countertop, illustrating a typical operational setup.
4.3 Internal Technology
The ice maker utilizes advanced refrigeration technology for efficient and quiet operation.

Figure 4.2: Exploded view illustrating the internal components: (1) Sturdy Spinning Auger & Evaporator, (2) Advanced Gear Motor, (3) Efficient Condenser, (4) Upgraded Compressor.
5. Maintenance
5.1 Self-Cleaning Function
The ice maker features an automatic self-cleaning function to maintain hygiene.
- Ensure the water reservoir is filled with clean water.
- Press and hold the CLEAN button (or refer to your specific model's control panel for the self-clean initiation method) for a few seconds to activate the self-cleaning cycle.
- The machine will circulate water and flush out residue. This cycle typically takes several minutes.
- Once the cycle is complete, drain the water from the unit.
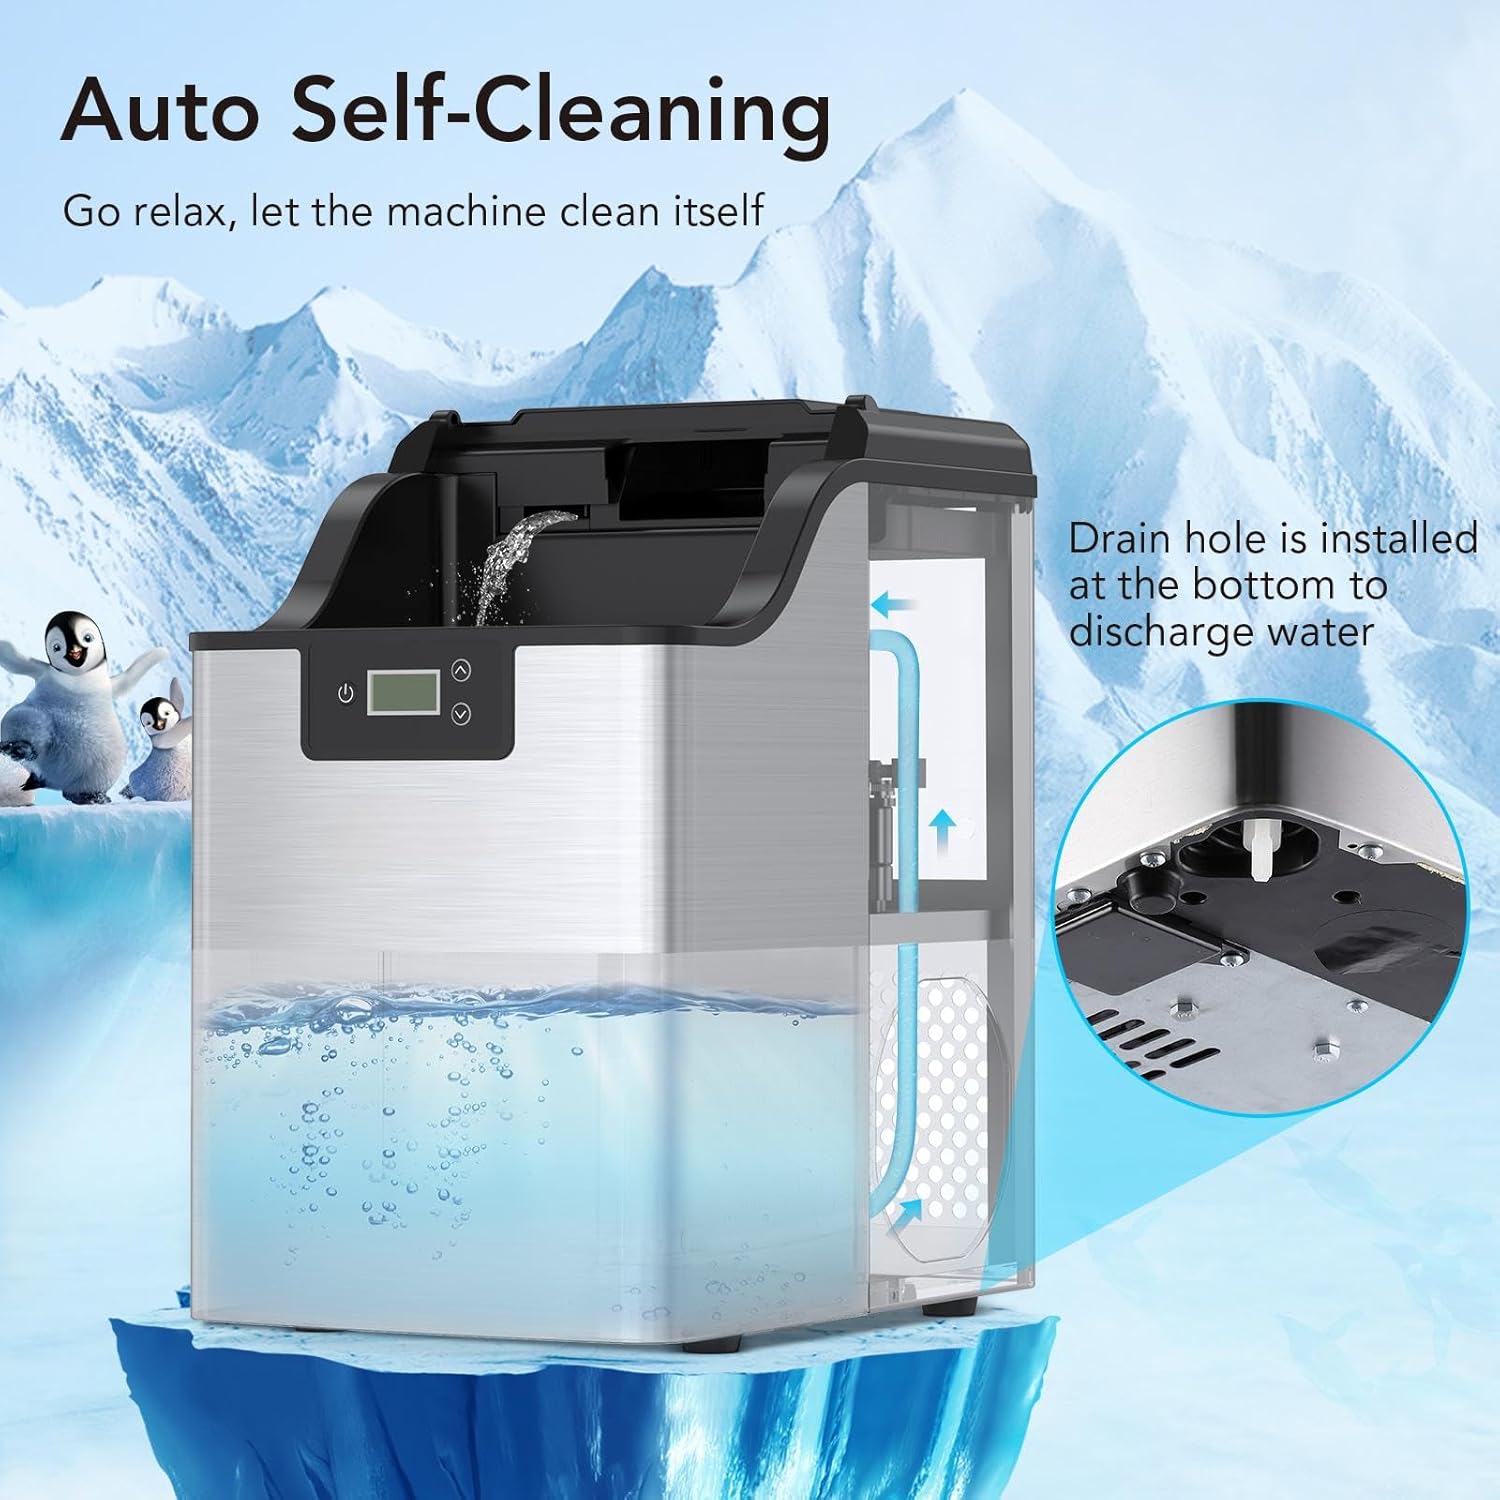
Figure 5.1: Visual representation of the self-cleaning process, highlighting water circulation and the drain hole for discharge.
5.2 Manual Cleaning
- Unplug the ice maker before cleaning.
- Remove the ice basket.
- Clean the interior with a soft cloth dampened with a mild detergent solution. Rinse thoroughly.
- Wipe the exterior with a soft, damp cloth.
- Ensure all parts are dry before reassembling and operating.
- Regularly clean the air vents on the sides/back of the unit to ensure proper airflow.
6. Troubleshooting
| Problem | Possible Cause | Solution |
|---|---|---|
| Ice maker not producing ice. | No water in reservoir; power issue; ambient temperature too high. | Fill water reservoir; check power connection; ensure unit is in a cool environment. |
| "ADD WATER" indicator is on. | Water level is low. | Add potable water to the reservoir up to the MAX fill line. |
| "ICE FULL" indicator is on. | Ice basket is full. | Remove ice from the basket. |
| Ice production is slow. | Poor ventilation; high ambient temperature; dirty condenser. | Ensure adequate clearance around the unit; move to a cooler location; clean condenser vents. |
| Unusual noise during operation. | Unit not level; internal component issue. | Ensure the unit is on a level surface. If noise persists, contact customer support. |
7. Specifications
| Feature | Detail |
|---|---|
| Model Name | PHO_0UZPCHOG |
| Brand | ExploreHorizon |
| Product Dimensions (D x W x H) | 17.32" x 14.96" x 11.42" |
| Weight | Approximately 31.81 Pounds |
| Ice Production Capacity | Up to 44 Pounds per 24 Hours |
| Voltage | 110 Volts |
| Installation Type | Countertop |
| Material | Stainless Steel |

Figure 7.1: Dimensions of the ice maker, indicating its compact and portable size.
8. Warranty and Support
For warranty information or technical support, please refer to the contact details provided with your purchase or visit the official ExploreHorizon website.
Please have your model number (PHO_0UZPCHOG) and purchase date available when contacting support.
Ask a question about this manual
Ask about setup, troubleshooting, compatibility, parts, safety, or missing instructions. Manuals+ will review the question and use this page’s manual context to help answer it.