1. Introduction
This manual provides comprehensive instructions for the installation, operation, and maintenance of your CHENJE Android 13 Car Stereo Head Unit. Please read this manual thoroughly before using the product to ensure proper functionality and to prevent damage.
The CHENJE Android 13 Car Stereo Head Unit is designed to enhance your driving experience with advanced features including a 9-inch HD touch screen, Android 13 operating system, 8-core processor, 4G+WiFi connectivity, GPS navigation, Bluetooth, wireless CarPlay/Android Auto, and Digital Sound Processor (DSP).
2. Safety Information
- Professional Installation Recommended: Due to the complexity of car electrical systems, professional installation is highly recommended to avoid damage to the unit or your vehicle.
- Power Supply: Ensure the unit is connected to a 12V DC power supply with negative grounding. Incorrect voltage can cause damage.
- Driving Safety: Do not operate the unit in a way that distracts you from driving. Always prioritize road safety.
- Temperature: Avoid exposing the unit to extreme temperatures or direct sunlight for prolonged periods.
- Moisture: Keep the unit dry. Exposure to moisture can lead to malfunction or electric shock.
- Cleaning: Use a soft, dry cloth for cleaning. Do not use abrasive cleaners or solvents.
3. Package Contents
Verify that all items listed below are present in your package:
- 1 x Android Host Screen and Frame
- 1 x Power Cord Adapter
- 1 x GPS Antenna
- 1 x Camera Input Cable
- 1 x 4G Antenna
- 1 x RCA Input and Output Cable
- 1 x Reversing Camera (Gift)
- 2 x USB Cables
- 1 x Canbus Decoder (if required for your vehicle model)

Figure 3.1: Included Accessories. This image displays the various components provided with the car stereo head unit, including the main frame, the head unit itself, a backup camera, power cables, USB cables, a GPS module, a 4G module, a 4G SIM cable, and a Canbus decoder.
4. Setup and Installation
Before beginning installation, ensure the vehicle's battery is disconnected to prevent electrical shorts.
4.1 Pre-Installation Check
- Confirm compatibility with your Peugeot 508 (2011-2018) model.
- Verify all package contents are present.
4.2 Wiring Diagram
Refer to the wiring diagram below for correct connections. Incorrect wiring can damage the unit or vehicle electronics.
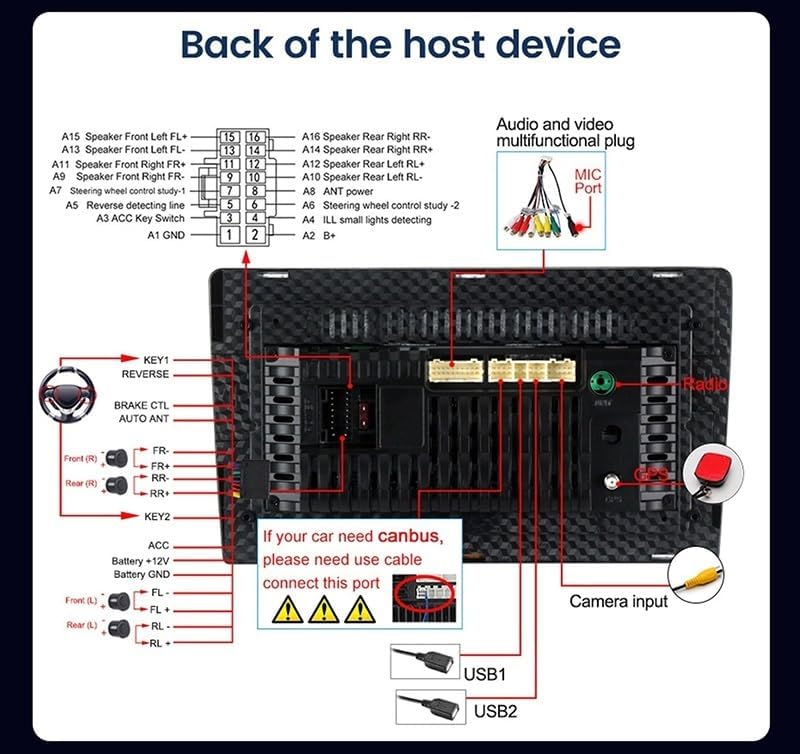
Figure 4.1: Back of the Host Device Wiring. This diagram illustrates the various ports and connections on the rear of the head unit, including speaker outputs (A1-A16), power input (ACC, Battery+12V, Battery GND), USB ports (USB1, USB2), GPS antenna, camera input, and CANbus connection points.
- Power Connection: Connect the power cord adapter to the vehicle's wiring harness. Ensure correct polarity.
- Speaker Connections: Connect vehicle speakers to the corresponding outputs on the unit.
- GPS Antenna: Mount the GPS antenna in a location with a clear view of the sky, typically on the dashboard.
- 4G Antenna: Connect the 4G antenna for cellular data connectivity.
- USB Cables: Route the USB cables to an accessible location for connecting external devices.
- Reversing Camera: Install the reversing camera at the rear of the vehicle and connect its video input to the unit. Ensure the reverse trigger wire is connected to the vehicle's reverse light circuit.
- CANbus: If your vehicle requires a CANbus decoder for steering wheel controls or other vehicle data integration, connect it as per the diagram.
4.3 Mounting the Unit
Carefully integrate the head unit into your vehicle's dashboard opening. Secure it using the provided mounting brackets and screws. Ensure all cables are neatly tucked away and not pinched.

Figure 4.2: Installed Head Unit in Peugeot 508. This image demonstrates the appearance of the CHENJE head unit after installation in a Peugeot 508 (2011-2018) vehicle, contrasting it with the factory-installed radio.
5. Operating Instructions
This section details the primary functions and operations of your CHENJE Android 13 Car Stereo Head Unit.
5.1 Basic Operations
- Power On/Off: The unit typically powers on with the vehicle's ignition. Press and hold the power button (if available) for manual control.
- Touch Screen: Navigate the Android interface by tapping, swiping, and pinching on the 9-inch HD touch screen.
- Volume Control: Adjust volume using the on-screen controls or vehicle's steering wheel controls (if CANbus is connected).

Figure 5.1: Main User Interface. This image displays the primary screen of the head unit, featuring a customizable Android interface with widgets for speed, weather, and media playback, alongside app icons for Google, YouTube, Spotify, and more.
5.2 Wireless CarPlay and Android Auto
The unit supports wireless CarPlay and Android Auto for seamless smartphone integration.
- Ensure Bluetooth and Wi-Fi are enabled on your smartphone.
- On the head unit, open the CarPlay or Android Auto application.
- Follow the on-screen prompts to pair your smartphone via Bluetooth.
- Once paired, the system will automatically connect for wireless CarPlay or Android Auto functionality.
5.3 GPS Navigation
Utilize the built-in GPS module for navigation. The unit supports both online and offline navigation applications.
- Online Navigation: Connect to Wi-Fi or 4G and use pre-installed apps like Google Maps or download others from the Google Play Store.
- Offline Navigation: Download map data for your desired regions to use navigation without an internet connection.
5.4 Bluetooth Connectivity
Connect your smartphone via Bluetooth for hands-free calling and audio streaming.
- Go to the Bluetooth settings on the head unit.
- Enable Bluetooth on your smartphone and search for available devices.
- Select the head unit's Bluetooth name (e.g., "CHENJE Car Stereo") from your phone's list.
- Confirm the pairing code on both devices.
5.5 FM/RDS Radio
Access local radio stations with the built-in FM/RDS tuner.
- Open the Radio application.
- Use the scan function to find available stations or manually tune to a frequency.
- Save preferred stations to presets for quick access.
5.6 Mirror Link
Mirror your smartphone's screen onto the head unit display via USB cable or Wi-Fi connection.
- Open the Mirror Link application on the head unit.
- Follow the specific instructions for your smartphone's operating system (Android or iOS) to establish the connection.
5.7 Digital Sound Processor (DSP)
The integrated DSP allows for advanced audio customization.
- Access the DSP settings through the audio or sound application.
- Adjust equalizer settings, balance, fader, and subwoofer output to optimize sound quality.

Figure 5.2: 3D User Interface Examples. This image showcases various themes and layouts available on the head unit's 3D user interface, demonstrating different media playback screens and dashboard configurations.
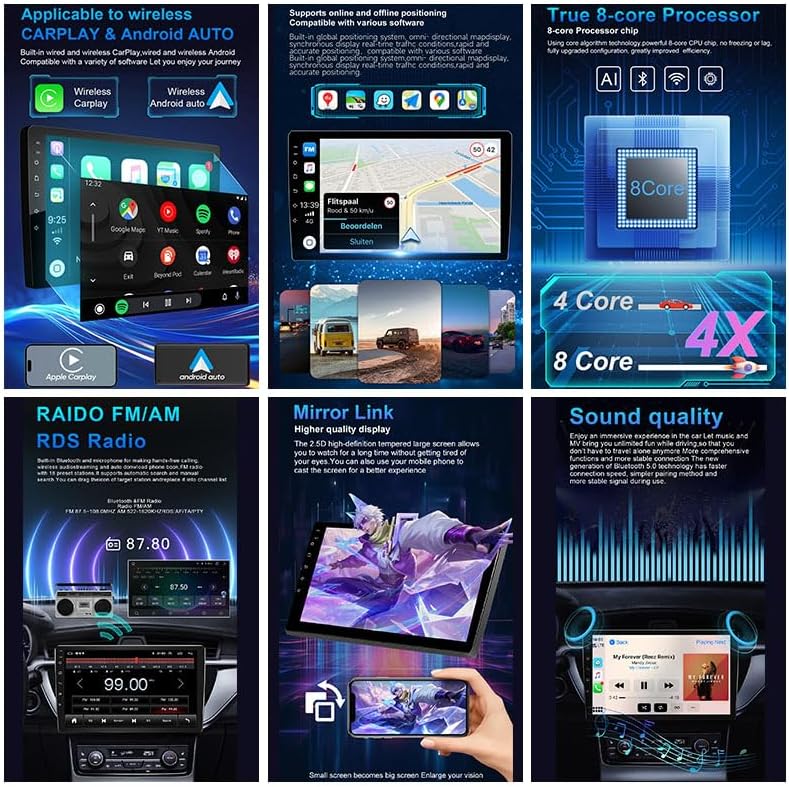
Figure 5.3: Key Features Overview. This collage highlights the main functionalities of the head unit, such as wireless CarPlay and Android Auto, GPS navigation, the powerful 8-core processor, FM/AM/RDS radio, mirror link capability, and enhanced sound experience.
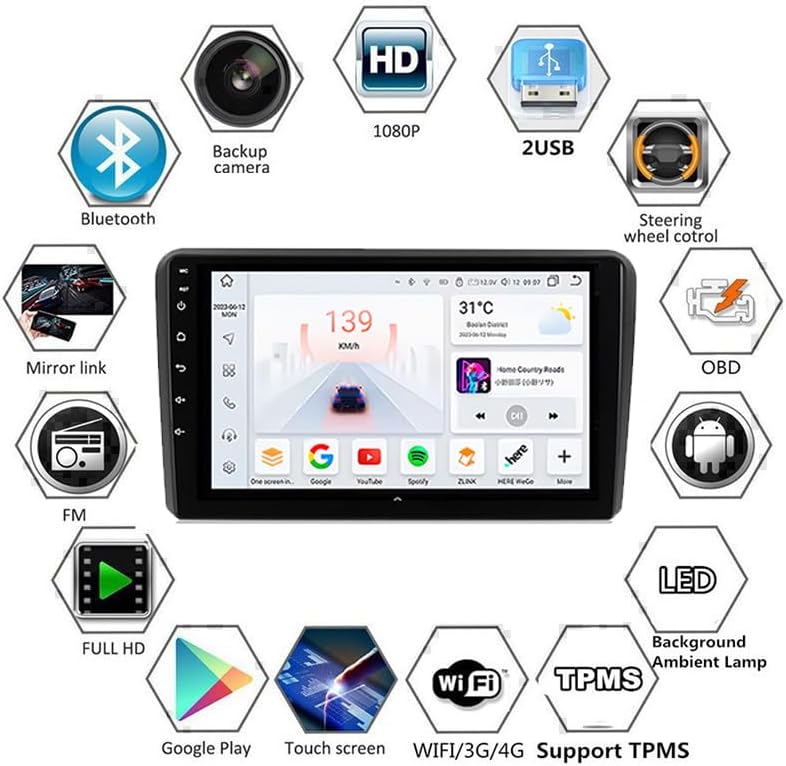
Figure 5.4: Feature Icons. This graphic illustrates the comprehensive features of the head unit through a series of icons, including Bluetooth, backup camera support, 1080P video playback, dual USB ports, steering wheel control compatibility, OBD support, mirror link, FM radio, full HD display, Google Play access, touch screen interface, WiFi/3G/4G connectivity, TPMS support, LED lighting, and ambient lamp functionality.
6. Maintenance
- Screen Cleaning: Use a soft, lint-free cloth to gently wipe the touch screen. For stubborn smudges, slightly dampen the cloth with water or a screen-safe cleaner. Avoid harsh chemicals.
- Software Updates: Periodically check for software updates to ensure optimal performance and access to new features. Updates can typically be found in the system settings or through the manufacturer's website.
- System Reset: If the unit experiences persistent issues, a factory reset may resolve them. Back up any important data before performing a reset.
7. Troubleshooting
This section addresses common issues you might encounter and provides potential solutions.
| Problem | Possible Cause | Solution |
|---|---|---|
| Unit does not power on | Incorrect wiring, blown fuse, vehicle battery issue | Check power connections, inspect vehicle fuses, verify battery charge. Consult a professional if unsure. |
| No sound output | Speaker wires disconnected, volume too low, mute activated, incorrect audio source | Check speaker connections, increase volume, disable mute, select correct audio source. |
| GPS signal lost or inaccurate | GPS antenna obstructed or improperly installed, outdated map data | Ensure GPS antenna has a clear view of the sky. Update map data if necessary. |
| Bluetooth connection issues | Bluetooth not enabled, pairing failed, interference | Ensure Bluetooth is enabled on both devices. Re-pair the devices. Move away from sources of interference. |
| Touch screen unresponsive | Software glitch, screen damage | Restart the unit. If the issue persists, perform a factory reset. If still unresponsive, contact support. |
8. Specifications
This section outlines the technical specifications for the CHENJE Android 13 Car Stereo Head Unit, Model T5 8 Core 4G+WiFi 4G+64G.
- Operating System: Android 13.0
- Processor: 8-Core
- RAM/ROM: 4GB RAM / 64GB ROM
- Display: 9-inch HD Touch Screen
- Resolution: 2000 x 1200P
- Connectivity: 4G, Wi-Fi, Bluetooth
- Navigation: Built-in GPS (supports online/offline maps)
- Smartphone Integration: Wireless CarPlay, Android Auto, Mirror Link
- Radio Tuner: FM / AM / RDS
- Audio: Built-in DSP
- Input/Output: USB ports, Camera Input, RCA Input/Output
- Compatibility: Peugeot 508 (2011-2018)
- Item Weight: 3 Kilograms

Figure 8.1: Model Comparison Table. This table provides a detailed comparison of various CHENJE car stereo models (T1 through T9), outlining differences in user interface, internet connectivity, operating system, CPU, amplifier IC, RAM/ROM configurations, CarPlay/Android Auto support, RDS/DSP features, equalizer bands, display resolution, split-screen capability, AI voice control, and AV output options.
9. Warranty and Support
CHENJE provides after-sales service and support for this product. For technical assistance, troubleshooting beyond this manual, or warranty inquiries, please contact our support team via email. Refer to your purchase documentation for specific warranty terms and contact information.
Contact Information: Please refer to the contact details provided with your product packaging or on the official CHENJE website.