Introduction
This manual provides detailed instructions for the installation, operation, and maintenance of your VIRROW Multi-Size Dash Cam Hardwire Kit. This kit is designed to provide continuous power to your dash camera for 24-hour parking monitoring, featuring low voltage protection to safeguard your vehicle's battery. Please read this manual thoroughly before installation and use to ensure proper function and safety.

Image: Overview of the VIRROW Multi-Size Dash Cam Hardwire Kit components.
Setup and Installation
Proper installation is crucial for the optimal performance of your hardwire kit. If you are unsure about any steps, it is recommended to consult a professional.
1. Safety Precautions
- Ensure the vehicle is turned off and the key is removed to prevent electric shock or damage to the electrical system.
- Wear appropriate safety gear, such as gloves, during installation.
2. Locate the Fuse Box
Identify the location of your vehicle's fuse box. This is typically found under the driver's side dashboard or in the engine compartment. Refer to your vehicle's owner's manual for the exact location.

Image: Illustration of locating the vehicle's fuse box, typically under the dashboard.
3. Identify Fuse Types and Power Sources
The hardwire kit includes four types of fuse adapters to match various vehicle fuse types. You will need to identify a constant power fuse (always on) and an ACC fuse (on when the vehicle is running).
- Constant Power Fuse: Provides power even when the vehicle is off, essential for parking monitoring.
- ACC Fuse: Provides power only when the vehicle's ignition is on.
Use an LED test pen (not included) to identify these fuses. The LED will light up for a constant power fuse when the vehicle is off, and for an ACC fuse when the vehicle is on.

Image: The four different types of fuse adapters provided with the hardwire kit.
4. Connect the Wires
- Remove the vehicle's original power fuse and insert it into the inner hole of the matching fuse adapter connector.
- Locate the yellow wire from the hardwire kit and connect it to the adapter with the rated power fuse inserted. This will connect to the constant power fuse slot in your vehicle.
- Locate the red wire from the hardwire kit and connect it to the adapter with the ACC fuse inserted. This will connect to the ACC fuse slot in your vehicle.
- Connect the black wire (GND) to any metal bolt or screw in your vehicle's chassis for grounding.

Image: Detailed view of connecting the yellow and red wires to their respective fuse adapters.
5. Route the Cables
Carefully route the hardwire kit cables along the vehicle's interior trim to conceal them, ensuring a clean and professional installation. The 11.5ft cable length provides ample reach for most installations.

Image: Illustration of how to route the hardwire kit cables for a hidden installation.
6. Connect to Dash Cam
Connect the USB-C power port of the hardwire kit to your dash camera. The dash cam should power on automatically.
Installation Video Guide
Video: A detailed installation guide for the VIRROW Hardwire Kit, demonstrating the steps in a vehicle.
Operating Instructions
Once installed, the hardwire kit enables advanced features for your dash camera.
1. 24-Hour Parking Monitoring
The hardwire kit provides continuous power to your dash cam, allowing it to monitor your vehicle even when the engine is off. This feature records impacts or motion, providing security around the clock.
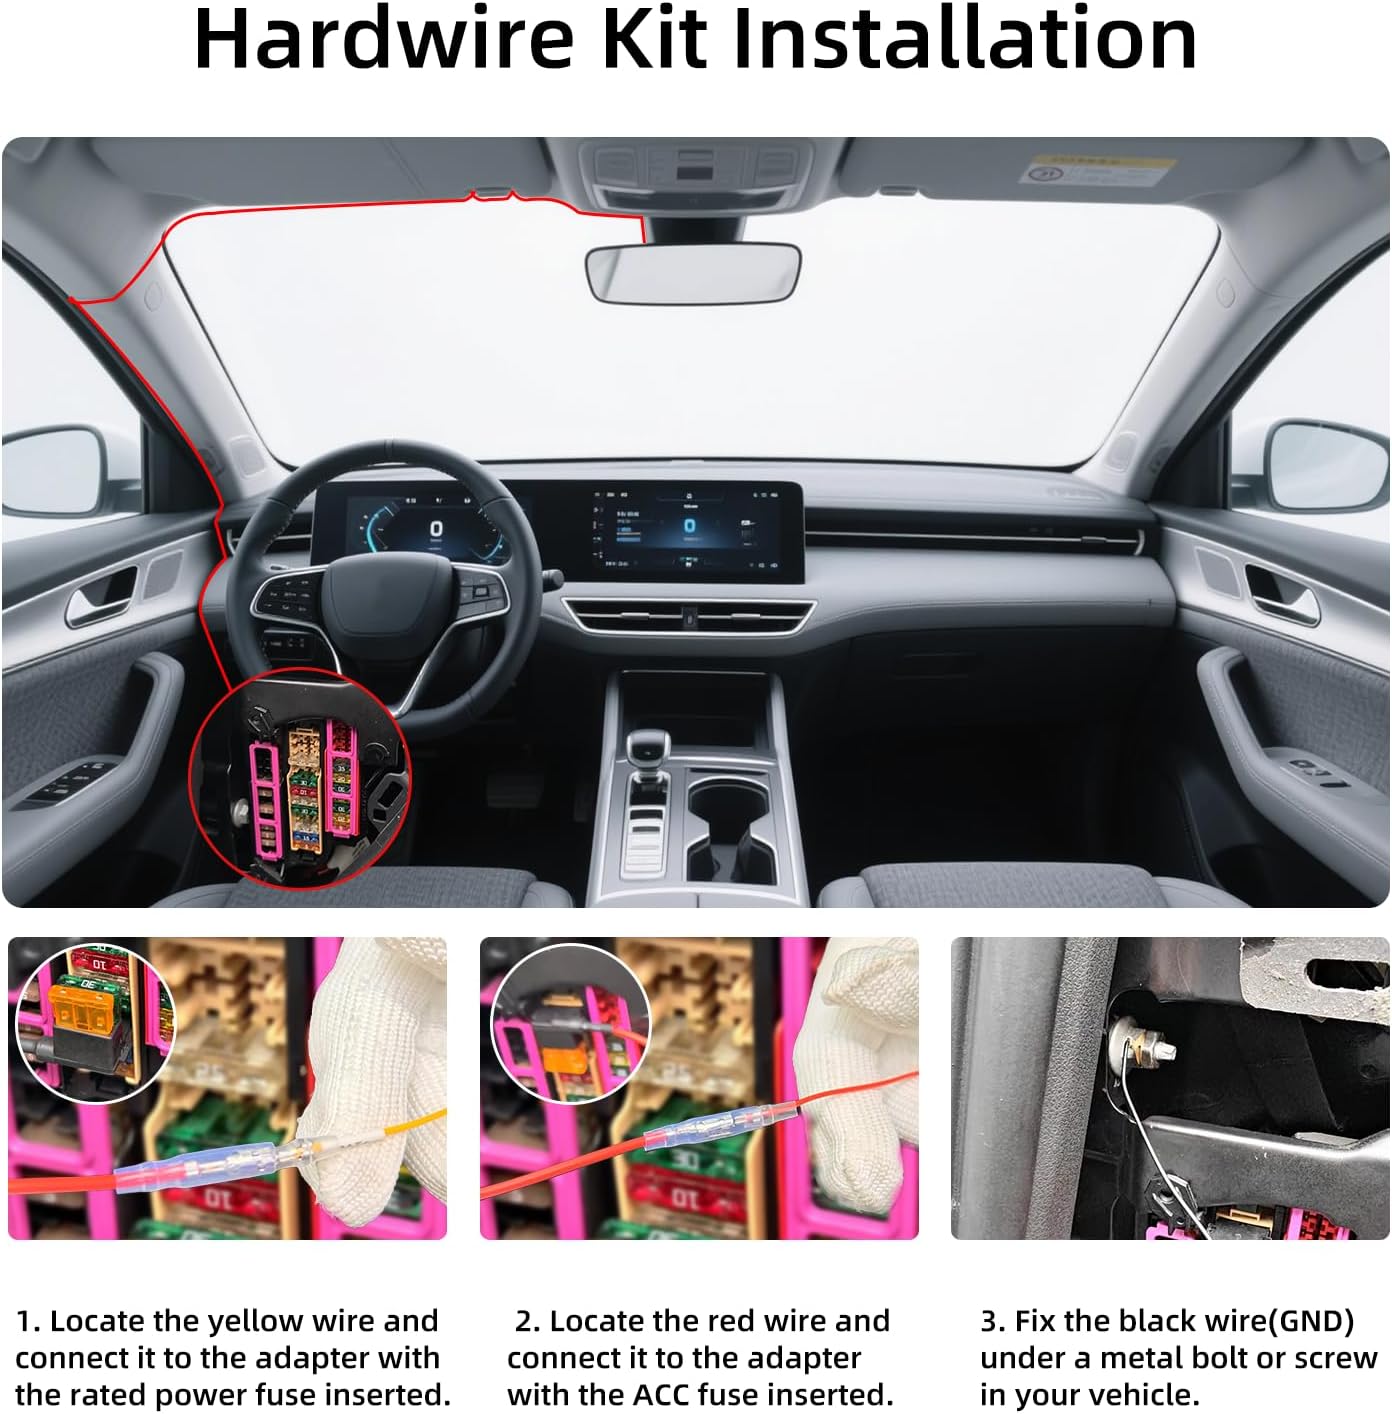
Image: Visual representation of the 24-hour parking monitoring feature, showing a car being protected.
2. Low Voltage Protection
The hardwire kit is equipped with intelligent low voltage protection. It automatically cuts off power to the dash cam when the vehicle's battery voltage drops below 11.6V (for 12V systems) or 23.6V (for 24V systems) to prevent battery drainage. This ensures your vehicle will always have enough power to start.

Image: Diagram explaining the low voltage protection function, applicable to 12V/24V vehicle power systems.
3. Dash Cam Settings for Parking Mode
After installation, it is recommended to restore your dash cam to its factory settings and then configure the following:
- Time-Lapse: Set the time-lapse recording interval (e.g., 1S, 2S, 3S).
- Time-Lapse Time: Choose the duration for time-lapse recording (e.g., 12H, 24H).
- Parking Guard: Adjust the sensitivity of the parking guard (e.g., Low, Middle, High) to detect impacts or motion.
Once these settings are applied and the vehicle is turned off, the dash cam should display a message indicating entry into 'Parking Mode' or 'Time-lapse video' mode.
Maintenance
To ensure the longevity and optimal performance of your hardwire kit and dash camera, follow these maintenance guidelines:
- Regular Checks: Periodically inspect the wiring connections to ensure they are secure and free from corrosion or damage.
- Cleanliness: Keep the dash cam and surrounding area clean. Avoid using harsh chemicals that could damage the device or wiring.
- Firmware Updates: Check the VIRROW website for any available firmware updates for your dash camera, as these can improve performance and add new features.
- Cable Management: Ensure cables remain neatly tucked away to prevent interference with vehicle operation or accidental damage.
Troubleshooting
If you encounter issues with your hardwire kit, refer to the following common problems and solutions:
Dash Cam Not Powering On
- Check Connections: Ensure all wires (yellow, red, black) are securely connected to the correct fuse slots and ground point.
- Verify Fuses: Confirm that the fuses in the adapters are not blown. Replace if necessary.
- Vehicle Power: Check if your vehicle's battery has sufficient charge.
Parking Monitoring Not Working
- Constant Power Fuse: Ensure the yellow wire is connected to a constant power fuse that remains active when the vehicle is off.
- Dash Cam Settings: Verify that 'Time-Lapse' and 'Parking Guard' settings are correctly configured in your dash cam's menu.
- Low Voltage Protection: If the vehicle battery voltage is too low, the kit's low voltage protection may prevent parking monitoring from activating. Charge your vehicle's battery if needed.
Vehicle Battery Drains Quickly
- Low Voltage Protection: While the kit has low voltage protection, prolonged parking monitoring in a vehicle with an older or weak battery can still lead to drainage. Consider reducing parking monitoring duration or checking your battery health.
- Incorrect Fuse Connection: Ensure the yellow wire is connected to a constant power source and not an ACC source, and that the low voltage protection is functioning as intended.
If problems persist, please contact VIRROW customer support for further assistance.
Specifications
| Feature | Detail |
|---|---|
| Product Dimensions | 5.9 x 0.98 x 2.56 inches |
| Item Weight | 7 ounces |
| Model Number | CSXE0810 |
| Connectivity Technology | USB C |
| Special Feature | Parking Monitor, Low Voltage Protection |
| Input Voltage | DC 12V-24V |
| Output Voltage | 5V |
| Cable Length | 11.5 ft |
| Included Components | Hardwire Kit, 4 Types of Fuses Adapters |
| Manufacturer | VIRROW |
| Vehicle Service Type | Car, Minivan, RV, Truck |
Warranty and Support
VIRROW is committed to your satisfaction. We offer comprehensive support for our products.
Warranty Information
This VIRROW Hardwire Kit comes with an 18-month warranty. In the event of any issues arising due to product quality, VIRROW offers a free replacement.
Customer Support
Our dedicated team is available to assist you with any questions or concerns regarding your product. Please feel free to contact us anytime for support.

Image: VIRROW's commitment to customer support, including 24-hour service and email contact options.