Introduction
This manual provides comprehensive instructions for the setup, operation, maintenance, and troubleshooting of your Machenike G3V2 Bluetooth Gaming Controller. Please read this manual carefully to ensure optimal performance and longevity of your device.
Video: Machenike G3V2 UG Controller Description. This video provides a general overview of the controller's features and design.
Setup
1. Package Contents
Verify that all items are present in the package:
- Machenike G3V2 Bluetooth Gaming Controller
- Charging Dock
- USB-C Cable
- User Manual
- Dual-Core Receiver (for 2.4G wireless connection)
2. Charging the Controller
The controller features a built-in 1000mAh high-capacity battery. For initial use, fully charge the controller.
- Connect the USB-C cable to the charging dock.
- Place the controller onto the charging dock.
- The controller's RGB lighting will indicate charging status.

Image: The Machenike G3V2 controller resting on its dedicated charging dock, illustrating the charging process.

Image: An internal view highlighting the 1000mAh high-capacity battery, ensuring extended playtime.
3. Connecting the Controller
The Machenike G3V2 supports Tri-Mode Connectivity: Bluetooth, 2.4G Wireless (via Dual-Core Receiver), and Wired USB-C.
3.1. Connecting to Nintendo Switch (Bluetooth Mode)
- Ensure your Nintendo Switch is powered on.
- On the Machenike G3V2 controller, hold the Y + Home buttons simultaneously until the indicator light flashes rapidly, changing from slow to fast flashing. This puts the controller into Switch pairing mode.
- On your Switch, navigate to the HOME Menu, select "Controllers", then "Change Grip/Order".
- Wait for the controller to connect automatically. Once connected, the controller will vibrate, and its icon will appear on the Switch screen.
- Press the A button on the controller to confirm.
- To swap the A/B/X/Y button layout to match the Switch standard, press FN + A.
Video: Product Tutorial - How to Connect to Switch Host. This video demonstrates the step-by-step process of pairing your controller with a Nintendo Switch.
3.2. Connecting to PC/Other Devices (2.4G Wireless)
For PC and other compatible devices, use the included Dual-Core Receiver for a 2.4G wireless connection.
- Plug the Dual-Core Receiver into an available USB port on your device.
- Turn on the controller. It should automatically connect to the receiver.
- The controller supports a 1000Hz polling rate for ultra-low latency via 2.4G wireless.
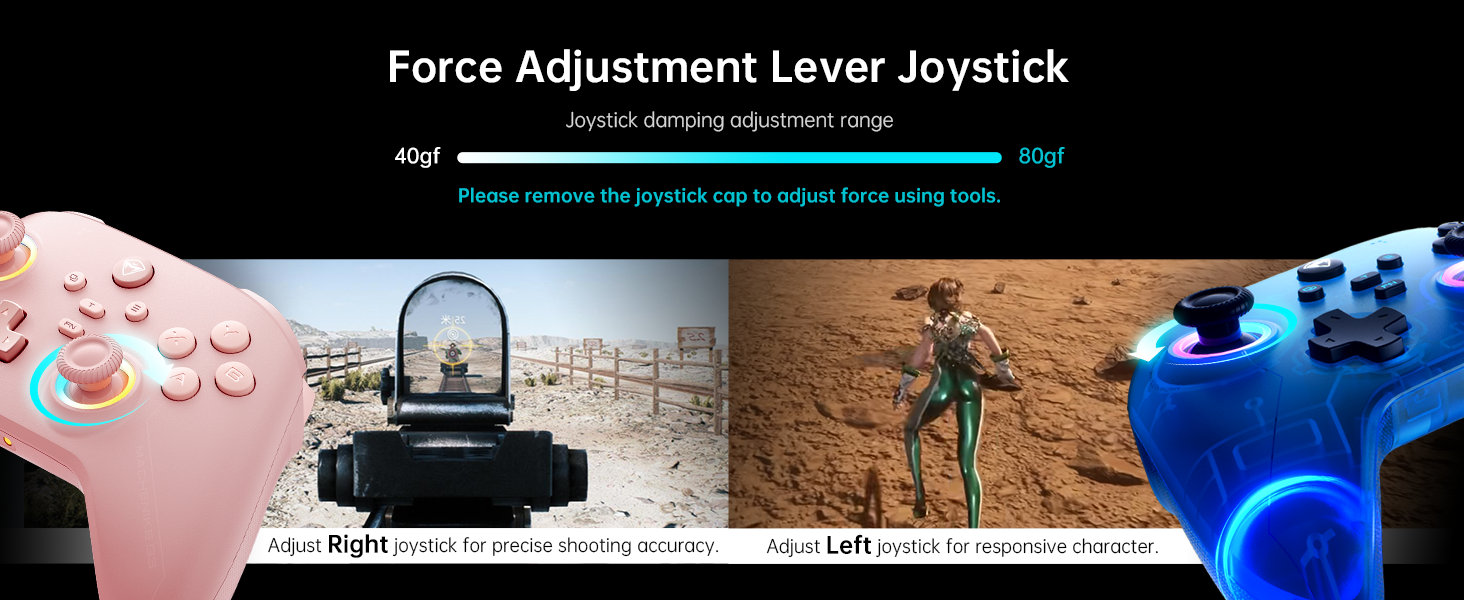
Image: The Dual-Core Receiver, which supports simultaneous connection of two controllers for cooperative play.
3.3. Wired Connection
Connect the controller directly to your device using the USB-C cable for a stable wired connection. This mode also supports a 1000Hz polling rate.
Operating Instructions
1. Hall Effect Joysticks and Triggers
The controller features dual Hall-Effect sensing joysticks and high-precision trigger buttons, designed for durability and accuracy without drift.

Image: An illustration of the infinitely adjustable Hall Joystick and other key features like dual customizable back buttons and 1000mAh battery.
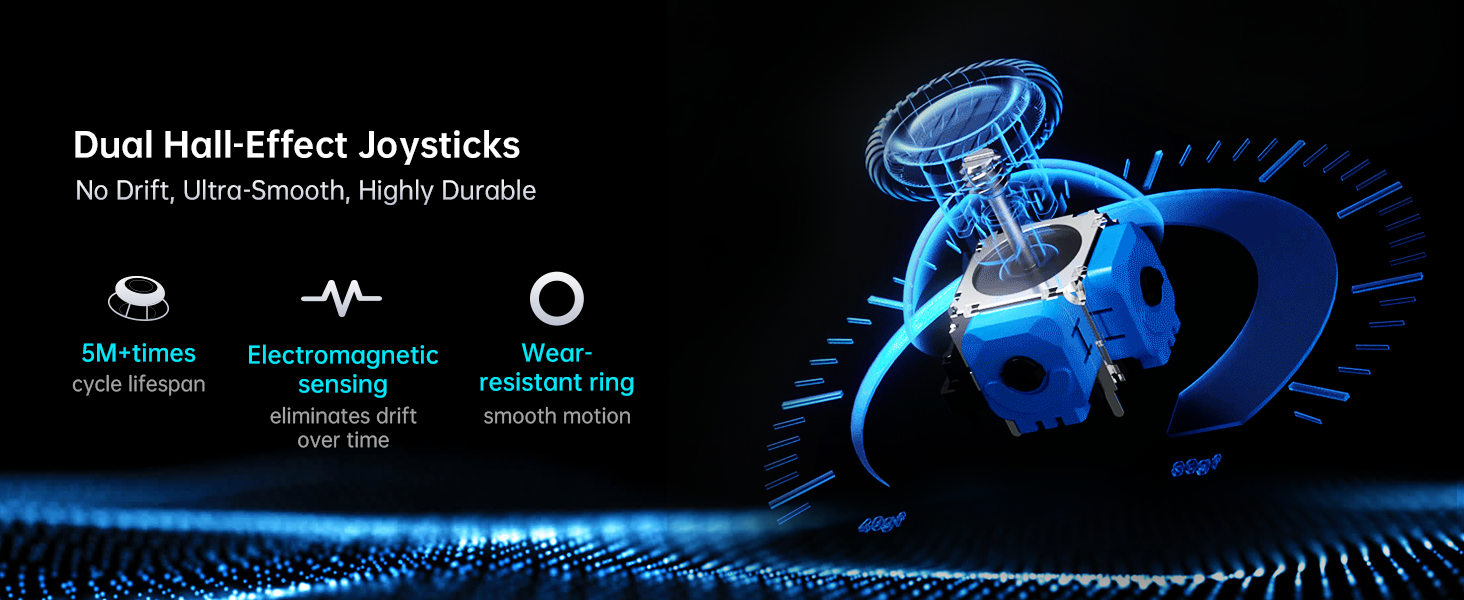
Image: A detailed view of the dual Hall-Effect Joysticks, emphasizing their no-drift, ultra-smooth, and highly durable characteristics with 5M+ cycle lifespan and electromagnetic sensing.
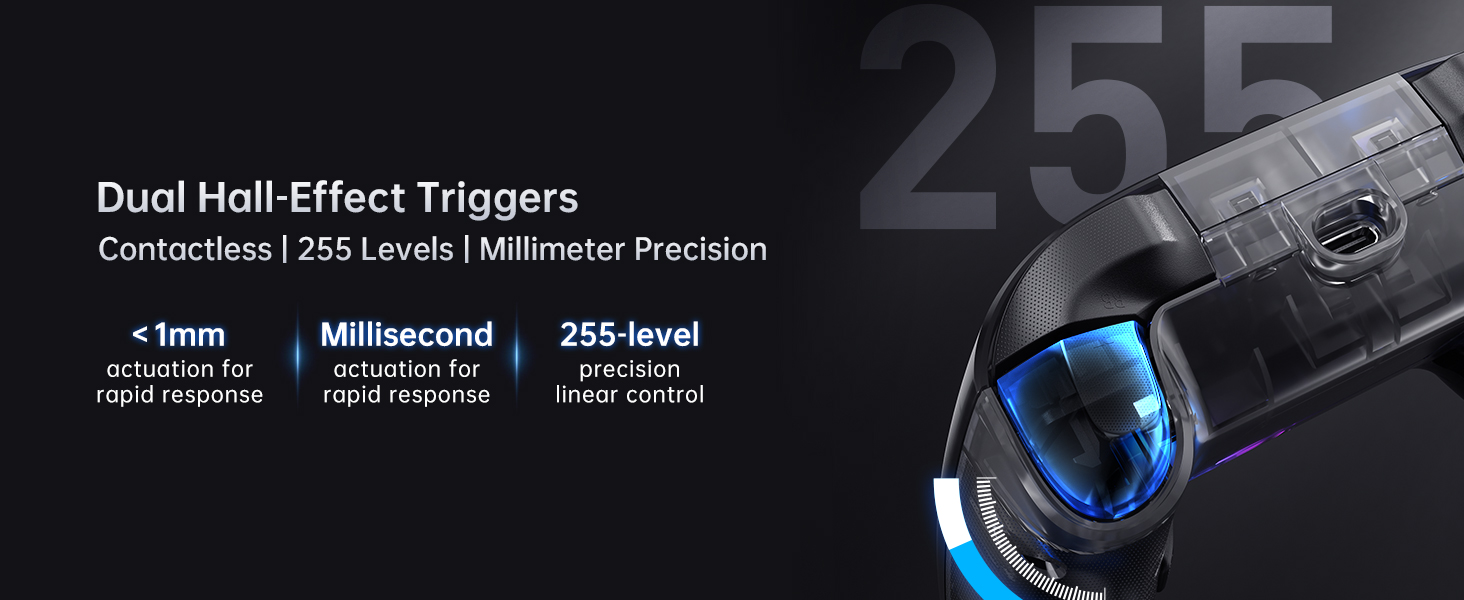
Image: A close-up of the dual Hall-Effect Triggers, highlighting contactless operation, 255 levels of linear control, and millisecond actuation for rapid response.
2. Joystick and Trigger Calibration
If you experience slight misalignment or drift with joysticks or triggers, perform a calibration:
2.1. Joystick Calibration
- Press and hold the B + Back + Home buttons simultaneously until the blue LED flashes.
- Move both joysticks in full circles (about three full rotations) slowly and steadily.
- Press the Start button to save. The controller will power off, indicating successful calibration.
- Reconnect the controller to resume normal operation.
2.2. Trigger Calibration
- Press and hold the Y + Back + Home buttons simultaneously until the red LED flashes.
- Press both triggers normally all the way down three times. Do not press too hard.
- Press the Start button to save. The controller will power off, indicating successful calibration.
- Reconnect the controller to resume normal operation.
Note: When calibrating, use normal, gentle pressure to ensure accurate results and avoid abnormal behavior.
Video: Product Tutorial - How to Calibration Trigger and Joystick. This video guides you through the calibration process for both joysticks and triggers.
3. Customizable Force Adjustable Stick Tension
The joysticks feature adjustable tension, allowing customization from lightweight and agile to heavy and precise. This feature helps adapt to various game requirements.
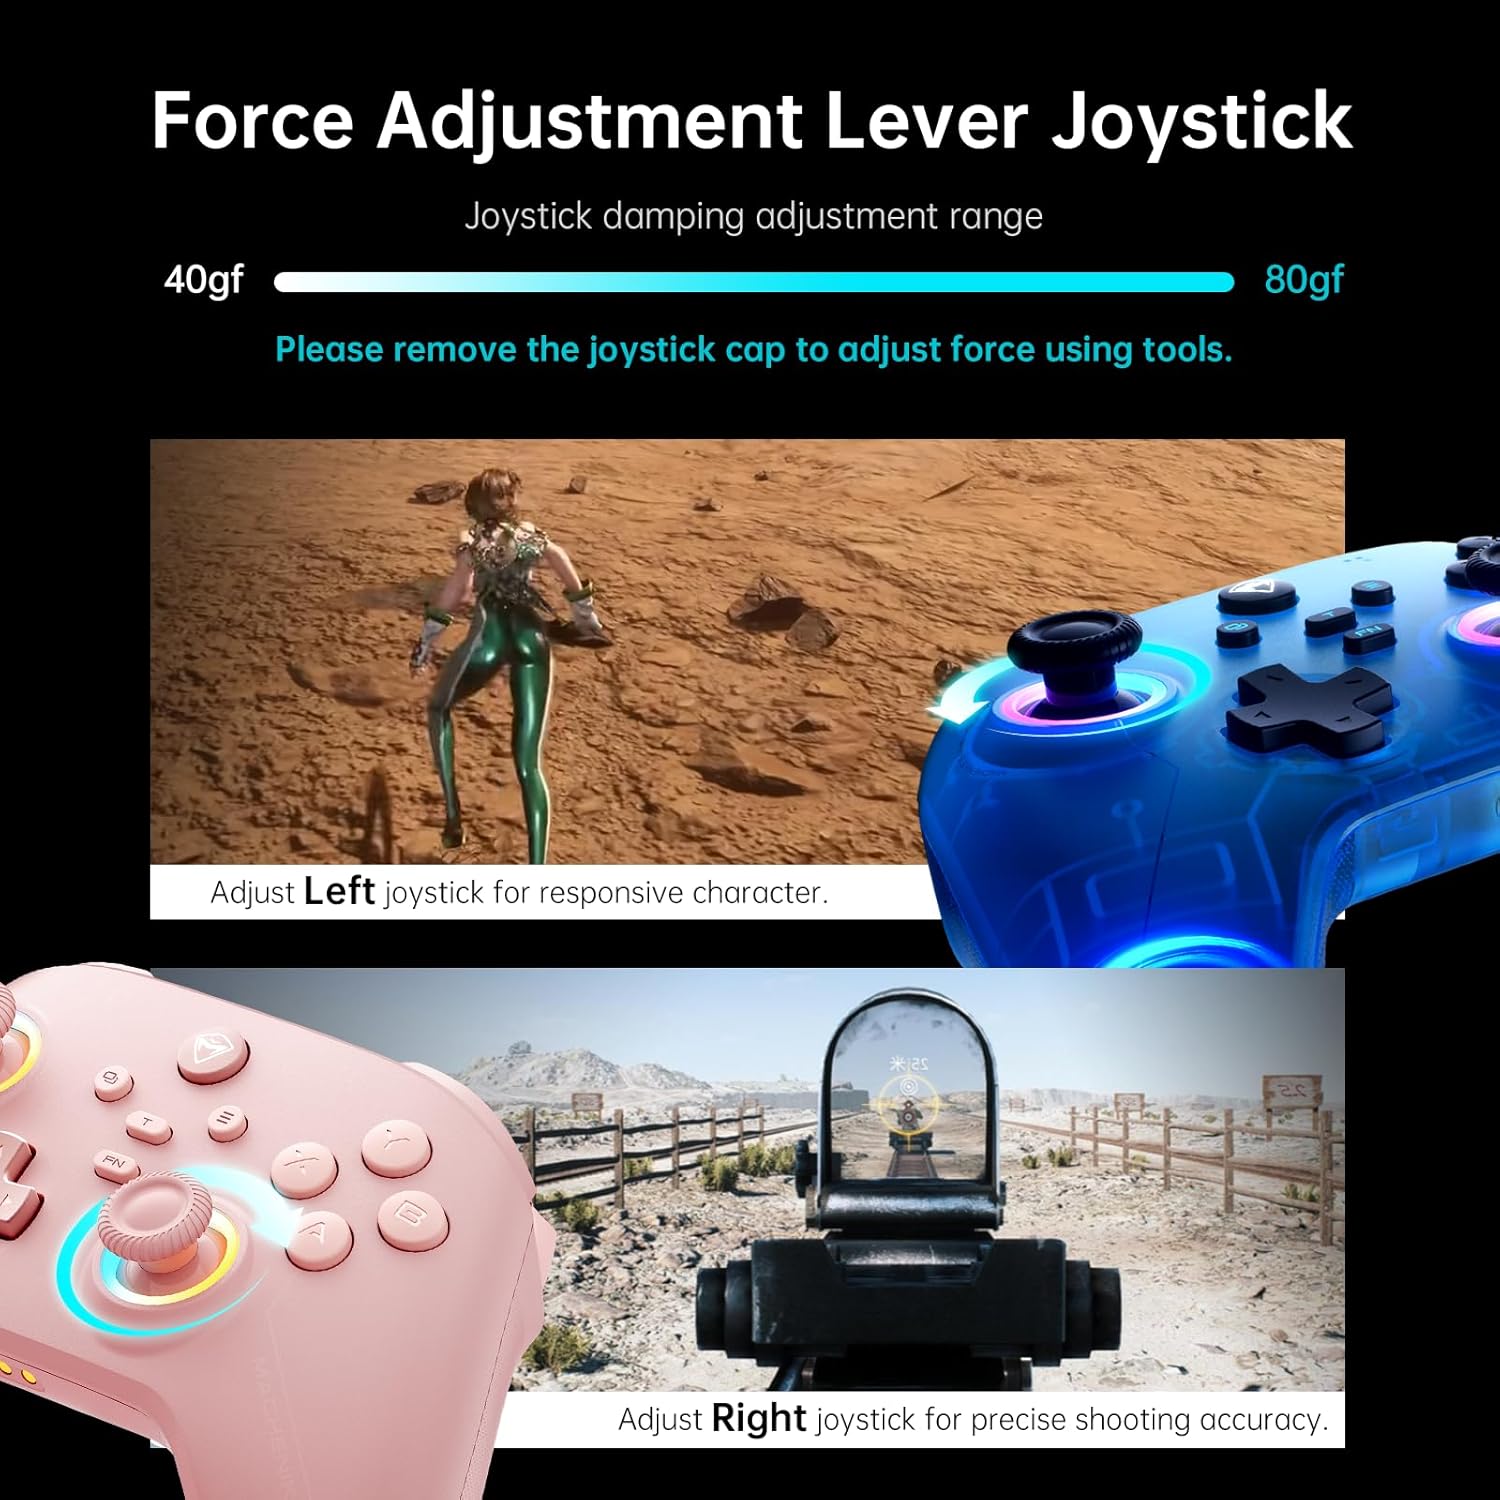
Image: An illustration showing the force adjustment lever for joysticks, with a damping adjustment range of 40-80gf. Tools are required to remove the joystick cap for adjustment.
4. Programmable Back Buttons (M1/M2)
The controller includes two customizable back buttons (M1 and M2) that can be programmed for single key assignments or complex macros (up to 32 programmable actions).
4.1. Assigning a Single Key
- Hold FN + M1 (or M2) to enter recording mode. The left joystick's light ring will glow with a soft blue breathing effect.
- Press the desired key you wish to assign (e.g., A, B, X, Y, RB, LB).
- Press M1 (or M2) again to save the assignment. The light ring will flash three times, indicating successful saving.
4.2. Recording Multiple Keys (Macro)
- Hold FN + M1 (or M2) to enter recording mode.
- Press the sequence of keys you want to record (e.g., A, B, X, Y, RB, LB). The timing between key presses will be recorded.
- Press M1 (or M2) again to save the macro. The light ring will flash three times.
- When you press the assigned back button, it will automatically send the entire recorded combo.
4.3. Clearing an Assignment
- Hold FN + M1 (or M2) to enter recording mode.
- Without pressing any other key, press M1 (or M2) again to save a blank input. The light ring will flash three times. This effectively clears the previous assignment.
Video: Product Tutorial - How to Record Keystroke Macros. This video demonstrates how to program the back buttons for single keys and macros.
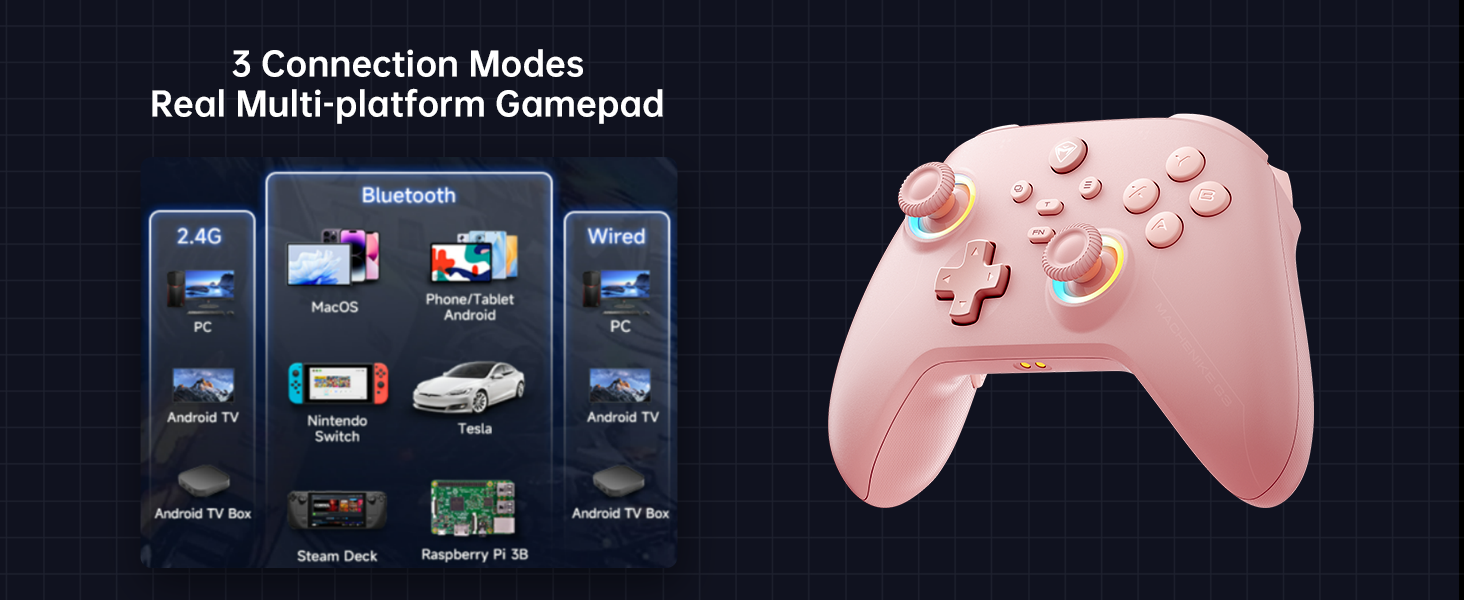
Image: An illustration of the dual customizable back buttons (M1 and M2) and their macro recording and remapping capabilities.
5. RGB Lighting
The controller features dual-ring dynamic RGB lighting around the joysticks, offering customizable aesthetic appeal.

Image: The controller showcasing its dual 1000Hz polling rate and RGB lighting around the joysticks.
6. Native Vibration Feedback
Experience immersive feedback with 4-level native vibration, where asymmetrical rotor motors replicate in-game actions for realistic driving vibrations and authentic recoil feedback.
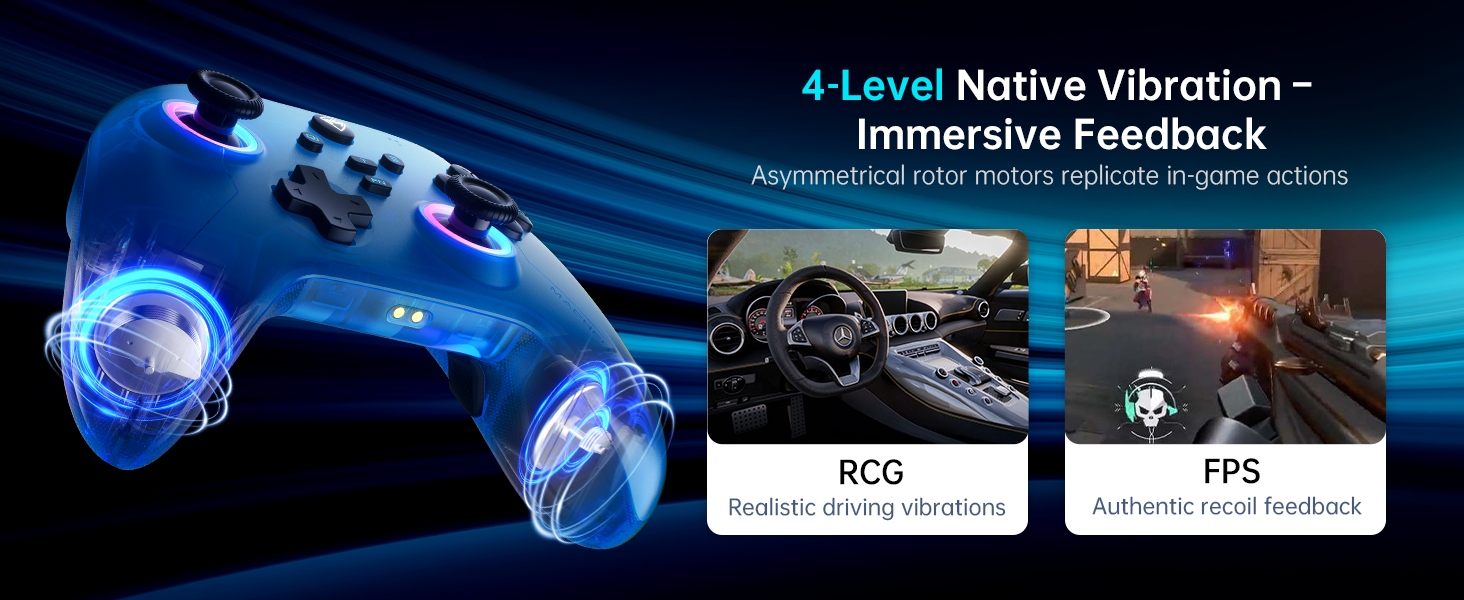
Image: An illustration demonstrating the 4-level native vibration feature, providing immersive feedback for various game genres like RCG (racing) and FPS (first-person shooter).
7. Mobile App Customization (Keylinker 2.0)
Utilize the Keylinker 2.0 mobile application for smart, hassle-free quick setup and advanced customization options, including precise timing adjustments for macros.

Image: Screenshots of the Keylinker 2.0 mobile application interface, showing various customization options for the controller.
Maintenance
1. Battery Care
The 1000mAh high-capacity battery provides extended playtime. To maximize battery life:
- Avoid fully discharging the battery frequently.
- Store the controller in a cool, dry place when not in use.
- Use the dedicated charging dock for efficient and fast charging.
2. Cleaning
To clean your controller:
- Use a soft, dry cloth to wipe the surface.
- For stubborn dirt, slightly dampen the cloth with water or a mild cleaning solution.
- Avoid using harsh chemicals or abrasive materials, as these can damage the controller's finish.
Troubleshooting
1. Connection Issues
- Controller not pairing: Ensure the controller is in the correct pairing mode (e.g., Y+Home for Switch). Check your device's Bluetooth settings.
- Intermittent connection: Ensure the controller is within range of your device. For 2.4G wireless, ensure the Dual-Core Receiver is securely plugged in and not obstructed.
- Wired connection not recognized: Try a different USB-C cable or USB port. Ensure the cable is fully inserted.
2. Joystick Drift or Trigger Malfunction
If joysticks or triggers exhibit unintended movement or fail to register input correctly, perform the calibration steps detailed in the "Operating Instructions" section (Joystick and Trigger Calibration).
3. Programmable Button Issues
- Button not responding: Ensure the button has been correctly assigned. Try clearing the assignment and re-recording it.
- Macro timing issues: Use the Keylinker 2.0 mobile app for more precise timing adjustments in macros.
4. App Connectivity Issues
If you encounter issues with the Keylinker 2.0 app, ensure your controller is connected to your mobile device via Bluetooth and the app is updated to the latest version.
Specifications
| Feature | Detail |
|---|---|
| Model Number | PE-Upgrade |
| Connectivity | Bluetooth, 2.4G Wireless (Dual-Core Receiver), Wired (USB-C) |
| Compatibility | Switch/Switch 2, iOS, Android, Windows PC (Not compatible with Xbox, PlayStation, GeForce Now) |
| Joysticks | Dual Hall-Effect, Infinitely Adjustable Stick Tension (40-80gf) |
| Triggers | Dual Hall-Effect, Contactless, 255 Levels, Millimeter Precision |
| Polling Rate | 1000Hz (Ultra-Low Latency) |
| Battery Capacity | 1000mAh Lithium Polymer (included) |
| Programmable Buttons | 2 (M1, M2) - Up to 32 programmable actions |
| Vibration | 4-Level Native Vibration Feedback |
| Lighting | Dual-Ring Dynamic RGB Lighting |
| App Support | Keylinker 2.0 |
| Item Weight | 1.01 pounds |
| Package Dimensions | 6.89 x 6.46 x 3.23 inches |
Warranty and Support
For warranty information and customer support, please refer to the official Machenike website or contact Machenike customer service directly. You can also visit the Machenike Store on Amazon for additional resources and contact details.
Protection plans are available for purchase separately to extend coverage for your device.