Introduction
This manual provides essential information for the safe and efficient operation, setup, and maintenance of your STAHLWERK TIG 200P Inverter Welding Machine. Please read this manual thoroughly before operating the device to ensure proper use and to prevent injury or damage.
Safety Instructions
Welding operations involve significant risks. Adhere to all safety precautions to prevent electric shock, burns, fire, and exposure to fumes and gases. Always wear appropriate personal protective equipment (PPE), including welding helmet, gloves, and protective clothing.
- Electric Shock: Ensure the welding machine is properly grounded. Do not touch live electrical parts. Work in a dry area.
- Fumes and Gases: Provide adequate ventilation to remove welding fumes and gases from the breathing zone.
- Arc Rays: Protect eyes and skin from arc rays using a welding helmet with appropriate shade and protective clothing.
- Fire and Explosion: Keep flammable materials away from the welding area. Have a fire extinguisher readily available.
- Burns: Hot metal and equipment can cause severe burns. Use insulated gloves and protective clothing.
Product Overview
The STAHLWERK TIG 200P is a versatile inverter welding machine designed for TIG (DC), Pulse TIG, and MMA (Stick) welding. It features advanced MCU control, high-frequency arc ignition, and a broad current range for precision work.
Front Panel Controls and Connections

Figure 1: Front panel of the STAHLWERK TIG 200P Welder. This view highlights the digital LED display, the central control knob for parameter adjustment, and the various connection ports for the TIG torch, electrode holder, and ground clamp. The mode selection buttons are also visible.
- LED Display: Shows current welding parameters.
- Control Knob: Adjusts welding current, pulse frequency, and other settings.
- Mode Selection Buttons: Switches between TIG DC, Pulse TIG, and MMA modes.
- TIG Torch Connection: For connecting the TIG welding torch.
- Electrode Holder / Ground Clamp Connections: For MMA welding and connecting the ground clamp.
Rear Panel Connections
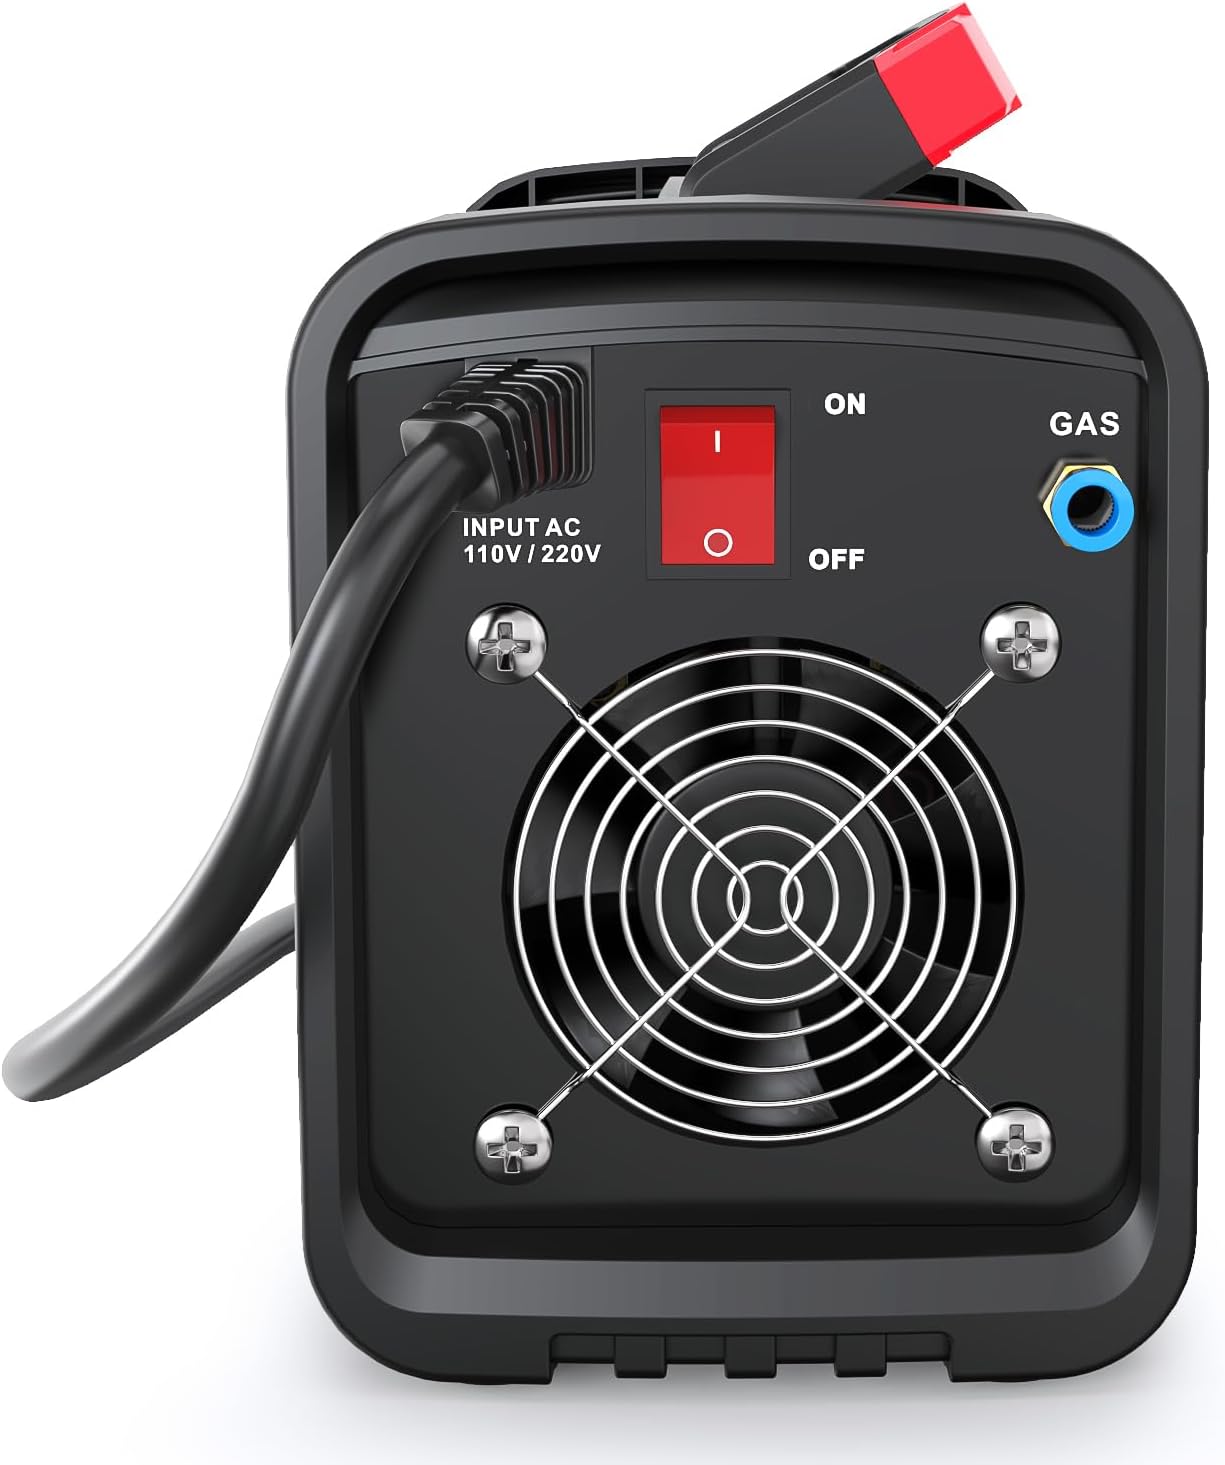
Figure 2: Rear panel of the STAHLWERK TIG 200P Welder. This view shows the main power input cable, the red ON/OFF switch, and the gas inlet port for inert gas supply during TIG welding. The cooling fan is also prominently featured.
- Power Input: Connects to the main power supply (110V/220V).
- ON/OFF Switch: Main power control for the unit.
- Gas Inlet: Connects to the inert gas cylinder (e.g., Argon) for TIG welding.
- Cooling Fan: Ensures proper heat dissipation during operation.
Product Dimensions

Figure 3: Physical dimensions of the STAHLWERK TIG 200P Welder. The unit measures approximately 338mm in length, 200mm in height, and 158mm in width, illustrating its compact and portable design.
The compact design of the TIG 200P (approximately 16.54 x 8.66 x 7.09 inches or 338 x 200 x 158 mm) makes it portable and suitable for various work environments.
Setup
- Unpacking: Carefully remove the welding machine and all accessories from the packaging. Inspect for any shipping damage.
- Placement: Place the welder on a stable, level surface, ensuring adequate ventilation around the unit. Do not block the cooling fan vents.
- Power Connection:
- Ensure the ON/OFF switch on the rear panel is in the "OFF" position.
- Connect the power cable to a suitable grounded electrical outlet (110V or 220V, as indicated on the machine).
- Gas Connection (for TIG Welding):
- Connect the gas hose from your inert gas cylinder (e.g., Argon) to the gas inlet on the rear panel of the welder.
- Ensure all connections are tight to prevent gas leaks.
- Set the gas regulator to the recommended flow rate for your welding application.
- Torch and Ground Clamp Connection:
- Connect the TIG torch cable to the appropriate connector on the front panel.
- Connect the ground clamp cable to the designated ground terminal on the front panel. Secure the ground clamp to the workpiece or welding table, ensuring good electrical contact.
- For MMA (Stick) welding, connect the electrode holder to the positive (+) terminal and the ground clamp to the negative (-) terminal (or vice-versa, depending on electrode polarity requirements).
Operating Instructions
- Powering On: Flip the ON/OFF switch on the rear panel to the "ON" position. The LED display will illuminate.
- Mode Selection: Use the mode selection buttons on the front panel to choose your desired welding process:
- TIG DC: For welding stainless steel, carbon steel, titanium, and copper alloys.
- Pulse TIG: Provides enhanced control over heat input, ideal for thin materials and achieving specific bead appearances.
- MMA (Stick): For general-purpose stick welding with various electrode types.
- Parameter Adjustment:
- Rotate the central control knob to adjust the welding current (Amperage) according to the material thickness and type.
- In Pulse TIG mode, further adjustments for pulse frequency (1-200Hz), pulse width, and base current may be available via dedicated buttons or menu options. Refer to the display for specific settings.
- Select 2T (two-stroke) or 4T (four-stroke) trigger mode as required for your TIG application.
- Welding Process (TIG):
- Ensure your tungsten electrode is properly ground and extended from the ceramic cup.
- Open the gas cylinder valve and set the flow rate.
- Initiate the arc by pressing the torch trigger. The high-frequency start will create a stable arc without touching the workpiece.
- Maintain a consistent arc length and travel speed, feeding filler rod as needed.
- Release the trigger to stop welding. The post-flow gas will continue for a set period to protect the weld puddle and tungsten.
- Welding Process (MMA/Stick):
- Insert the appropriate electrode into the electrode holder.
- Strike the arc by lightly touching and then quickly lifting the electrode from the workpiece.
- Maintain a consistent arc length and travel speed.
- Powering Off: After completing welding, turn off the gas cylinder, then switch the welder's ON/OFF switch to "OFF."
Maintenance
Regular maintenance ensures the longevity and optimal performance of your welding machine. Always disconnect the power supply before performing any maintenance.
- Cleaning: Periodically clean the exterior of the machine with a dry, soft cloth. Use compressed air to clear dust from the cooling vents and internal components (ensure power is disconnected).
- Cable and Connection Inspection: Regularly inspect all cables, connections, and torch components for wear, damage, or loose fittings. Replace damaged parts immediately.
- Tungsten Electrode Care: Ensure tungsten electrodes are properly ground to a sharp point for TIG welding. Replace worn or contaminated electrodes.
- Gas Line Inspection: Check gas hoses and fittings for leaks or damage.
Troubleshooting
| Problem | Possible Cause | Solution |
|---|---|---|
| No power to the machine | Power cable disconnected; ON/OFF switch off; circuit breaker tripped. | Check power cable connection; turn ON/OFF switch on; reset circuit breaker. |
| No arc in TIG mode | Gas not flowing; tungsten electrode not properly installed; poor ground connection; incorrect settings. | Check gas supply and flow; ensure tungsten is correctly installed; verify ground clamp connection; adjust welding parameters. |
| Poor weld quality | Incorrect current setting; improper gas flow; contaminated tungsten/electrode; incorrect travel speed. | Adjust current; check gas flow and purity; clean/replace tungsten/electrode; adjust welding technique. |
| Overheat protection activated | Exceeded duty cycle; blocked cooling vents; high ambient temperature. | Allow machine to cool down; ensure vents are clear; operate in a cooler environment. |
Specifications
- Model: CP-0801015US
- Welding Processes: TIG (DC), Pulse TIG, MMA (Stick)
- Input Voltage: 110V/220V (Dual Voltage)
- Current Range: 10-200A
- Duty Cycle: 40% at 200A
- Item Weight: 18.86 pounds (approx. 8.55 kg)
- Product Dimensions: 16.54 x 8.66 x 7.09 inches (approx. 42 x 22 x 18 cm)
- Protection Class: IP23
- Manufacturer: S STAHLWERK
Warranty and Support
For warranty information, technical support, or service inquiries, please refer to the contact details provided with your purchase documentation or visit the official STAHLWERK website. Keep your purchase receipt as proof of purchase for warranty claims.