1. Introduction
This manual provides essential instructions for the safe and efficient operation, setup, and maintenance of your BSNANCA 368A Professional Vertical Key Cutting Machine. Please read this manual thoroughly before operating the machine to ensure proper usage and to prevent damage or injury.
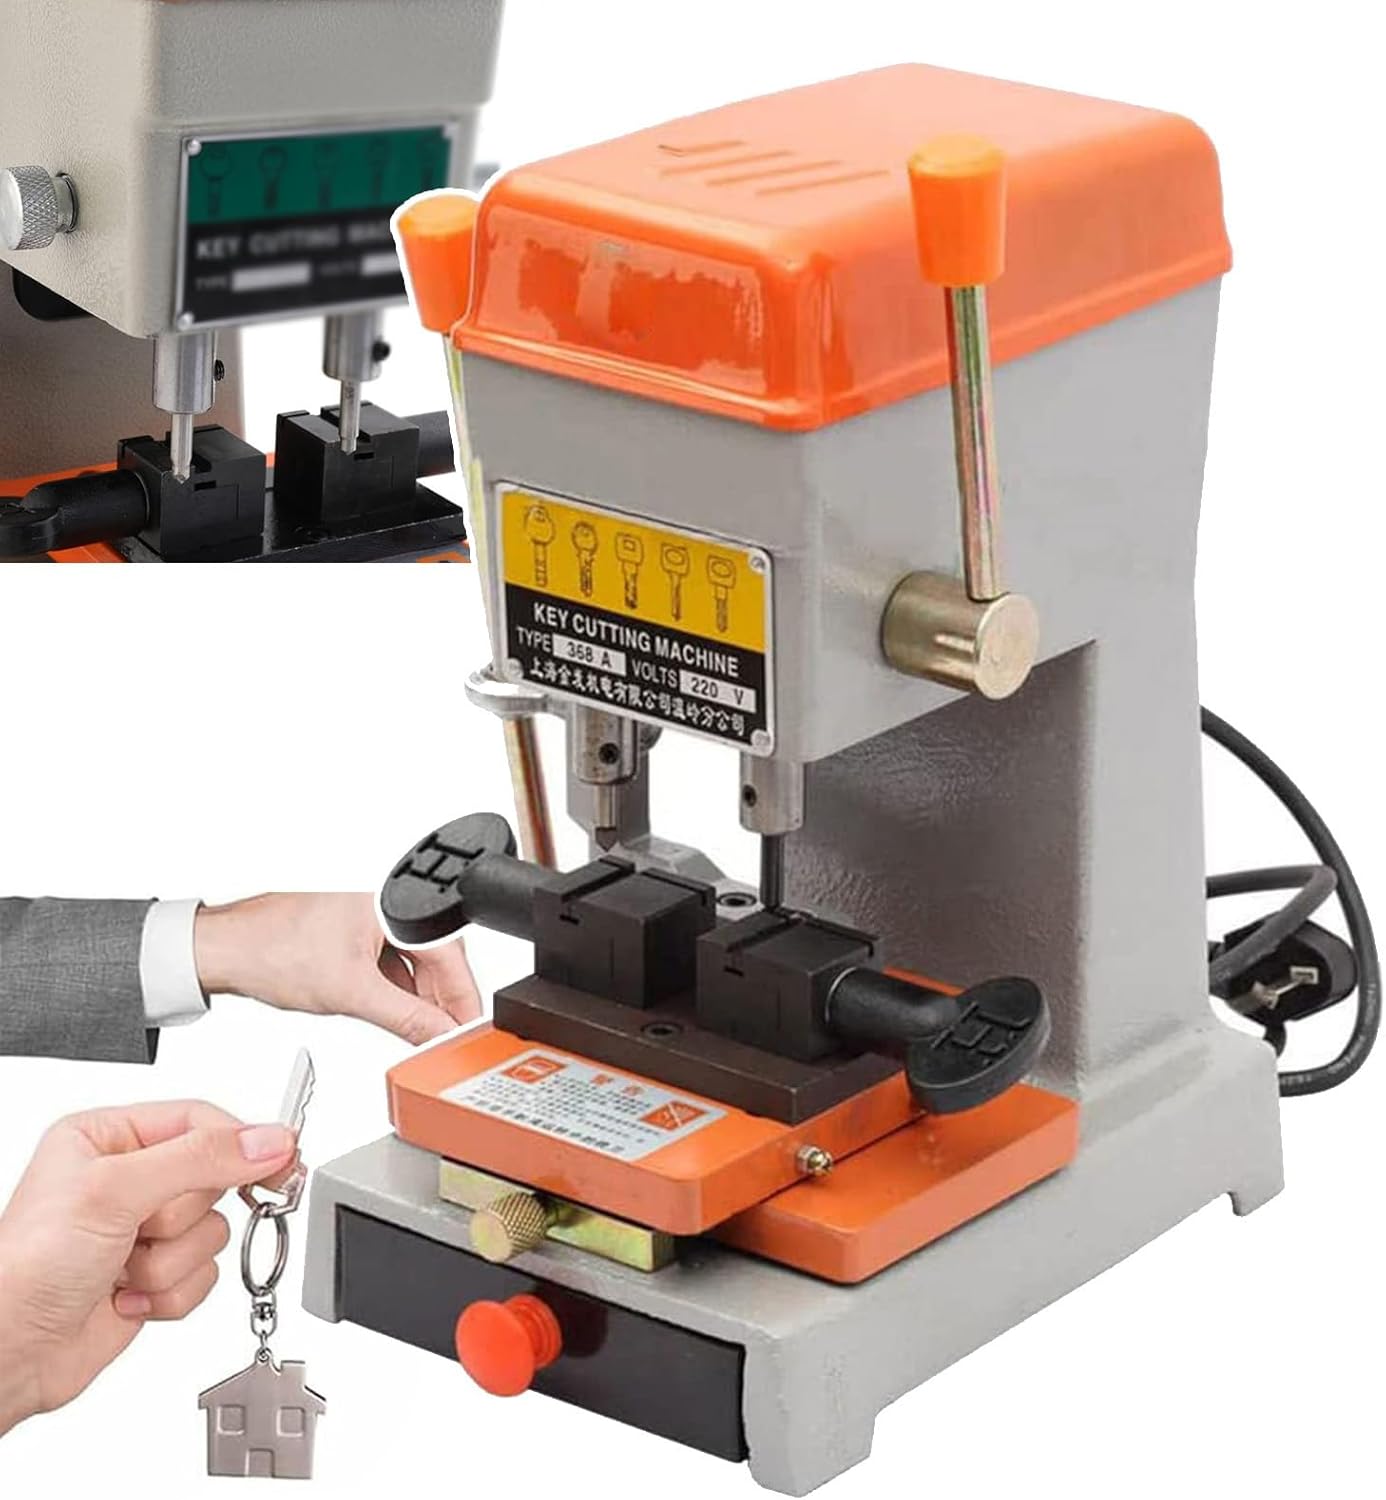
Figure 1.1: BSNANCA 368A Professional Vertical Key Cutting Machine. This image displays the overall appearance of the key cutting machine, including its main body, key clamps, and operating handles.
2. Product Overview and Features
The BSNANCA 368A is a versatile vertical key cutting machine designed for duplicating various types of keys. Its robust construction and user-friendly design make it suitable for professional use.
Key Features:
- Versatile Key Duplication: Capable of copying various pit-shaped, wave-shaped, three or four cylinder keys, hollow, corrugated, cylindrical, multi-lock, composite ball keys, and some car keys.
- Durable Motor: Equipped with a full copper motor for extended service life and stable operation.
- Dual Handle System: Features two handles for efficient and safe operation, reducing effort and time.
- Horizontal Feed: Includes a horizontal feed handle with hardened ball bearings for precise control during cutting.
- Integrated Lighting: Built-in light bulb for improved visibility during operation.
- Storage Drawer: Convenient drawer for storing tools and accessories.
Main Components:

Figure 2.1: Front view of the machine with labeled components. This image highlights the Light switch, Start switch, Move Handle, Multi-function jig, and Fixed clamp.
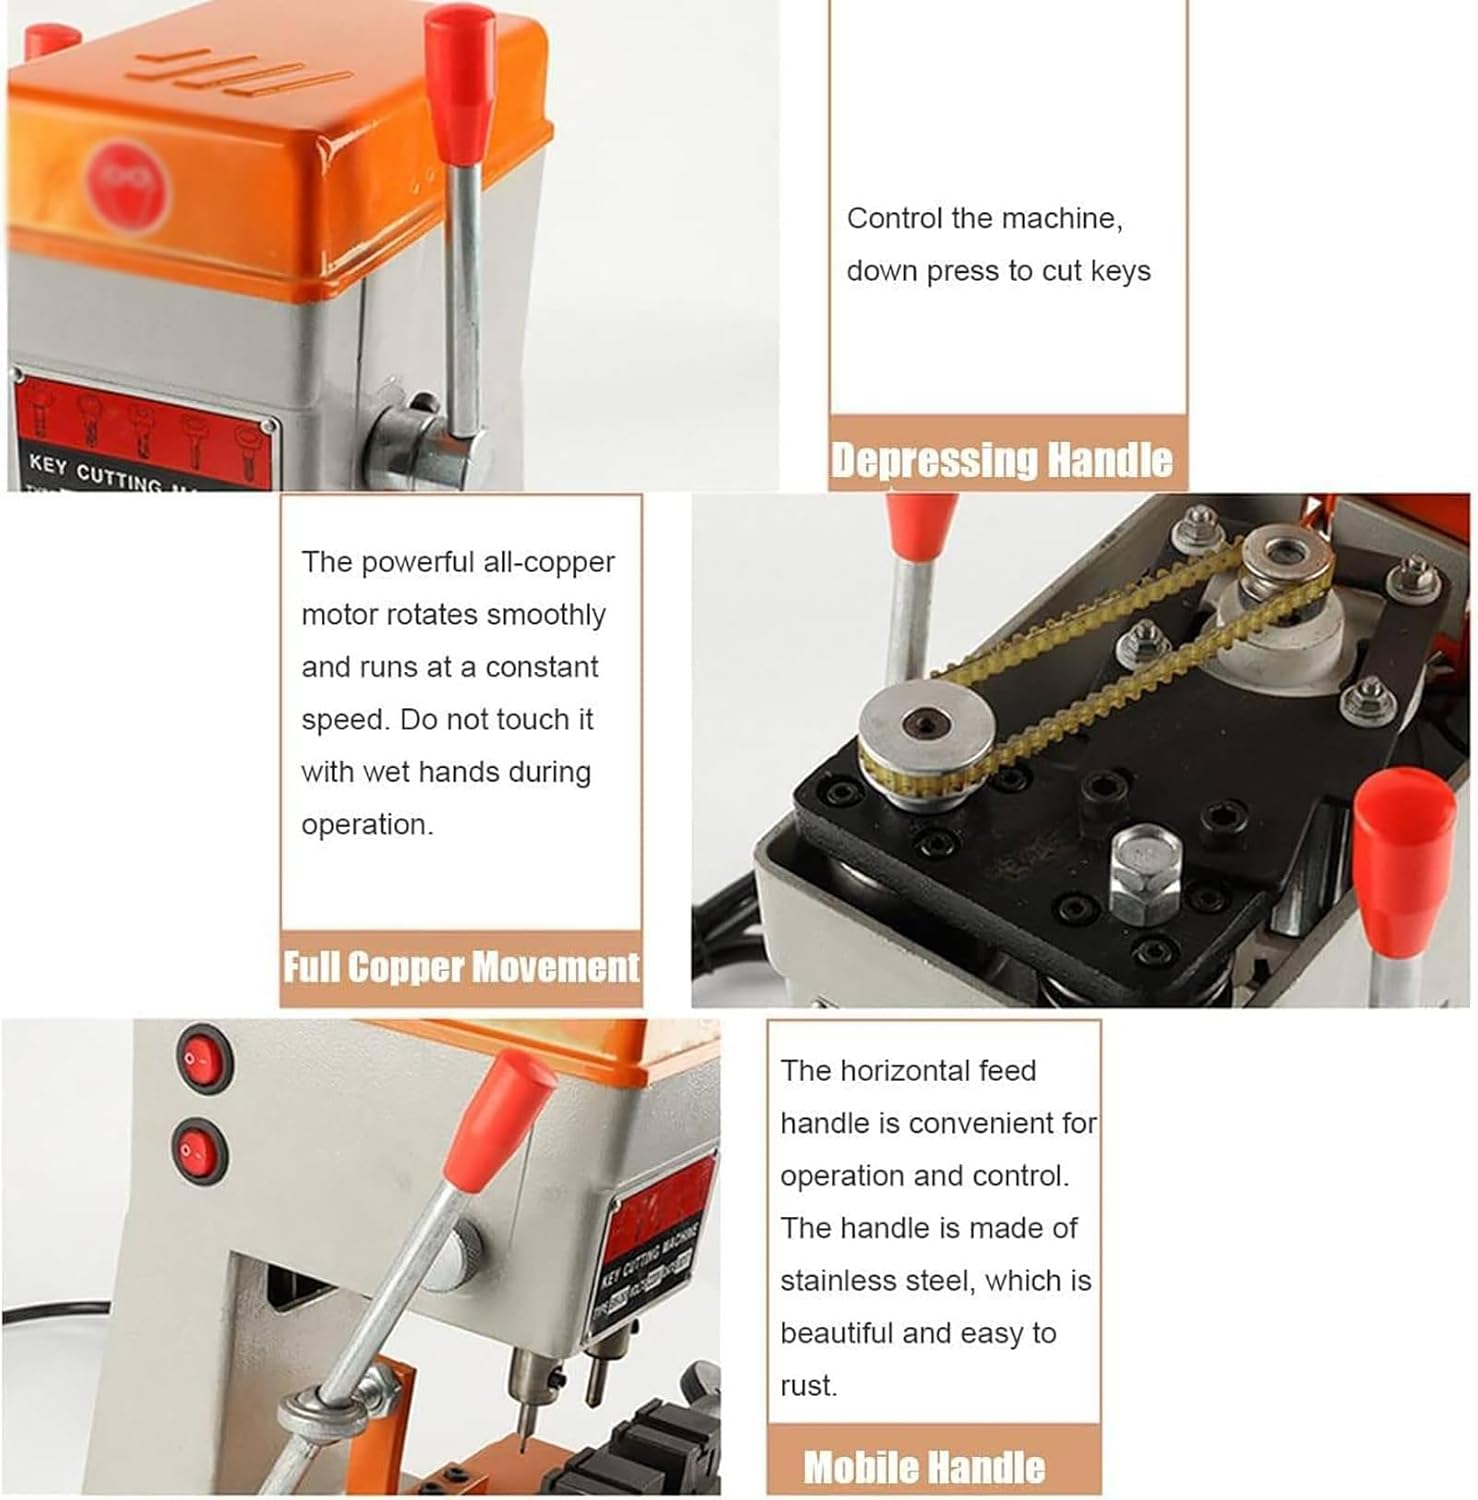
Figure 2.2: Detailed view of the Depressing Handle, Full Copper Movement (motor area), and Mobile Handle, illustrating their functions.
3. Safety Instructions
Adhering to these safety guidelines is crucial for preventing accidents and ensuring the longevity of your machine.
- Electrical Safety: Ensure the machine is connected to a grounded power outlet. Do not operate the machine with wet hands or in damp conditions.
- Personal Protective Equipment: Always wear appropriate eye protection (safety glasses) when operating the machine to guard against flying debris.
- Secure Work Area: Place the machine on a stable, level, and clean workbench. Ensure adequate lighting and ventilation.
- Keep Clear: Keep hands, hair, loose clothing, and jewelry away from moving parts, especially the cutting blade, during operation.
- Unplug When Not in Use: Disconnect the power cord from the outlet before performing any maintenance, adjustments, or when the machine is not in use.
- Supervision: Do not allow children or untrained personnel to operate the machine.
4. Setup
Follow these steps to set up your key cutting machine for initial use.
- Unpacking: Carefully remove the machine and all accessories from the packaging. Retain packaging for future transport or storage.
- Inspection: Inspect the machine for any signs of damage that may have occurred during shipping. If damage is found, do not operate the machine and contact customer support.
- Placement: Position the machine on a sturdy, level, and clean surface capable of supporting its weight (approximately 11 kg). Ensure there is sufficient space around the machine for safe operation and access.
- Power Connection: Connect the power cord to the machine and then to a suitable grounded electrical outlet. Ensure the voltage matches the machine's requirements (220V, as indicated on the machine label).
- Accessory Check: Verify that all included accessories, such as cutting bits and any other tools, are present.

Figure 4.1: Rear view of the machine, showing the power cord connection point. Ensure the power cord is securely connected.
5. Operating Instructions
This section outlines the general procedure for duplicating keys using the BSNANCA 368A machine.
- Prepare Keys: Obtain the original key and a blank key of the correct type and size.
- Secure Original Key: Place the original key into one side of the Multi-function jig (Fixed clamp) and secure it firmly. Ensure it is aligned correctly.
- Secure Blank Key: Place the blank key into the other side of the Multi-function jig (Fixed clamp) and secure it firmly, ensuring it mirrors the alignment of the original key.
- Power On: Press the Start switch to power on the machine. If needed, press the Light switch to illuminate the work area.
- Align and Cut:
- Use the Move Handle (horizontal feed handle) to precisely align the cutting blade with the original key's profile.
- Once aligned, use the Depressing Handle to slowly lower the cutting blade onto the blank key.
- Carefully move the blank key along the profile of the original key, allowing the cutting blade to replicate the cuts.
- Repeat the process as necessary, ensuring all cuts are precise and complete.
- Inspect Key: After cutting, power off the machine using the Start switch. Carefully remove the newly cut key and inspect it for accuracy and smoothness. Deburr any rough edges if necessary.
- Test Key: Test the duplicated key in the corresponding lock to ensure proper function.

Figure 5.1: This image shows the storage drawer for tools and accessories, along with examples of cutting bits used for key duplication.
6. Maintenance
Regular maintenance ensures optimal performance and extends the lifespan of your key cutting machine.
- Cleaning: Keep the machine clean. Regularly remove metal shavings and dust from the cutting area, clamps, and motor housing using a brush or vacuum.
- Lubrication: Add lubricant regularly to moving parts, such as the horizontal feed mechanism and any pivot points, to ensure smooth operation and prevent wear.
- Blade Inspection: Periodically inspect the cutting blade for wear or damage. A dull or damaged blade can lead to inaccurate cuts and increased motor strain. Replace blades as needed.
- Storage: When not in use, keep the machine covered to protect it from dust and debris. Store in a dry, clean environment.
- Motor Belt: Check the motor belt periodically for tension and wear. Adjust or replace if necessary to maintain consistent motor performance.
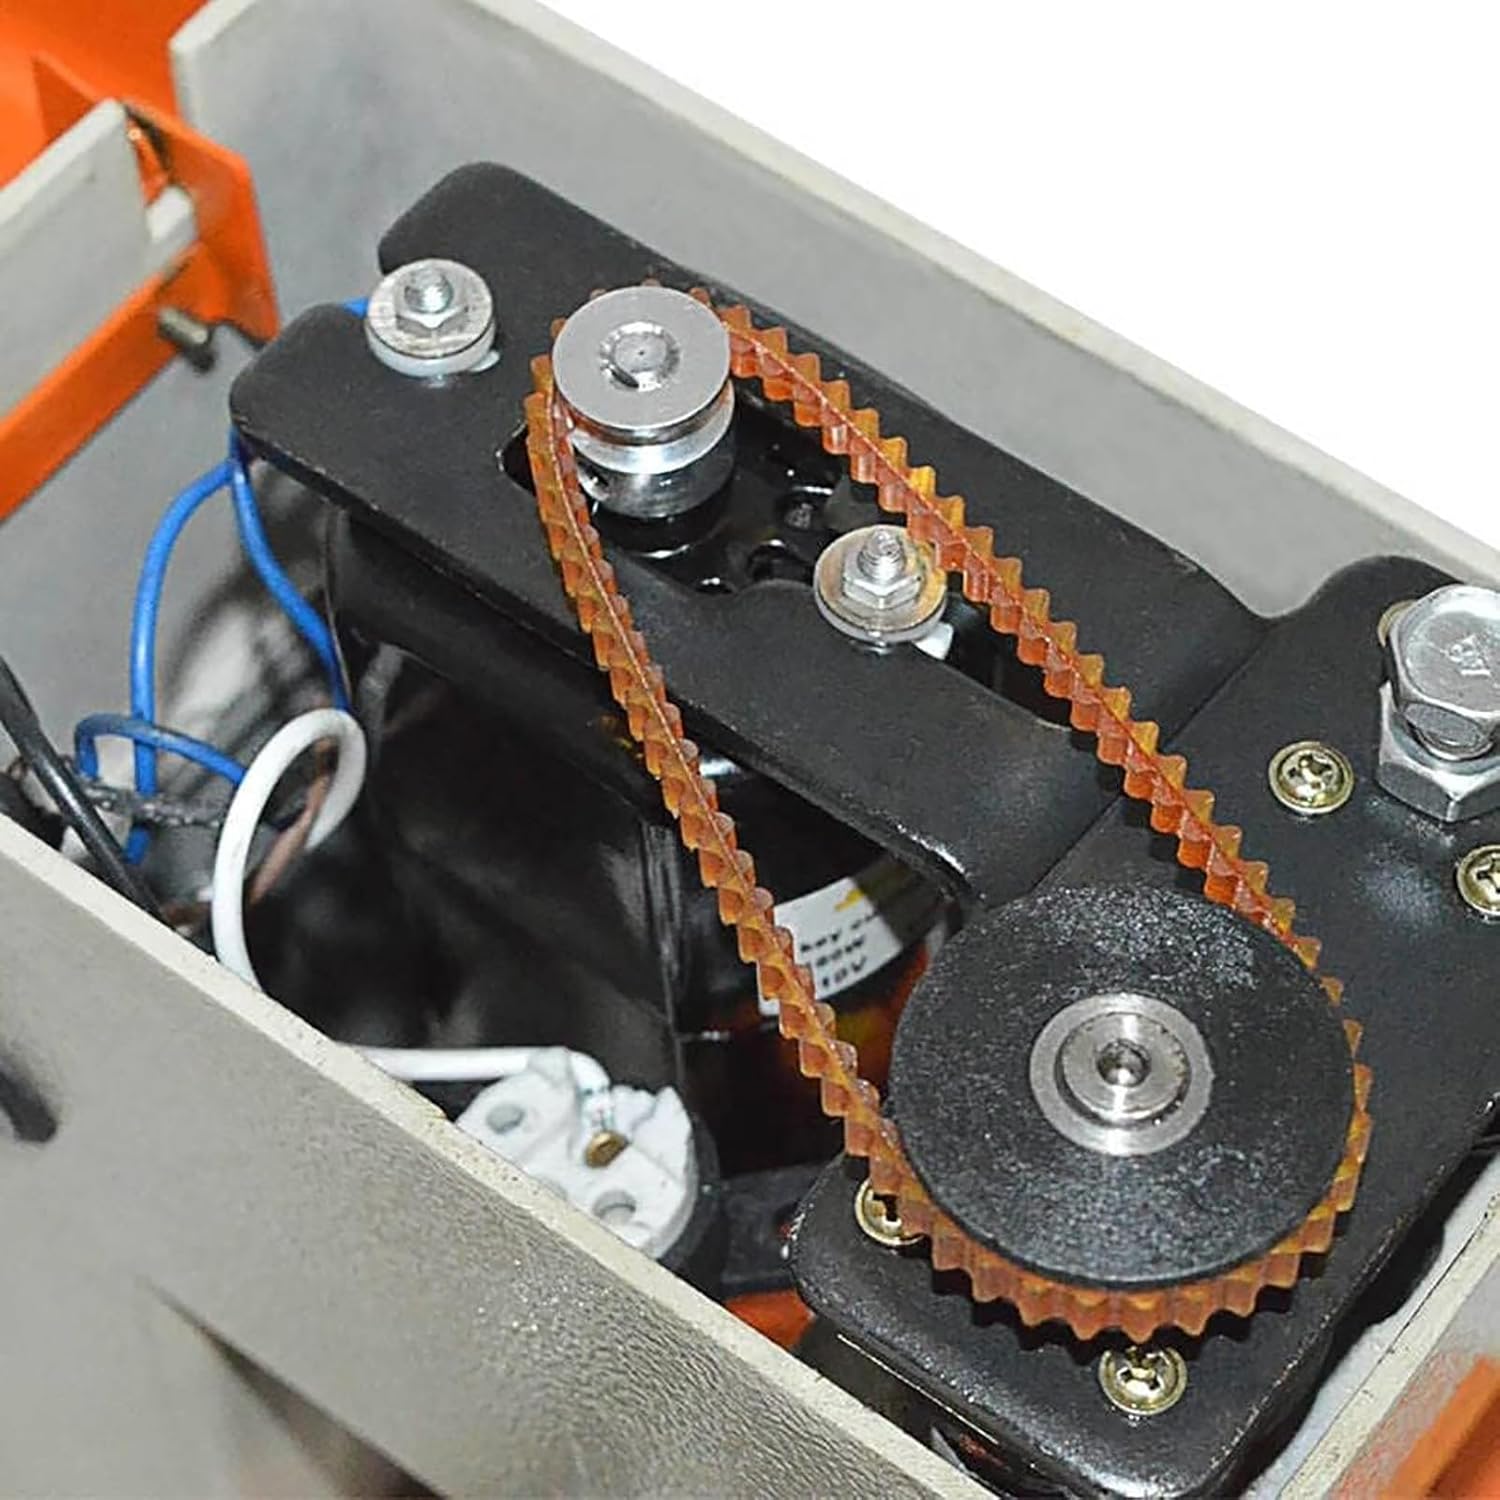
Figure 6.1: Close-up view of the motor belt mechanism. Regular inspection and maintenance of this component are important for machine longevity.
7. Troubleshooting
This section addresses common issues you might encounter. For problems not listed here, please contact customer support.
- Machine Does Not Power On:
- Check if the power cord is securely plugged into both the machine and a working electrical outlet.
- Verify that the power outlet is functional by testing it with another device.
- Ensure the Start switch is in the 'On' position.
- Key Cuts Are Inaccurate or Rough:
- Ensure both the original and blank keys are securely clamped and properly aligned in the jig.
- Inspect the cutting blade for wear, damage, or dullness. Replace if necessary.
- Verify that the horizontal feed mechanism is clean and well-lubricated, allowing for smooth movement.
- Ensure you are applying consistent pressure and moving the key slowly during the cutting process.
- Excessive Noise or Vibration:
- Check for loose components or fasteners and tighten them.
- Inspect the motor belt for proper tension and wear.
- Ensure the machine is placed on a stable surface.
8. Specifications
| Specification | Detail |
|---|---|
| Machine Model | 368A |
| Control Method | Manual Control |
| Motor Type | Copper Wire Motor |
| Dimensions (L×W×H) | 30 cm × 17 cm × 23 cm |
| Packing Weight | 11 kg |
| Manufacturer | BSNANCA |
| Part Number | 250512Q65 |

Figure 8.1: This image illustrates the physical dimensions of the BSNANCA 368A machine: 30mm (length), 17mm (width), and 23mm (height).
9. Warranty and Support
For any questions regarding your purchase, operation, or troubleshooting, please do not hesitate to contact our customer support. We are committed to providing assistance and will respond to your inquiries within 24 hours.
Please refer to your purchase documentation for specific warranty terms and contact information.

