1. Introduction
This manual provides detailed instructions for the installation, operation, and maintenance of your KEMIMOTO UTV/ATV Turn Signal Kit. This kit is designed to enhance the safety and street legality of your off-road vehicle by providing essential signaling capabilities, including turn signals, a horn, and a license plate light.
The KEMIMOTO turn signal kit features a pre-wired, plug-and-play design for simplified installation, an auto turn-off function for convenience, and durable, waterproof LED components. It is universally compatible with a wide range of UTVs and ATVs, including models from Polaris, Can-Am, Teryx, and CFMOTO.
2. Package Contents
Please verify that all components listed below are included in your package:

Image: All components included in the KEMIMOTO UTV Turn Signal Kit. This includes four amber turn signal lights, an aluminum license plate holder with light, a 110dB horn, left/right rocker switch, hazard/horn switch, a wiring harness set, a relay, nylon cable ties, and an installation guide.
- Amber Turning Signal Lights (x4)
- Aluminum License Plate Holder with Light (x1) (License plate not included)
- 110DB Horn (x1)
- Left/Right Rocker Switch (x1)
- Hazard and Horn Switch (x1)
- Harness Set (x1)
- Relay (x1)
- Nylon Cable Ties Set (x1)
- Installation Guide (x1)
3. Key Features
- Universal Compatibility: Designed to fit a wide range of UTVs and ATVs, including Polaris RZR Ranger, Pioneer, Talon, Can-Am X3, Teryx, Mule, Arctic Cat, CFMOTO, Golf Cart, LandMaster, and Segway.
- Auto Turn-Off Function: Turn signals automatically deactivate after 5 flashes for quick lane changes (short press) or 22 flashes for turns (2.5-second press), eliminating manual shutoff.
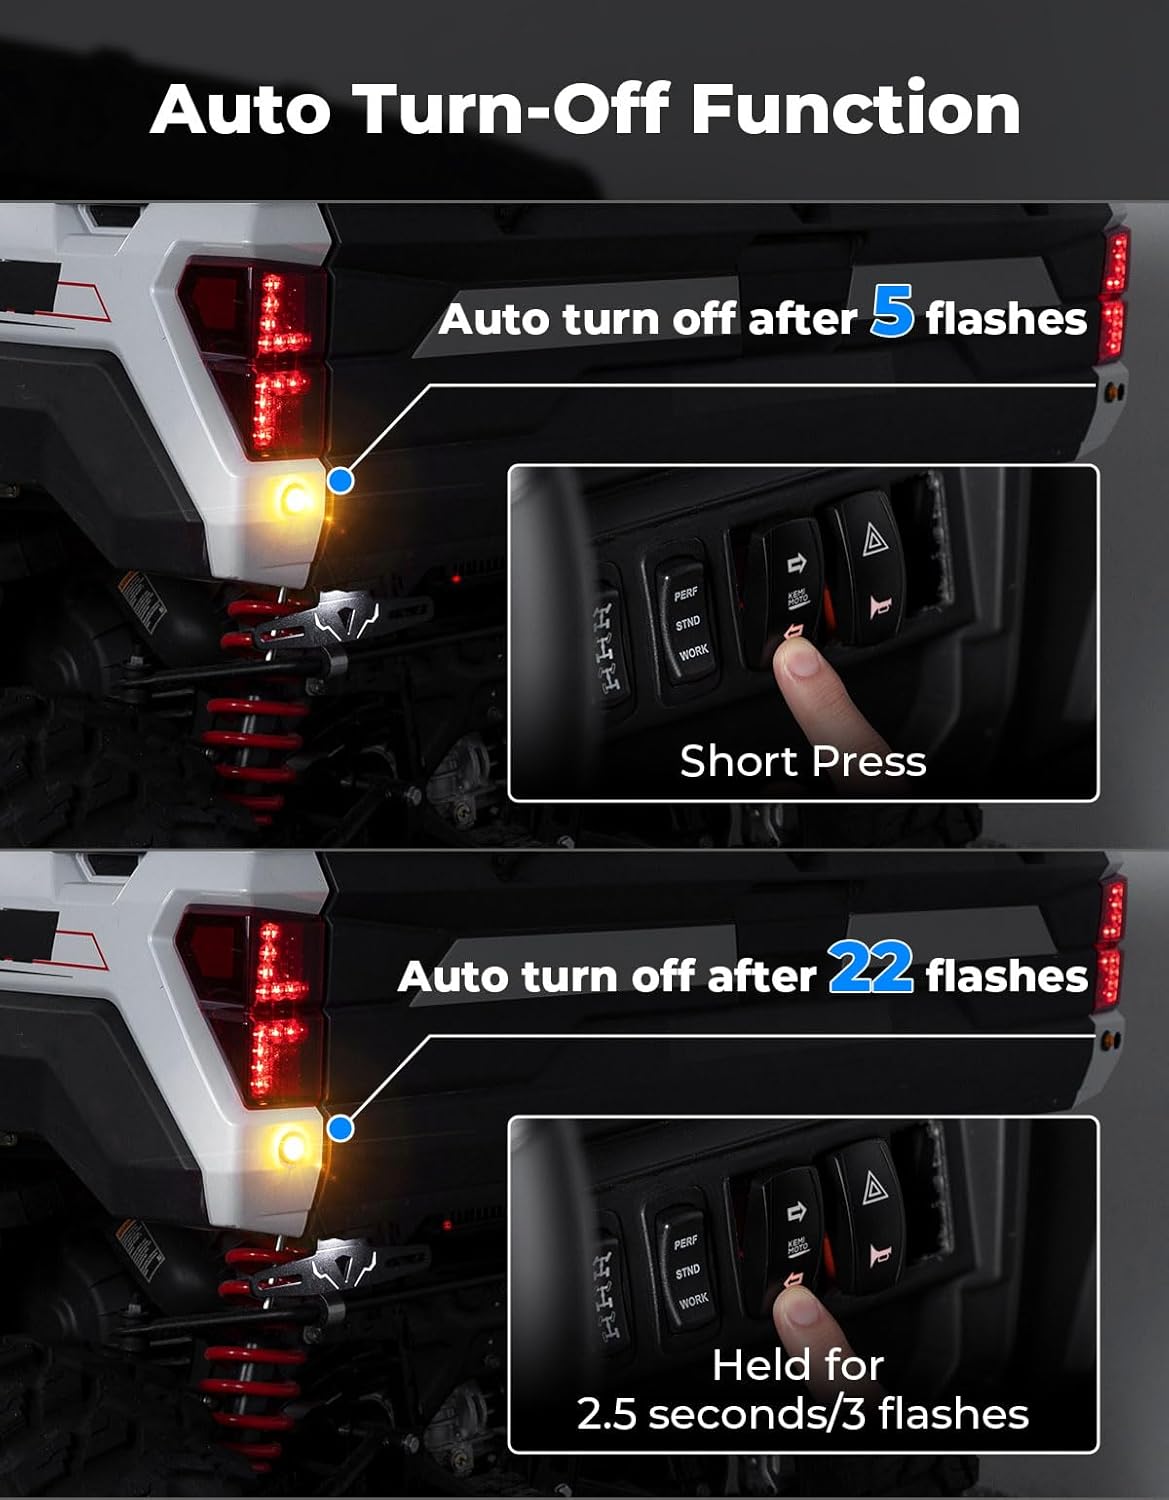
Image: Illustration of the auto turn-off feature, showing 5 flashes for a short press and 22 flashes for a longer press (2.5 seconds).
- Plug & Play Installation: Pre-wired harness with extended cables for easy, no-splice installation on 2/4/6-seaters. Labeled connectors simplify the process.

Image: Visual guide demonstrating the simple plug-and-play connections for the wiring harness.
- Waterproof LED License Plate Light: Features 3 bright LED lights to ensure license plate visibility in dark conditions, making your vehicle street legal.

Image: The waterproof LED license plate light shown in operation during wet weather, clearly illuminating the license plate.
- Durable Aluminum License Plate Holder: Constructed from aluminum for enhanced durability compared to standard plastic holders.

Image: A comparison highlighting the robust aluminum construction of the KEMIMOTO license plate holder against a damaged plastic alternative.
- 110dB Horn: A loud horn for effective signaling.
- Backlit Rocker Switches: Illuminated switches for easy control in low-light conditions.

Image: The backlit rocker switches, showing their illumination for visibility in dark environments.
4. Setup and Installation
Before beginning installation, ensure your vehicle's ignition is off and the battery is disconnected to prevent electrical shorts.
4.1 Tools Required (Not Included):
- Drill with appropriate drill bits (e.g., 3/4 inch hole saw for turn signals and switches)
- Wire strippers/crimpers (if custom wiring is needed for license plate light or other modifications)
- Screwdrivers (Phillips and Flathead)
- Wrench set
- Measuring tape
- Zip ties (additional may be useful)
4.2 Installation Steps:
- Plan Component Placement: Determine optimal locations for the four turn signal lights (two front, two rear), the horn, the license plate holder, and the rocker switches on your vehicle's dashboard or console. Consider wire routing to ensure the harness reaches all components.
- Mount Turn Signal Lights: Drill appropriate-sized holes (typically 3/4 inch) at the chosen front and rear locations. Insert the amber turn signal lights and secure them.
- Install License Plate Holder: Mount the aluminum license plate holder at the rear of your vehicle. The integrated white LED light will require a connection to the main harness.
- Mount Horn: Secure the 110dB horn in a suitable location, typically under the hood or near the front of the vehicle, ensuring it is protected from direct impact and water spray.
- Install Rocker Switches: Cut openings in your dashboard or console for the left/right turn signal switch and the hazard/horn switch. Insert the switches and ensure they are securely seated.
- Connect Wiring Harness: The KEMIMOTO kit features a pre-wired harness.
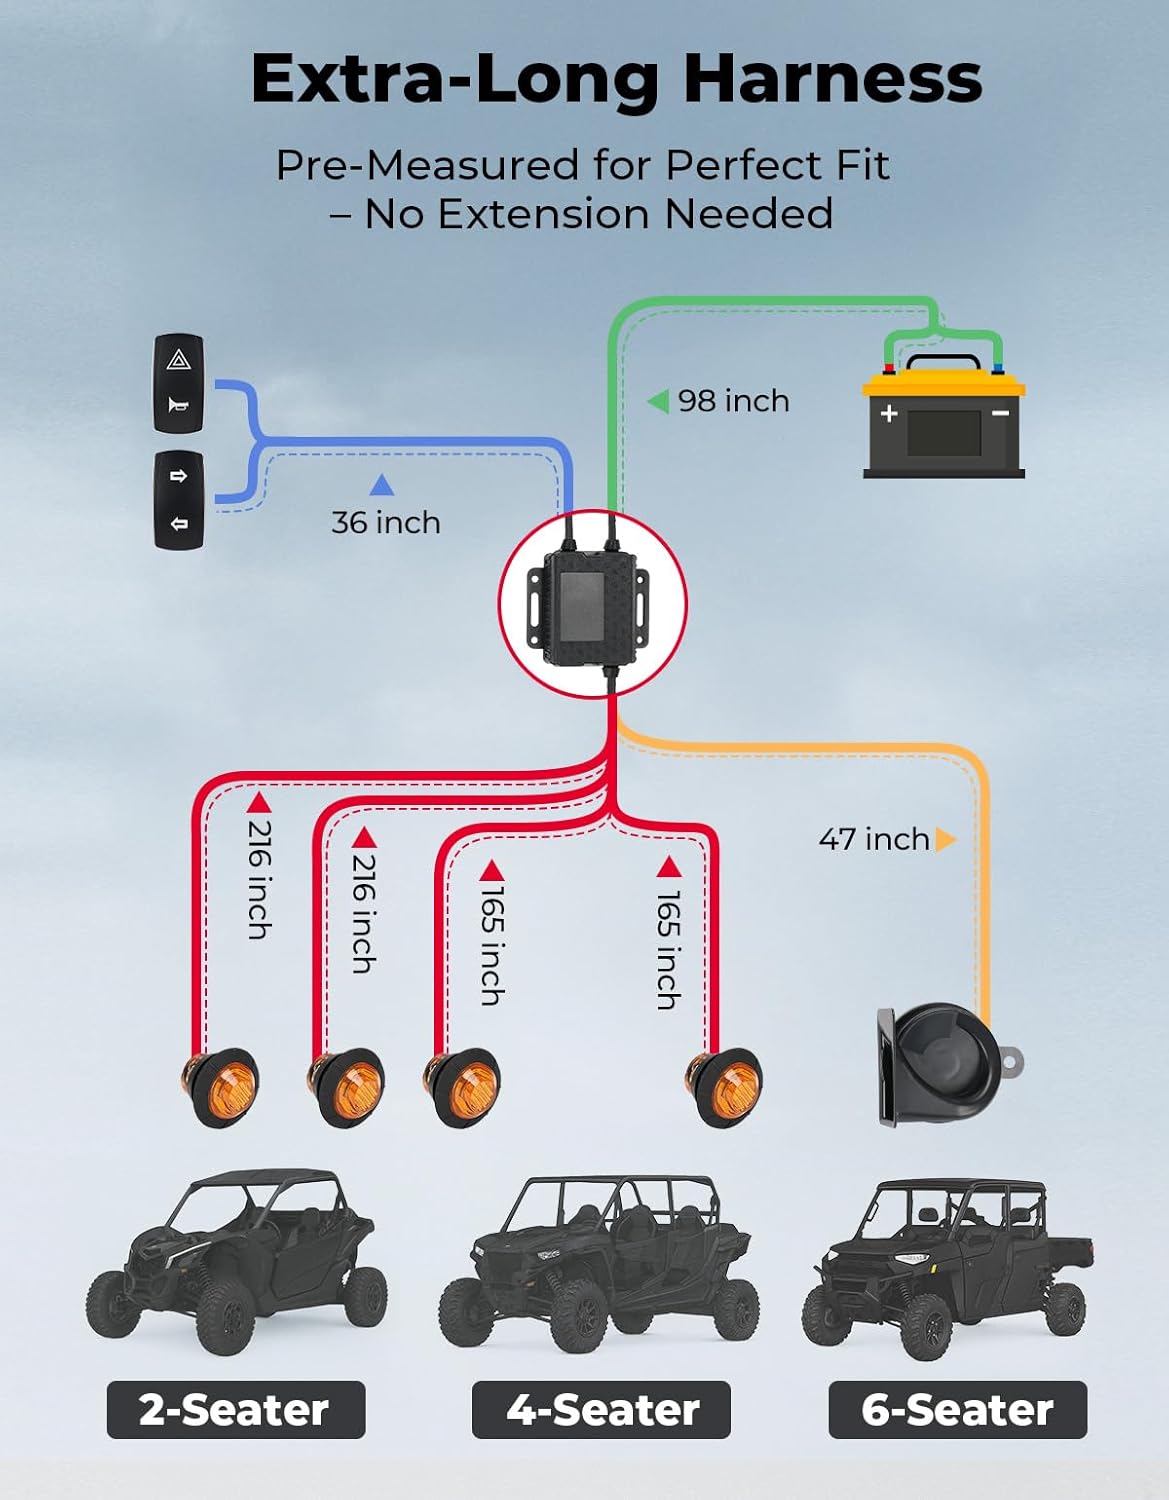
Image: Detailed wiring diagram illustrating the harness connections and lengths for various UTV configurations (2-seater, 4-seater, 6-seater).
- Connect the main harness to the vehicle's 12V power source (battery). The harness is designed with extended cables (up to 220 inches) to fit various vehicle sizes without additional extensions.
- Connect the labeled connectors from the main harness to the corresponding turn signal lights, horn, license plate light, and rocker switches. Ensure all connections are secure and fully seated.
- The relay should be integrated into the main harness; ensure it is properly positioned and connected.
- Secure Wiring: Route all wires neatly and securely using the provided nylon cable ties. Avoid routing wires near hot engine components, sharp edges, or moving parts. Ensure wires are not pinched or stretched.
- Reconnect Battery and Test: Once all components are installed and wired, reconnect your vehicle's battery. Turn on the ignition and test all functions:
- Left and Right Turn Signals
- Hazard Lights
- Horn
- License Plate Light
Note: While the kit is designed for plug-and-play installation, some vehicles may require minor modifications (e.g., drilling holes) for optimal component placement. If you are unsure about any step, consult a professional installer.
5. Operating Instructions
5.1 Turn Signals:
- Left Turn: Press the left side of the turn signal rocker switch. The left turn signals will flash.
- Right Turn: Press the right side of the turn signal rocker switch. The right turn signals will flash.
- Auto Turn-Off Function:
- For quick lane changes, a short press of the turn signal switch will activate the signals for 5 flashes, then automatically turn off.
- For turns, press and hold the turn signal switch for approximately 2.5 seconds (or until 3 flashes occur). The signals will then flash 22 times before automatically turning off.
5.2 Hazard Lights:
- To activate hazard lights, press the hazard button on the hazard/horn rocker switch. All four turn signals will flash simultaneously.
- To deactivate, press the hazard button again.
5.3 Horn:
- To sound the horn, press the horn button on the hazard/horn rocker switch.
- A short press will result in a single beep.
- A long press will cause the horn to sound continuously until released.
6. Maintenance
To ensure the longevity and optimal performance of your KEMIMOTO Turn Signal Kit, follow these maintenance guidelines:
- Regular Inspection: Periodically check all wiring connections for tightness and signs of wear or corrosion. Ensure all lights are functioning correctly.
- Cleaning: Keep the turn signal lenses, license plate light, and switches clean from dirt, mud, and debris. Use a soft cloth and mild cleaner. Avoid abrasive materials that could scratch the lenses.
- Wiring Protection: Ensure all wiring remains securely fastened with cable ties and is not exposed to excessive heat, sharp edges, or moving parts.
- Water Exposure: While components are waterproof, avoid prolonged submersion or high-pressure washing directly on electrical connections.
7. Troubleshooting
If you encounter issues with your KEMIMOTO Turn Signal Kit, refer to the following common problems and solutions:
| Problem | Possible Cause | Solution |
|---|---|---|
| Turn signals or horn not working. |
|
|
| Lights are dim or flickering. |
|
|
| Auto turn-off function not working correctly. |
|
|
If you cannot resolve the issue using the troubleshooting guide, please contact KEMIMOTO customer support for further assistance.
8. Specifications
| Feature | Detail |
|---|---|
| Brand | KEMIMOTO |
| Model | B0802-00309-BK |
| Color | Amber (lights), Black (components) |
| Specific Uses | Turn Signal Lights, Horn, License Plate Illumination |
| Vehicle Service Type | ATV, Golf Cart, UTV (Universal Fit) |
| Special Feature | Auto Turn-Off Function |
| Auto Part Position | Front, Rear |
| Lens Material | Acrylic |
| Item Weight | 3.67 pounds |
| Package Dimensions | 7.87 x 7.8 x 5.47 inches |
| Horn Output | 110dB |
| Harness Length | Fits vehicles up to 220 inches |
9. Warranty and Support
KEMIMOTO products are designed for durability and performance. While specific warranty details are not provided in this manual, KEMIMOTO typically offers support for their products. For warranty claims, technical assistance, or any questions regarding your turn signal kit, please contact KEMIMOTO customer service directly.
You can often find contact information on the KEMIMOTO official website or through the retailer where you purchased the product. Please have your model number (B0802-00309-BK) and purchase details ready when contacting support.
10. Legal Disclaimer
This item is not a licensed Honda/Yamaha/Polaris/Can Am/Kawasaki/CF Moto/BRP product. We do not claim ownership and have no affiliation with Honda/Yamaha/Polaris/Can Am/Kawasaki/CF Moto/BRP. Any Honda/Yamaha/Polaris/Can Am/Kawasaki/CF Moto/BRP copyrights and trademarks belong to the respective owners. Unless specifically identified as such, our use of third party trademarks does not indicate any relationship, sponsorship, or endorsement between us and Honda/Yamaha/Polaris/Can Am/Kawasaki/CF Moto/BRP. Any references by us (or company name) (or the seller) to third party trademarks is to identify the corresponding third party's goods and shall be considered nominative fair use under the trademark law.