1. Product Overview
The Diyife 1.2 Cu Ft Safe Box is designed to secure your valuables. It features heavy-duty SPCC steel construction, three robust 20mm live locking bolts, and a 45mm thick door for enhanced protection. The safe offers dual access methods: a digital keypad and emergency override keys. Additional features include an alarm system, silent mode, and an interior light for convenience.

Image: Front view of the Diyife 1.2 Cu Ft Safe Box, showcasing the digital keypad and knob.

Image: Detailed view of the safe's security features, including the 20mm locking bolts, 45mm thick door, anti-theft door design, and pre-drilled holes for secure mounting.
2. What's in the Box
Verify that all components are present before proceeding with installation and setup.
- 1 x Diyife Safe Box
- 4 x Expansion Bolts
- 2 x Emergency Keys
- 1 x User Manual
- 1 x Felt Mat

Image: All items included in the Diyife Safe Box package: the safe, four expansion bolts, two emergency keys, a user manual, and a felt mat.
3. Setup Instructions
3.1 Initial Unlock (First-Time Use)
For first-time use, the safe can be opened using the emergency key or by entering the factory default password with an external power source.
Using the Emergency Key:
- Locate the emergency keyhole cover on the front panel and remove it.
- Insert one of the emergency keys into the keyhole.
- Turn the key to the left (counter-clockwise).
- Simultaneously turn the knob on the safe door to the right (clockwise) to open the door.
Using Passcode with External Power:
- Connect a USB Type-C cable (not included) to the external power port on the safe.
- Enter the factory default password: 159.
- Press the "ENTER" button.
- Turn the knob to the right (clockwise) to unlock and open the safe.
3.2 Battery Installation
The safe requires 4 AA batteries (not included) for the digital keypad to function. The battery compartment is located on the inside of the safe door.
- Open the safe door.
- Locate the battery compartment cover on the inside of the door.
- Remove the cover and insert 4 AA batteries, ensuring correct polarity.
- Replace the battery compartment cover.
3.3 Personal Password Setup
After installing batteries, you can set your personal password (3-8 digits).
- With the safe door open, press the green reset button located on the inner side of the door, near the battery compartment.
- The yellow indicator light on the keypad will flash.
- Enter your desired password (3-8 digits) on the digital keypad.
- Press the "ENTER" button to confirm. The yellow light will stop flashing, indicating the password is set.
Important: Keep the emergency keys stored securely outside of the safe.
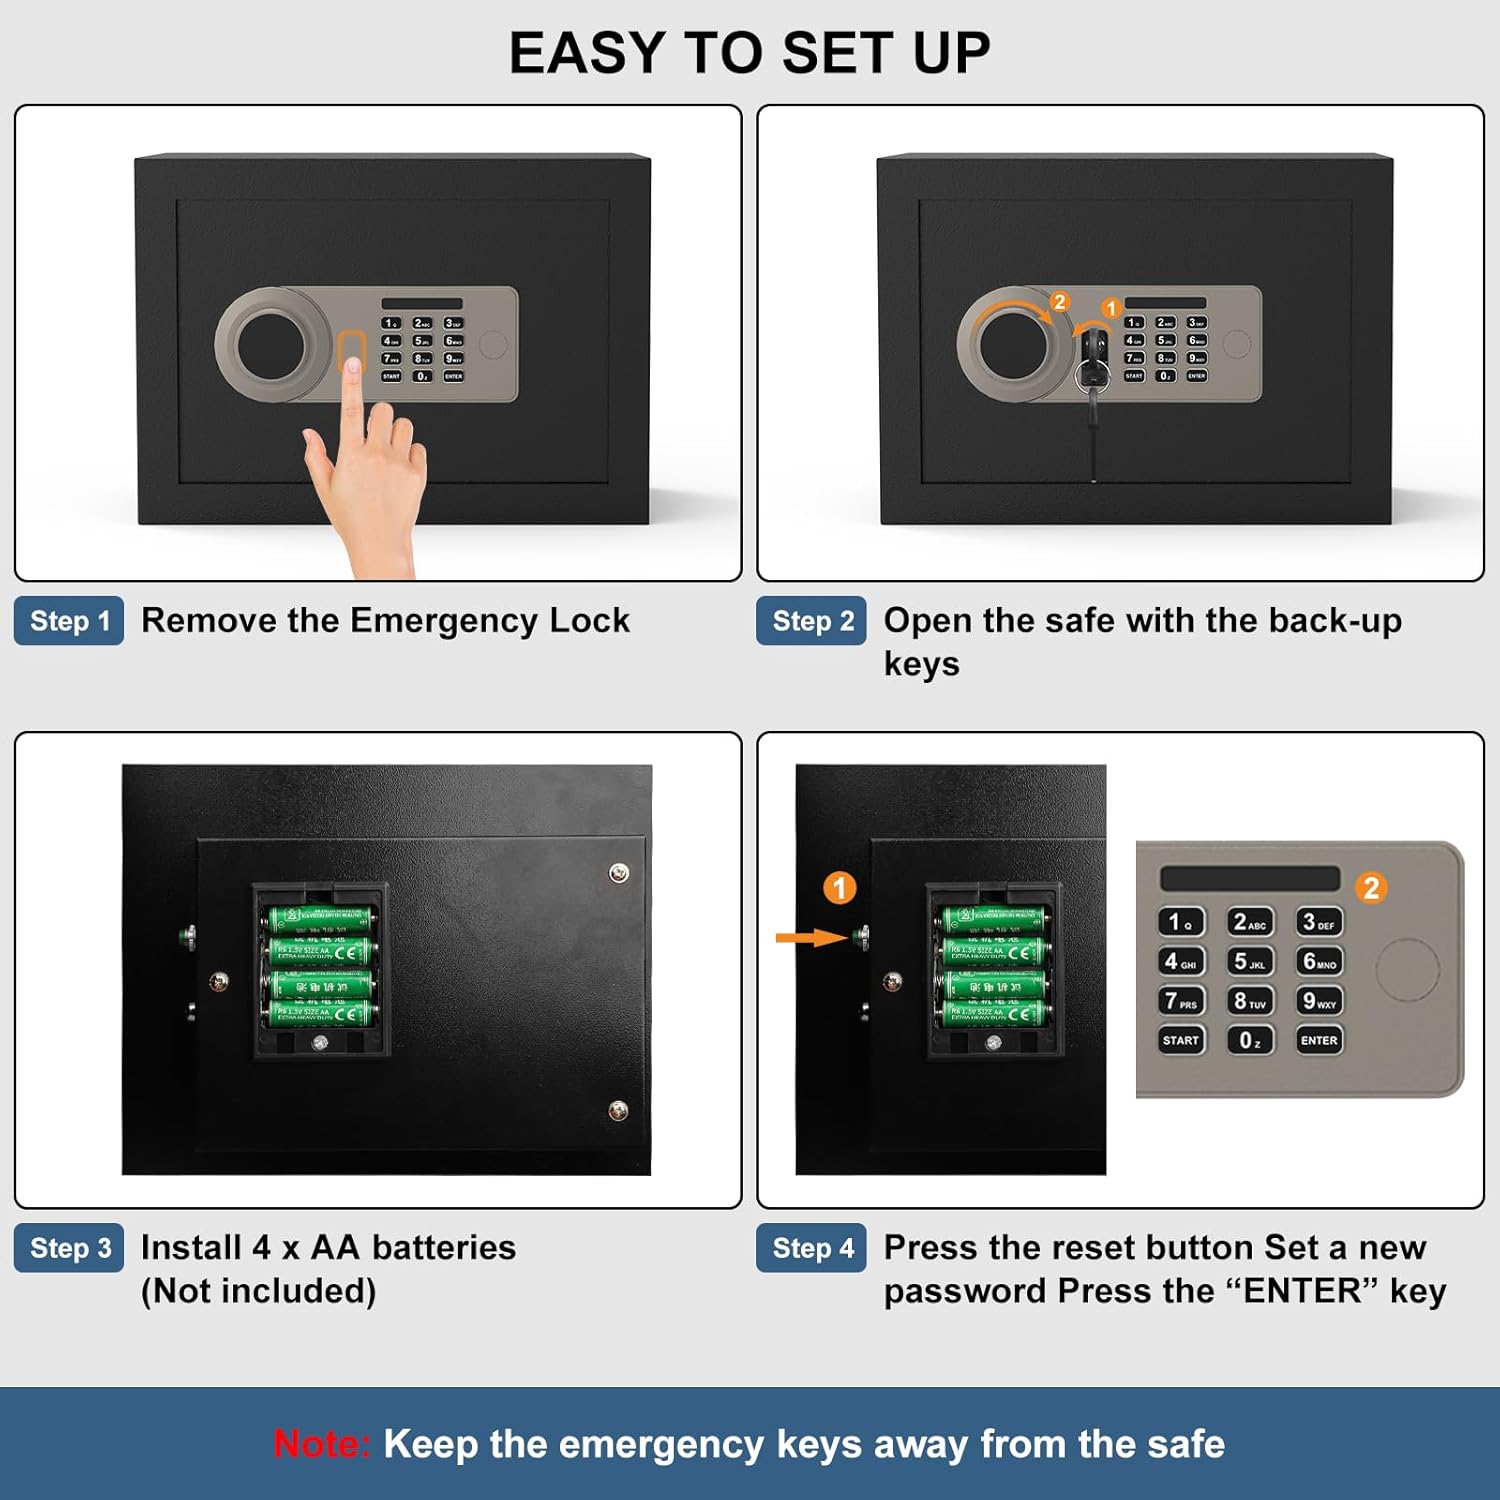
Image: Visual guide for initial setup, including removing the emergency lock cover, opening with backup keys, installing 4 AA batteries, and setting a new password using the reset button and keypad.
Video: A detailed instructional video demonstrating the initial setup process for the Diyife Safe Box, including key unlock, passcode unlock, and personal password setup.
4. Operating Instructions
4.1 Opening the Safe
The safe can be opened using either your personal digital password or the emergency keys.
Using Digital Passcode:
- Enter your personal 3-8 digit password on the keypad.
- Press the "ENTER" button. A green light will illuminate.
- Within 5 seconds, turn the knob to the right (clockwise) to open the safe door.
Using Emergency Key:
- Remove the emergency keyhole cover.
- Insert the emergency key and turn it to the left (counter-clockwise).
- Turn the knob to the right (clockwise) to open the safe door.
4.2 Closing and Locking the Safe
To close and lock the safe, simply close the door and turn the knob to the left (counter-clockwise). The bolts will extend, securing the door.
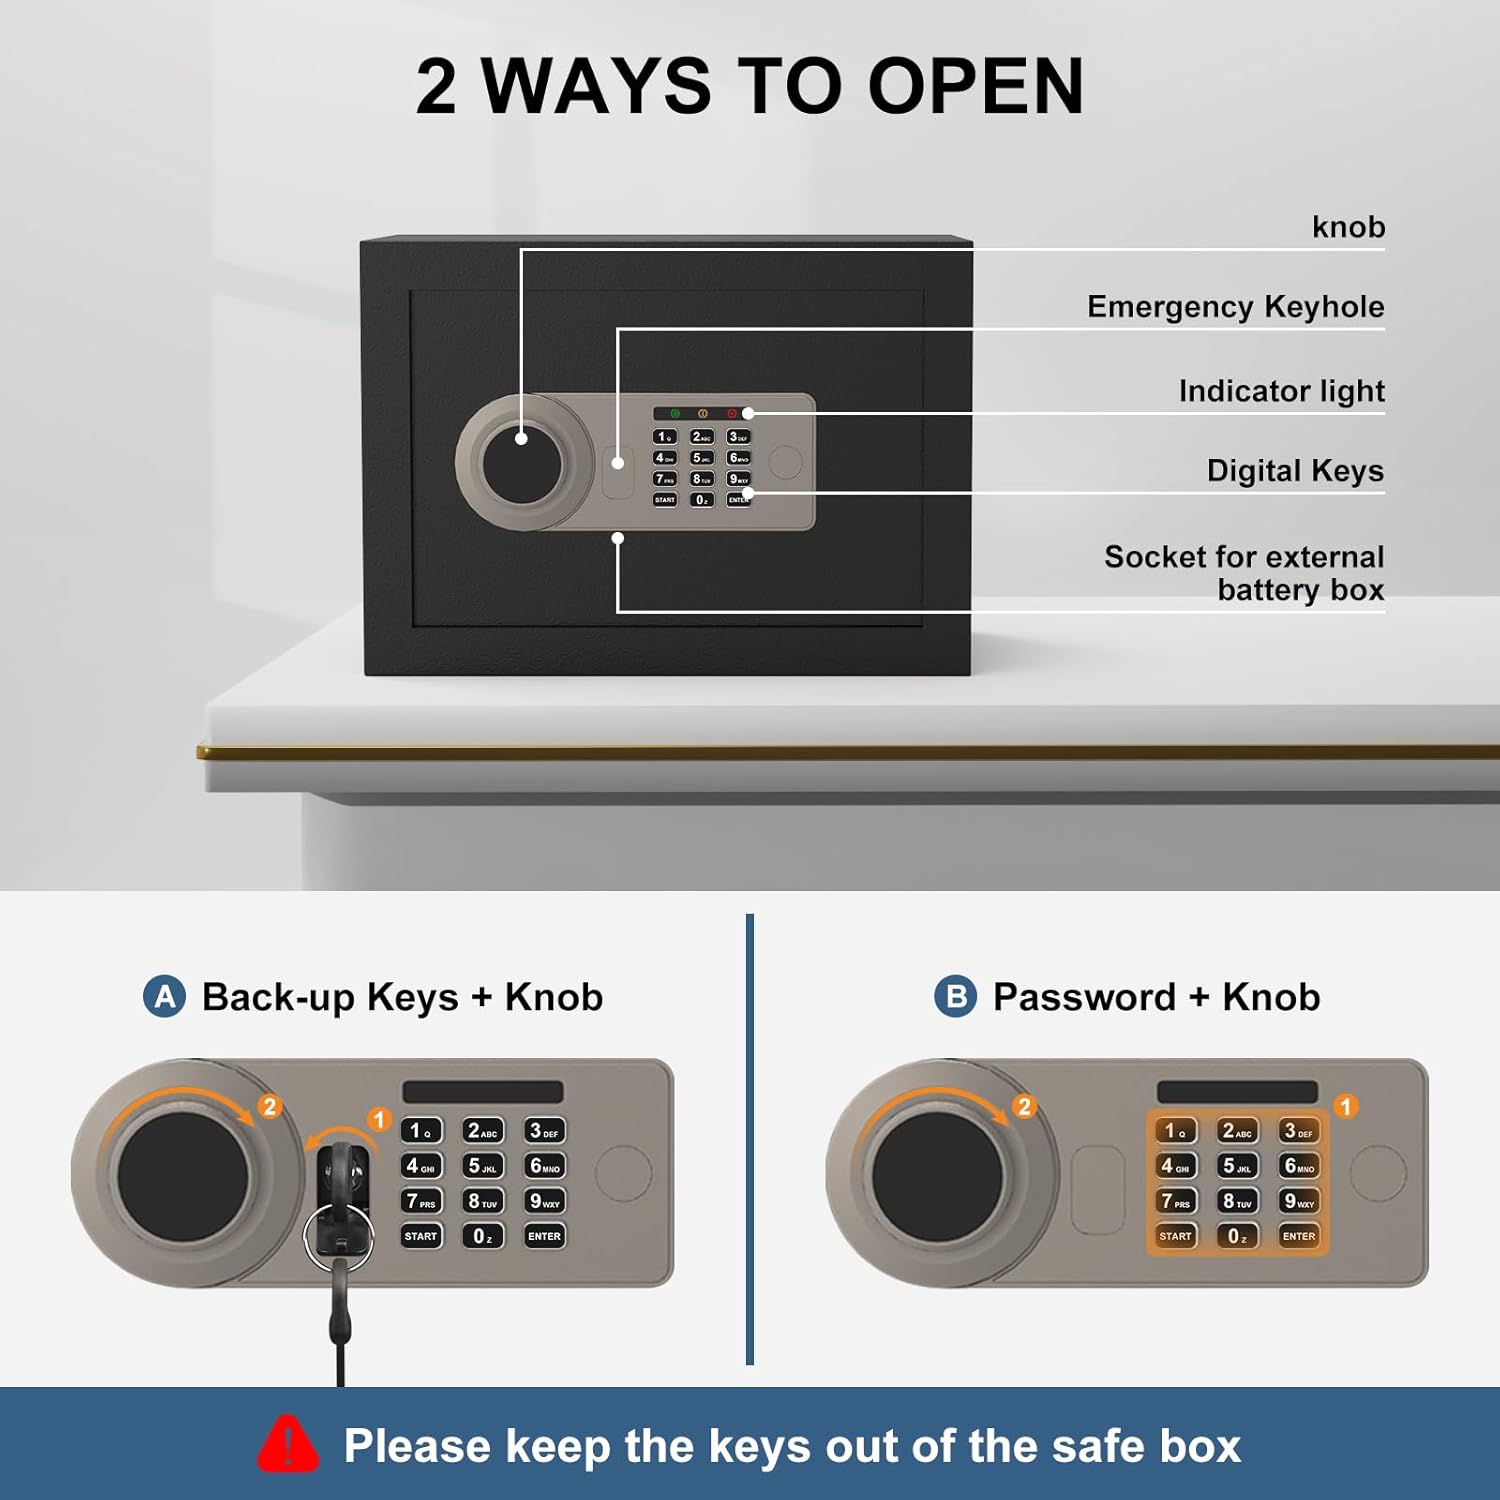
Image: Illustration of the two methods to open the safe: using the backup keys in conjunction with the knob, or entering a password on the digital keypad and then turning the knob.
4.3 Smart Protection Features
- Wrong Access Alarm: If an incorrect password is entered multiple times, the safe's alarm system will activate to deter unauthorized access.
- Silent Mode: For discreet operation, the safe can be set to silent mode, which mutes keypad beeps and alarm sounds. Refer to the full user manual for instructions on activating silent mode.
- Interior Light: An internal light illuminates when the safe door is opened, providing clear visibility of contents in low-light conditions.
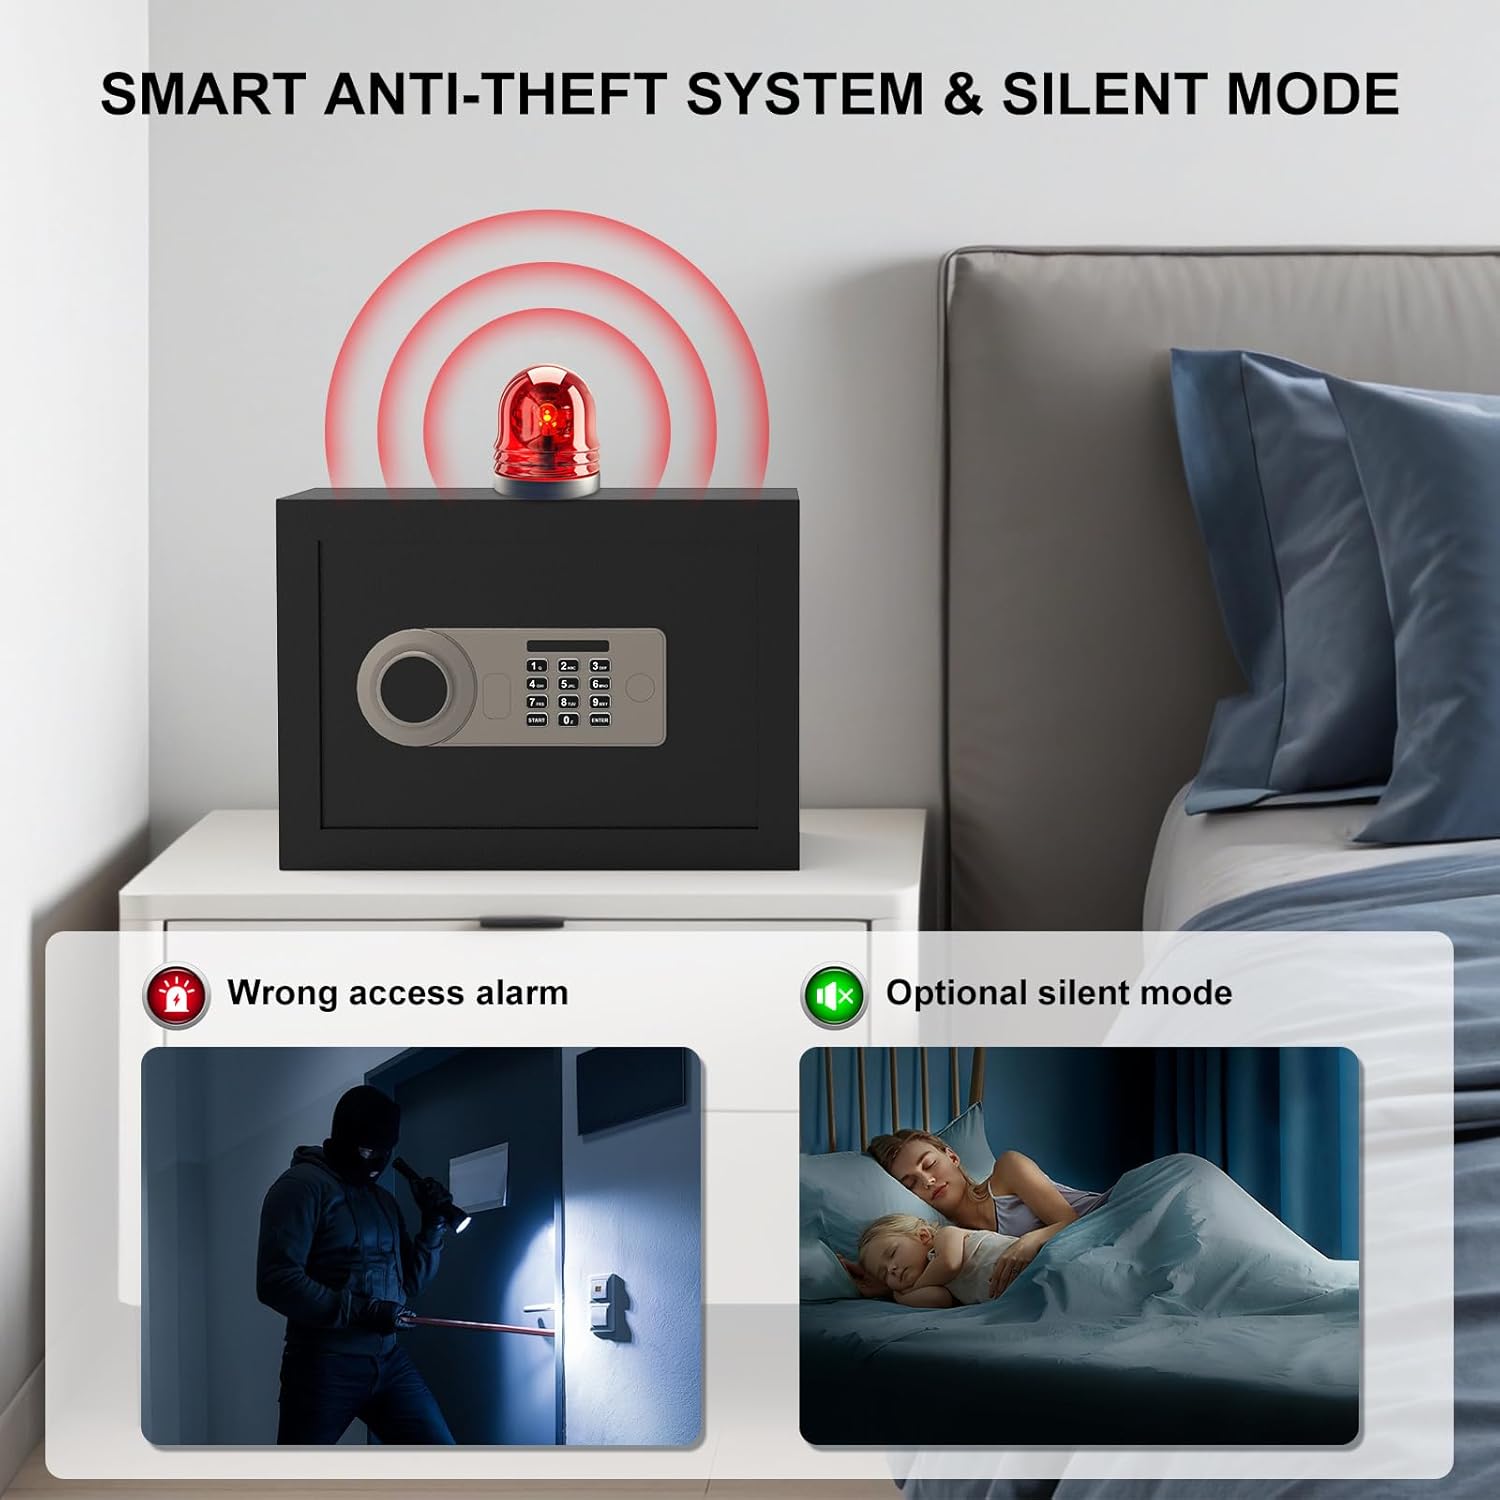
Image: Visual representation of the safe's smart anti-theft system, highlighting the wrong access alarm and the optional silent mode feature.

Image: The safe's interior light feature, showing how it illuminates the contents for easy access in low-light environments.
5. Mounting Instructions
The Diyife Safe Box includes pre-drilled holes and expansion bolts for secure wall or floor mounting. This prevents unauthorized removal of the safe.
- Choose a suitable location for mounting, such as inside a closet, cabinet, or directly to a wall or floor.
- Mark the drilling points through the pre-drilled holes on the back or bottom of the safe onto the mounting surface.
- Drill pilot holes into the marked spots.
- Align the safe with the drilled holes and secure it using the provided expansion bolts. Ensure the bolts are tightened firmly.

Image: Step-by-step guide for wall and floor mounting, demonstrating how to fix the safe to a wall or inside a wardrobe using expansion bolts.
6. Maintenance
- Battery Replacement: Replace batteries when the low battery indicator appears on the keypad. Always use 4 new AA alkaline batteries.
- Cleaning: Clean the exterior of the safe with a soft, damp cloth. Avoid abrasive cleaners or solvents.
- Key Storage: Always store emergency keys in a secure location away from the safe.
- Felt Mat: The included felt mat helps protect stored items from scratches. Ensure it is properly placed inside the safe.
7. Troubleshooting
- Safe does not open with password: Ensure batteries are correctly installed and charged. Try using the external USB Type-C power source. Re-enter your password carefully. If forgotten, use the emergency key to open and reset the password.
- Keypad is unresponsive: Check battery levels. If batteries are dead, use the external USB Type-C power source or emergency key.
- Alarm sounds unexpectedly: This may indicate multiple incorrect password attempts. Enter the correct password to disarm. If persistent, check for any obstructions or tampering.
- Door does not close/lock properly: Ensure no items are obstructing the door or locking bolts. Check that the knob turns freely.
8. Specifications
| Feature | Detail |
|---|---|
| Model Number | TALS01 |
| Capacity | 1.2 Cubic Feet |
| Exterior Dimensions (H x W x D) | 9.84 x 13.78 x 9.84 inches (25 x 35 x 25 cm) |
| Interior Dimensions (H x W x D) | 9.65 x 13.70 x 9.69 inches (24.5 x 34.8 x 24.6 cm) |
| Item Weight | 9.5 kg |
| Material | SPCC Steel |
| Lock Type | Electronic Combination Lock, Key |
| Locking Bolts | 3 x 20mm Live Locking Bolts |
| Door Thickness | 45mm |
| Mounting Type | Wall Mount / Floor Mount (pre-drilled holes) |
| Power Source | 4 x AA Batteries (not included), USB Type-C External Power |
| Special Features | Alarm System, Removable Shelf, Sensor Light, Silent Mode |

Image: Detailed diagram showing the exterior and interior dimensions of the safe box in both inches and centimeters.
9. Warranty and Support
For warranty information, technical support, or further assistance, please refer to the contact details provided in the original product packaging or contact Diyife customer service directly. Keep your purchase receipt for warranty claims.