JJIESHENG B0F8B83SX3
JJIESHENG 2200W Professional Blender Instruction Manual
Model: B0F8B83SX3
1. Introduction
Thank you for purchasing the JJIESHENG 2200W Professional Blender. This powerful countertop appliance is designed for efficient blending, mixing, and crushing various ingredients, from soft fruits to ice cubes. Please read this manual thoroughly before operating the blender to ensure safe and optimal performance. Keep this manual for future reference.
2. Important Safety Instructions
WARNING: To reduce the risk of fire, electric shock, or injury, always follow these basic safety precautions:
- Read all instructions before using the appliance.
- Do not immerse the motor base in water or other liquids.
- Unplug from the outlet when not in use, before assembling or disassembling parts, and before cleaning.
- Avoid contact with moving parts. Blades are sharp. Handle with extreme care.
- Do not operate any appliance with a damaged cord or plug, or after the appliance malfunctions or has been dropped or damaged in any manner.
- The use of attachments not recommended or sold by the manufacturer may cause fire, electric shock, or injury.
- Do not use outdoors.
- Do not let the cord hang over the edge of a table or counter, or touch hot surfaces.
- Do not place on or near a hot gas or electric burner, or in a heated oven.
- Always operate the blender with the lid in place.
- Never put your hands or other utensils into the blender jar while blending to avoid severe injury. Use the tamper provided only when the lid is on.
- Do not blend hot liquids in the blender jar as this may cause pressure buildup and scalding.
- This appliance is not intended for use by persons (including children) with reduced physical, sensory, or mental capabilities, or lack of experience and knowledge, unless they have been given supervision or instruction concerning use of the appliance by a person responsible for their safety.
3. Product Components
Familiarize yourself with the various parts of your JJIESHENG Professional Blender.

Pitcher Components: This image illustrates the main parts of the blender pitcher. It features a Clear Lid for easy viewing and midway refilling, a Rubber Embedded Cover for leak-proof operation, a Solid Humanized Handle for comfortable grip, and the pitcher itself made from BPA-free PC material, safe for both dry and wet use. The pitcher also has a Double Scale (ML, OZ & Cup) for precise ingredient addition.

Six 402 Stainless Steel Blades: This image highlights the robust blade assembly. The blender is equipped with six sharp 402 stainless steel blades designed to efficiently break down various food items and ice cubes.

Blender Base Features: This image details the control panel and base connections. It shows a 12-tooth metal port ensuring a solid connection between the pitcher and the base, a Vibration Damping Pad to reduce noise, a Long-acting Switch for power, an Infinite Speed Knob for adjusting speed (Low, Medium, High), and a Pulse Switch for instant maximum power.

Bottom View: This image displays the underside of the blender base. It features Four non-slip feet for stable placement, a Management slot with clips to firmly fix the cable for neat tabletop organization, and Heat dissipation holes that circulate airflow to reduce temperature and protect the machine.
4. Setup
- Unpack: Carefully remove all components from the packaging. Retain packaging for storage or return if necessary.
- Clean Before First Use: Wash the pitcher, lid, and tamper in warm, soapy water. Rinse thoroughly and dry. Wipe the motor base with a damp cloth.
- Placement: Place the motor base on a clean, dry, and stable surface. Ensure there is enough space around the blender for proper ventilation.
- Assemble Pitcher: Place the pitcher onto the motor base, ensuring it is securely seated. The 12-tooth metal port should align correctly.
- Plug In: Plug the power cord into a grounded electrical outlet.
5. Operating Instructions
Follow these steps for safe and effective blending.

Power On/Shutdown Sequence: This image illustrates the correct sequence for operating the blender. To power on, turn the switch from left to right, then adjust the gear. To shut down, adjust the gear back from right to left, then turn off the power. The image also shows various applications like milkshakes, smoothies, sauces, ice cream, baby food, and juices.

Adjustable Speed Control: This image demonstrates the adjustable speed settings. The blender offers an infinite speed knob with settings for Low (for smaller and softer fruits like strawberries, bananas, blueberries), Medium (for larger fruits or vegetables like carrots, cauliflower, peaches), and High (for harder food like nuts and ice cubes). The control panel also includes a Pulse function for short bursts of high power.
5.1. Blending Process
- Prepare Ingredients: Cut ingredients into appropriate sizes. For best results, add liquids first, then soft ingredients, followed by harder ingredients and ice. Do not exceed the MAX fill line on the pitcher.
- Secure Lid: Place the lid firmly on the pitcher. Ensure the rubber embedded cover is properly sealed.
- Power On: Turn the main power switch (ON/OFF) to 'ON'.
- Select Speed: Rotate the infinite speed knob to your desired setting (Low, Medium, High). Start with a lower speed and gradually increase if needed.
- Use Pulse Function: For quick bursts of power or to break down stubborn ingredients, press and hold the 'PULSE' switch. Release to stop. The pulse switch automatically returns to its off position when released.
- Blend: Blend until desired consistency is achieved. If ingredients get stuck, use the tamper through the lid opening (only when the lid is on) to push them towards the blades.
- Shutdown: Once blending is complete, turn the speed knob to the lowest setting, then turn the main power switch (ON/OFF) to 'OFF'. Unplug the blender from the power outlet.
6. Maintenance and Cleaning
Regular cleaning ensures the longevity and hygiene of your blender.
- Unplug: Always unplug the blender before cleaning.
- Self-Cleaning (Quick Clean): After use, fill the pitcher halfway with warm water and add a few drops of dish soap. Secure the lid. Run the blender on a medium speed for 30-60 seconds. Rinse the pitcher thoroughly.
- Hand Washing: For a more thorough clean, disassemble the pitcher components (lid, tamper). Wash the pitcher, lid, and tamper in warm, soapy water using a brush for hard-to-reach areas. Be extremely careful when cleaning around the blades as they are very sharp. Rinse thoroughly and allow to air dry.
- Motor Base: Wipe the motor base with a damp cloth. Never immerse the motor base in water or any other liquid.
- Storage: Store the blender in a clean, dry place with the lid on the pitcher.
7. Troubleshooting
If you encounter issues with your blender, refer to the following common problems and solutions:
- Blender Does Not Turn On:
- Ensure the power cord is securely plugged into a working outlet.
- Check that the pitcher is correctly seated on the motor base.
- Verify the ON/OFF switch is in the 'ON' position.
- Ingredients Not Blending Smoothly:
- Add more liquid to the mixture.
- Cut ingredients into smaller pieces.
- Use the tamper to push ingredients towards the blades.
- Increase the speed setting.
- Motor Overheating/Blender Stops:
- The blender may have an overload protection feature. Turn off and unplug the unit.
- Remove some ingredients to reduce the load.
- Allow the motor to cool down for at least 15-20 minutes before restarting.
- Leakage from Lid:
- Ensure the lid is securely placed and the rubber embedded cover is properly sealed.
- Do not overfill the pitcher beyond the MAX line.
8. Specifications
Key technical details of your JJIESHENG Professional Blender.
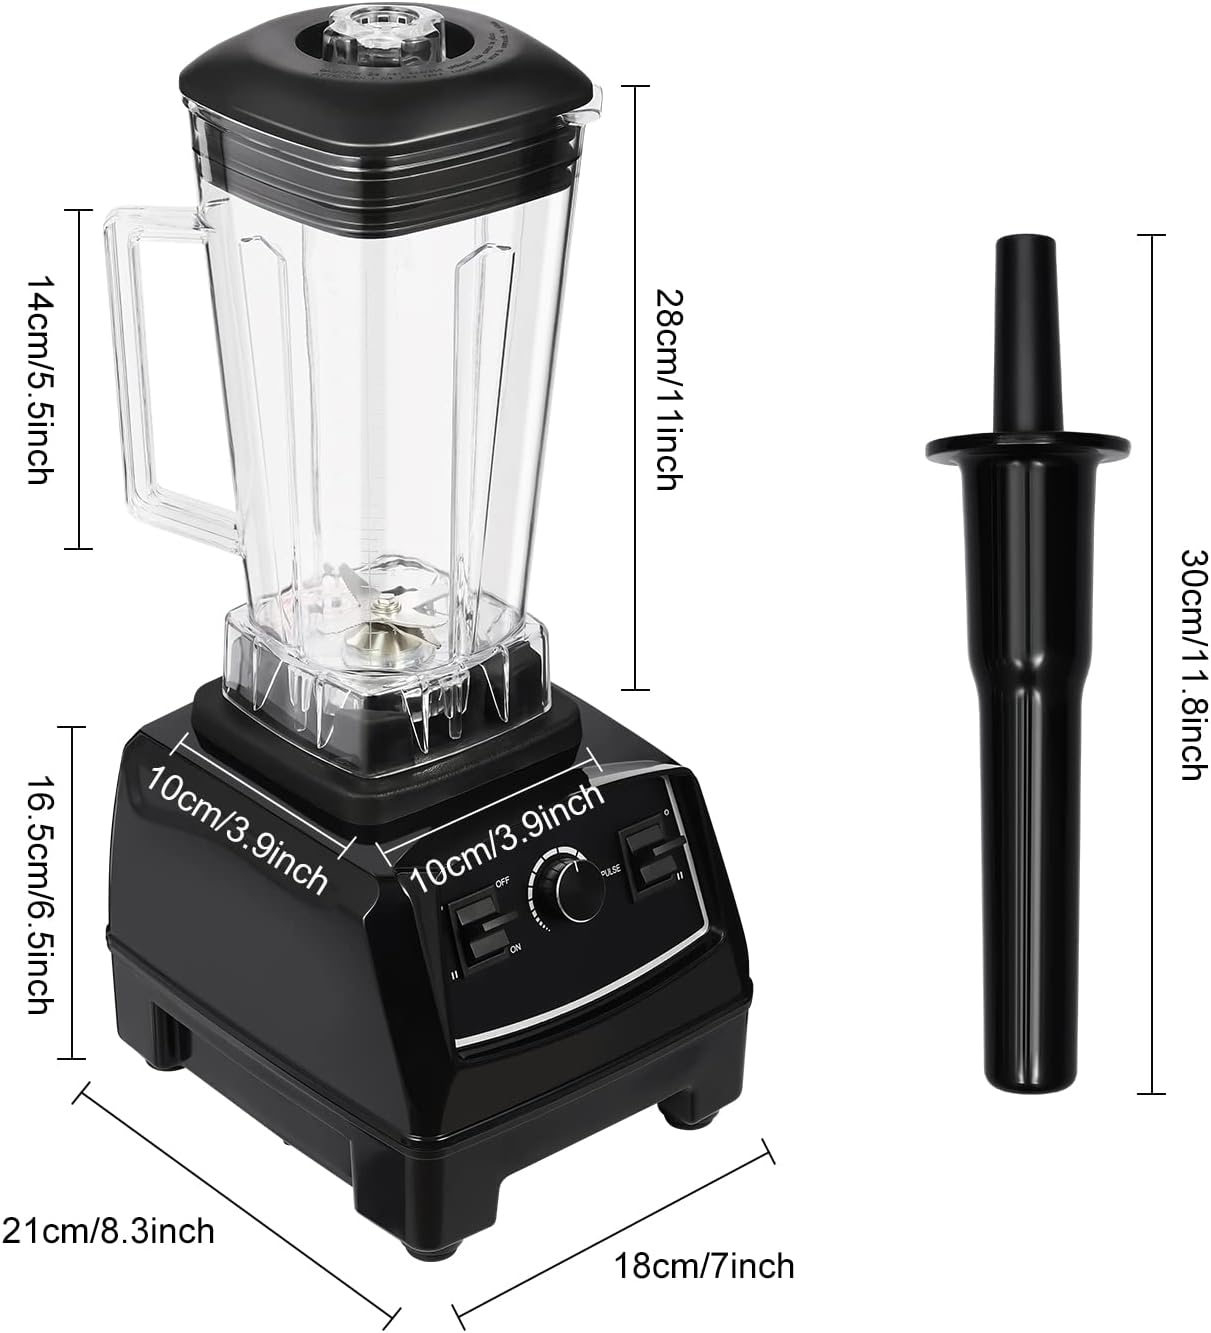
Product Dimensions: This image provides the key measurements of the blender. The pitcher height is approximately 28cm (11.1 inches), the base measures about 21cm (8.3 inches) wide by 18cm (7 inches) deep, and the tamper is approximately 30cm (11.8 inches) long.
| Feature | Specification |
|---|---|
| Model Number | B0F8B83SX3 |
| Power | 2200W |
| Capacity | 68 OZ (approximately 2 Liters) |
| Max RPM | 26000 rpm |
| Blades | Six 402 Stainless Steel Blades |
| Pitcher Material | BPA-free PC |
| Control Type | Infinite Speed Knob, Pulse Switch |
| Date First Available | May 12, 2025 |
9. Warranty and Customer Support
Your JJIESHENG Professional Blender is covered by a manufacturer's warranty. Please refer to the warranty card included in your product packaging for specific terms and conditions. For any questions, technical assistance, or warranty claims, please contact JJIESHENG customer support through the retailer where you purchased the product or visit the official JJIESHENG website for contact information.
Ask a question about this manual
Ask about setup, troubleshooting, compatibility, parts, safety, or missing instructions. Manuals+ will review the question and use this page’s manual context to help answer it.