EAMPDW-TY-63
Generic EAMPDW-TY-63 WiFi Smart Earth Leakage Over Under Voltage Protector User Manual
Model: EAMPDW-TY-63
1. Introduction
This manual provides detailed instructions for the installation, operation, and maintenance of the Generic EAMPDW-TY-63 WiFi Smart Earth Leakage Over Under Voltage Protector. This device integrates multiple protection functions, including over-voltage, under-voltage, over-current, and earth leakage protection, along with energy consumption monitoring and remote control capabilities via the Tuya/Smart Life app. Please read this manual thoroughly before installation and use to ensure safe and efficient operation.
2. Safety Information
- Installation must be performed by a qualified electrician in accordance with local electrical codes and regulations.
- Ensure the main power supply is disconnected before installation or maintenance to prevent electric shock.
- Do not operate the device if it appears damaged or has been exposed to moisture.
- Verify correct wiring connections (Input/Output, Live/Neutral) to avoid damage to the device or connected equipment.
- The device is designed for indoor use or in protective enclosures that meet environmental requirements.
3. Product Overview
The EAMPDW-TY-63 is a compact, DIN rail-mountable device designed to protect electrical circuits and appliances from various power anomalies. It features a digital display for real-time monitoring and control buttons for local adjustments.
3.1 Device Components

Figure 3.1: Front view of the EAMPDW-TY-63 Smart Protector. This image displays the device's main body, including the digital display, control buttons, and input/output terminals.

Figure 3.2: Labeled components and connections of the EAMPDW-TY-63 Smart Protector. This diagram highlights the input (IN) and output (OUT) terminals, Neutral (N) and Live (L) connections, the digital display, WiFi indicator, Pulse indicator, Manual Setting Key, Increase/Decrease buttons, and the ON/OFF button. It also points out the display areas for Overvoltage/Undervoltage, Overcurrent, and Leakage Protection.
- Digital Display: Shows real-time voltage, current, power, and energy consumption.
- Control Buttons: "SET" for menu navigation, "Up/Down" for value adjustment, "ON/OFF" for manual control.
- WiFi Indicator: Shows network connection status.
- Input/Output Terminals: Clearly marked for secure wiring.
4. Specifications
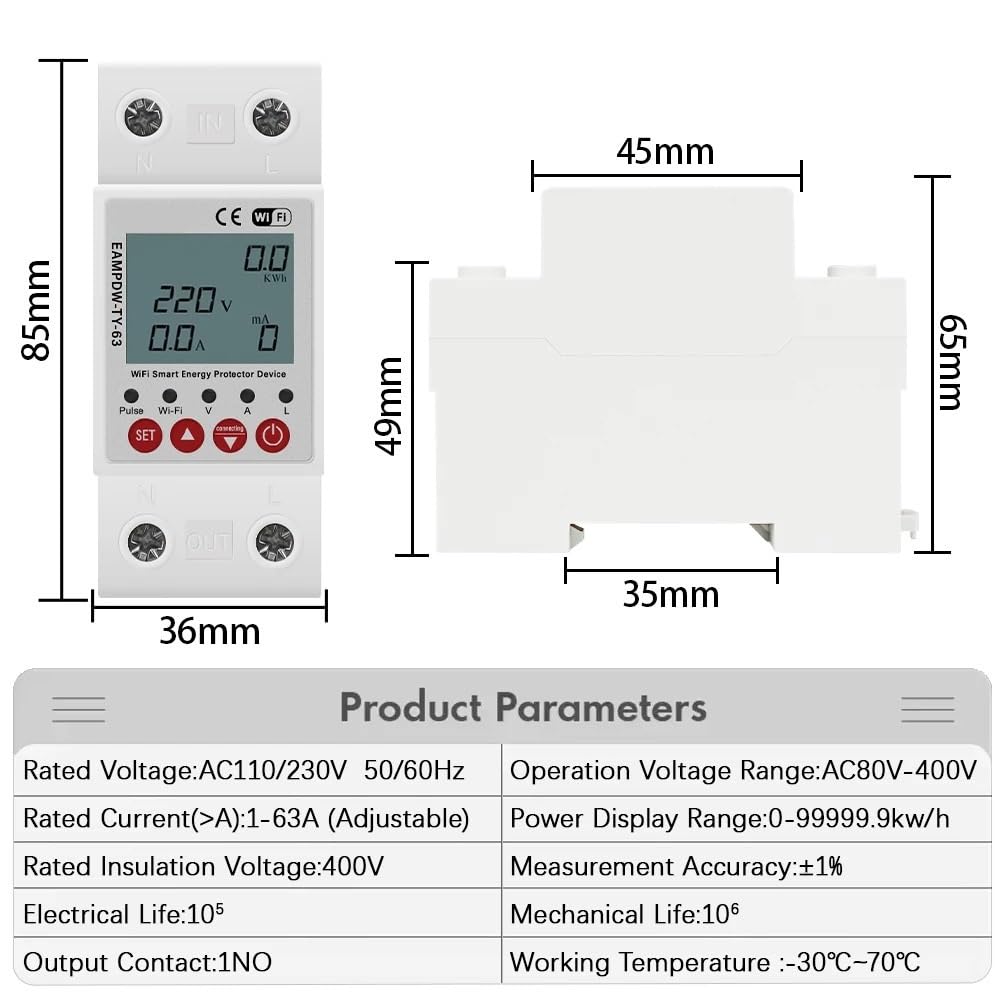
Figure 4.1: Product dimensions and parameters for the EAMPDW-TY-63 Smart Protector. This image provides a visual representation of the device's physical dimensions (85mm height, 36mm width, 65mm depth) and lists key electrical specifications in a table format.
| Parameter | Value |
|---|---|
| Rated Voltage | AC110V/230V |
| Rated Frequency | 50/60Hz |
| Rated Current (Adjustable) | 1-63A |
| Rated Insulation Voltage | 400V |
| Operation Voltage Range | AC80V-400V |
| Over Voltage Adjustable Range | 120V-300V |
| Under Voltage Adjustable Range | 80V-210V |
| Earth Leakage Adjustable Range | 10-99mA |
| Power Display Range | 0-99999.9kWh |
| Measurement Accuracy | ±1% |
| Electrical Life | 105 cycles |
| Mechanical Life | 106 cycles |
| Output Contact | 1NO |
| Working Temperature | -30°C to 70°C |
| App Compatibility | Tuya / Smart Life |
5. Setup and Installation
5.1 Physical Installation
- Power Disconnection: Before starting, ensure the main power supply to the circuit where the device will be installed is completely turned off. Use a voltage tester to confirm.
- Mounting: Mount the EAMPDW-TY-63 onto a standard 35mm DIN rail within an appropriate electrical enclosure.
- Wiring:
- Connect the incoming Live (L) and Neutral (N) wires to the "IN" terminals at the top of the device.
- Connect the outgoing Live (L) and Neutral (N) wires to the "OUT" terminals at the bottom of the device.
- Ensure all connections are secure and tightened using the screw-type terminals. Refer to Figure 3.2 for wiring diagram.
- Power Restoration: Once wiring is complete and verified, restore power to the circuit. The device display should illuminate.
5.2 App Pairing (Tuya/Smart Life)
- Download App: Download and install the "Tuya Smart" or "Smart Life" app from your smartphone's app store (iOS or Android).
- Register/Login: Open the app and register a new account or log in to an existing one.
- Add Device:
- Ensure your phone is connected to a 2.4GHz Wi-Fi network.
- In the app, tap the "+" icon (usually top right) to add a device.
- Select "Electrical Engineering" or "Circuit Breaker" from the device list.
- Follow the on-screen instructions to put the device into pairing mode. This usually involves pressing and holding the "SET" button or a combination of buttons until the WiFi indicator on the device blinks rapidly.
- Enter your Wi-Fi network password in the app.
- Wait for the device to connect. Once connected, the WiFi indicator will stop blinking and remain solid.
- Device Renaming: You can rename the device in the app for easier identification.
6. Operating Instructions
6.1 Local Control
- ON/OFF: Press the ON/OFF button to manually switch the power output on or off.
- Display Modes: Briefly press the SET button to cycle through different display parameters (Voltage, Current, Power, Energy Consumption, etc.).
- Parameter Adjustment:
- Press and hold the SET button for a few seconds to enter the setting menu.
- Use the Up and Down buttons to navigate between adjustable parameters (e.g., Over Voltage Threshold, Under Voltage Threshold, Earth Leakage Current, Over Current Limit).
- Press SET again to select a parameter, then use Up and Down to adjust its value.
- Press and hold SET to save the changes and exit the setting menu.
6.2 Remote Control (Tuya/Smart Life App)
- Remote ON/OFF: From the app, you can remotely switch the device on or off.
- Real-time Monitoring: View real-time voltage, current, power, and energy consumption data directly on your smartphone.
- Parameter Configuration: Adjust protection thresholds (over-voltage, under-voltage, over-current, earth leakage) remotely via the app.
- Energy Statistics: Access historical energy consumption data and generate reports.
- Scheduling: Set schedules or timers for automatic power on/off.
- Automation: Create smart scenes to link the device with other smart home devices.
7. Maintenance
- Regular Inspection: Periodically check the device and wiring for any signs of damage, loose connections, or overheating.
- Cleaning: Ensure the device is clean and free from dust and debris. Use a dry, soft cloth for cleaning. Do not use liquid cleaners.
- Firmware Updates: Check the Tuya/Smart Life app for any available firmware updates for the device to ensure optimal performance and security.
- Environmental Conditions: Ensure the operating environment remains within the specified temperature and humidity ranges.
8. Troubleshooting
| Problem | Possible Cause | Solution |
|---|---|---|
| Device does not power on. | No power supply; incorrect wiring. | Check main power supply. Verify input wiring (L/N) is correct and secure. |
| WiFi indicator not blinking/connecting. | Incorrect pairing mode; 5GHz WiFi network; weak signal. | Ensure device is in pairing mode (rapid blinking). Connect phone to 2.4GHz WiFi. Move device closer to router. |
| Device trips frequently. | Protection thresholds set too low; actual over-current/voltage/leakage. | Review and adjust protection parameters in the app or locally. Investigate the connected load for actual faults. |
| Remote control not working. | No internet connection; app issues. | Check WiFi connection of the device and your phone. Restart the app. |
| Display shows error code. | Internal fault or specific protection trigger. | Refer to the app for specific error code meanings or contact support. |
9. Warranty and Support
This Generic EAMPDW-TY-63 device comes with a standard manufacturer's warranty. Please refer to the purchase documentation or contact your retailer for specific warranty terms and conditions. For technical support, troubleshooting assistance, or further inquiries, please contact the seller or manufacturer's customer service department.
Note: Unauthorized disassembly or modification of the device will void the warranty.
Ask a question about this manual
Ask about setup, troubleshooting, compatibility, parts, safety, or missing instructions. Manuals+ will review the question and use this page’s manual context to help answer it.