1. Introduction
This manual provides detailed instructions for the assembly, operation, and maintenance of your Full Size Metal Loft Bed with Desk and Lateral Storage Ladder. Designed for maximized space, this contemporary loft bed features a sturdy metal frame, an integrated desk, and a lateral four-layer storage ladder that doubles as shelving. Please read all instructions carefully before assembly and use to ensure safe and proper operation.
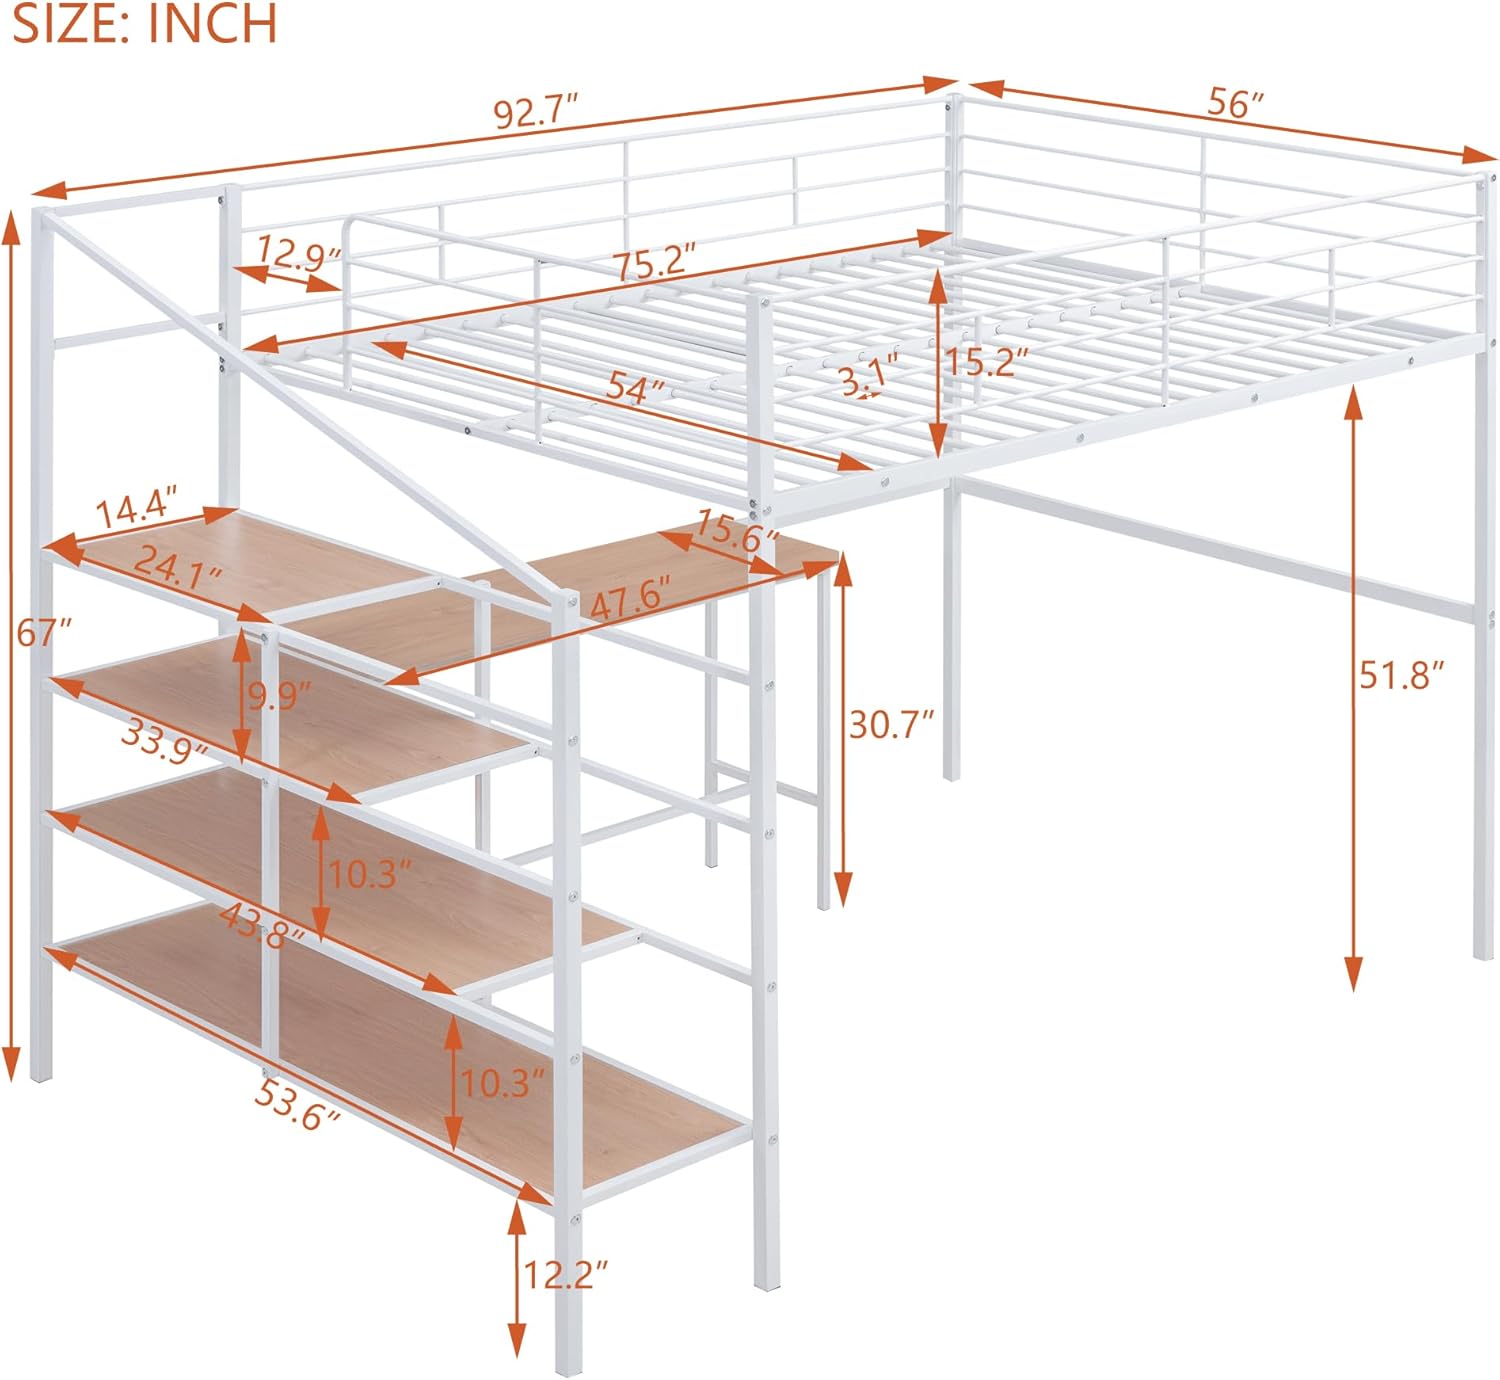
Image 1.1: The Full Size Metal Loft Bed with Desk and Lateral Storage Ladder in a typical room setup, demonstrating its functionality with a laptop on the desk and various items on the storage shelves.
2. Safety Information
- Maximum Weight Capacity: Do not exceed the recommended weight limit for the bed frame. Refer to the specifications section for details.
- Mattress Requirements: Use only a full-size mattress that meets the specified thickness and dimensions to ensure proper guardrail height.
- Assembly: Ensure all bolts and connections are securely tightened before use. Regularly check and re-tighten hardware as needed.
- No Jumping: Do not allow jumping on the bed.
- Ladder Safety: Always use the ladder for access to the upper bunk. Do not use the storage shelves as a climbing aid.
- Ventilation: Ensure adequate ventilation around the bed, especially if placed against a wall.
- Children: This bed is not recommended for children under 6 years of age.
3. Package Contents
Your loft bed is delivered in two packages. Carefully unpack all components and verify against the parts list provided in the separate installation manual. Ensure all hardware is present before beginning assembly. Typical components include:
- Metal Bed Frame Sections (Headboard, Footboard, Side Rails, Support Beams)
- Integrated Desk Components (Desktop, Desk Legs/Supports)
- Lateral Storage Ladder/Shelf Components (Shelf Panels, Ladder Frame)
- Bed Slats
- Assembly Hardware (Bolts, Screws, Washers, Allen Wrench)

Image 3.1: A side view of the loft bed, illustrating the main structural components including the bed frame, desk, and lateral storage ladder.
4. Assembly Instructions
Assembly typically requires two adults. Clear a spacious area for assembly and keep all parts and hardware organized. Follow the step-by-step instructions provided in the separate installation manual included with your product. The general assembly sequence is as follows:
- Preparation: Unpack all components and lay them out on a soft, clean surface to prevent scratches. Identify each part using the provided parts list.
- Assemble Main Bed Frame: Connect the headboard, footboard, and side rails to form the basic bed structure. Secure all connections with the provided hardware, but do not fully tighten until the entire frame is assembled.
- Attach Desk Frame: Integrate the desk support frame and desktop to the main bed structure. Ensure the desk is level and securely fastened.
- Install Lateral Storage Ladder: Attach the lateral storage ladder frame and shelf panels to the bed structure. Ensure each shelf is firmly in place.
- Install Bed Slats: Place the bed slats across the bed frame supports. Secure them according to the manual's instructions.
- Final Tightening: Once all components are in place and aligned, go back and fully tighten all bolts and screws. Do not overtighten.
- Placement: Position the assembled loft bed in its desired location, ensuring it is stable and level.

Image 4.1: A front view of the fully assembled loft bed, showcasing the complete structure including the bed, desk, and lateral storage unit.
5. Operating Instructions
- Using the Bed: Place a full-size mattress on the bed slats. Ensure the mattress fits snugly within the frame and does not exceed the maximum recommended thickness to maintain adequate guardrail height.
- Using the Desk: The integrated desk provides a dedicated workspace. Place your computer, books, or other study/work materials on the desk surface. Avoid placing excessively heavy items on the desk.
- Using the Lateral Storage Ladder/Shelves: The four-layer lateral ladder functions as convenient storage shelves. Use these shelves for books, decorative items, or small storage bins. Distribute weight evenly across the shelves and do not overload them.
- Accessing the Bed: Always use the designated ladder to climb into and out of the loft bed. Ensure a firm grip and stable footing.
6. Maintenance
- Cleaning: Wipe down the metal frame and desk/shelf surfaces with a soft, damp cloth. For stubborn marks, a mild soap solution can be used, followed by drying with a clean cloth. Avoid abrasive cleaners or harsh chemicals.
- Hardware Inspection: Periodically (e.g., every 3-6 months) inspect all bolts, screws, and connections. Re-tighten any loose hardware to maintain stability and safety.
- Structural Integrity: Check the bed frame for any signs of damage, bending, or stress. If any damage is found, discontinue use and contact customer support.
7. Troubleshooting
- Squeaking Noises: Squeaking often indicates loose hardware. Re-tighten all bolts and screws. Ensure the bed is placed on a level surface.
- Instability/Wobbling: Check that all connections are fully tightened. Verify that the bed is on a flat, even floor. If the issue persists, disassemble and reassemble carefully, ensuring all parts are correctly aligned.
- Missing Parts: If you find any parts missing upon unpacking, refer to the parts list in your installation manual and contact customer support immediately for replacements.
8. Specifications

Image 8.1: Detailed diagram illustrating the overall and component dimensions of the loft bed in inches.
| Feature | Detail |
|---|---|
| Product Dimensions | 92.7"L x 56"W x 67"H |
| Color | White |
| Material | Metal |
| Special Feature | Strong, Integrated Desk, Lateral Storage Ladder |
| Style | Modern |
| Item Weight | 130.1 pounds |
| Mattress Not Included | Yes |
9. Warranty and Support
For any questions, concerns, or assistance with your product, please refer to the contact information provided in your purchase documentation or reach out to the retailer/manufacturer directly. Please have your model number and purchase date available when contacting support.


