1. Introduction
This manual provides detailed instructions for the safe installation, operation, and maintenance of your Nordic Modern Style LED Chandelier. Please read this manual thoroughly before installation and retain it for future reference. This chandelier features a three-head design with integrated LED lighting and a unique decorative element.
2. Safety Information
WARNING: To reduce the risk of fire, electric shock, or personal injury, always follow these safety precautions:
- Ensure the power supply is disconnected at the circuit breaker before installation or maintenance.
- All electrical connections must be in accordance with local codes, ordinances, or the National Electric Code (NEC).
- Consult a qualified electrician if you are unsure about the installation process.
- Do not install this fixture in wet locations. For indoor use only.
- Handle the fixture with care to avoid damage to components.
- Do not exceed the specified voltage (90-260V).
3. Package Contents
Verify that all components listed below are present and undamaged before beginning installation. If any parts are missing or damaged, do not proceed with installation and contact customer support.
- Chandelier fixture with integrated LED lights
- Mounting bracket
- Mounting screws and wire connectors
- Instruction Manual

Image: Detailed view of chandelier components, highlighting the resin bird decoration, spray painted iron lampshade, and highly transparent mask.
4. Setup and Installation
Professional installation is recommended. Ensure power is OFF at the circuit breaker before starting.
- Prepare the Installation Area: Turn off the power to the junction box at the circuit breaker. Ensure the wall switch is in the OFF position.
- Attach Mounting Bracket: Secure the mounting bracket to the ceiling junction box using the provided screws. Ensure the bracket is firmly attached and can support the weight of the fixture.
- Connect Electrical Wires: Carefully connect the electrical wires from the fixture to the corresponding wires in the junction box. Typically, connect the black wire from the fixture to the black (live) wire from the ceiling, the white wire from the fixture to the white (neutral) wire from the ceiling, and the ground wire to the ground wire (bare copper or green). Use the provided wire connectors and ensure all connections are secure.
- Mount the Fixture: Carefully lift the chandelier fixture and align it with the mounting bracket. Secure the fixture to the bracket using the provided screws or fasteners. Ensure the fixture is stable and flush against the ceiling.
- Adjust Hanging Wire (Optional): The chandelier comes with a 1-meter hanging wire that can be shortened to achieve the desired height. Adjust the wire length before final mounting or consult a professional for adjustment.
- Restore Power: Once the installation is complete and all connections are secure, restore power at the circuit breaker.
5. Operating Instructions
This chandelier features a 3-color dimming function, allowing you to switch between different color temperatures using a standard household wall switch.
- Turn On: Flip the wall switch to the 'ON' position. The light will illuminate in its default color temperature (e.g., 4000K warm white light).
- Change Color Temperature: To cycle through the available color temperatures (Warm White, Positive White, Warm Yellow), quickly toggle the wall switch 'OFF' and then 'ON' again. Each toggle will switch to the next color temperature.
- Available Color Temperatures:
- 4000K: Warm White Light
- 6500K: Positive White Light
- 3000K: Warm Yellow Light
- Turn Off: Flip the wall switch to the 'OFF' position to turn off the light. The fixture will remember the last selected color temperature when turned back on.
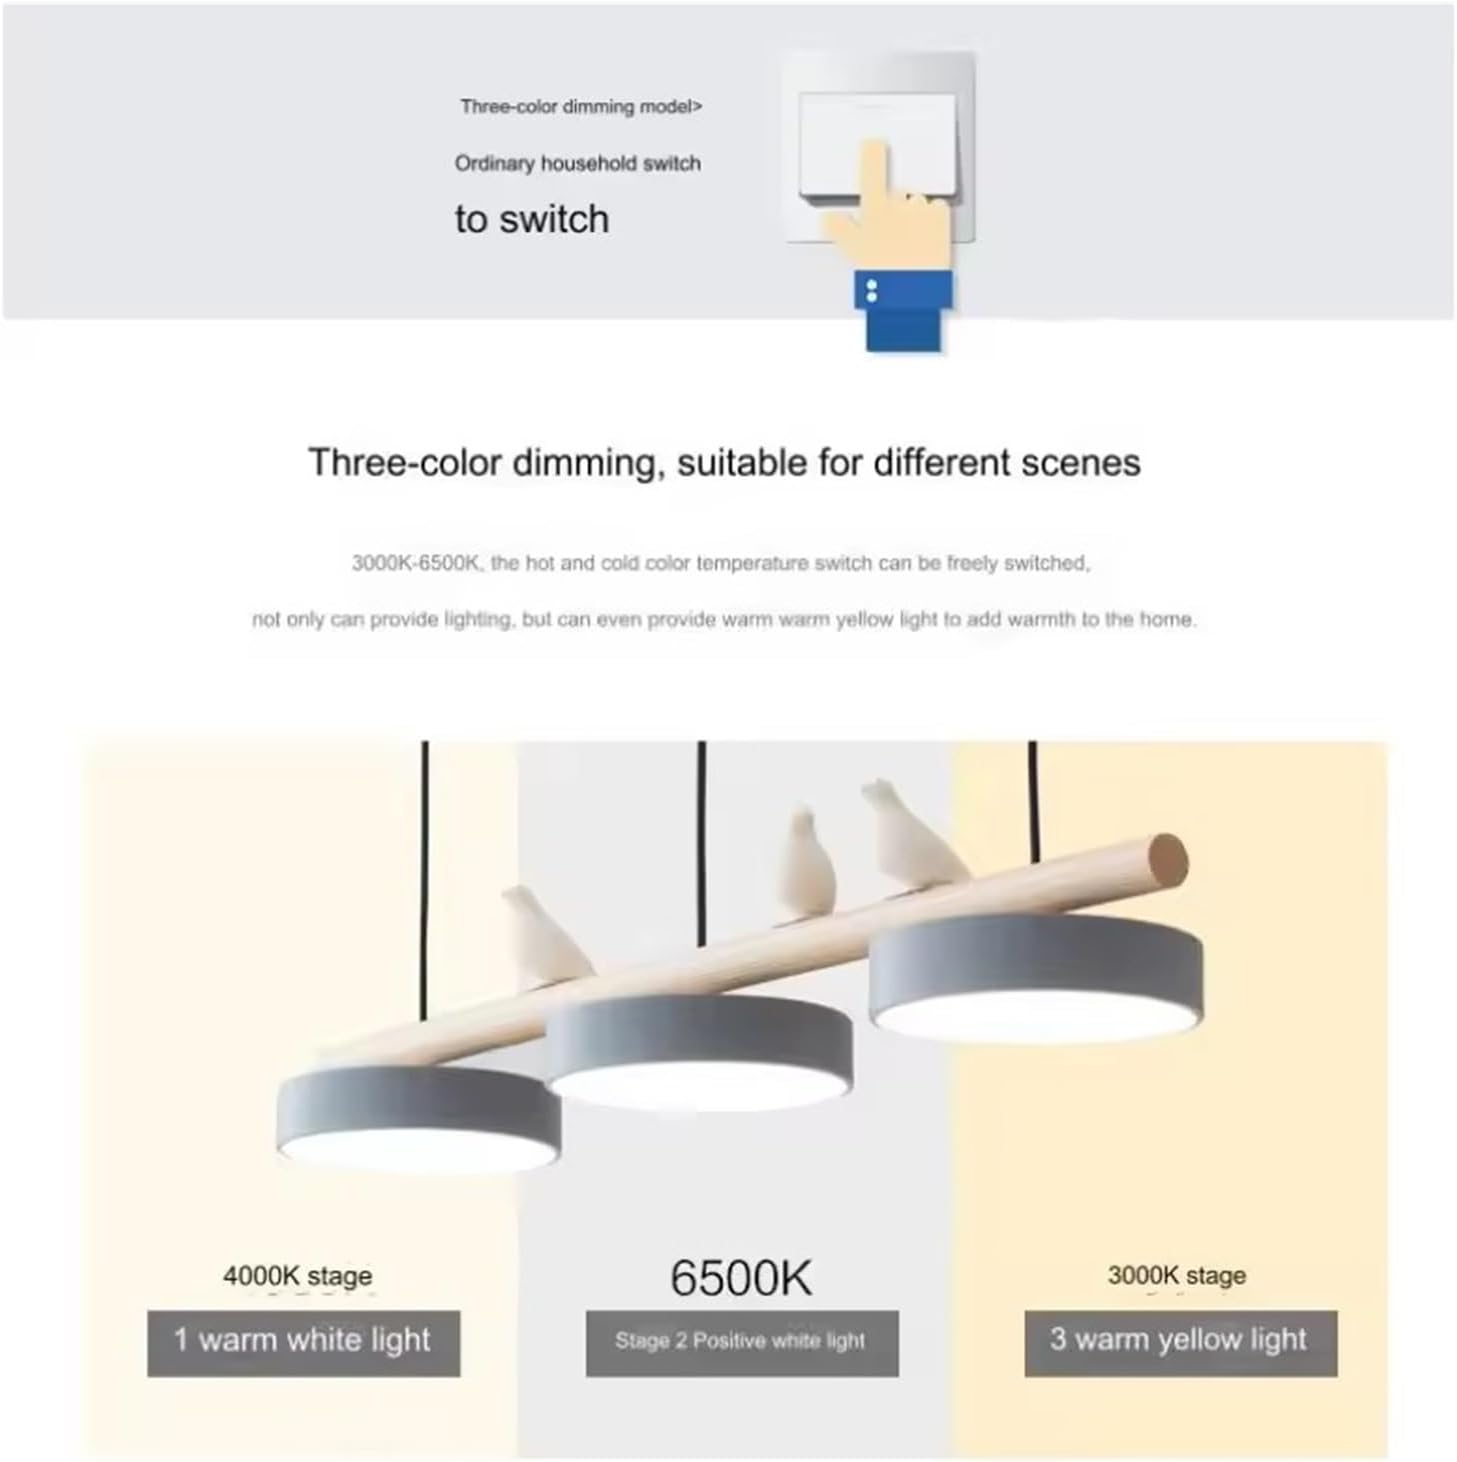
Image: Illustration of the 3-color dimming functionality, showing how to switch between 4000K, 6500K, and 3000K light settings.
6. Maintenance
To ensure the longevity and appearance of your chandelier, follow these maintenance guidelines:
- Cleaning: Always turn off the power before cleaning. Use a soft, dry cloth to wipe the fixture. Do not use abrasive cleaners, solvents, or polishes as they may damage the finish.
- Bulb Replacement: This fixture uses integrated LED lighting and does not require bulb replacement. If the LED light source fails, contact customer support for assistance.
- Inspection: Periodically check all electrical connections and mounting hardware for tightness.
7. Troubleshooting
If you encounter issues with your chandelier, refer to the following common problems and solutions:
| Problem | Possible Cause | Solution |
|---|---|---|
| Light does not turn on | No power supply; Loose wiring; Faulty switch | Check circuit breaker; Verify all wire connections are secure; Test wall switch. |
| Light flickers | Loose wiring; Incompatible dimmer switch (if applicable) | Ensure all connections are tight; This fixture is designed for standard wall switches, not dimmers. |
| Cannot change color temperature | Incorrect operation | Ensure you are quickly toggling the wall switch OFF then ON to cycle through colors. |
If the problem persists after attempting these solutions, please contact customer support.
8. Specifications
Technical details for the Nordic Modern Style LED Chandelier:
| Feature | Detail |
|---|---|
| Model Number | HRHZDLZJG-GREY |
| Brand | Generic |
| Color | Gray |
| Voltage | 90-260V (AC) |
| Light Source | Integrated LED 36W |
| Emitting Color | 3-colors (4000K Warm White, 6500K Positive White, 3000K Warm Yellow) |
| Body Material | Resin, Iron |
| Product Dimensions (L x W x H) | 80cm (Length) x 8.5cm (Height, without accessories) |
| Hanging Wire Length | 1 meter (adjustable) |
| Applicable Area | 5-15 m² |
| Indoor/Outdoor Usage | Indoor Only |
| Item Weight | 50 Grams (Please verify actual weight upon receipt) |

Image: Chandelier dimensions, indicating 80cm length and 1-meter adjustable hanging wire.
9. Warranty and Support
For warranty information or technical support, please refer to the product listing on the retailer's website or contact the seller directly. Keep your purchase receipt as proof of purchase.