1. Product Overview
The Chapter Seven 82-inch Adjustable Phone Tripod is a versatile and stable support system designed for mobile phones and small cameras. It features an adjustable height up to 82 inches, a flexible gooseneck for multi-angle shooting, and a robust carbon steel construction. This tripod is ideal for various applications including video recording, selfies, live streaming, and vlogging, offering enhanced stability and flexibility for content creation.

Image: The Chapter Seven 82-inch Adjustable Phone Tripod shown fully extended, demonstrating its maximum height and stable base.
2. Key Features
- Extended Height: Reaches up to 82 inches (including gooseneck) for diverse shooting perspectives.
- Durable Construction: Made from premium reinforced carbon steel for stability and longevity.
- Flexible Gooseneck: Allows for multi-angle shooting, including overhead shots, without obstruction.
- Wide Compatibility: Universal phone holder fits devices from 2.8" to 5.7". Features a 1/4" screw hole for digital cameras, action cameras, webcams, and camcorders.
- Integrated Selfie Mirror: Enables easy use of the rear camera for higher quality selfies and vlogging.
- Compact Storage: Collapses to approximately 60 cm for portability and easy transport.
- Accessory Tray: Includes reserved locations for additional slabs and a tray for small accessories.

Image: The flexible gooseneck mechanism, illustrating its ability to adjust for various shooting angles, including overhead views.
3. Setup Instructions
- Unpack Components: Carefully remove all parts from the packaging. Ensure you have the tripod base, telescopic pole, gooseneck arm, phone holder, and any additional accessories.
- Extend Tripod Legs: Place the tripod base on a flat, stable surface. Gently pull the legs outwards until they are fully extended and locked into position. Ensure the base is wide enough to provide maximum stability.
- Assemble Telescopic Pole: Insert the telescopic pole into the center of the tripod base. Secure it by tightening the locking knob at the base.
- Adjust Height: Loosen the height adjustment clamps on the telescopic pole. Extend the pole to your desired height. Tighten all clamps securely to prevent slippage.
- Attach Gooseneck Arm: The gooseneck arm connects to the top section of the telescopic pole. Secure it by screwing it into the 1/4" screw mount or by using the integrated clamp mechanism.
- Mount Phone Holder: Attach the universal phone holder to the gooseneck arm. It typically uses a ball head joint for flexible positioning. Tighten the collar to secure the phone holder's angle.
- Insert Device: Gently expand the phone holder clamps and insert your smartphone. Ensure it is securely gripped without obstructing buttons or ports. For cameras, screw the camera directly onto the 1/4" screw mount.

Image: A close-up view of the tripod's stable base, highlighting its wide stance and secure locking mechanism for enhanced stability.

Image: The 360-degree adjustable ball head, allowing for precise positioning and angling of the attached device.
4. Operating Instructions
4.1 Adjusting Height and Angle
- To adjust the tripod's height, loosen the quick-release clamps on the telescopic pole sections, extend or retract to the desired height, and then firmly close the clamps.
- The flexible gooseneck arm allows for precise positioning. Bend and twist the gooseneck to achieve overhead shots, eye-level views, or any other desired angle.
- The phone holder's ball head joint can be rotated 360 degrees and tilted. Loosen the locking collar, adjust the phone to the desired orientation (portrait or landscape), and then tighten the collar.
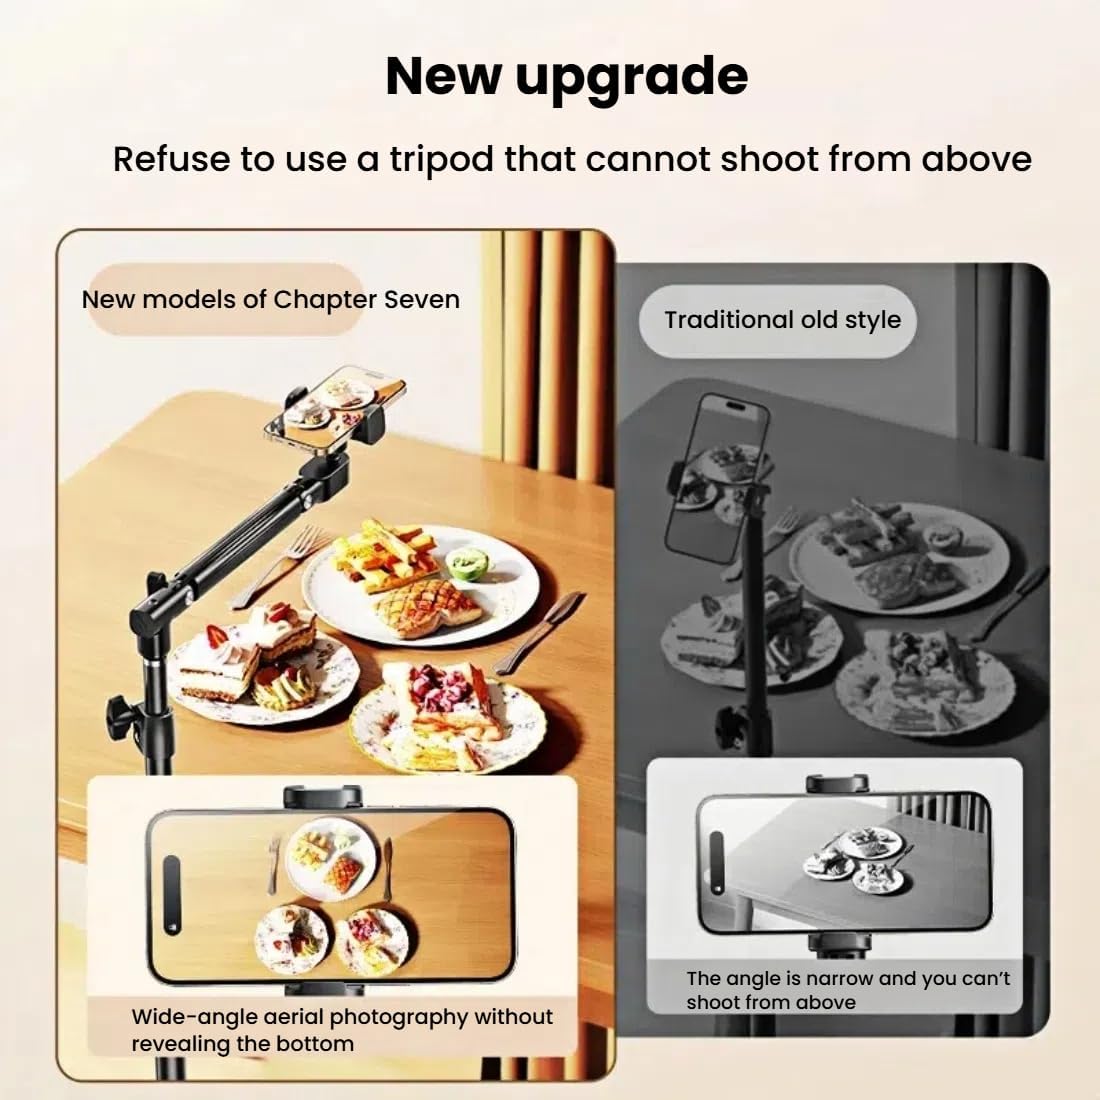
Image: The tripod with its gooseneck arm extended and positioned for an overhead shot, demonstrating its flexibility for top-down content creation.
4.2 Using the Selfie Mirror
The integrated selfie mirror allows you to use your phone's higher-quality rear camera for selfies and vlogging. Position your phone in the holder with the rear camera facing the mirror. Adjust the mirror's angle to see your reflection and frame your shot.

Image: A smartphone mounted on the tripod, showcasing the integrated selfie mirror that allows users to frame shots using the rear camera.
4.3 Attaching Multiple Devices and Accessories
The tripod is designed to accommodate multiple devices. Additional phone holders or tablet mounts (sold separately) can be attached to the telescopic pole at various points. The integrated accessory tray provides a convenient spot for power banks, remote controls, or other small items.

Image: The tripod configured to hold both a smartphone and a tablet, with an accessory tray positioned below for convenience during live streams or recordings.
4.4 Video Demonstration
For a visual guide on setting up and operating your Chapter Seven Phone Tripod, please watch the official product video below:
Video: An official demonstration video showcasing the features, setup, and various uses of the Chapter Seven Phone Tripod, including its adjustable height, flexible gooseneck, and multi-device support.
5. Maintenance
- Cleaning: Wipe the tripod's carbon steel body and plastic components with a soft, damp cloth. Avoid abrasive cleaners or solvents that could damage the finish.
- Storage: When not in use, collapse the tripod to its minimum size and store it in the provided carry bag. Store in a dry place away from extreme temperatures.
- Inspection: Periodically check all locking mechanisms, screws, and joints for tightness. Tighten any loose parts to ensure continued stability.
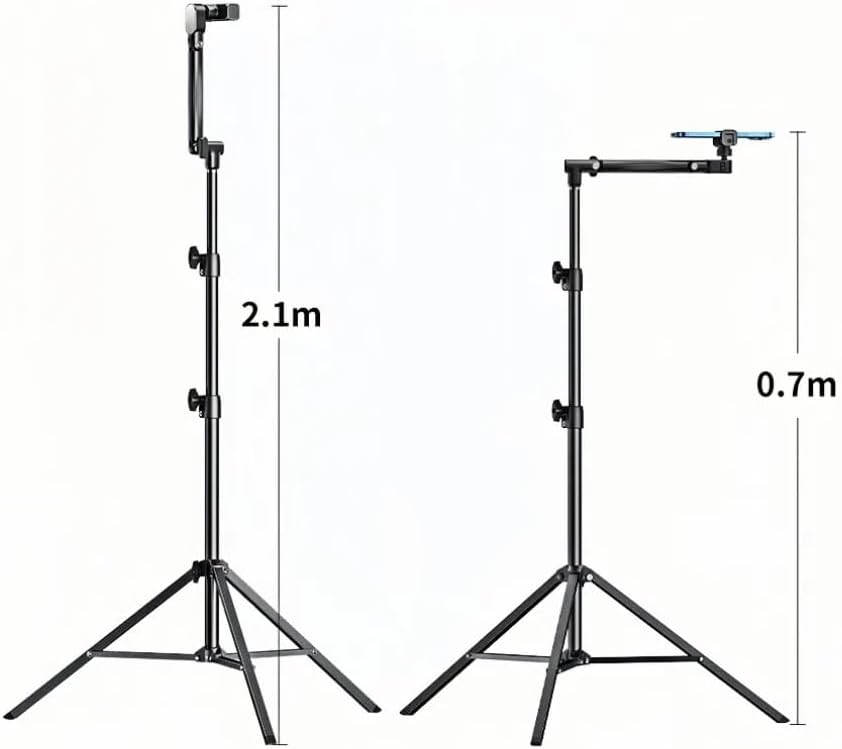
Image: The tripod shown in its collapsed state, ready for storage or transport in its accompanying carry bag.
6. Troubleshooting
- Tripod feels unstable: Ensure the legs are fully extended and the base is on a flat, level surface. Check that all height adjustment clamps are securely tightened. Avoid over-extending the legs beyond their stable range.
- Phone mount difficult to remove/attach for storage: The phone mount bracket may need to be removed for the tripod to fit into the carry bag. Exercise care when attaching and detaching to avoid stressing the plastic components.
- Limited angle adjustment at the top joint: The primary gooseneck offers extensive multi-directional movement. The ball head on the phone mount provides 360-degree rotation and tilt. If a specific angle is not achievable, try adjusting both the gooseneck and the ball head.
- Phone not fitting securely: Ensure your phone's width is within the compatible range of 2.8" to 5.7". Remove bulky phone cases if necessary to achieve a secure fit.
- Tripod is too heavy for outdoor use: While made of carbon steel for stability, the tripod is designed to be portable when collapsed. Utilize the carry bag for easier transport.
7. Specifications
| Brand | Chapter Seven |
| Model Name | 82-inch Adjustable Phone Tripod |
| Material | Carbon steel |
| Maximum Height | 82 Inches (2.1 meters) |
| Item Weight | 2.7 pounds |
| Package Dimensions | 24 x 3.25 x 3.15 inches |
| Compatible Devices | Smartphones (2.8" to 5.7"), Cameras, Webcams |
| Special Features | Foldable, Gooseneck, Includes Cover, Telescopic |
8. Safety Information
- Always ensure the tripod is placed on a stable, level surface before mounting any device.
- Do not overload the tripod beyond its intended weight capacity.
- Securely tighten all locking mechanisms after adjusting height or angle to prevent accidental collapse.
- Keep hands and fingers clear of moving parts during adjustment.
- Avoid using the tripod in strong winds or unstable outdoor conditions that could cause it to tip over.
9. Warranty and Support
This product is subject to a standard 30-day return policy. For any product inquiries, technical support, or warranty claims, please contact Chapter Seven customer service through your retailer or the official brand website. Please retain your proof of purchase for warranty purposes.