CUIPPWRJ CUIPPWRJ123
Carburetor Installation and Maintenance Manual
Model: CUIPPWRJ123 | Brand: CUIPPWRJ
Introduction
This manual provides detailed instructions for the proper installation, operation, and maintenance of your new CUIPPWRJ Carburetor with Gasket. This carburetor is designed to be a direct replacement part for Loncin LC1P92F, LC1P92F1, LC1P90F, 1P90, 1P92, 1P90F, 1P92F 452cc Vertical Axis Engines, ensuring optimal engine performance and longevity.
Product Features:
- Durable: Built to last and perform under various conditions.
- Compatible: Specifically designed to fit various Loncin engine models.
- Efficient: Helps restore and maintain optimal engine performance.
- Versatile: Works with a range of compatible engine brands and models.
- Affordable: A cost-effective solution for carburetor replacement.
Setup and Installation
Proper installation is crucial for the correct function of your new carburetor. Please follow these steps carefully.
Safety Precautions:
- Always ensure the engine is cool before beginning any work.
- Disconnect the spark plug wire to prevent accidental starting.
- Work in a well-ventilated area.
- Have a fire extinguisher nearby when working with fuel.
- Wear appropriate personal protective equipment, such as gloves and eye protection.
Tools Required:
- Wrench set (metric and/or imperial, depending on engine fasteners)
- Screwdriver set (flathead and Phillips)
- Pliers
- Fuel line clamps or pinch-off tool
- Container for draining fuel
- Clean rags
Installation Steps:
- Prepare the Engine: Turn off the engine and allow it to cool completely. Disconnect the spark plug wire. Place a suitable container under the fuel line to catch any spilled fuel.
- Remove Air Filter Assembly: Loosen and remove the bolts or clamps securing the air filter housing and air filter. Carefully detach the air filter assembly from the carburetor.
- Disconnect Fuel Line: Use fuel line clamps to pinch off the fuel line leading to the carburetor. Disconnect the fuel line from the carburetor's fuel inlet.
- Disconnect Linkages: Carefully note and disconnect all throttle and choke linkages, springs, and wires attached to the carburetor. Taking a photo before disconnecting can be helpful.
- Remove Old Carburetor: Loosen and remove the mounting bolts that secure the carburetor to the engine's intake manifold. Carefully remove the old carburetor and any old gaskets.
- Install New Gasket: Ensure the mounting surface on the engine is clean. Place the new gasket (included with your carburetor) onto the mounting studs or surface.
- Mount New Carburetor: Carefully position the new CUIPPWRJ carburetor onto the mounting studs, aligning it with the gasket. Secure it with the mounting bolts, tightening them evenly to prevent warping.
- Reconnect Linkages: Reattach all throttle and choke linkages, springs, and wires to their correct positions on the new carburetor. Ensure they move freely without binding.
- Reconnect Fuel Line: Remove the fuel line clamps and securely connect the fuel line to the carburetor's fuel inlet. Ensure there are no kinks or leaks.
- Reinstall Air Filter Assembly: Reattach the air filter housing and air filter. Ensure all connections are secure.
- Final Checks: Double-check all connections, bolts, and linkages. Ensure no tools or debris are left near the engine. Reconnect the spark plug wire.

Figure 1: Front view of the CUIPPWRJ carburetor, showing the main body, fuel bowl, and various linkages.
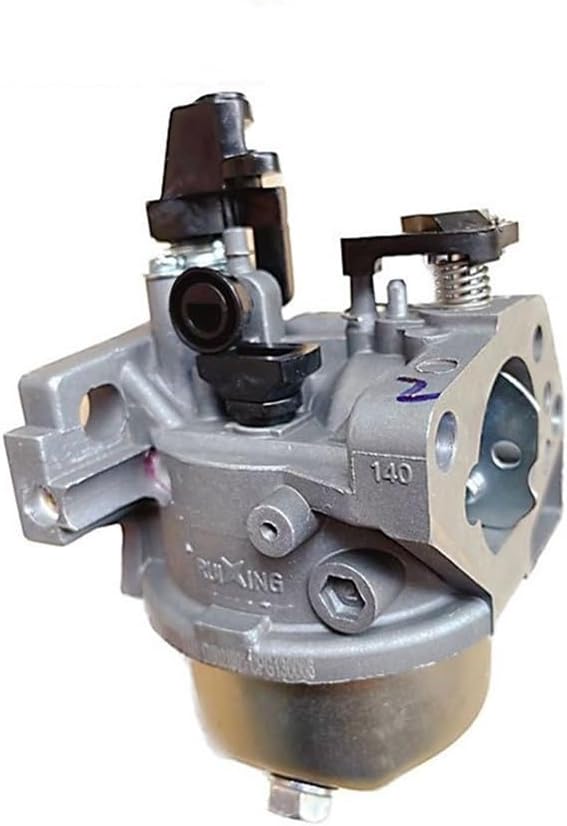
Figure 2: Angled view of the CUIPPWRJ carburetor, highlighting the intake manifold side and mounting points for installation.

Figure 3: Side view of the CUIPPWRJ carburetor, showing the fuel inlet and potential adjustment screws.

Figure 4: Front view of the carburetor with a red arrow indicating a 27mm measurement, likely the intake bore diameter.

Figure 5: Angled view of the carburetor with a red arrow indicating a 53mm measurement, likely the distance between mounting holes.
Operating Instructions
After successful installation, follow these general steps to operate your engine.
- Fuel Tank: Ensure the engine's fuel tank is filled with fresh, clean fuel appropriate for your engine type.
- Choke Position: For a cold engine, move the choke lever to the 'FULL CHOKE' position. For a warm engine, the choke may not be necessary or only require a partial choke.
- Starting: Follow your engine manufacturer's specific starting procedure (e.g., pull start, electric start).
- Warm-up: Once the engine starts, gradually move the choke lever to the 'RUN' position as the engine warms up and runs smoothly.
- Operation: Allow the engine to run for a few minutes to reach operating temperature before putting it under load.
Maintenance
Regular maintenance of your carburetor and engine components will ensure long-lasting performance.
- Air Filter: Regularly inspect and clean or replace the air filter. A clogged air filter can restrict airflow to the carburetor, leading to poor engine performance.
- Fuel Quality: Always use fresh, clean fuel. Stale or contaminated fuel can cause deposits in the carburetor, leading to starting or running issues. Consider using a fuel stabilizer if storing the engine for extended periods.
- Fuel Filter: Check and replace the fuel filter (if equipped) periodically to prevent debris from reaching the carburetor.
- Carburetor Cleaning: If the engine experiences persistent issues like rough idling, stalling, or difficulty starting, the carburetor may require cleaning. This typically involves disassembling the carburetor, cleaning jets and passages with carburetor cleaner, and replacing gaskets. It is recommended to consult a qualified technician for complex carburetor cleaning or adjustments.
- Linkage Inspection: Periodically check all throttle and choke linkages for proper movement and ensure they are not binding or loose.
Troubleshooting
This section provides solutions to common issues you might encounter after carburetor installation.
| Problem | Possible Cause | Solution |
|---|---|---|
| Engine will not start | No fuel reaching carburetor; clogged fuel filter; incorrect choke setting; spark plug issue. | Check fuel level and quality. Ensure fuel valve is open. Inspect fuel filter. Adjust choke. Check spark plug. |
| Engine starts then stalls | Improper choke adjustment; fuel delivery issue; carburetor jets clogged. | Gradually move choke to RUN. Check fuel flow. Clean carburetor jets if necessary. |
| Rough idle or poor performance | Dirty air filter; carburetor out of adjustment; stale fuel; vacuum leak. | Clean/replace air filter. Use fresh fuel. Inspect carburetor mounting and gaskets for leaks. Adjust idle screw if accessible and knowledgeable. |
| Fuel leaks from carburetor | Improperly seated gasket; loose fuel line connection; damaged fuel bowl or float. | Ensure carburetor mounting bolts are tightened evenly. Check fuel line connections. Inspect fuel bowl and float for damage. |
Product Specifications
| Attribute | Detail |
|---|---|
| Manufacturer | CUIPPWRJ |
| Brand | CUIPPWRJ |
| Model | CUIPPWRJ123 |
| Item Weight | 1.76 ounces |
| Package Dimensions | 0.39 x 0.39 x 0.39 inches |
| Item Model Number | CUIPPWRJ123 |
| Manufacturer Part Number | CUIPPWRJ123 |
| ASIN | B0F84KRFZX |
| Date First Available | May 9, 2025 |
Warranty Information
This product is covered by a standard return policy. Please refer to your purchase documentation for specific terms and conditions.
- Return Policy: This product is eligible for a 30-day return policy from the date of purchase. Returns are subject to the seller's terms and conditions.
- Coverage: The warranty typically covers defects in materials and workmanship under normal use. It does not cover damage caused by improper installation, misuse, neglect, accidents, or unauthorized modifications.
- Claim Process: For warranty claims or returns, please contact the seller or retailer from whom you purchased the product, providing your proof of purchase.
Customer Support
If you have any questions, require technical assistance, or need to report an issue with your CUIPPWRJ Carburetor, please contact the seller or manufacturer directly through the platform where the purchase was made. Provide your product model number (CUIPPWRJ123) and purchase details for faster service.
For additional resources, you may also refer to the official Loncin engine manuals for your specific engine model, as they may contain further details on carburetor system integration and maintenance.
Ask a question about this manual
Ask about setup, troubleshooting, compatibility, parts, safety, or missing instructions. Manuals+ will review the question and use this page’s manual context to help answer it.