1. Introduction
This instruction manual provides essential information for the safe and effective use of the EFZRZYJ TX1-10K Electromechanical Relay. Please read this manual thoroughly before installation and operation to ensure proper functionality and to prevent damage to the device or associated equipment.
2. Product Overview
The EFZRZYJ TX1-10K is a general-purpose electromechanical relay designed for various industrial and electronic applications. It operates based on electromagnetic theory, providing a sealed protective feature and suitable for low power contact loads.
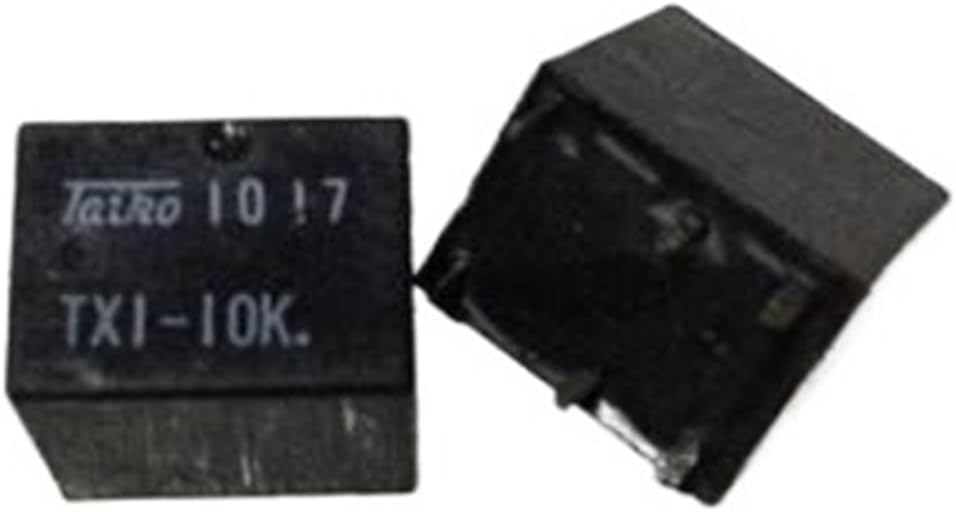
Figure 1: Two EFZRZYJ TX1-10K Electromechanical Relays. The relay on the left clearly displays the model number "TX1-10K" and "TatRo 1017" markings. The relay on the right is shown from a side angle, revealing its compact, rectangular form factor and DIP6 pin configuration.
3. Specifications
| Feature | Detail |
|---|---|
| Model Number | TX1-10K |
| Brand | EFZRZYJ |
| Theory | Electromagnetic Relay |
| Protection Feature | Sealed |
| Contact Load | Low Power |
| Usage | General Purpose |
| Package Dimensions | 5.12 x 3.54 x 3.15 inches |
| Item Weight | 1.76 ounces |
4. Setup and Installation
Proper installation is crucial for the reliable operation of the TX1-10K relay. Always ensure power is disconnected before handling electrical components.
- Safety First: Disconnect all power to the circuit where the relay will be installed. Verify with a multimeter.
- Identify Pins: Refer to the relay's datasheet (not provided in this manual, typically available from manufacturer) to identify the coil pins and contact pins. The TX1-10K is a DIP6 package, meaning it has 6 pins.
- Mounting: Insert the relay pins into the appropriate sockets on a PCB (Printed Circuit Board) or breadboard. Ensure correct orientation.
- Wiring the Coil: Connect the coil pins to the control circuit that will energize the relay. Observe polarity if the relay coil is polarized (check datasheet).
- Wiring the Contacts: Connect the load circuit to the relay's contact pins. Ensure the load's voltage and current ratings do not exceed the relay's specifications.
- Verify Connections: Double-check all wiring for correctness and secure connections before reapplying power.
Note: If you are unsure about any step, consult a qualified electrician or electronics technician.
5. Operating Instructions
The TX1-10K relay operates by using an electrical current to activate an electromagnet, which in turn opens or closes electrical contacts, thereby controlling a separate circuit.
- Energizing the Coil: When the specified voltage is applied across the relay's coil pins, the coil becomes energized, creating a magnetic field.
- Contact Actuation: This magnetic field attracts an armature, causing the internal contacts to switch their state (e.g., from Normally Open (NO) to Closed, or Normally Closed (NC) to Open).
- Load Control: The switched contacts then complete or break the circuit connected to the load, controlling its operation.
- De-energizing the Coil: When the voltage is removed from the coil, the magnetic field collapses, and a spring returns the contacts to their original state.
Ensure the control voltage for the coil and the load voltage/current for the contacts are within the relay's specified operating ranges to prevent damage and ensure longevity.
6. Maintenance
The EFZRZYJ TX1-10K relay is a sealed unit and generally requires minimal maintenance. However, periodic checks can help ensure its continued reliable operation.
- Visual Inspection: Periodically inspect the relay and its connections for any signs of physical damage, discoloration, or loose wiring.
- Environmental Conditions: Ensure the operating environment remains within the specified temperature and humidity ranges to prevent premature failure.
- Cleaning: If dust or debris accumulates around the relay, gently clean the area using a soft, dry brush or compressed air. Do not use liquids directly on the relay.
- Contact Wear: While sealed, excessive arcing due to overcurrent or frequent switching can degrade internal contacts over time. If the relay exhibits inconsistent operation, it may need replacement.
7. Troubleshooting
If the TX1-10K relay is not functioning as expected, consider the following troubleshooting steps:
| Problem | Possible Cause | Solution |
|---|---|---|
| Relay does not switch | No power to coil, incorrect coil voltage, faulty coil, incorrect wiring. | Check coil power supply. Verify coil voltage matches relay specification. Test coil resistance (if possible). Recheck wiring connections. |
| Load does not activate/deactivate | Faulty contacts, incorrect load wiring, load circuit issue. | Check continuity across contacts when coil is energized/de-energized. Verify load circuit wiring. Test the load independently. |
| Relay makes clicking sound but load doesn't switch | Contacts are switching but not making good connection, load circuit open. | This indicates internal contact issues or a problem with the load circuit. Consider replacing the relay or checking the load circuit thoroughly. |
| Overheating or burning smell | Overcurrent through contacts, incorrect coil voltage, short circuit. | Immediately disconnect power. Check load current against relay contact rating. Verify coil voltage. Inspect for short circuits. Replace damaged relay. |
If troubleshooting steps do not resolve the issue, the relay may be faulty and require replacement.
8. Warranty and Support
Specific warranty information for the EFZRZYJ TX1-10K Electromechanical Relay is not provided in this manual. For details regarding warranty coverage, technical support, or replacement parts, please contact the original seller or the manufacturer, EFZRZYJ, directly.
Always retain your proof of purchase for warranty claims.