VEVOR SPN003
VEVOR Volleyball Setter Training Equipment User Manual
Model: SPN003
1. Introduction
This manual provides detailed instructions for the assembly, operation, and maintenance of your VEVOR Volleyball Setter Training Equipment. Please read this manual thoroughly before use to ensure proper function and safety.
2. Safety Instructions
- Always ensure all components are securely fastened before use.
- Use the provided sandbags to stabilize the net, especially in outdoor or windy conditions.
- Wear the provided rubber gloves during assembly to protect your hands from potential fiberglass or sharp edges.
- Keep children and pets away from the equipment during assembly and operation.
- Do not hang or climb on the net or frame.
- Inspect the equipment regularly for wear and tear. Discontinue use if any damage is observed.
3. Package Contents

The VEVOR Volleyball Setter Training Equipment package includes all necessary components for assembly and immediate use. Please verify that all items listed below are present before beginning assembly.
- 1 x Volleyball Training Net System
- 1 x Portable Bag
- 1 x Pair of Rubber Gloves
- 1 x Manual (this document)
- 1 x Set of Assembly Accessories (bolts, nuts, washers)
- 4 x Sandbags
- 4 x Wheels (casters)
Note: Please wear gloves when setting up, in case the fiberglass will hurt your hands.
4. Setup and Assembly
Follow these steps to assemble your VEVOR Volleyball Setter Training Equipment. It is recommended to have two people for easier assembly.
4.1 Frame Assembly
- Unpack all components and lay them out on a clean, flat surface.
- Attach the four wheels (casters) to the base frame using the provided bolts and nuts. Ensure the locking brakes are facing outwards for easy access.
- Connect the vertical support poles to the base frame. Secure them firmly with the assembly accessories.

Figure 4.1: Attaching the omni-directional wheels to the base frame. The wheels feature locking brakes for stability.
4.2 Net and Target Frame Installation
- Attach the main net assembly to the vertical support poles. Ensure the net is properly aligned and secured at the top and bottom.
- Install the red target frame at the top of the net system. This frame is designed to improve accuracy during training.
- Connect the mesh ball collection pouch to the bottom of the net system and the base frame. This pouch will collect balls after they pass through the net.

Figure 4.2: Fully assembled training equipment, ready for use. Note the integrated ball collection system.

Figure 4.3: Details of the integrated target frame for accuracy and the mesh ball pouch for efficient ball collection.
4.3 Stabilization
For enhanced stability, especially during intense training or outdoor use, utilize the provided sandbags.
- Fill the four sandbags with sand (sand not included).
- Place one sandbag on each corner of the base frame to provide additional weight and prevent tipping.

Figure 4.4: Overview of the reinforced structure, including the placement of sandbags for stability.
5. Operating Instructions
The VEVOR Volleyball Setter Training Equipment is designed for versatile training. Here's how to optimize its use:
5.1 Adjusting Height and Angle
The equipment offers adjustable height and angle settings to accommodate various training needs and player heights.
- Height Adjustment: The net system can be adjusted from 6.3 ft to 10.8 ft. Locate the height adjustment pin on the vertical support pole. Pull the pin, slide the upper section to the desired height, and re-insert the pin to lock it in place. There are 5 distinct height settings.
- Angle Adjustment: The target frame can be adjusted to 4 different angles (70°, 80°, 90°, 110°) to simulate various shot trajectories. Adjust the angle by loosening the locking mechanism near the target frame, setting the desired angle, and re-tightening to secure.
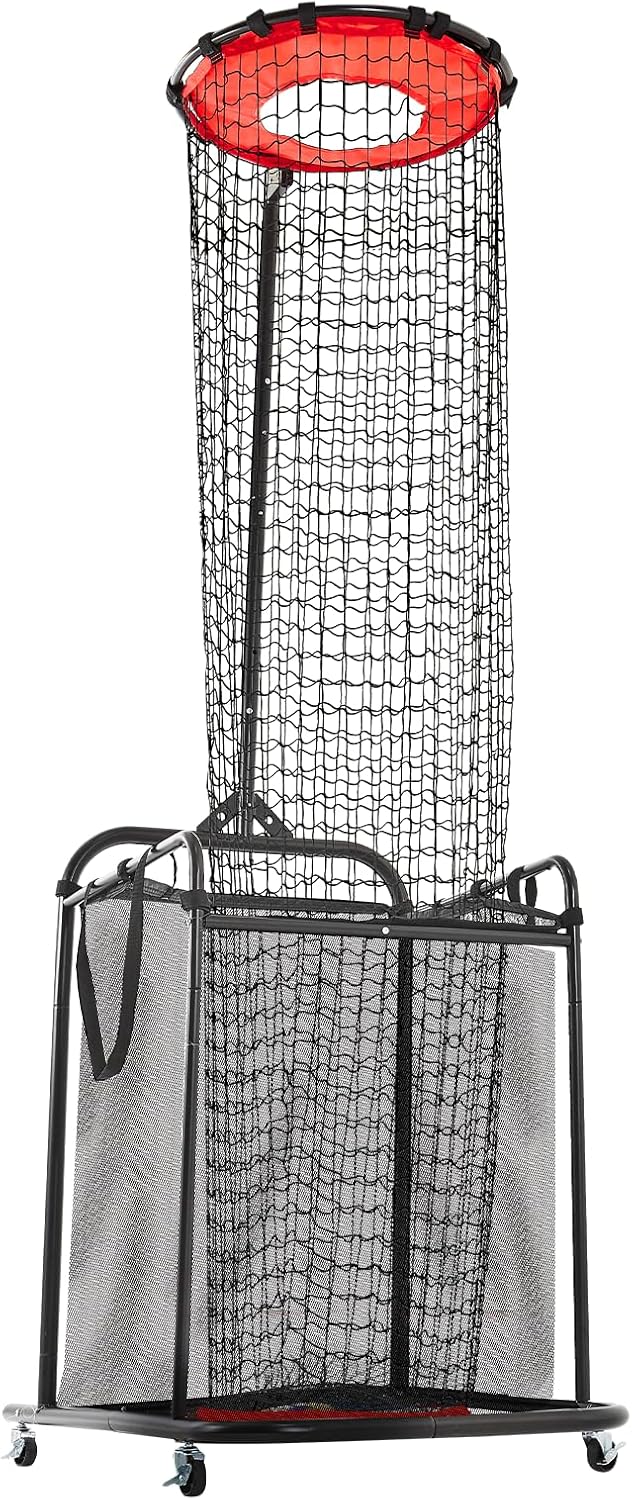
Figure 5.1: Illustration of height and angle adjustment mechanisms.
5.2 Mobility and Placement
The integrated wheels allow for easy repositioning of the equipment.
- To move the equipment, ensure the locking brakes on the wheels are disengaged.
- Roll the equipment to your desired training location (indoor gym, lawn, playground, etc.).
- Once in position, engage the locking brakes on all four wheels to secure the equipment during use.

Figure 5.2: The equipment is suitable for various training environments due to its portability.
5.3 Ball Collection
The integrated mesh ball pouch automatically collects balls that pass through the net, reducing retrieval time.
- Ensure the mesh pouch is properly attached to the frame before training.
- After training, the collected balls can be easily accessed from the pouch.
6. Maintenance
- Cleaning: Wipe down the steel frame with a damp cloth as needed. The net can be gently cleaned with mild soap and water. Ensure all parts are dry before storage.
- Inspection: Regularly check all bolts, nuts, and connections to ensure they are tight. Inspect the net for any tears or damage.
- Storage: When not in use, store the equipment in a dry, sheltered area to prolong its lifespan. The included portable bag can be used for convenient storage and transport.
7. Troubleshooting
| Problem | Possible Cause | Solution |
|---|---|---|
| Equipment is unstable or wobbles. | Wheels not locked; uneven surface; sandbags not used or filled. | Ensure all four wheel brakes are engaged. Move to a flat surface. Fill and place sandbags on the base. |
| Height/Angle adjustment is difficult. | Adjustment pin/mechanism is stuck or not fully disengaged. | Ensure the pin is fully pulled out or the locking mechanism is completely loosened before attempting to adjust. Do not force. |
| Balls are not collecting properly in the pouch. | Pouch is not securely attached or is full. | Verify the mesh pouch is correctly attached to the net and frame. Empty the pouch if it is full. |
8. Specifications
| Feature | Detail |
|---|---|
| Model Number | SPN003 |
| Material | Durable PE Net + Steel Frame |
| Net Weight | 22 lbs / 10 kg |
| Adjustable Height Range | 6.3 ft to 10.8 ft (5 settings) |
| Adjustable Angle | 70°, 80°, 90°, 110° (4 settings) |
| Mobility | 4 Omni-directional wheels with locking brakes |
| Color | Black |
| UPC | 197988879398 |
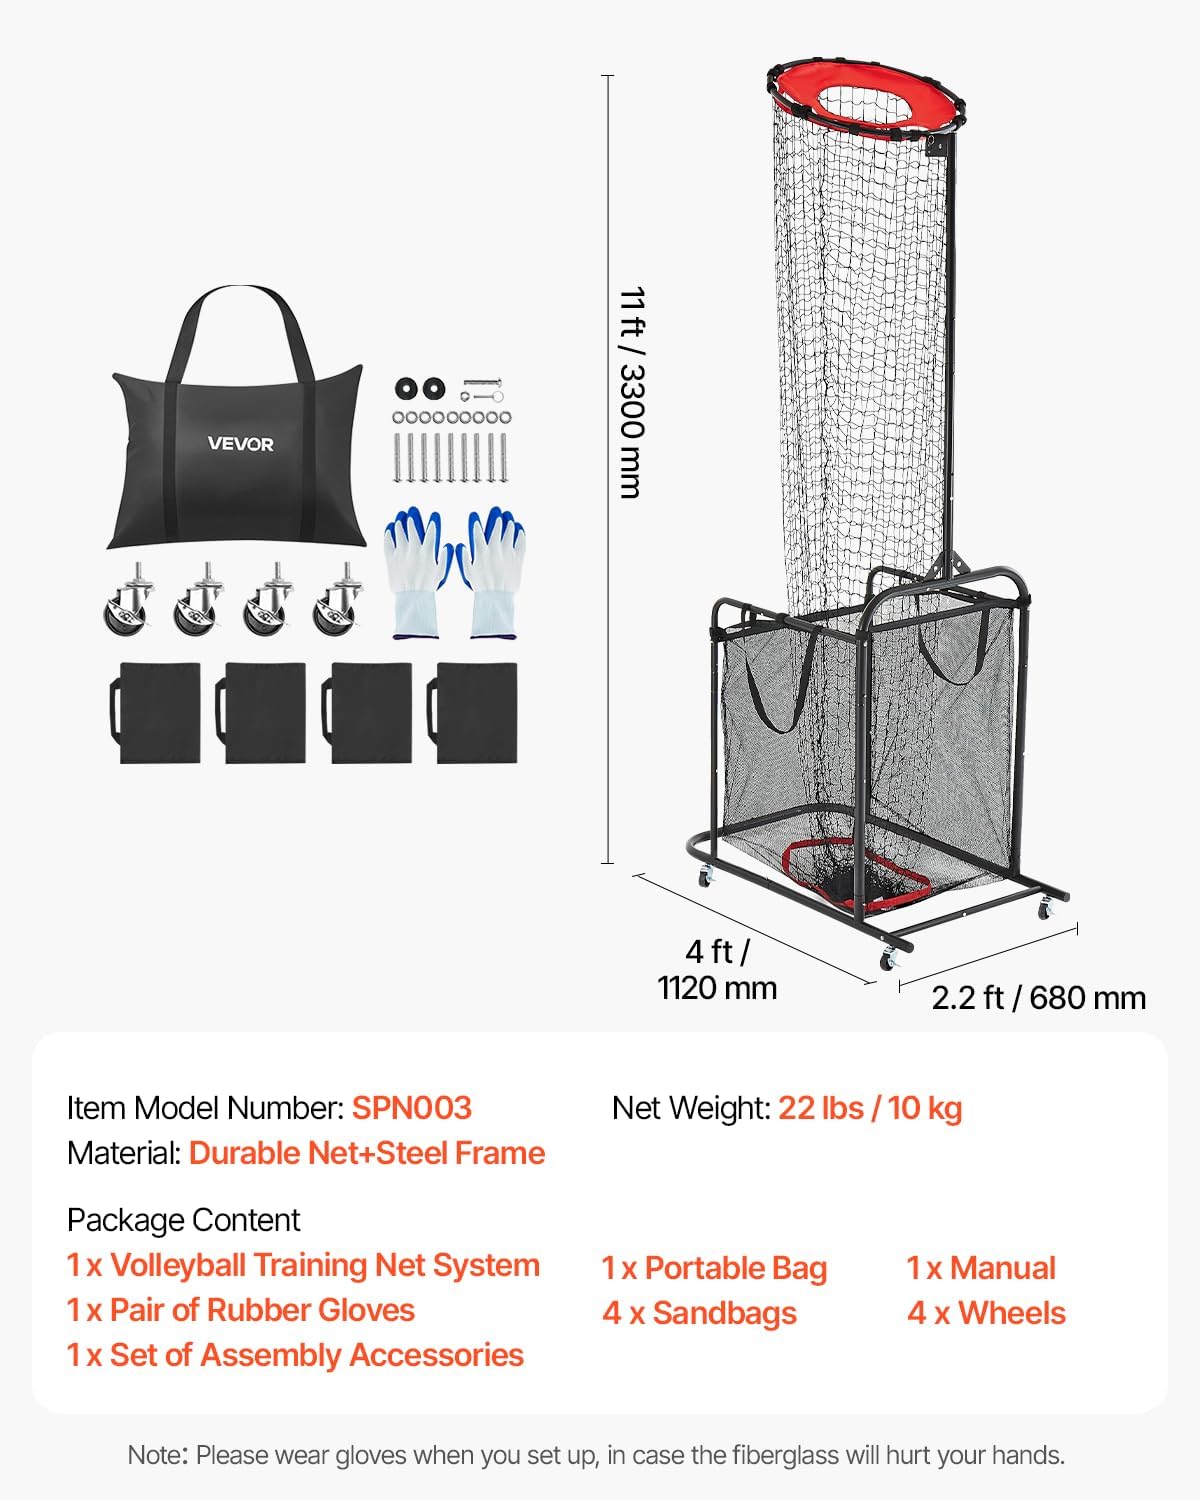
Figure 8.1: Detailed dimensions and key specifications of the equipment.
9. Warranty and Support
VEVOR products are designed for durability and performance. For warranty information, product support, or to purchase replacement parts, please visit the official VEVOR website or contact their customer service directly.
VEVOR Official Website: www.vevor.com
Please have your model number (SPN003) and purchase details ready when contacting support.
Ask a question about this manual
Ask about setup, troubleshooting, compatibility, parts, safety, or missing instructions. Manuals+ will review the question and use this page’s manual context to help answer it.