1. Introduction
This manual provides detailed instructions for the installation, operation, and maintenance of your ETLFUCyber Qualcomm 8-Core Car Radio. This unit is specifically designed for Mercedes Benz Smart Fortwo models manufactured between 2011 and 2015. It features a 9-inch touchscreen, Android 15 operating system, Qualcomm chip, 4GB RAM, 64GB ROM, Wireless CarPlay, Android Auto, GPS, Bluetooth 5.1, FM/RDS radio, and DSP audio processing.
2. Safety Information
- Read all instructions carefully before installation and use.
- Professional installation is recommended to avoid damage to the vehicle's electrical system or the unit.
- Do not operate the unit in a way that distracts you from driving. Always prioritize road safety.
- Ensure all wiring is correctly connected and insulated to prevent short circuits.
- Keep the unit away from water and excessive moisture.
3. Package Contents
Verify that all items are present in the package:
- ETLFUCyber Car Radio Unit
- Power Harness
- GPS Antenna
- USB Cables
- External Microphone
- Rear View Camera (if included in your specific package)
- Installation Brackets and Screws
4. Product Overview
The ETLFUCyber car radio is an advanced infotainment system designed to integrate seamlessly into your Mercedes Benz Smart Fortwo. It features a powerful Qualcomm 8-Core processor, 4GB of RAM, and 64GB of internal storage for smooth performance and ample space for applications.
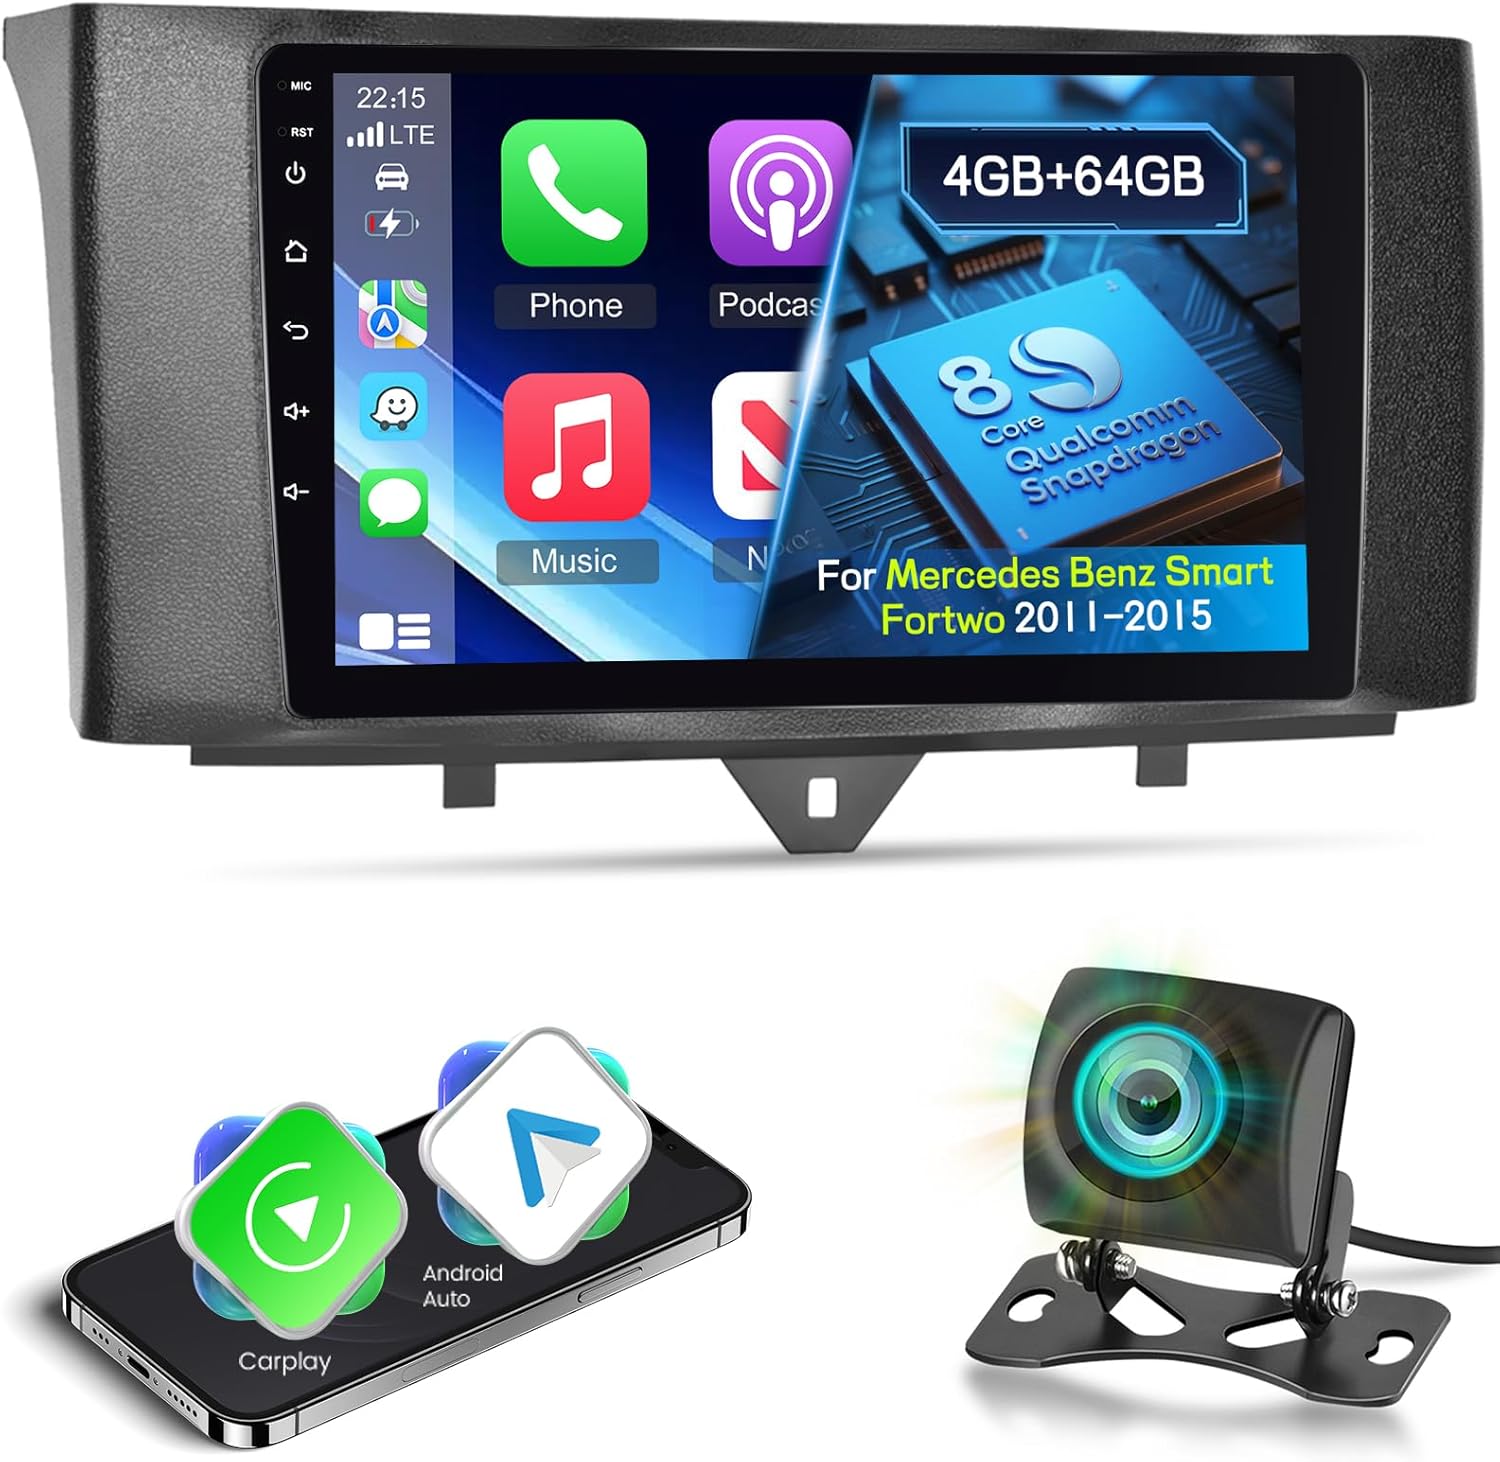
Image 4.1: The ETLFUCyber car radio unit shown with a backup camera and smartphone icons, illustrating its core functionalities.

Image 4.2: Diagram illustrating the internal components, including the 8-Core Qualcomm Chip, 4GB RAM, and 64GB ROM, highlighting the Android system.
5. Installation and Setup
This unit is designed for direct fitment in Mercedes Benz Smart Fortwo models from 2011 to 2015. Ensure your vehicle's dashboard matches the compatible design before proceeding with installation.
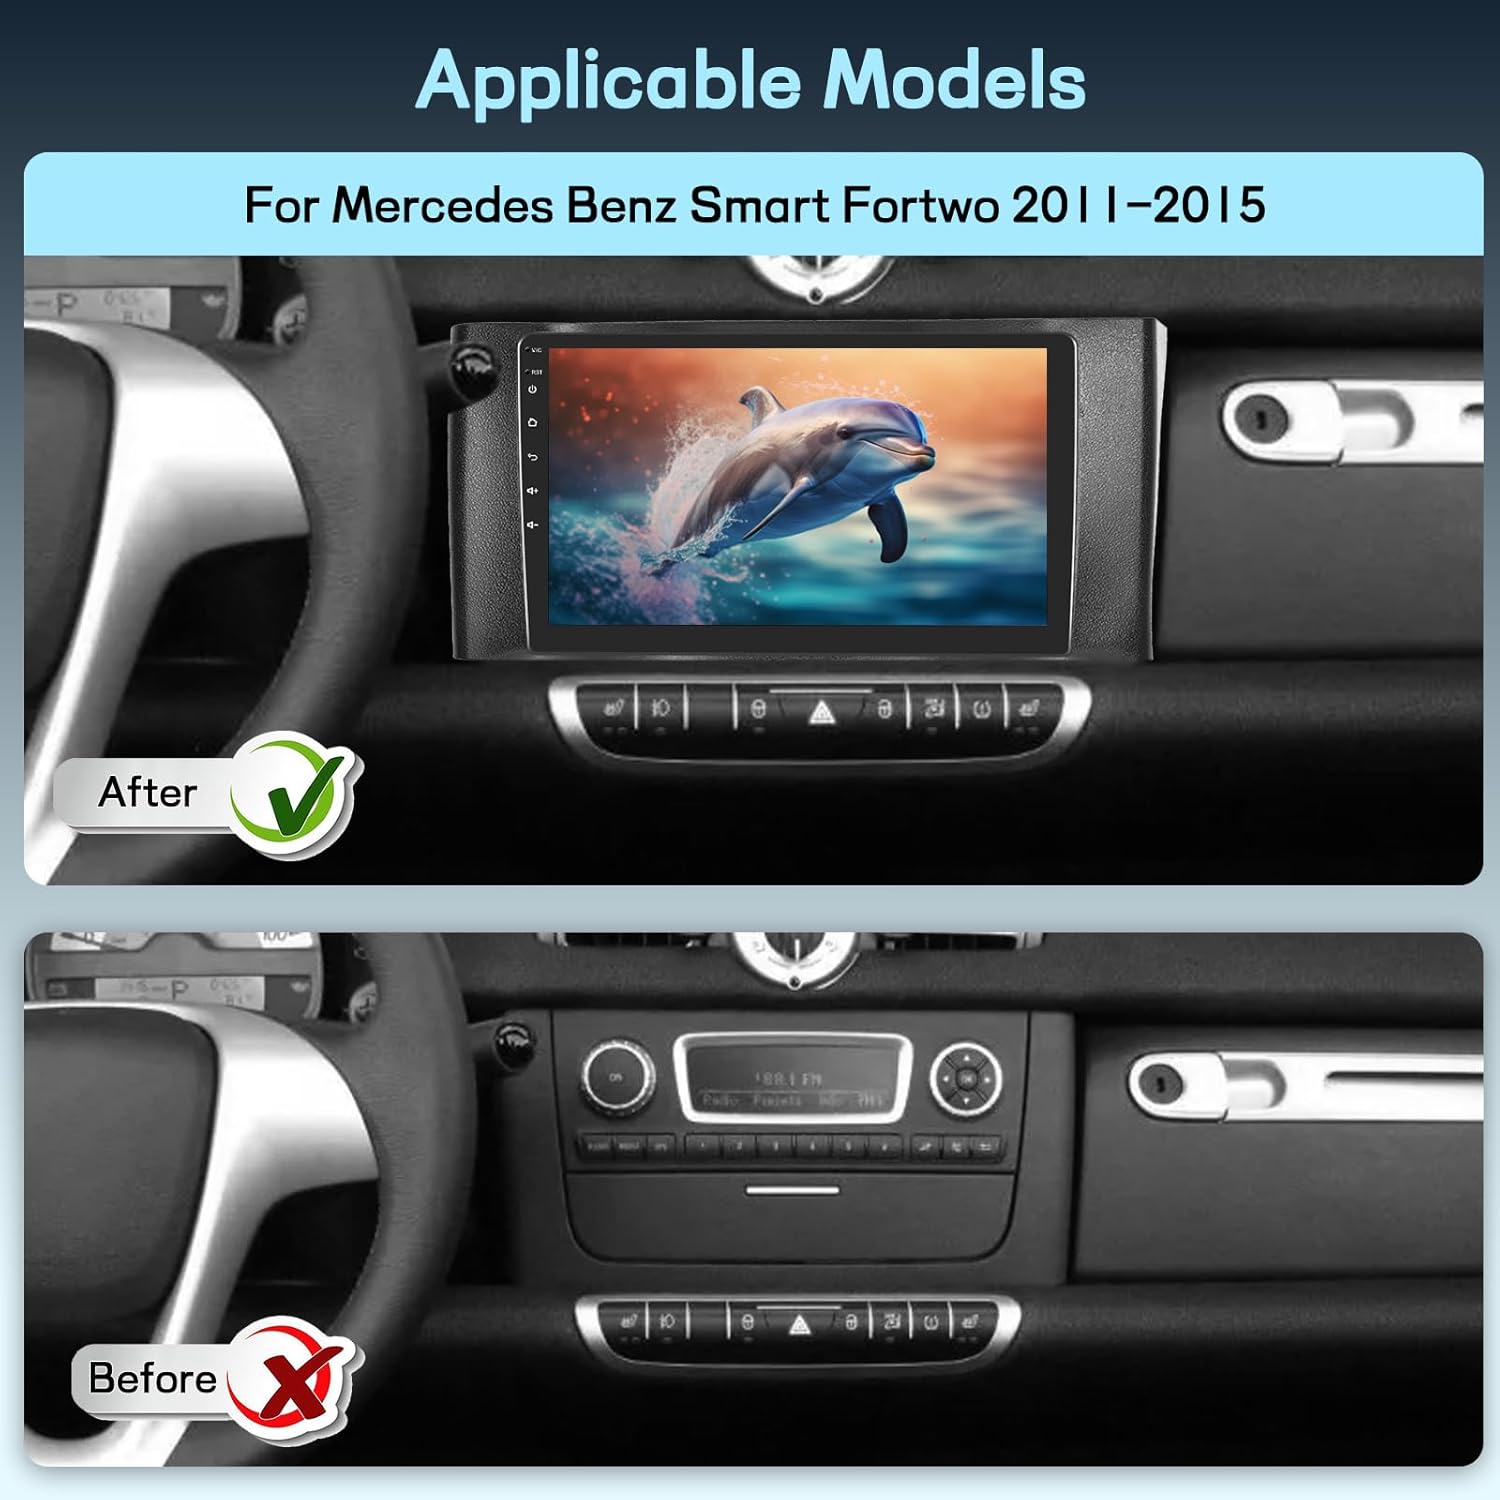
Image 5.1: Comparison of the vehicle's dashboard before and after the installation of the 9-inch car radio, demonstrating compatibility and fit.
5.1 Basic Installation Steps
- Disconnect Battery: Before starting, disconnect the negative terminal of your vehicle's battery to prevent electrical shorts.
- Remove Old Radio: Carefully remove the existing car radio and trim panels. Refer to your vehicle's service manual for specific instructions.
- Connect Wiring Harness: Connect the provided wiring harness to the vehicle's factory harness. Ensure all connections are secure.
- Connect Antennas: Connect the GPS antenna and any other relevant antennas (e.g., WiFi, 4G if applicable). Position the GPS antenna in a location with a clear view of the sky.
- Connect Peripherals: Connect the external microphone, USB cables, and the rear view camera cable (if installing).
- Test Unit: Before fully reassembling the dashboard, reconnect the battery and power on the unit to test basic functions (power, sound, touchscreen, GPS signal).
- Secure Unit: Mount the new car radio into the dashboard using the provided brackets and screws.
- Reassemble Dashboard: Carefully reattach all trim panels.
5.2 Initial Setup
- Language and Time: Upon first boot, set your preferred language, time zone, and date.
- WiFi Connection: Connect to a WiFi hotspot (e.g., from your smartphone) to enable online features, download maps, and update applications.
- GPS Calibration: Ensure the GPS antenna is properly connected and the unit acquires a satellite signal.
6. Operating Instructions
6.1 Wireless CarPlay and Android Auto
The unit supports both Wireless CarPlay and Android Auto, allowing seamless integration with your smartphone for navigation, music, calls, and messages.

Image 6.1: Display showing the Wireless CarPlay and Android Auto interfaces, with icons for phone, music, and navigation, demonstrating smartphone connectivity.
- Enable Bluetooth/WiFi: On your smartphone, enable Bluetooth and WiFi.
- Pair Device: On the car radio, go to the Bluetooth settings and pair with your smartphone.
- Launch CarPlay/Android Auto: Once paired, select the CarPlay or Android Auto icon on the car radio's main screen. Follow any on-screen prompts on your phone to grant permissions.
- Voice Control: Use the integrated voice assistant (Siri for CarPlay, Google Assistant for Android Auto) for hands-free operation.
6.2 GPS Navigation
The unit comes with built-in GPS functionality, supporting both online and offline maps.
- Online Maps: Connect to WiFi to use online navigation apps like Google Maps, Waze, etc.
- Offline Maps: Download map data for your region via a WiFi connection for navigation without internet access.
6.3 Bluetooth 5.1
Connect your smartphone via Bluetooth for hands-free calling and audio streaming.

Image 6.2: A multi-panel image showing Bluetooth call functionality, FM/RDS radio interface, DSP Hi-Res audio settings, and various user interface themes.
- Pairing: Go to Bluetooth settings, search for your phone, and pair.
- Hands-Free Calls: Make and receive calls directly from the unit's screen. The built-in microphone ensures clear communication.
- Audio Streaming: Play music from your phone through the car's speakers.
- Phonebook Sync: Your phonebook can be automatically uploaded to the unit.
6.4 FM/RDS Radio
Enjoy high-quality radio reception with FM and RDS features.
- Frequency Range: 87.5-108 MHz.
- Automatic Search: Use the auto-scan function to find available stations.
- Preset Stations: Save up to 18 of your favorite stations for quick access.
- RDS: Radio Data System displays station information, song titles, and traffic announcements where available.
6.5 DSP Hi-Res Audio
The Digital Signal Processor (DSP) allows for advanced audio tuning.
- Equalizer: Adjust frequency bands to customize your sound profile.
- Sound Field: Optimize the sound stage for an immersive listening experience.
- Bass/Treble Control: Fine-tune bass and treble levels.
6.6 Steering Wheel Control
Integrate with your vehicle's existing steering wheel controls for safe and convenient operation.

Image 6.3: Top panel shows the backup camera view with parking lines. Bottom panel illustrates the steering wheel control learning interface and common control buttons for calls and volume.
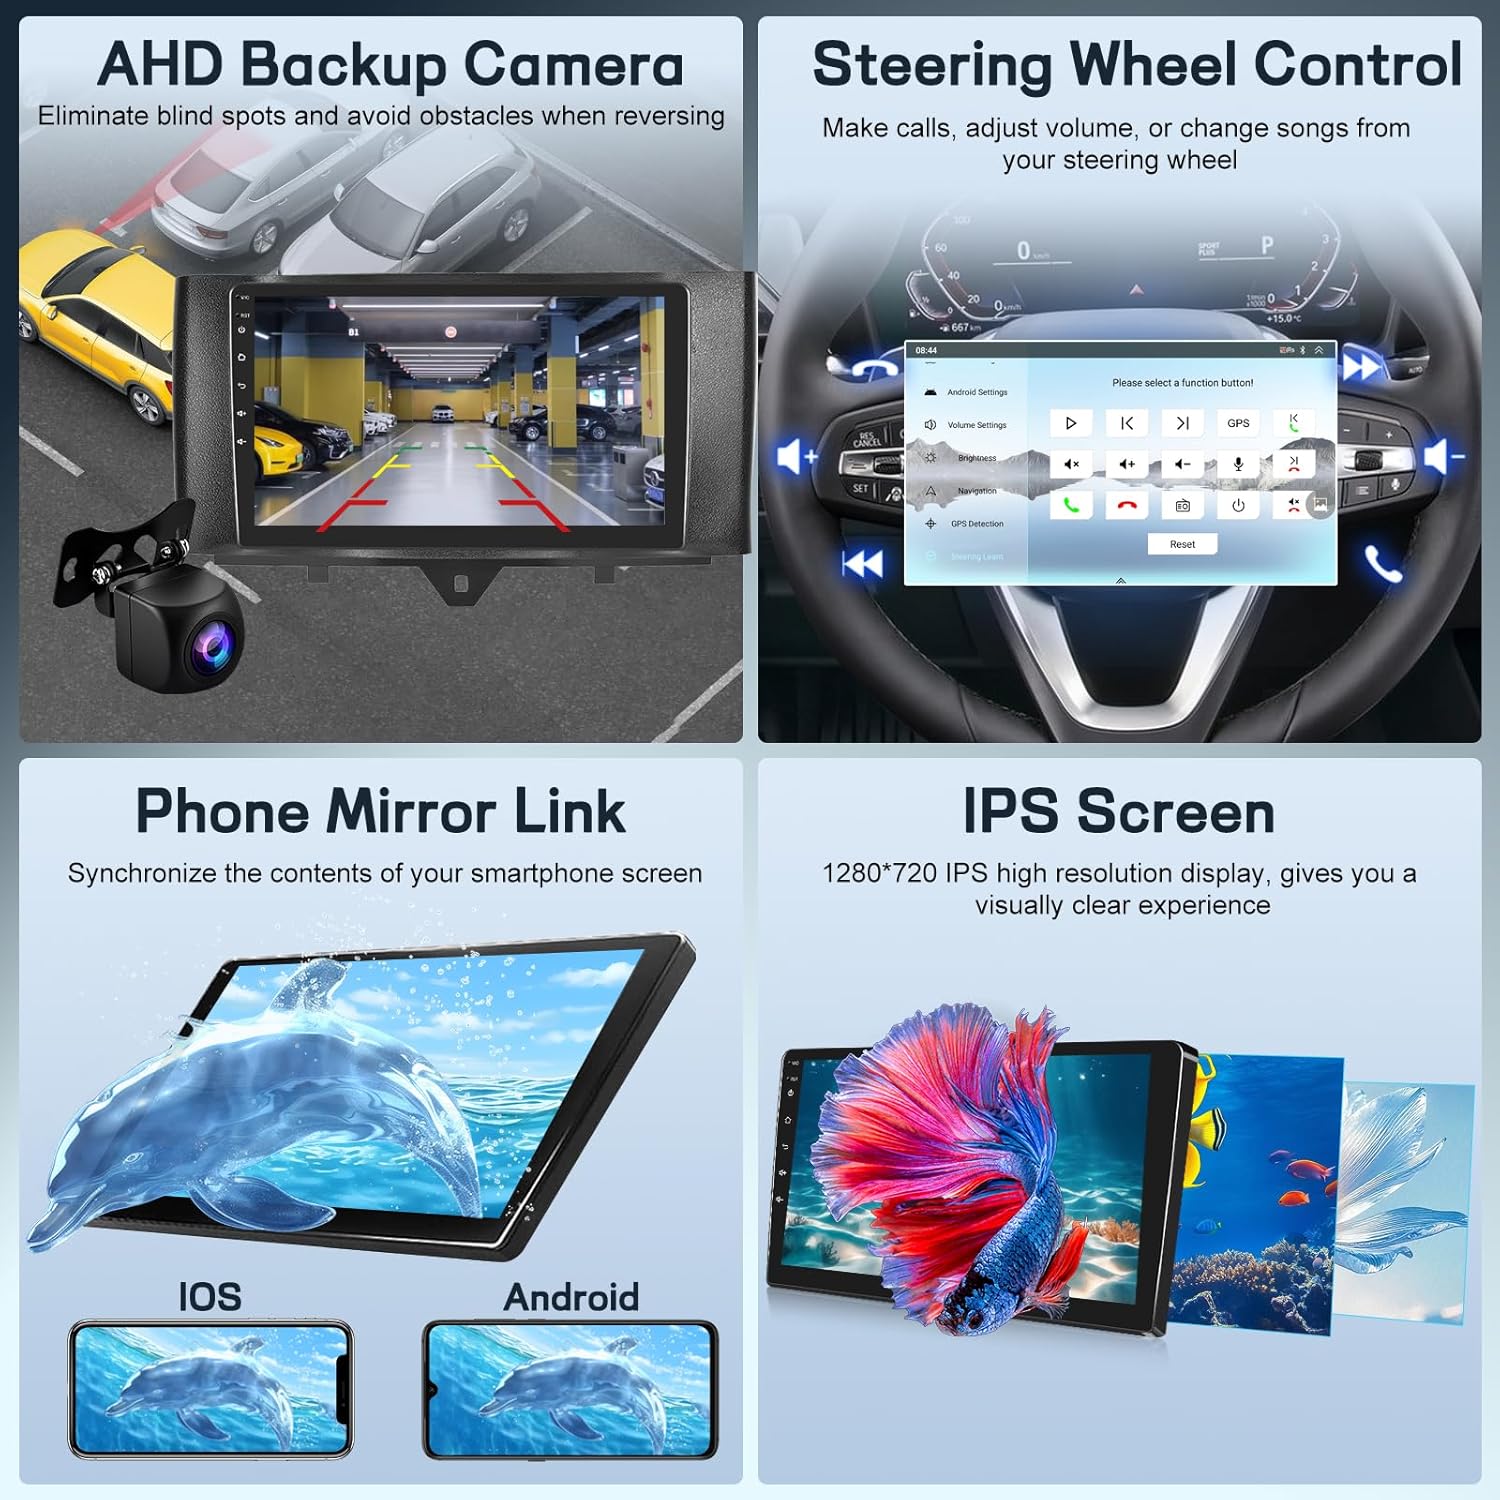
Image 6.4: A four-panel image detailing the AHD backup camera view, the steering wheel control setup screen, phone mirror link functionality for both iOS and Android, and the clarity of the IPS screen.
- Learning Function: Access the steering wheel control settings in the unit's menu. Follow the on-screen instructions to map your vehicle's steering wheel buttons to specific functions (e.g., volume up/down, track skip, answer call).
6.7 AHD Rear View Camera
The unit supports an AHD (Analog High Definition) rear view camera for enhanced visibility when reversing.
- Automatic Display: When reverse gear is engaged, the screen automatically switches to the camera view.
- Parking Guidelines: Dynamic parking lines assist in safe maneuvering.
6.8 Phone Mirror Link
Mirror your smartphone's screen directly onto the car radio display.
- Compatibility: Supports both iOS and Android devices.
- Connection: Connect your phone via USB or WiFi (depending on the app/feature) and follow the instructions in the 'Mirror Link' application on the head unit.
6.9 IPS Screen and UI Themes
- IPS Display: The 1280*720 resolution IPS screen provides wide viewing angles and vibrant colors.
- UI Themes: Customize the look and feel of your car radio with various pre-installed user interface themes. Navigate to the 'Themes' section in settings to change.
7. Maintenance
- Screen Cleaning: Use a soft, lint-free cloth to gently wipe the touchscreen. For stubborn smudges, use a screen cleaner specifically designed for electronics. Do not use harsh chemicals or abrasive materials.
- Software Updates: Periodically check for software updates via the unit's settings menu when connected to WiFi. Updates can improve performance and add new features.
- General Care: Avoid exposing the unit to extreme temperatures or direct sunlight for prolonged periods.
8. Troubleshooting
| Problem | Possible Cause | Solution |
|---|---|---|
| Unit does not power on. | Incorrect wiring, blown fuse, loose connection. | Check power connections, vehicle fuse box, and unit's fuse. Ensure battery is connected. |
| No sound. | Volume too low, incorrect audio source, speaker wiring issue. | Increase volume. Check audio output settings. Verify speaker connections. |
| GPS not working or inaccurate. | GPS antenna not connected, poor signal, antenna placement. | Ensure GPS antenna is securely connected and placed with a clear view of the sky. Check GPS settings. |
| Bluetooth connection issues. | Phone not discoverable, incorrect pairing, interference. | Ensure Bluetooth is enabled on both devices. Delete previous pairings and re-pair. Restart both devices. |
| Rear view camera not displaying. | Camera not connected, incorrect wiring, camera faulty. | Check camera video input and power connections. Ensure reverse trigger wire is connected. |
9. Specifications
- Brand: ETLFUCyber
- Model: ETLFUC-RADIO
- Operating System: Android 15 (Latest version at time of product release)
- Processor: Qualcomm 8-Core Chip
- RAM: 4GB
- ROM: 64GB
- Screen Size: 9 inches
- Screen Type: IPS Touch Screen
- Display Resolution: 1280x720
- Connectivity: Wireless CarPlay, Android Auto, WiFi, Bluetooth 5.1, GPS
- Radio: FM/RDS (Frequency: 87.5-108 MHz)
- Audio: DSP Hi-Res Audio
- Compatibility: Mercedes Benz Smart Fortwo (2011-2015)
- Included Components: Car Radio
- Product Weight: 1.72 kg
- Package Dimensions: 32 x 15 x 9 cm
10. Warranty and Support
For warranty information and technical support, please refer to the documentation provided with your purchase or contact ETLFUCyber customer service directly. Contact details can typically be found on the manufacturer's official website or through your point of purchase.


