
1. Introduction
This manual provides detailed instructions for the installation, operation, and maintenance of your PLPFUDVDZZ SDS2-3VA 3 Axis Digital Readout (DRO) Kit with KA35 Linear Scale Encoders. This system is designed to provide precise digital position feedback for various machine tools, enhancing accuracy and efficiency in your workshop.
Please read this manual thoroughly before operating the device to ensure proper usage and to prevent damage or injury. Keep this manual for future reference.
2. Safety Information
WARNING: Failure to follow these safety instructions may result in electric shock, fire, or serious injury.
- Ensure the power supply voltage matches the specifications of the DRO unit (AC80V~240V 50/60Hz).
- Do not expose the DRO unit or linear scales to water or excessive moisture.
- Disconnect power before performing any installation, maintenance, or cleaning.
- Avoid placing the unit in direct sunlight or near heat sources.
- Handle linear scales with care to prevent bending or damage to the glass grating.
- Ensure all cables are properly routed and secured to prevent entanglement with moving machine parts.
- Only use accessories and replacement parts specified by the manufacturer.
3. Package Contents
Verify that all items listed below are present in your package. If any items are missing or damaged, please contact your supplier immediately.
- SDS2-3VA Digital Readout Display Unit
- KA35 Linear Scale Encoders (3 units: 500mm, 700mm, 1000mm)
- Mounting Brackets and Fasteners for DRO and Scales
- Power Cable
- User Manual (this document)

Image: Overview of the PLPFUDVDZZ SDS2-3VA 3 Axis DRO Kit components, including the digital readout display and linear scales.
4. Setup and Installation
Proper installation is crucial for accurate and reliable operation. Follow these steps carefully.
4.1 Mounting the DRO Display Unit
- Select a suitable location on your machine tool that provides clear visibility and easy access to the controls.
- Use the provided mounting bracket to secure the DRO display unit. Ensure it is firmly attached and stable.
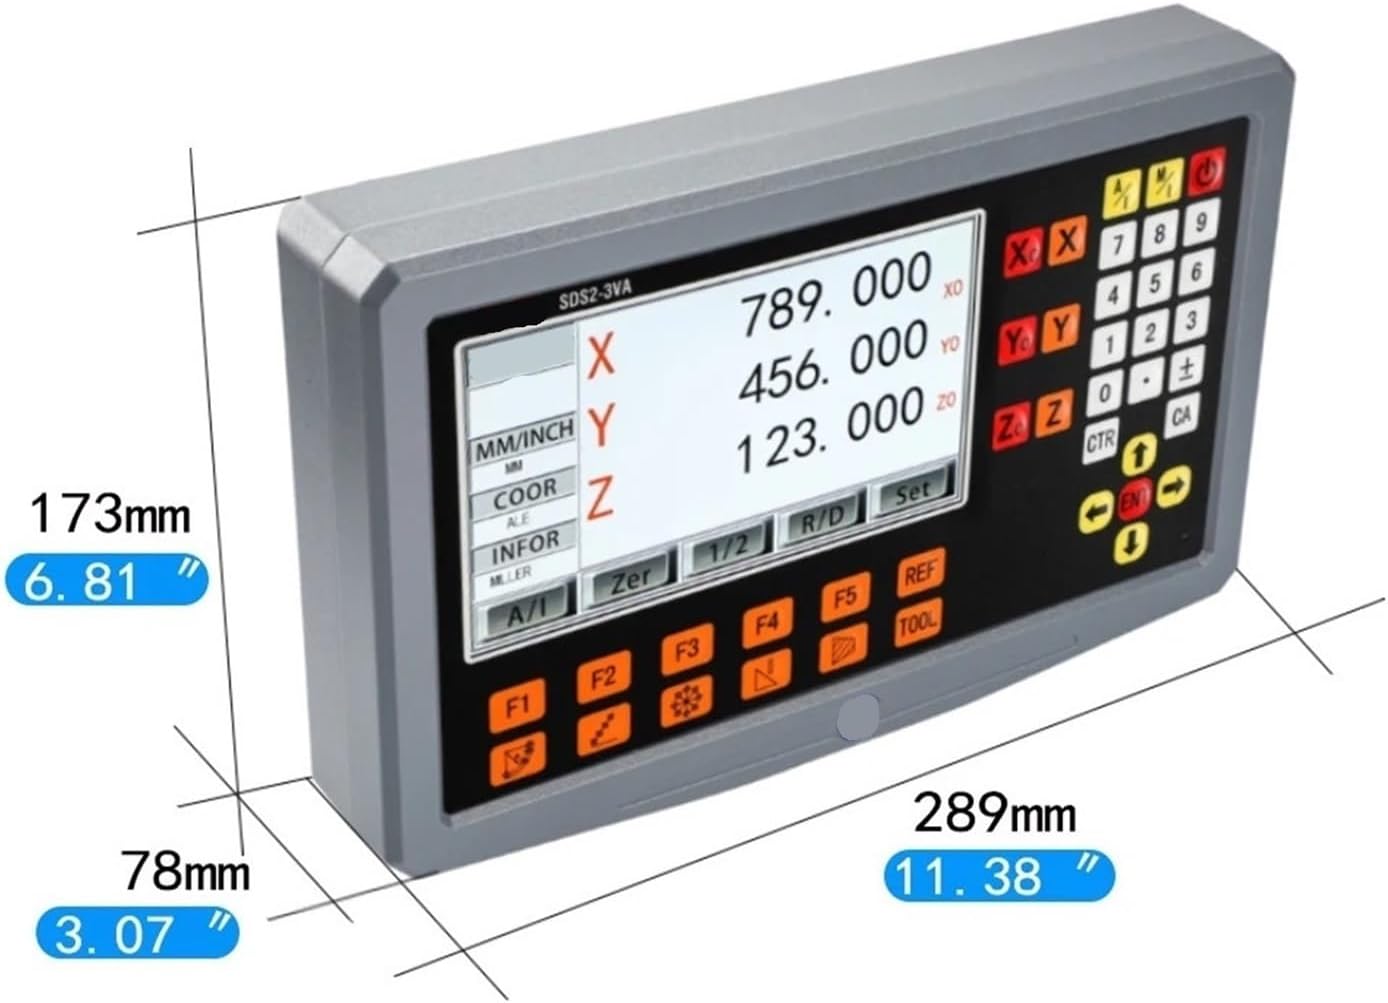
Image: SDS2-3VA Digital Readout Display Unit showing its dimensions (173mm height, 289mm width, 78mm depth).
4.2 Mounting the Linear Scales
Each linear scale corresponds to an axis (X, Y, Z) of your machine. Match the scale length to the travel of each axis.
- Identify the appropriate scale for each axis (500mm, 700mm, 1000mm).
- Mount the linear scale body securely to the stationary part of the machine axis using the provided brackets and fasteners. Ensure it is parallel to the axis of motion.
- Mount the reading head to the moving part of the machine axis. Ensure the reading head is centered over the scale and maintains a consistent, small gap (typically 0.5-1.0mm) from the scale body throughout the entire travel.
- Verify that the reading head moves smoothly along the scale without binding or excessive friction.
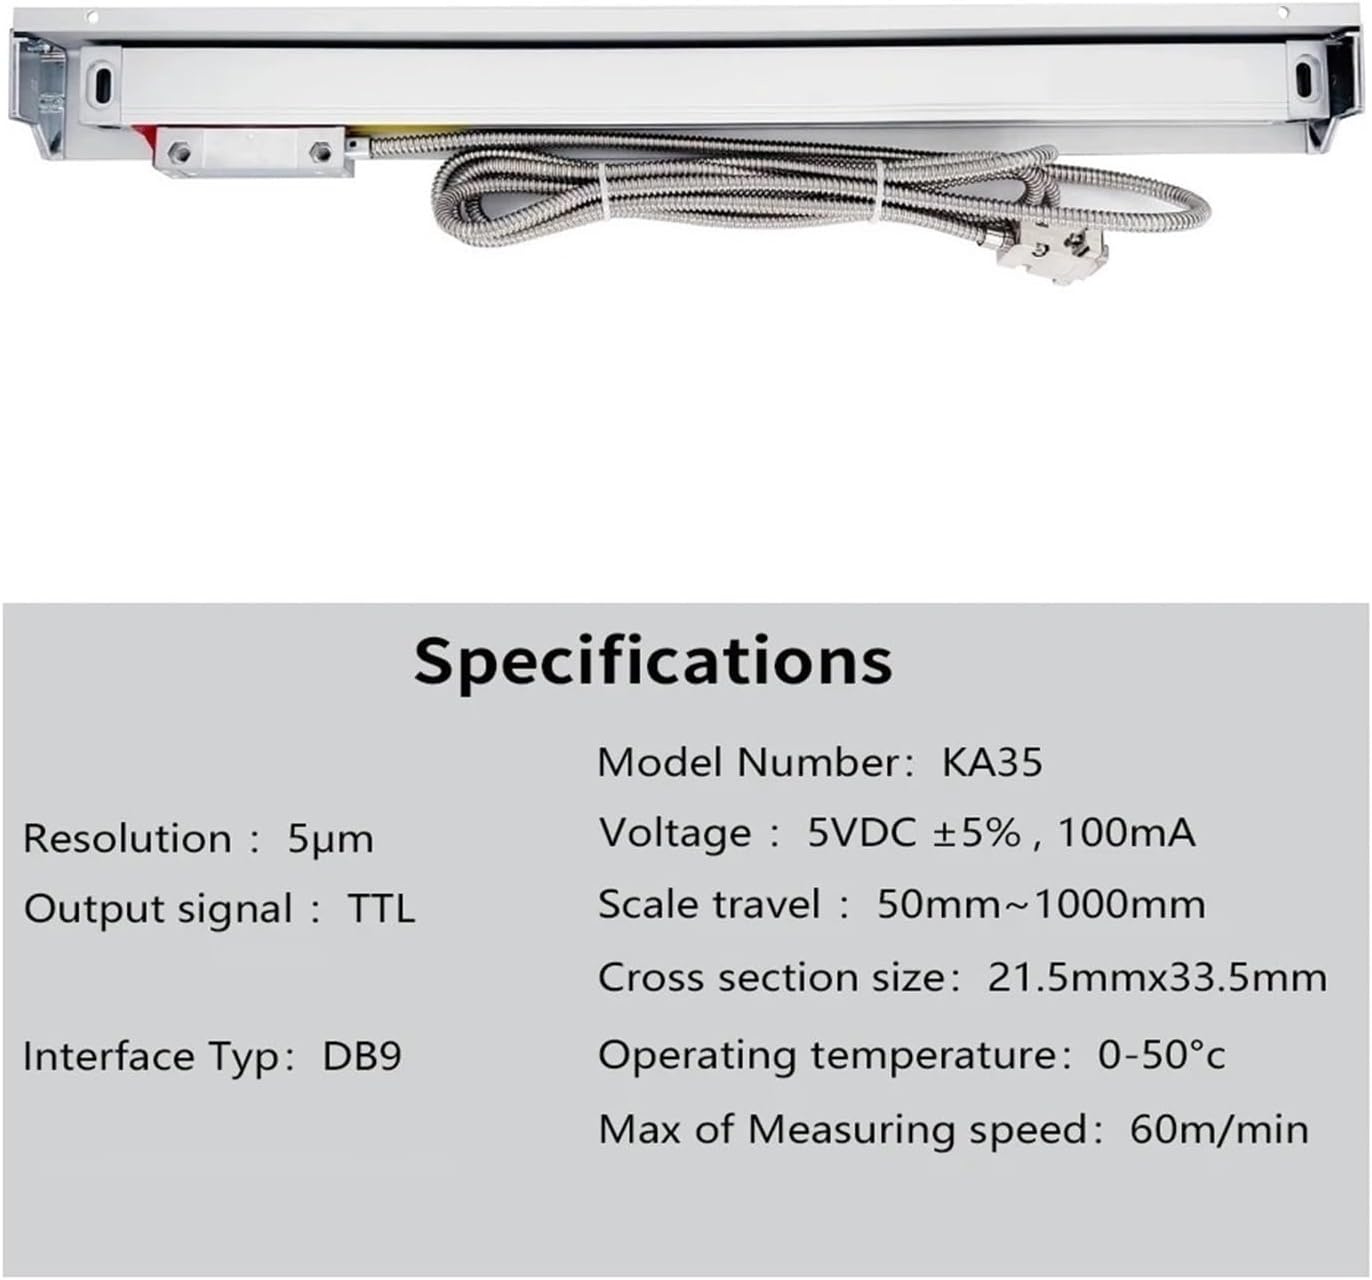
Image: KA35 Linear Scale Encoder, showing the scale body and reading head with its cable connection.
4.3 Electrical Connections
- Connect the cables from each linear scale's reading head to the corresponding input ports (X, Y, Z) on the back of the SDS2-3VA DRO display unit. Ensure connectors are fully seated.
- Connect the power cable to the DRO unit and then plug it into a suitable AC power outlet.
5. Operating Instructions
5.1 Power On/Off
- To power on, press the POWER button. The display will illuminate.
- To power off, press and hold the POWER button until the display turns off.
5.2 Basic Functions
- Zeroing an Axis: Move the machine axis to the desired starting point. Press the ZERO button for the corresponding axis (X, Y, or Z) to set the current position to zero.
- MM/INCH Conversion: Press the MM/INCH button to toggle between metric (mm) and imperial (inch) units.
- Absolute/Incremental Mode (ABS/INC): Press the ABS/INC button to switch between absolute (ABS) and incremental (INC) measurement modes.
- Absolute Mode: Displays the position relative to a fixed datum point.
- Incremental Mode: Displays the position relative to the last zeroed point.
- 1/2 Function: Press the 1/2 button to find the center point between two measured positions.
5.3 Advanced Functions (Refer to on-screen menus)
The SDS2-3VA DRO unit includes various advanced functions accessible via the function keys (F1-F5) and menu navigation. These may include:
- Hole Pattern Calculation (PCD)
- Line of Holes
- Arc Machining
- Tool Compensation
- Taper Measurement
Detailed instructions for these advanced functions are typically displayed on the DRO screen or can be found in supplementary documentation if provided by the manufacturer.
6. Maintenance
Regular maintenance ensures the longevity and accuracy of your DRO system.
- Cleaning: Use a soft, dry cloth to clean the display unit and linear scales. For stubborn dirt on scales, a mild, non-abrasive cleaner can be used sparingly on a cloth, avoiding direct application. Do not use solvents.
- Cable Inspection: Periodically check all cables for signs of wear, cuts, or damage. Replace damaged cables immediately.
- Scale Alignment: Ensure the linear scales and reading heads remain properly aligned and securely fastened. Misalignment can lead to inaccurate readings.
- Environmental Conditions: Operate and store the unit within the specified operating temperature and humidity ranges to prevent damage.
7. Troubleshooting
This section addresses common issues you might encounter. For problems not listed here, contact technical support.
| Problem | Possible Cause | Solution |
|---|---|---|
| DRO display does not power on. | No power supply; loose power cable. | Check power connection; ensure outlet is functional. |
| Inaccurate readings on an axis. | Linear scale misalignment; damaged scale/reading head; dirty scale. | Re-align scale and reading head; clean scale surface; inspect for damage. |
| Display shows "Error" or "---". | Loose scale cable connection; scale reading head out of range. | Check scale cable connections; ensure reading head is within the scale's travel range. |
| Buttons unresponsive. | Temporary software glitch; unit freeze. | Power off the unit, wait 10 seconds, then power back on. |
8. Specifications
The following table details the technical specifications for the PLPFUDVDZZ SDS2-3VA DRO Kit and KA35 Linear Scales.
| Feature | Specification |
|---|---|
| Model Number (DRO) | SDS2-3VA |
| Number of Axes | 3 Axis |
| Input Voltage (DRO) | AC80V~240V 50/60Hz |
| Model Number (Scales) | KA35 |
| Resolution | 5um / 0.005mm |
| Output Signal | TTL |
| Interface Type | DB9 |
| Scale Travel (Available Measurement) | 50mm ~ 1000mm (Specific scales: 500mm, 700mm, 1000mm) |
| Total Length (Scale) | Measurement + 140mm |
| Cross Section Size (Scale) | 21.5mm x 33.5mm |
| Cable Length (Scale) | 3 meters |
| Operating Temperature | 0-50°C |
| Max Measuring Speed | 60m/min |
| Item Weight | 11.02 pounds (approx. total package) |
| Package Dimensions | 0.39 x 0.39 x 0.39 inches (Note: This dimension is likely a placeholder and not representative of the actual package size.) |
9. Warranty and Support
For warranty information and technical support, please refer to the documentation provided with your purchase or contact your retailer. Keep your proof of purchase for warranty claims.
For further assistance, please contact PLPFUDVDZZ customer service through the vendor's contact information provided at the point of purchase.