1. Introduction
This manual provides detailed instructions for the installation, operation, and maintenance of your PHANSATIM Dual Lens WiFi Outdoor Security Camera, model YH-A10S. Please read this manual thoroughly before using the product to ensure proper function and safety.
1.1 Safety Information
- Ensure the power supply matches the camera's requirements.
- Avoid placing the camera in direct sunlight or near heat sources.
- Do not expose the camera to extreme temperatures or humidity.
- Keep the camera away from strong magnetic fields.
- Only use accessories specified by the manufacturer.
- Do not attempt to disassemble or modify the camera.
2. Package Contents
Verify that all items are present in your package:
- PHANSATIM Dual Lens WiFi Outdoor Security Camera (YH-A10S)
- Power Adapter
- Mounting Stand
- Mounting Screws and Wall Plugs
- User Manual (this document)
3. Product Overview
Familiarize yourself with the components of your security camera.
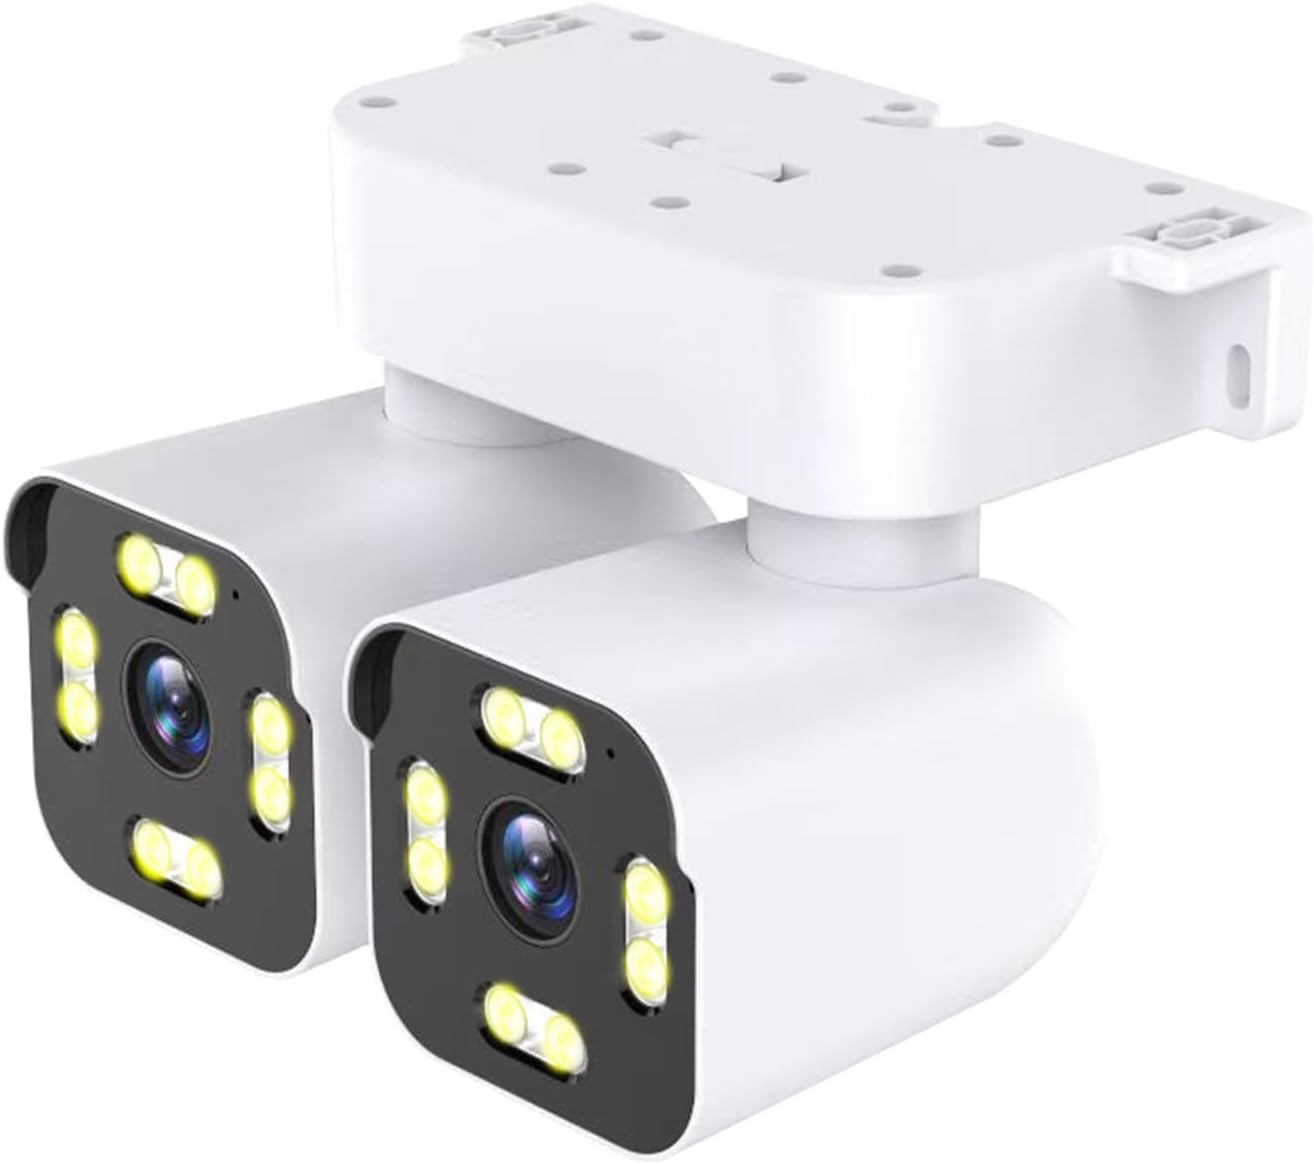
Figure 3.1: Front view of the PHANSATIM Dual Lens WiFi Outdoor Security Camera YH-A10S, showing the dual lenses and integrated spotlights.

Figure 3.2: Overview of camera features including 2.5K HD resolution, motion detection, 24/7 live view, instant alerts, two-way audio, voice control, and local/cloud storage options.
3.1 Camera Components
- Dual Lenses: Provide a wider field of view and enhanced detail.
- Infrared LEDs: For black and white night vision.
- Spotlights: For color night vision and warning functions.
- Microphone: For audio input.
- Speaker: For two-way audio communication and warning sounds.
- Reset Button: To restore factory settings.
- MicroSD Card Slot: For local storage (card not included).
- Power Port: For connecting the power adapter.
- Ethernet Port: For wired network connection (optional).
4. Setup
4.1 App Installation
Before setting up your camera, download the dedicated mobile application. Search for "[App Name, e.g., 'PHANSATIM Home Security']" in your device's app store (iOS App Store or Google Play Store) and install it.
4.2 Account Registration
- Open the installed app.
- Tap "Register" or "Sign Up".
- Follow the on-screen prompts to create an account using your email address or phone number.
- Set a secure password.
4.3 Camera Connection
Ensure your smartphone is connected to a 2.4GHz Wi-Fi network. The camera does not support 5GHz Wi-Fi.
4.3.1 Wireless (Wi-Fi) Connection
- Power on the camera by connecting it to the power adapter.
- Wait for the camera's indicator light to flash, indicating it's ready for setup.
- Open the app, tap "+" to add a new device.
- Select "Add Camera" or scan the QR code on the camera (if available).
- Follow the in-app instructions to connect the camera to your Wi-Fi network. This typically involves entering your Wi-Fi password and scanning a QR code displayed on your phone with the camera lens.
- Once connected, the indicator light will turn solid.
4.3.2 Wired (Ethernet) Connection (Optional)
- Connect an Ethernet cable from your router to the camera's Ethernet port.
- Power on the camera.
- Open the app, tap "+" to add a new device.
- Select "Add Camera" and choose the wired connection option. The camera should be automatically detected.
4.4 Mounting Instructions
The camera is designed for outdoor use and can be ceiling-mounted. Choose a location that provides the desired viewing angle and is within range of your Wi-Fi signal or Ethernet connection.
- Select Location: Identify a suitable mounting surface, such as a wall or ceiling, ensuring it is sturdy enough to support the camera.
- Mark Drill Holes: Use the mounting stand as a template to mark the positions for drilling.
- Drill Holes: Drill pilot holes at the marked positions. Insert wall plugs if mounting on masonry.
- Attach Stand: Secure the mounting stand to the surface using the provided screws.
- Attach Camera: Mount the camera onto the stand, ensuring it is securely fastened.
- Adjust Angle: Loosen the adjustment screws on the stand to set the desired camera angle, then tighten them to fix the position.
5. Operating Instructions
5.1 Live View
Open the app and select your camera from the device list to access the live video feed. You can view real-time footage from your camera.
5.2 PTZ Control (Pan, Tilt, Zoom)
The camera supports pan, tilt, and digital zoom functions, allowing you to adjust the viewing area remotely.

Figure 5.1: Illustration of the camera's pan and tilt capabilities, showing 180-degree horizontal rotation and 90-degree vertical movement, controllable via the mobile application.
- Pan/Tilt: On the live view screen, swipe your finger across the video feed to pan (left/right) or tilt (up/down) the camera lens.
- Digital Zoom: Pinch in or out on the live view screen to digitally zoom.
5.3 Recording & Playback
The camera can record video footage based on motion detection or continuous recording (if configured). Recorded footage can be stored on a microSD card or in cloud storage (subscription may be required).
- Access Recordings: In the app, navigate to the "Playback" or "History" section.
- Select Date/Time: Choose the desired date and time to review recorded events.
5.4 Motion Detection & Alerts
The camera features AI detection and auto-tracking to identify and follow human movement, sending instant alerts to your smartphone.

Figure 5.2: Depiction of the camera's AI detection and tracking feature, highlighting its ability to identify and follow subjects within its field of view, sending alerts to a smartphone.
- Enable/Disable: Go to camera settings in the app to enable or disable motion detection.
- Sensitivity: Adjust the motion detection sensitivity level.
- Alerts: Configure notification settings to receive instant alerts on your mobile device when motion is detected.
5.5 Sound & Light Warning
The camera can activate a sound alarm and flash its spotlights upon detecting an intruder, serving as a deterrent.

Figure 5.3: Visual representation of the camera's sound and light warning system, showing the camera emitting red and blue warning lights and an alarm sound when an intrusion is detected, with an alert pushed to the mobile app.
- Activation: This feature is typically linked to motion detection settings. Enable it within the app's camera settings.
- Customization: Some apps allow customization of warning sounds or light patterns.
5.6 Night Vision Modes
The camera offers multiple night vision options to suit different monitoring needs.

Figure 5.4: Comparison of night vision modes: "Double-Light" (full color with spotlights) and "Infrared Night" (black and white using IR LEDs). Users can select the preferred mode in the app.
- Full Color Night Vision: Utilizes built-in spotlights to provide full-color video in low-light conditions.
- Infrared Night Vision: Uses infrared LEDs for clear black and white video in complete darkness.
- Double-Light Mode: Combines infrared for general monitoring and activates spotlights for color vision upon motion detection.
- Selection: Switch between these modes in the camera settings within the mobile app.
5.7 Two-Way Audio
Communicate with individuals near the camera using the built-in microphone and speaker.

Figure 5.5: Illustration of the two-way audio feature, showing a user speaking through the mobile app to someone near the camera, enabling real-time communication.
- Activate: On the live view screen, tap the microphone icon to speak through the camera's speaker. Tap again to end.
- Listen: The camera's microphone is active during live view, allowing you to hear audio from the camera's vicinity.
6. Maintenance
6.1 Cleaning
Regularly clean the camera lens and housing to ensure optimal performance.
- Use a soft, dry cloth to wipe the camera body.
- For the lens, use a lens cleaning cloth and specialized lens cleaning solution to avoid scratches.
- Do not use harsh chemicals or abrasive cleaners.
6.2 Firmware Updates
Periodically check for firmware updates through the mobile application. Updates can improve performance, add new features, and enhance security.
- In the app, navigate to camera settings and look for "Firmware Update" or "Device Upgrade".
- Follow the on-screen instructions to download and install any available updates.
- Ensure the camera remains powered on during the entire update process.
7. Troubleshooting
| Problem | Possible Cause | Solution |
|---|---|---|
| Camera offline | No power; Wi-Fi signal lost; Router issue. | Check power connection; Verify Wi-Fi signal strength; Restart router; Reconnect camera in app. |
| Cannot connect to Wi-Fi | Incorrect Wi-Fi password; 5GHz network used; Camera too far from router. | Ensure correct 2.4GHz Wi-Fi password; Move camera closer to router; Reset camera and try again. |
| Poor video quality | Dirty lens; Weak Wi-Fi signal; Low bandwidth. | Clean the lens; Improve Wi-Fi signal; Check internet speed. |
| Motion detection not working | Feature disabled; Sensitivity too low; Incorrect detection zone. | Enable motion detection in app; Increase sensitivity; Adjust detection zone. |
| No audio | Microphone/speaker disabled; App volume low. | Check audio settings in app; Increase app volume; Ensure camera's microphone/speaker are not obstructed. |
8. Specifications
| Feature | Detail |
|---|---|
| Model Number | YH-A10S |
| Indoor/Outdoor Usage | Outdoor |
| Video Capture Resolution | 2.5K / 1440p |
| Connectivity Protocol | Wi-Fi (2.4GHz only) |
| Power Source | Corded Electric |
| Mounting Type | Ceiling Mount |
| Special Features | Dual Lens, 2-Way Audio, Color Night Vision, Auto Tracking, AI Detection, Sound & Light Warning |
| Compatible Devices | Smartphone (Android, iOS) |
| Product Dimensions | 7.48 x 5.12 x 7.48 inches |
| Item Weight | 1.9 pounds |
9. Warranty and Support
PHANSATIM products are designed for reliability and performance. For specific warranty details, please refer to the warranty card included with your product or visit the official PHANSATIM website.
For technical support, troubleshooting assistance, or further inquiries, please contact PHANSATIM customer service through the contact information provided on our official website or within the mobile application.


