1. Product Overview
This manual provides essential information for the installation, operation, and maintenance of your CNSTWEI 12.1-inch Android Auto/Apple CarPlay Car Stereo Receiver. This unit is designed to upgrade and integrate advanced media features into Ford F-150 Raptor vehicles manufactured between 2009 and 2012. It offers a high-definition touchscreen display, Android Auto, Apple CarPlay, hands-free calling, GPS navigation, and various multimedia capabilities while retaining original vehicle functions.
Important Note on Compatibility: This specific model (B Model 12.1in 8GB+128GB) is designed for Ford F-150 Raptor 2009-2012 models where the original radio does NOT have a screen. Please verify your vehicle's dashboard configuration before proceeding with installation.
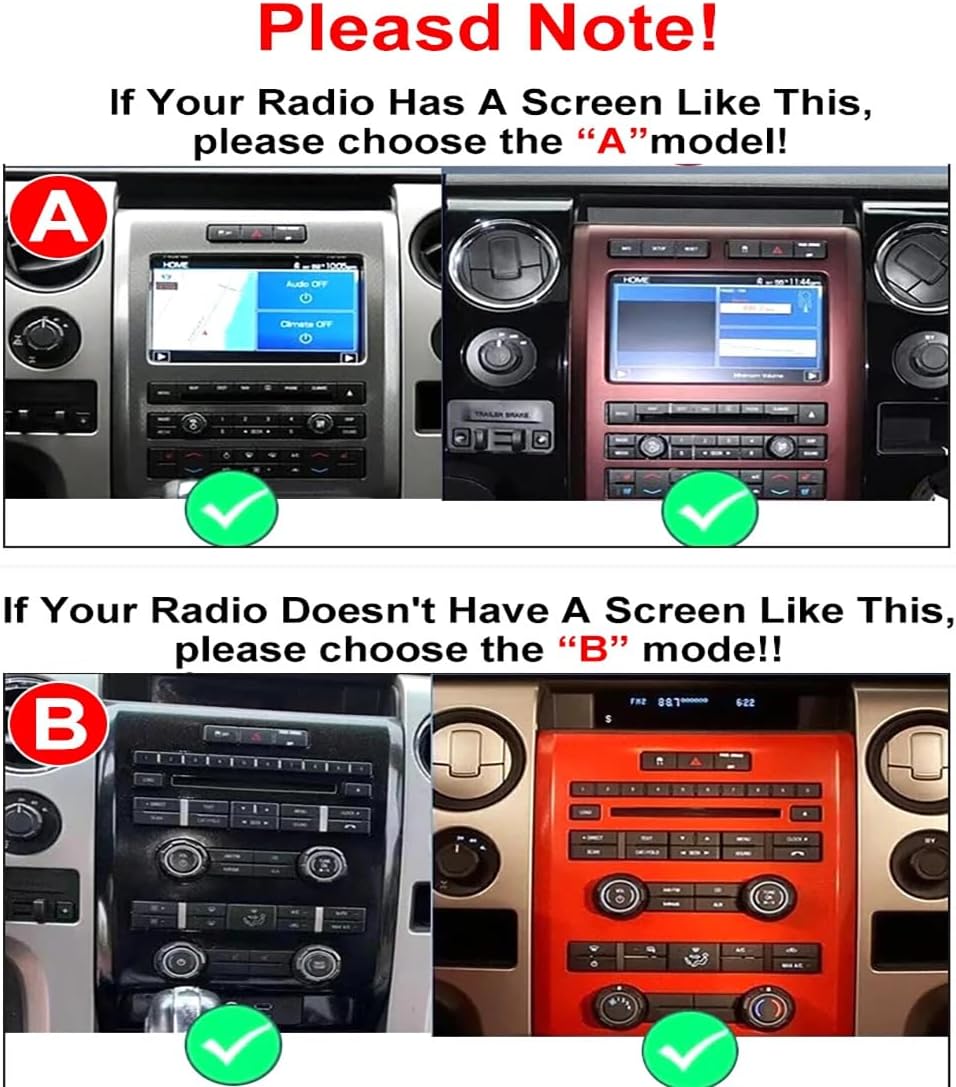
Figure 1: Compatibility Guide for Ford F-150 Dashboards (B Model is for dashboards without a screen).

Figure 2: Examples of incompatible Ford F-150 central control panel designs.
2. What's in the Box
- 1 x 12.1'' Car Touchscreen
- 1 x Microphone (MIC)
- 1 x Power Cable
- 1 x CAM (Camera cable)
- 1 x 4G Antenna
- 1 x GPS Antenna
- 1 x USB Cable
- 1 x AUX Cable
- 1 x User Manual (this document)
3. Key Features
- HD IPS Touch Screen: 12.1-inch display with 1024*768 resolution for clear visuals.
- Seamless Integration: Retains original car radio system, amplifier function, factory joystick control, and original camera compatibility.
- Smart Connectivity: Supports Apple CarPlay and Android Auto for smartphone integration.
- Navigation: Built-in GPS with support for various navigation apps and offline map downloads.
- Multimedia: Supports Bluetooth music, calls, video playback (MP3/WMA/AAC/RM/FLAC, etc.), and USB media.
- DSP Processor: High precision professional tuning for multi-dimensional surround lossless sound effects.
- Wireless Communication: Built-in Wi-Fi and Bluetooth.
4. Installation Guide
Installation of this car stereo receiver requires careful handling of vehicle components and electrical connections. It is recommended that installation be performed by a qualified professional. Incorrect installation can lead to damage to the product or vehicle.
4.1 Pre-Installation Steps
- Ensure the vehicle's ignition is off and the battery is disconnected to prevent electrical shorts.
- Carefully remove the existing car dashboard components to access the original radio and wiring. Use appropriate trim removal tools to avoid scratching or damaging the interior.
- Detach and install the OEM electronic stability control switch from the original unit to the new unit.
- Connect the provided CANBUS box to the wiring harness.
- Connect the power harness to the new unit.
4.2 Testing the New Unit
Before fully reassembling the dashboard, perform the following tests:
- Power on the vehicle. The new unit should power on, and the screen should illuminate.
- Check GPS signal reception. Place the GPS antenna in the glove box instead of behind the dashboard for better signal. Use the new supplied GPS antenna, not the original stereo's antenna.
- Test volume controls (+/-) and song switching via steering wheel controls.
- Test air conditioning functionality. The new unit should support automatic AC.
- Test the backup camera. It should display a reverse image automatically when the vehicle is in reverse.
- Test radio reception for various channels.
- Verify sound output. If your car has an amplifier other than SONY, there might be compatibility issues. Contact support for assistance.
4.3 Reassembly
After successful testing, power off the car and reinstall all previously removed screws and dashboard components. Ensure all connections are secure and components are properly seated.
WARNING: This installation video is specifically for a 2013-2014 Ford F-150 T-style screen. While some steps may be similar, your 2009-2012 Ford F-150 Raptor may have different dashboard components, wiring harnesses, and screw locations. Always consult your specific vehicle's service manual or a professional installer to ensure correct and safe installation for your model year.
Video 1: General installation overview for a Ford F-150 (Note: Model year discrepancy, refer to text warning above).
WARNING: This video demonstrates testing for a 2013-2014 Ford F-150. While the testing procedures may be similar, specific features or interfaces might differ for your 2009-2012 Ford F-150 Raptor.
Video 2: General testing of a new car stereo unit in-dash (Note: Model year discrepancy, refer to text warning above).
5. Operating Instructions
5.1 User Interface Overview

Figure 3: Main user interface of the car stereo receiver.
Video 3: User interface demonstration, showing various functions and navigation.
5.2 Air Conditioning Control
The unit integrates with your vehicle's air conditioning system, allowing control directly from the touchscreen. Adjust temperature, fan speed, and air direction using the on-screen interface.

Figure 4: DSP Processor interface for audio customization.
5.3 Apple CarPlay / Android Auto
Connect your smartphone wirelessly via Bluetooth to access Apple CarPlay or Android Auto. This allows you to use compatible apps for navigation, music, messaging, and calls directly on the car stereo display.
Video 4: Demonstration of Wireless CarPlay and Android Auto functionality.
5.4 GPS Navigation
Utilize the built-in GPS module for navigation. The unit supports various Android navigation software and allows for offline map downloads, ensuring navigation even without an internet connection.

Figure 5: GPS Navigation interface.
5.5 Multimedia Playback
The stereo supports various audio and video formats. Play music via Bluetooth, USB, or other connected sources. Video playback is also supported on the high-definition screen.

Figure 6: Music playback interface with Bluetooth features.
6. Specifications
| Feature | Detail |
|---|---|
| Brand | CNSTWEI |
| Model | 12.1in 8GB+128GB (B Model) |
| Screen Size | 12.1-inch |
| Screen Type | IPS Touch Screen with 2.5D Multi-Touchscreen |
| Resolution | 1024*768 |
| CPU | 4 Core, 8 Core (depending on configuration) |
| RAM | 2GB-8GB DDR (depending on configuration) |
| ROM | 32GB-128GB (depending on configuration) |
| Connectivity | Bluetooth, Wi-Fi |
| Controller Type | Touch |
| Audio Output Mode | Stereo |
| Compatible Devices | Smartphone (for CarPlay/Android Auto) |
7. Troubleshooting
This section addresses common issues you might encounter. For more complex problems, please contact customer support.
- No Power:
- Check all power cable connections to ensure they are securely plugged in.
- Verify the vehicle's battery is connected and has sufficient charge.
- Inspect vehicle fuses related to the stereo system.
- No Sound:
- Ensure the volume is not muted or set to minimum.
- Check speaker wire connections.
- If your vehicle has an aftermarket amplifier (not SONY), there might be compatibility issues. Contact support for assistance.
- Verify audio settings on the unit.
- GPS Signal Issues:
- Ensure the GPS antenna is properly connected and placed in an area with clear sky view (e.g., glove box, not behind metal obstructions).
- Verify GPS settings on the unit.
- CarPlay/Android Auto Connection Problems:
- Ensure Bluetooth is enabled on both your smartphone and the car stereo.
- Delete any previously paired Bluetooth connections on both devices and attempt to pair again.
- Restart both your smartphone and the car stereo unit.
- Verify your smartphone's operating system is up to date.
- Steering Wheel Controls Not Working:
- Check the CANBUS box connection.
- Access the steering wheel control settings on the unit and ensure they are properly configured or mapped.
Many problems arise from incorrect cable connections and settings. If you encounter any issues, please reach out to CNSTWEI customer support for assistance.
8. Warranty and Support
For warranty information, technical support, or service inquiries, please refer to the contact details provided with your purchase documentation or visit the official CNSTWEI website. Keep your proof of purchase for warranty claims.