1. Introduction
This manual provides detailed instructions for the installation, operation, and maintenance of your Zelikovitz U10 Dual-Band WiFi Extender. This device is designed to expand your existing wireless network coverage, eliminate Wi-Fi dead zones, and provide stable internet access throughout your home or office.
The Zelikovitz U10 supports dual-band operation (2.4GHz and 5GHz) and offers multiple operating modes to suit various networking needs.
2. Package Contents
Please verify that all items are present in your package:
- WiFi Repeater (Zelikovitz U10)
- Ethernet cable
- Quick Installation Guide (this document)
3. Product Overview
The Zelikovitz U10 WiFi Extender features a compact design with external antennas for enhanced signal coverage. Familiarize yourself with the device's components:

Figure 3.1: Front view of the Zelikovitz U10 WiFi Extender, showing four external antennas, WPS button, and LED indicators for Reset/WPS, LAN, WAN, 5G, 2.4G, and Power.
3.1. Physical Components
- Antennas: Four external high-gain antennas for improved signal transmission and reception.
- WPS Button: Used for quick, one-touch setup with compatible routers. Also functions as a Reset button when held for an extended period.
- Ethernet Ports: Two ports (WAN/LAN) for wired connections to devices or for connecting to a modem/router in different operating modes.
- Power Plug: Integrated wall plug for direct connection to an electrical outlet.
3.2. LED Indicators
The LED indicators provide status information about the device's operation:
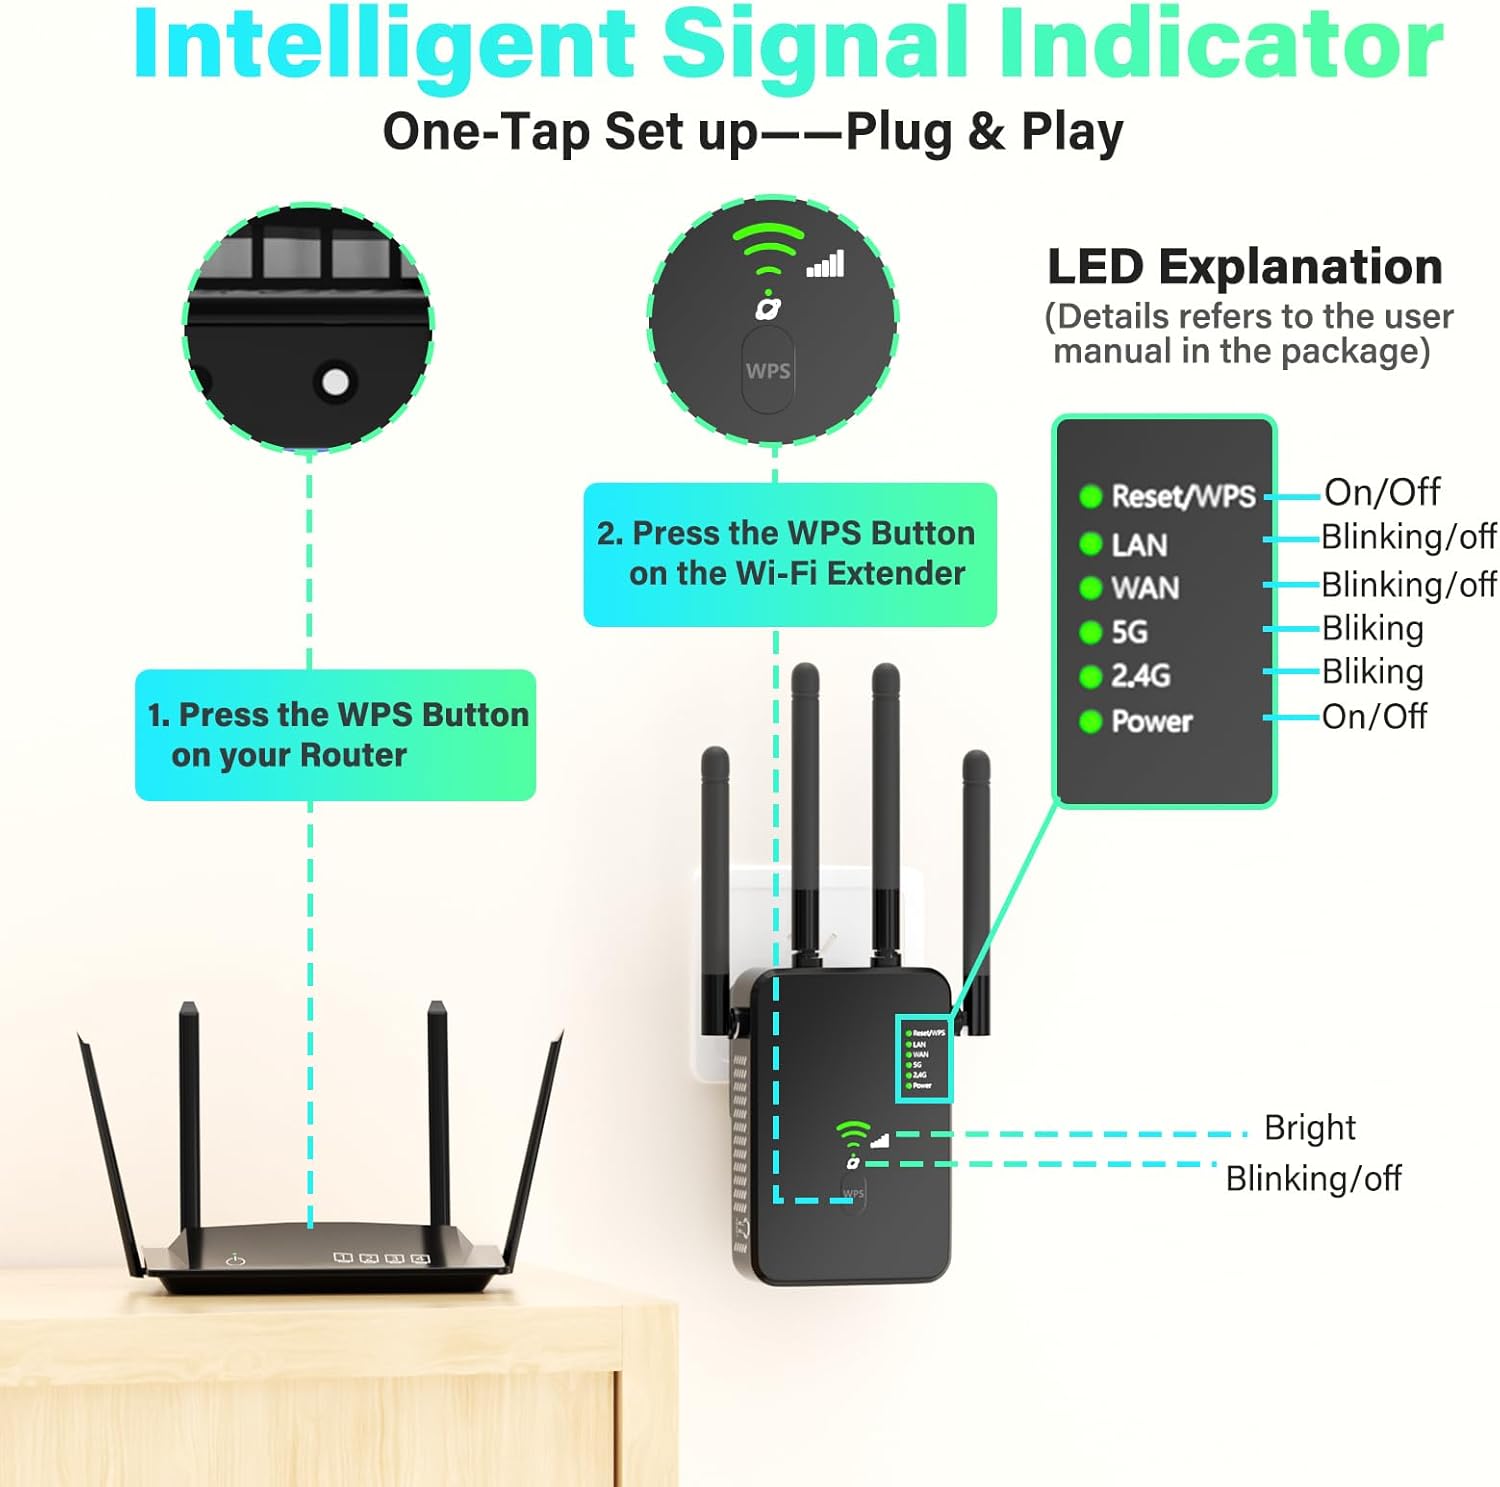
Figure 3.2: Detailed explanation of the LED indicators on the Zelikovitz U10. From top to bottom: Reset/WPS, LAN, WAN, 5G, 2.4G, and Power. Each indicator shows its status (On/Off/Blinking).
- Reset/WPS: Indicates WPS activity or reset status.
- LAN: Indicates activity on the LAN Ethernet port.
- WAN: Indicates activity on the WAN Ethernet port.
- 5G: Indicates 5GHz Wi-Fi band activity.
- 2.4G: Indicates 2.4GHz Wi-Fi band activity.
- Power: Indicates the device is powered on.
4. Setup and Installation
The Zelikovitz U10 offers two primary methods for setup: WPS (Wi-Fi Protected Setup) for quick configuration, and manual setup via a web browser for more control.
4.1. Quick Setup using WPS
WPS allows you to connect the extender to your existing router with a single button press, without needing to enter network passwords.
- Power On: Plug the Zelikovitz U10 into an electrical outlet near your main Wi-Fi router. Wait for the Power LED to turn on.
- Activate WPS on Router: Press the WPS button on your main Wi-Fi router. Refer to your router's manual for the exact location and timing.
- Activate WPS on Extender: Within two minutes, press the WPS button on the Zelikovitz U10 extender. The WPS LED on the extender will blink during the connection process.
- Verify Connection: Once connected, the 2.4G and 5G LEDs on the extender will turn solid, indicating a successful connection.
- Reposition: Unplug the extender and move it to a location halfway between your router and the Wi-Fi dead zone. Plug it into an outlet. Ensure the signal strength indicator (often represented by the 2.4G/5G LEDs or a dedicated signal LED) shows a good connection.
Figure 4.1: Visual guide for WPS setup, showing pressing the WPS button on the router first, then on the Zelikovitz U10 extender.
4.2. Manual Setup via Web Browser
If your router does not support WPS, or for advanced configuration, you can set up the extender manually:
- Power On: Plug the Zelikovitz U10 into an electrical outlet near your main Wi-Fi router.
- Connect to Extender: On your computer or mobile device, connect to the extender's default Wi-Fi network (e.g., "Zelikovitz_Extender" or similar, check the label on the device). No password is required initially.
- Access Web Interface: Open a web browser and enter the default IP address or domain name (e.g.,
192.168.1.1orrepeater.net- refer to the device label or quick start guide for the exact address). - Login: Enter the default username and password (usually "admin" for both, check the device label).
- Select Mode: Choose your desired operating mode (Repeater, Access Point, or Router).
- Configure Settings: Follow the on-screen instructions to select your existing Wi-Fi network, enter its password, and configure the extender's network name (SSID) and password.
- Save and Reboot: Save your settings and allow the extender to reboot.
- Reposition: Unplug the extender and move it to a suitable location.
5. Operating Modes
The Zelikovitz U10 supports three main operating modes:

Figure 5.1: Illustration of the three operating modes: AP Mode, Repeater Mode, and Router Mode, highlighting the WAN/LAN Ethernet port functionality.
5.1. Repeater Mode (Default)
In Repeater Mode, the extender wirelessly connects to your existing Wi-Fi network and re-broadcasts it, extending its coverage. This is ideal for eliminating Wi-Fi dead zones.
- Connects wirelessly to your main router.
- Creates a new Wi-Fi network name (SSID) or uses the same as your main router.
- Ethernet ports can be used to connect wired devices to the extended network.
5.2. Access Point (AP) Mode
In AP Mode, the extender connects to your wired network (e.g., via an Ethernet cable from your router) and transforms it into a wireless access point. This is useful for adding Wi-Fi capability to a wired-only network.
- Connects to your router via an Ethernet cable.
- Creates a new Wi-Fi network for wireless devices.
- Ideal for converting a wired network segment into a wireless one.
5.3. Router Mode
In Router Mode, the extender acts as a primary router, connecting directly to a modem via an Ethernet cable and creating a new private wireless network. This mode is typically used when you don't have an existing router.
- Connects to a modem via the WAN port.
- Creates a new Wi-Fi network and manages IP addresses for connected devices.
- Provides basic routing functions.
6. Maintenance
To ensure optimal performance and longevity of your Zelikovitz U10 WiFi Extender, consider the following maintenance tips:
- Optimal Placement: Position the extender in a central location, away from obstructions like thick walls, metal objects, and large appliances that can interfere with Wi-Fi signals. Ensure it's within range of your main router for a strong connection.
- Firmware Updates: Periodically check the Zelikovitz support website for firmware updates. Updating the firmware can improve performance, add new features, and enhance security.
- Cleaning: Keep the device clean and free from dust. Use a soft, dry cloth for cleaning. Do not use liquid cleaners or solvents.
- Resetting: If the device becomes unresponsive or you wish to revert to factory settings, press and hold the Reset/WPS button for approximately 5-10 seconds until the LEDs flash. This will erase all custom configurations.
7. Troubleshooting
If you encounter issues with your Zelikovitz U10 WiFi Extender, refer to the following common problems and solutions:
- No Internet Connection After Setup:
- Check Router Connection: Ensure your main router is working correctly and has an active internet connection.
- Reposition Extender: The extender might be too far from your main router. Move it closer and check the signal strength LEDs.
- Re-configure: Try re-running the setup process (WPS or manual) to ensure the extender is properly connected to your main Wi-Fi network.
- Check Passwords: Verify that you entered the correct Wi-Fi password for your main router during setup.
- Slow Internet Speed:
- Optimal Placement: Ensure the extender is placed in an optimal location, roughly halfway between your router and the devices needing extended coverage. Avoid placing it in corners or near interference sources.
- Interference: Other electronic devices (microwaves, cordless phones, Bluetooth devices) can cause interference. Try moving the extender or these devices.
- Network Congestion: Too many devices connected to the extender or your main network can reduce speeds.
- Cannot Access Web Management Page:
- Direct Connection: Ensure your computer is connected to the extender's Wi-Fi network or directly via an Ethernet cable.
- Correct IP/Domain: Double-check the IP address or domain name you are entering (e.g.,
192.168.1.1orrepeater.net). - Browser Cache: Clear your browser's cache and cookies, or try a different web browser.
- Firewall/Antivirus: Temporarily disable any firewall or antivirus software that might be blocking access.
- Extender Keeps Disconnecting:
- Signal Strength: The signal from your main router might be too weak at the extender's location. Relocate the extender closer to the router.
- Power Supply: Ensure the extender is plugged into a stable power outlet.
- Firmware: Ensure the extender's firmware is up to date.
8. Specifications
Below are the technical specifications for the Zelikovitz U10 Dual-Band WiFi Extender:
| Feature | Specification |
|---|---|
| Brand | Zelikovitz |
| Model Number | U10 |
| Wireless Communication Standard | 2.4 GHz Radio Frequency, 5 GHz Radio Frequency (802.11a/b/g/n/ac) |
| Data Transfer Rate | Up to 1200 Mbps (300 Mbps for 2.4GHz, 867-1200 Mbps for 5GHz) |
| Frequency Band Class | Dual-Band |
| Special Features | 4X Faster Processing, Dead Zone Elimination, Secure Encrypted Network, 1-Tap Setup |
| Ethernet Ports | 2 (WAN/LAN) supporting 300M wired connections |
| Coverage Area | Up to 12880 sq. ft. |
| Max Connected Devices | Up to 100 Wi-Fi enabled devices |
| Security Protocols | WEP/WPA/WPA2 |
| Item Weight | 6.4 ounces |
| Package Dimensions | 4.72 x 3.94 x 3.82 inches |
9. Warranty and Support
For warranty information, technical support, or further assistance, please refer to the documentation included with your purchase or visit the official Zelikovitz website. Contact details for customer support are typically available on the manufacturer's product page or within the packaging.
Please retain your proof of purchase for warranty claims.